Three Versions – Simplicity Waist-Tie Top

PicMonkey Collage-5

Packing for a trip always points out the flaws in your wardrobe, don’t you think? A planned visit to the already muggy east coast made me realize – I have very few easy-to- wear, easy-to-pack tops that are humidity friendly.

Enter Simplicity 8601 – – An ‘easy-to-sew’ top with lots of variations.

simplicity-tie-front-top-pattern-8601-envelope-front

Version 1; Rayon

IMG_1234 2

This lovely batik rayon was purchased last Spring (Millendstore). I used some of it for this dress last spring. This rayon has a lovely, soft drape, so even though I was short a quarter of a yard, I worked hard to squeeze this 3/4 sleeve top from it. I was really lucky it worked because the drape of rayon is so perfect for this style!

One thing to note about this pattern – – It has a seam down the front, a necessity because of the tie at the waist. Stripes, plaids etc need to be positioned strategically. Even though this rayon has a polka dot print, it’s a batik with a noticeable pattern to it so I had to do some strategic matching around that front seam.

I loved this top right away! Encouraged by the immediate gratification this pattern offered, I pressed on and sewed a few more…..

Version two: Medium weight cotton

IMG_1279

This is View A with bell sleeves, the perfect shape for layering under sweaters.  I was a bit concerned that the stiffness of this Cotton and Steel print would be a bit much for the waist tie…but it worked! Not only is this medium weight cotton great  in humid weather, it supports the shape of these sleeves.

Version 3; Cotton Double GauzeIMG_1337

When the weather is a bit sticky, double gauze always makes me feel great, so I just had to use a cotton gauze remnant in my stash for version B. I am so glad I did! There’s a reason people use double gauze for baby blankets – it’s so soft.  Wearing this top is like wearing pajamas, which makes me wonder…..Why don’t I make everything out of double gauze?

I’m pleased with all three versions so Simplicity 8601 so it gets a big thumbs up from me. I have plans to make View D as well (flutter sleeves) and who knows what else I might whip up.  From start to finish each version of this top took only two hours to sew – – a perfect saturday or evening project. The instructions are great and the fabric options that work with this pattern are endless. I have some linen I will use for a flutter sleeve version. I will likely make a flannel version in the fall.

IMG_1332

IMG_1291


IMG_1234 2

I was pleased to see several similar RTW tops at Anthropologie last week with a waist tie, so give this look a try. What version do you like best? Have you ever made a top from double gauze?

Happy sewing and thanks for stopping by!

Remnant Buster– Vogue 9301 three ways

When it comes to fabric shopping I can be my own worst enemy. Last year, I was in a frugal mood. Unfortunately, this didn’t keep me from buying fabric – – it only kept me from purchasing enough. So, I found myself short by a half a yard on several projects. Now, in 2018, I seem to have over-corrected. Now, I have more than my fair share of one yard remnants, leftovers from large purchases of knits that were way too much for the dresses I made recently. What to do? Sew a few knit tops, of course.

Enter Vogue 9301, a semi-fitted knit top designed by Kayla Kennington.

V9301_aWho is Kayla, anyway? If you read Threads magazine, you’ve likely heard of her. She’s a designer who’s written articles for them and her creations are gorgeous – so artistic and amazing. She can take the leftovers from her various projects and turn them into something special. If you haven’t visited her website, do. It’s a treat! Vogue 9301 is such a perfect example of  her style, a semifitted top that you can mix and match fabrics and embellish as you wish.

V9301

My first version was really simple, because I needed to see how the top would fit me. I’m small, so sometimes unstructured tunics can really be overwhelming on me. To test the pattern, I used a piece of fabric that’s been in my stash for so long, it has a faded streak in the back. I’m 5′ 4″ yet, this pattern is almost as long as a dress on me…a great length with leggings.

IMG_0112

Even without contrast fabric, this pattern has a great shape and style.  I loved the asymmetry of the hem line and the hem band – I couldn’t wait to play around with contrast fabric.  To make the top a bit shorter, I shortened both the front and back bodice at the waist line by 5/8″. This made the fit much better I think for my height.

IMG_0272

For this version, I used remnants from this dress, and had some fun playing around with stripe placement. The wide band at the hemline requires alot of fabric (I had very little) and it must be in one piece, so it was a struggle to get it from the leftover fabric I had. Luckily, I made it, but it would have been fun to have cut that band so that the stripes were at a diagonal to the bodice, but that’s what happens when you’re using remnants – options are limited!  I think this version is casual and fun – – the sort of top I throw on over jeans to hang out in.

Version Three: I just had to go all the way, and add in the flaps too!

IMG_0160


I used contrast fabric remnants for the sleeves and the optional flaps. The wide hem band is a second contrast fabric and the sleeve bands are cut perpendicular to the grain.

Vogue 9301 is a fun sew and pretty fast too, each version took me about two hours. It’s a great remnant stash buster, and a nice palate cleanser after my coat. I can imagine using this pattern again.

These tops will make Me-Made-May easier to pull off this year! Are you participating? I’m joining in and will post some of my days on Instagram. I do find the exercise of wearing me-mades every day to be revealing. It’s interesting to see which makes you reach for again and again, and which you ignore! I’ll be sharing my findings here.

Remnant busting is so satisfying – would love to hear what you do with yours. Happy sewing and thanks for stopping by!

A Remant Busting Top X 3

PicMonkey Collage-4

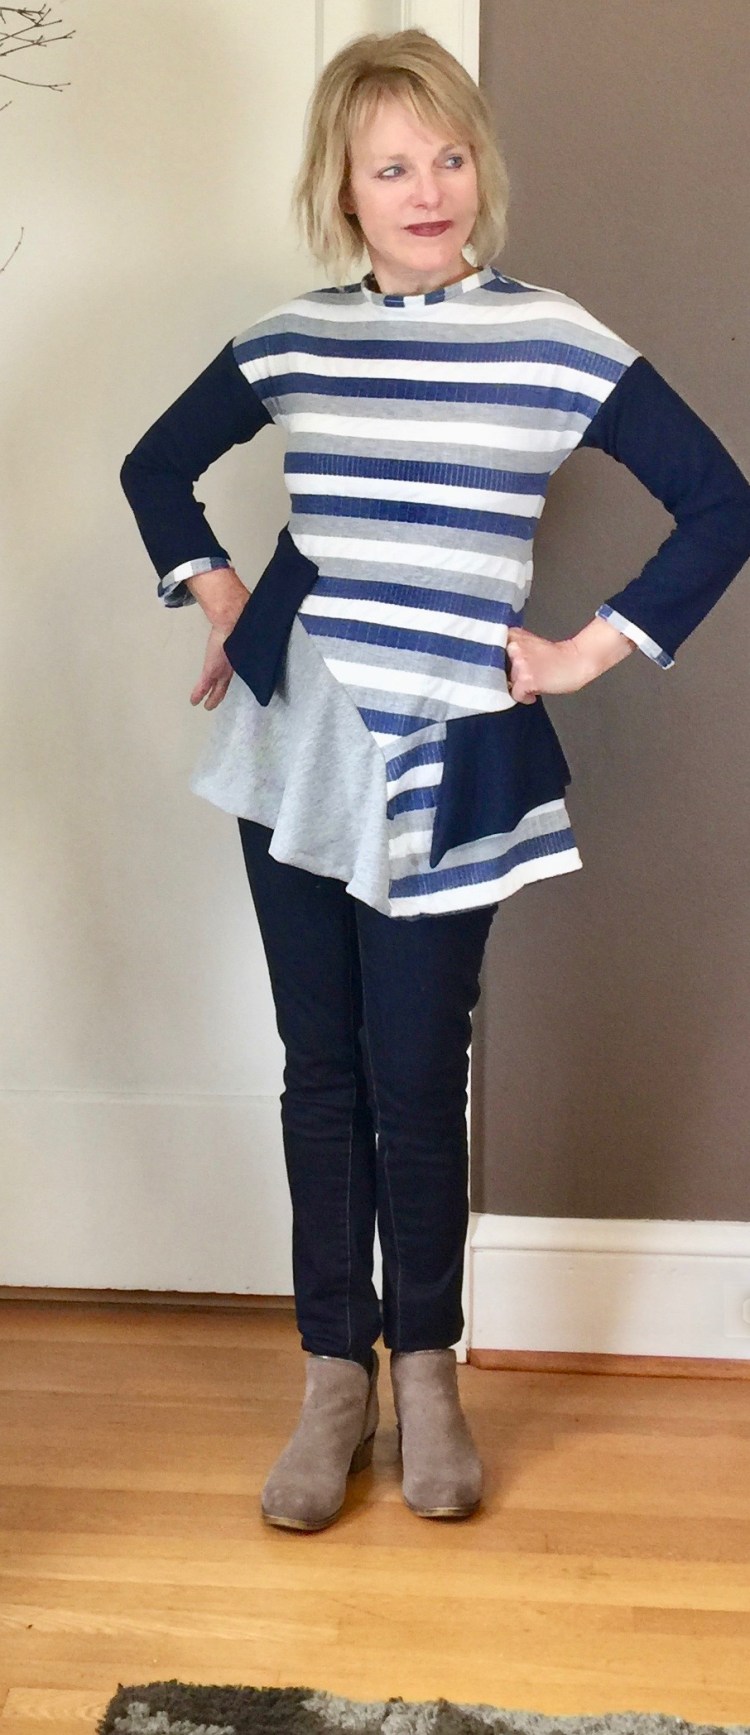
I think I’ve found a new tried and true top pattern to add to my go-to collection. This one is a favorite because it’s perfect for knit remnants! As you all know, I can’t bear to part with sweater knit pieces, no matter what the size or shape, so I have quite the collection of lovely bits. It’s so great to find a pattern that accomodates my need to save them!

IMG_7478

My preferred wardrobe choice at this time of year is pants and a top, so cute options are always on my to-sew list. I really love the curvy raglan sleeves on this pattern! It’s the sort of detail that takes this top from ordinary to something I’ll reach for again and again.

IMG_7607

On this version, I added a large cuff to the sleeve just for fun. I love this fabric, and am so glad I saved this lovely remnant. I didn’t have enough fabric to do the entire shirt so the back is a solid black.

IMG_7521

This top is made from remnants of two different sweaters and I added narrow cuffs to the sleeves to make it look a bit more polished.

This Melissa Watson design is McCalls 7574.

It’s an easy sew, the perfect diversion from a more demanding project (my night dress for the Day/Night Dress challenge, soon to be revealed.). I was pleased that this top fit me right out of the envelope with no adjustments. It has two options on the neckline, either a narrow band or a collar. I used the collar option twice and the neckband on the bright floral version. Both were really easy to sew and are so comfortable to wear. I think the dress version of this pattern would be great to try.

I love the efficiency of sewing several versions of a pattern back to back. By the time I was sewing version three, I was able to complete the top in less than an hour, LOL!

It’s nice to have some fresh options in my closet to go with jeans. If I had to choose a favorite, it would probably be this one. The textured wool knit is so colorful and I love the bold print. Which do you prefer?

IMG_7596

Do you save bits of knit or am I the only one who can’t bear to let them go? Happy sewing and thanks for stopping by!


One for you, one for me…A reversible fringed scarf to give or keep

Well, it’s almost too late to pull off a DIY gift for a friend, but here’s a last minute gift you can sew in an hour – – A fringed scarf that’s so versatile! It’s cozy and lovely as a scarf, but also wide enough to wear as a shawl. When I saw a version of this scarf on a mannequin at Fabric Depot, I just had to sew one for me and a few for friends. They’re popular gifts as the scarves are reversible and can be worn a variety of ways.

IMG_6653


IMG_6631

IMG_6471


Here’s how to make a quick reversible scarf of your own.

The best part of this project is selecting the coordinating fabric. To make one scarf you need 1 1/3 yards each of two coordinating flannels, 44/45″ wide.

IMG_6091

From each piece of coordinating flannel, cut two (2) 20″ high pieces.

IMG_6096

You now have the four panels that will make up the scarf. For each coordinating flannel, place the two 20″ high panels right sides together and sew a 5/8” seam down the center.IMG_6662

You now have two long pieces of two coordinating fabrics.  Place wrong sides together, aligning the center seams and the edges, smoothing out wrinkles. I use clips to hold the edges in place.

IMG_6103 2


Sew these two pieces together around the entire circumference of your scarf placing your stitching line 1 and 1/2 inches from the edge. ( I used a piece of tape on my machine placed at 1 1/2 inches as my stitching guide.) This stitching line is important as it will be your guide to cut the fringe. You can double stitch it if you want for extra security.


From each corner, cut a 1/1/2’ square, then begin to cut your fringe, using a small scissors at 1/4” intervals, being careful not to cut through your seams.

IMG_6104 3

You can see my edges don’t meet all that perfectly. That’s okay because the fringe will be fluttering about when you’re done, so precision is not essential. It looks so great after it’s been ruffled by your hand or the washing machine.

IMG_6477

That’s all there is to it! I’m not sure which scarf is my favorite….

Another fringe option that’s more time consuming is to take a darning needle and carefully pull out fibers at the scarf’s edge to fringe it. This requires alot of patience. IMG_6625

These scarves are quick to sew and cost effective as gifts go. They’ve been quite popular with friends who enjoy throwing something stylish around their shoulders on damp wintery days.

I’ve experimented with various combinations with regard to fringe. On this scarf, I only fringed one side and serged the other. It’s a tidier look if that appeals to you. I also made this scarf a bit longer, using  1 1/2 yards of fabric. The longer length makes it very easy to wrap . I chose to keep this scarf for myself, because, well, it’s blue!!


IMG_6568

Here, in Oregon, the weather is damp, and I love wearing my scarf as I enjoy dinners around the fire with friends.

It’s a great time of the year to reflect on the past and plan for the future. I’ve loved reading everyone’s top five hits posts and I’ll be posting my own list here before the year ends. Happy sewing and thanks for stopping by!

‘Tis the Season for Flannel

IMG_5243

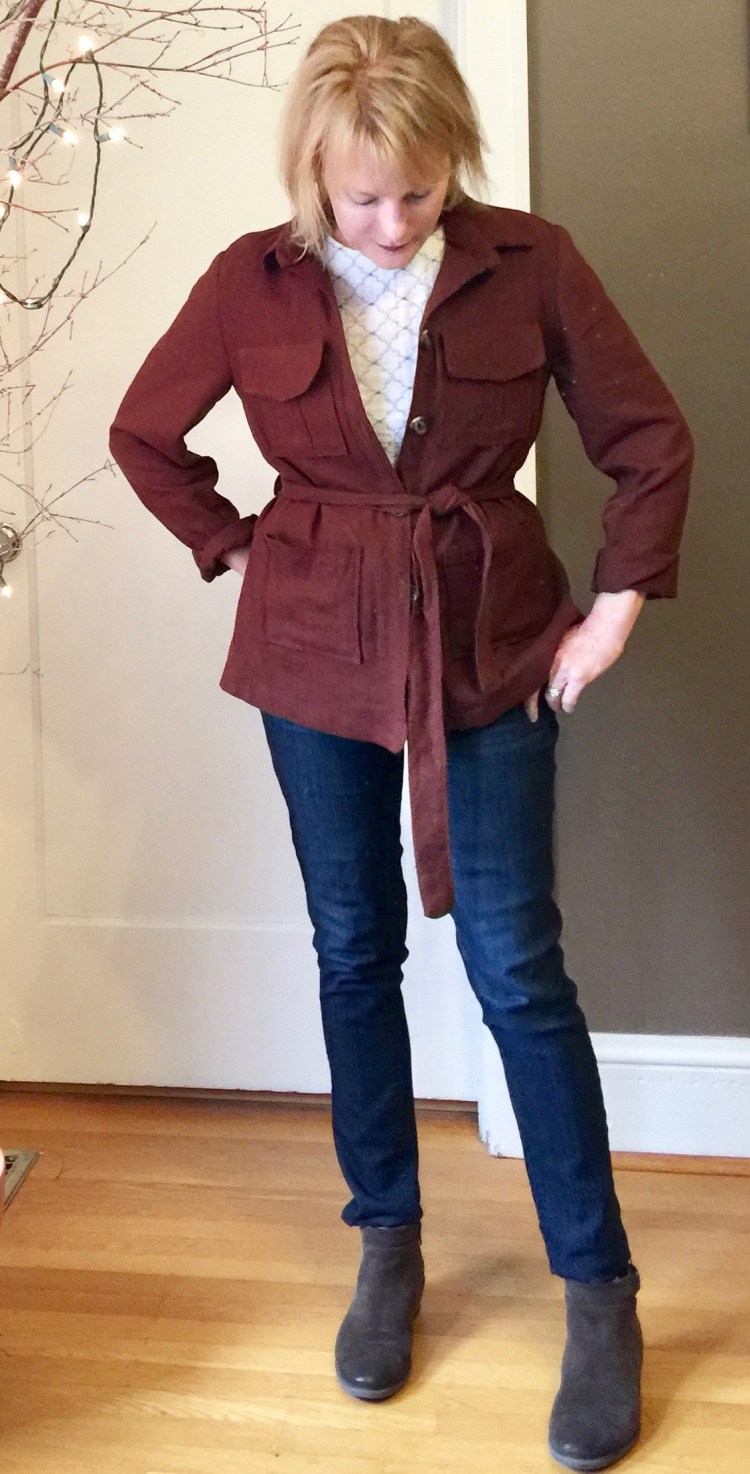
Hi All! I’ve been traveling on the East Coast this week, where the below freezing temperatures have encouraged me to think about the benefits of a wardrobe dominated by flannel.  It’s certainly not a bad thing as there’s nothing more comfortable to wear! This plaid flannel has been hiding in my stash for a couple of years. I found it when I was putting away my lightweight warm weather fabrics in favor of heavier fall and winter options. I had exactly a yard and a half and it was only 45″ wide. What to do….

IMG_5224

Even though it’s flannel, the turquoise plaid made me think of a top with feminine details like bell sleeves so I went to my pattern stash to find a tried and true pattern, McCall’s 7542 (two other versions made here ). It has a number of sleeve options, none of them quite right for a cozy fall/winter top.


So, I went for View D, but decided I needed long sleeves. To do that, I lengthened the sleeve by 4″ before attaching the bell. To make the bell a bit more dramatic, I increased the width to ten inches.

IMG_5262

I do love this McCall’s pattern, but have never been wild about the boxy shape with my waistless figure. So, I cut the longer length option on the bodice, then widened it by four inches at the waist. That allowed me some room to insert two six-inch long pinch pleats on either side of the waist. I like this look because it pulls that boxy bodice in a bit, giving the illusion of a waist. To further accentuate it, I inserted a tie at the side seam right at the waist. I’m such a fan of adding in ties at the side seam…they never get lost!

IMG_5267

This was a fun, easy sew, because there isn’t a zipper or buttons. The simple neck opening is fastened with a hook and eye.

IMG_5257 2

I love my new flannel top, and know it will just get softer and cozier as I wash and wear it. Flannel is such a great fabric and it’s nice to find another other way to have it in my wardrobe besides the classic button down shirt. I have a few more pieces of plaid flannel in my stash and I’d love some ideas of what to do with them.What are you sewing with flannel these days?

Happy sewing and thanks for stopping by!

A Ruffled Top Done 3 Ways

Sometimes when you first meet a pattern, you can see so many possibilities. That’s the way it was with me and this simple pattern. I made one view, then couldn’t resist immediately trying another and….well, another. Three versions of one pattern…overkill maybe, but why fight it?

IMG_2016

When you have alot of children, you aren’t supposed to pick favorites, but I refuse to believe that rule applies to sewn garments too. The above version is my favorite, and as usual, it’s all about the fabric. Linen knit might be the finest fabric to wear on this planet. It’s like wearing pajamas every day, and easy to sew with too. The seams need to be overlocked to prevent unraveling, but otherwise it’s a dream with a perfect drape for this top.

When I pulled that linen from my stash, I happened on this white linen gauze that I’ve been saving for too long, waiting for the perfect project…very lightweight, and well, flounce-appropriate. So, as the song says, one thing leads to another.IMG_2120

Of course, my timing wasn’t so great on this summer-perfect make. As I’m typing this post, rain is pounding the deck outside. For once, I’m glad to see it  as we have high hopes the rain will put out the fire that is destroying our spectacular Columbia River Gorge. (Fingers crossed!!) I do expect we’ll have a few more days of warm weather though because I need to take this linen version out for a test run.

Then, there was this lonely piece of rayon that I’d dithered about for months….

IMG_2066

Voila, a simple version was born, no flounce at the yoke, only on the sleeves. Three fun  and very wearable versions….Now, that’s what I call a great pattern!

I probably don’t need to tell you that this is an easy pattern since there are three versions in one blog post, LOL.  Simplicity 8454 may be easy, but it does have nice details, so it’s destined to be made a few more times before it’s time is done.

simplicity-ruffle-blouse-pattern-8454-envelope-front

I’m always looking for tops with sleeve variations that can take it from one season to the next and this pattern meets the need. It’s meant to be made from a woven fabric, but I just sized down to make it from my linen knit. The design element that attracted me to it was the yoke and flounce combo, but I like the simple version too, without the flounce at the yoke, and can imagine variations with lace at the yoke and sleeves. The flounce is very simply finished, and if you had a fabric that didn’t unravel, you could actually just skip the finish, and leave the edges raw…so easy!

I don’t think you’ve seen the last of this pattern on my blog. It’s just too fun to make! Have you ever made three versions of  a pattern one right after another? Do you love it or does it bore you? It’s a great way to get alot of sewing done because you have immediate feedback regarding fit on one version to try out on the next.

I find it so fascinating to see how just a change of fabric can make a pattern look so different! A slight change in drape and texture, and voila, a new look is born.

Happy sewing and thanks for stopping by!

My Mini Wardrobe with Indie Patterns

IMG_0340Hi All! Indie Pattern month is winding down over at the Monthly Stitch. The last challenge was to create a mini wardrobe from Indie patterns and I decided it was the perfect motivation to pull out the lovely Indie patterns I’ve been meaning to try, but haven’t. After looking at my patterns and my fabric stash, I decided the theme for my wardrobe would be ‘layers’ and transitions, as I wanted my mini wardrobe to take me from summer to fall.  To make my outfit, I combined the Orsola dress by By Hand London with a Modified Alder Shirtdress by Grainline Studios, and topped it all off with the Sapporo coat by Papercut Patterns.

First up the Orsola dress. I love this design!

IMG_0170

The dress pattern was a dream to sew. The instructions are spot on and the sizing was perfect too. Since this was my first BHL pattern, I wasn’t sure if it would be true to the displayed pattern measurements, but it was, Hooray! The bodice is lined which makes for a nice clean finish on the inside.

IMG_0420

I love the way it wraps in the back.

IMG_0165

I made it from a lightweight cotton print, and lined it with rayon. The drape is really nice in this fabric, but I can imagine it would be perfect in rayon, silk or linen (I’ve already purchased linen for another one.) If you hate darts, beware!!  This pattern has eight! But the good news is there isn’t a zipper, LOL!! One word of caution…you must commit to the length of the dress right away as the hem is faced. I love the detail of the dip in the hem. I think this style would be flattering on anyone!

Next up, is a shortened version of the Alder shirt dress in blue linen. I shortened the pattern so that it would function as a jacket or topper.

IMG_0386

Using the Archer pattern sleeves, I modified by adding a sleeve to the Alder without a cuff so that it would look more like a little jacket ( I rolled them up in this photo as it is so….hot here.) I left off the collar, and used only the collar band. I also took out a little of the fullness in the peplum so that it would be a little less puffy of a silhouette. I love this linen – and I know I’ll wear this new Alder constantly as a topper, or just with my jeans.

IMG_0236

Last, but definitely not least is the Sapporo Coat by Papercut patterns.

IMG_0286

I’ve been eyeing this one for awhlle and IPM was the perfect excuse to jump right in. I made it from linen and lined it with rayon. This pattern is definitely a departure from my usual style, but I love the cocoon shape, a new obsession of mine!

IMG_0271

It’s a very unstructured look, so there is ALOT of ease in this pattern and I do mean a lot. I cut the size XS, and ended up taking in the side seams even more to get it to fit. I love the construction of this coat – the collar is built in and the sleeves are faced so that you can roll up cuffs if you want.

IMG_0421

The pockets are my favorite part of the design and I love the slouchy look they give the coat. Be forewarned though. There’s isn’t a mechanism for shortening the bodice – so I tried a quick muslin to make sure it fit. If you love this style, go for it! The construction of this jacket was really pretty easy! This is my new favorite coat and I know I’ll love it for fall. I might try it again in a wool blend or cotton boucle’.

IMG_0307

Phew!! I’m really glad that Indie Pattern month only comes once a year!  I do a crazy amount of sewing as there is just something about seeing everyone’s makes that just inspires me to jump right in! I’m really glad I tried new patterns this year. I love By Hand London and Paper-cut Patterns and I’m loving the results and the styles. Have you tried their patterns? If so, any recommendations?

Happy sewing and thanks for stopping by!

New Look 6519: An easy travel dress

IMG_7345 2

I’m always on the look out for stylish dresses that are easy and comfortable to wear while traveling in hot weather. That’s why the simplicity of this New Look pattern caught my eye. The shape of the dress is accomplished with the addition of a simple belt.

This means the dress can be loose or fitted, depending on how tight you tie the belt so it’s perfect for hot weather. The other good news, is that there are very few complicated design details which makes sewing a breeze. Yet, there are some cool details on this dress too, like the back V.

IMG_7434 3

I often forget about New Look patterns, but I’m not sure why, because they never let me down! New Look 6519 was simple to construct – – I made it in a Saturday afternoon! Also, the top version is a stash buster…It only takes a yard and a half.

I used a soft cotton lawn for this dress (Fabric Depot) which makes it perfect for hot, muggy weather. The neck of the dress is finished with seam-binding, which is fast and easy to do. I did modify the pattern slightly, adding wide 6″ ruffles to the sleeves in a contrast fabric. I love the relaxed, easy look of a wide ruffle. To accomplish this, I just took a twelve-inch wide piece of fabric that was the length of the sleeve opening times 1.5. Then I folded it over, wrong sides together and gathered it, before inserting it into the sleeve opening.

IMG_7431 2

IMG_7330Not only is cotton lawn easy to wear, but it’s lightweight, so this dress won’t take up much space in my very small suitcase. I’m determined to take small a single small bag on this next trip, in spite of the fact that I’ll be gone for almost three weeks and I’m determined to succeed. My clothes (mostly me-mades) are cottons, rayons and linens which I hope will compress easily, and for this trip, I ordered a set of packing cubes, a concept that’s new to me. Have you ever tried them? Any tips?

It’s so odd to be sewing light weight summer clothes when the weather here in Oregon is on the cool side with plenty of rain! Fingers crossed that my next post will include outdoor photos…. Happy summer sewing, and thanks for stopping by!


Wardrobe Part 2: Safari and Long Cardi

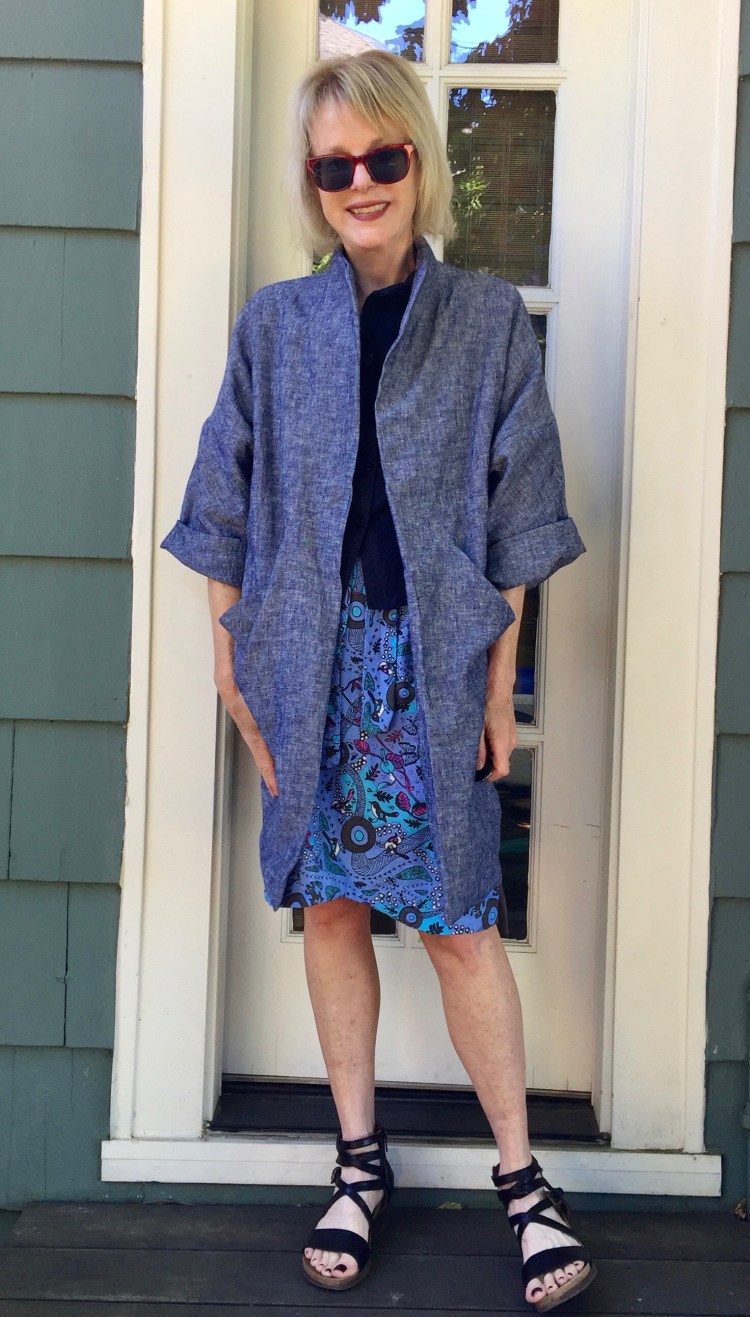
Hi All! I’m back with part 2 of my Sudoku Wardrobe adventure for Pattern Review’s Contest. These makes are two of my ‘accessories’, a linen safari jacket and a long knit cardigan. I think the fact that I interpreted the accessory category as a chance to add jackets or toppers to my wardrobe is a big clue that I live in Oregon! Honestly, one doesn’t venture out of the house, even in summer, without a wrap of some sort in hand. You just never know when the weather is going to shift and catch you by surprise.

This safari jacket was one of my favorite makes of this contest.

IMG_4313 2

Why? Because it’s detailed with double rows of topstitching everywhere!

Of course, I used my trusty #57 edge stitch presser foot to help guide me as I did on my denim dress last year. There’s something so satisfying about seeing those stitches lined up in perfect rows!

I’ve wanted to make a jacket like this for a while with a belt and pockets and buttons. I imagined a version with buttons on the upper pockets, but when I tried them on my jacket, well, it just was too much for me. So I left them off. McCalls 7365 is a loose-fitting, unlined vest and jacket with a self lined yoke, two piece sleeves, french seams and lots of pockets with tucks. It also has a cool back pleat, and a tie belt. There are lots of pieces of course, which makes this long project but it’s so satisfying and well worth the time. I love the two piece sleeves and the pleated pockets. One note though: the fit of the jacket is loose. Adjusting it would be a bit tricky if you usually adjust fit at the side seams because there are none. There’s a side panel instead.

The pattern instructions were great, the fit was good, and nothing was too tricky or confusing, definitely, a new favorite! The linen was from my stash, (YAY) purchased so long ago, I forgot where!  For the contest, the Sudoku grid forced me to pair this jacket with a skirt, but I’ll likely wear it more often with jeans and shorts. I want another version out of twill
 My other topper in the accessory category was a long knit cardigan.IMG_4826
I am such a fan of this shape. Earlier this year, I made this pattern and loved my wool knit version so much , I had to add a Spring version to my wardrobe.IMG_3967
It’s made from a denim colored cotton knit that I bought at Fabric Depot last summer. The fabric has just the right amount of stretch to make it wearable, but it’s not so stretch that it loses its shape. McCalls 7476 is one of my new favorites, and I have fabric for another version in linen knit. I cut this version a bit larger than my last because I wanted to take advantage of the light flow-y nature of this fabric. It floats a bit as I walk, which will make it a perfect summer layer.
M7476

I also made an Obagi belt from leather, and used that as one of my accessories too.

IMG_3875

This belt is basically just two pieces of leather sewn together with leather ties. I crafted the tassels by cutting strips of leather and sewing them to the ends :). Not sure I love how they turned out, but I do use this belt all the time!

That’s it for my accessories; The Moto jacket from last post, the Safari jacket, the cardigan and the belt…four pieces I’m glad to have in my wardrobe! Next post will be the tops I made.

I wandered around my sewing room a bit yesterday and noticed how airy and light I feel with a smaller stash :). That’s one of the best parts about entering a contest/challenge for me. I’m motivated to complete projects I’ve dreamed about for a long time, and I burn through my stash! I have to admit though. It is hard to part with some fabric, like the brown linen piece I used for the Safari jacket. I love the color and know I will never find a piece like that again. What? Do I have regrets? Not really, but I do get sentimental about fabric!  Am I the only one?

Happy sewing and thanks for stopping by!

A Ruffle Skirt and Cold Shoulder Top

IMG_3737 2
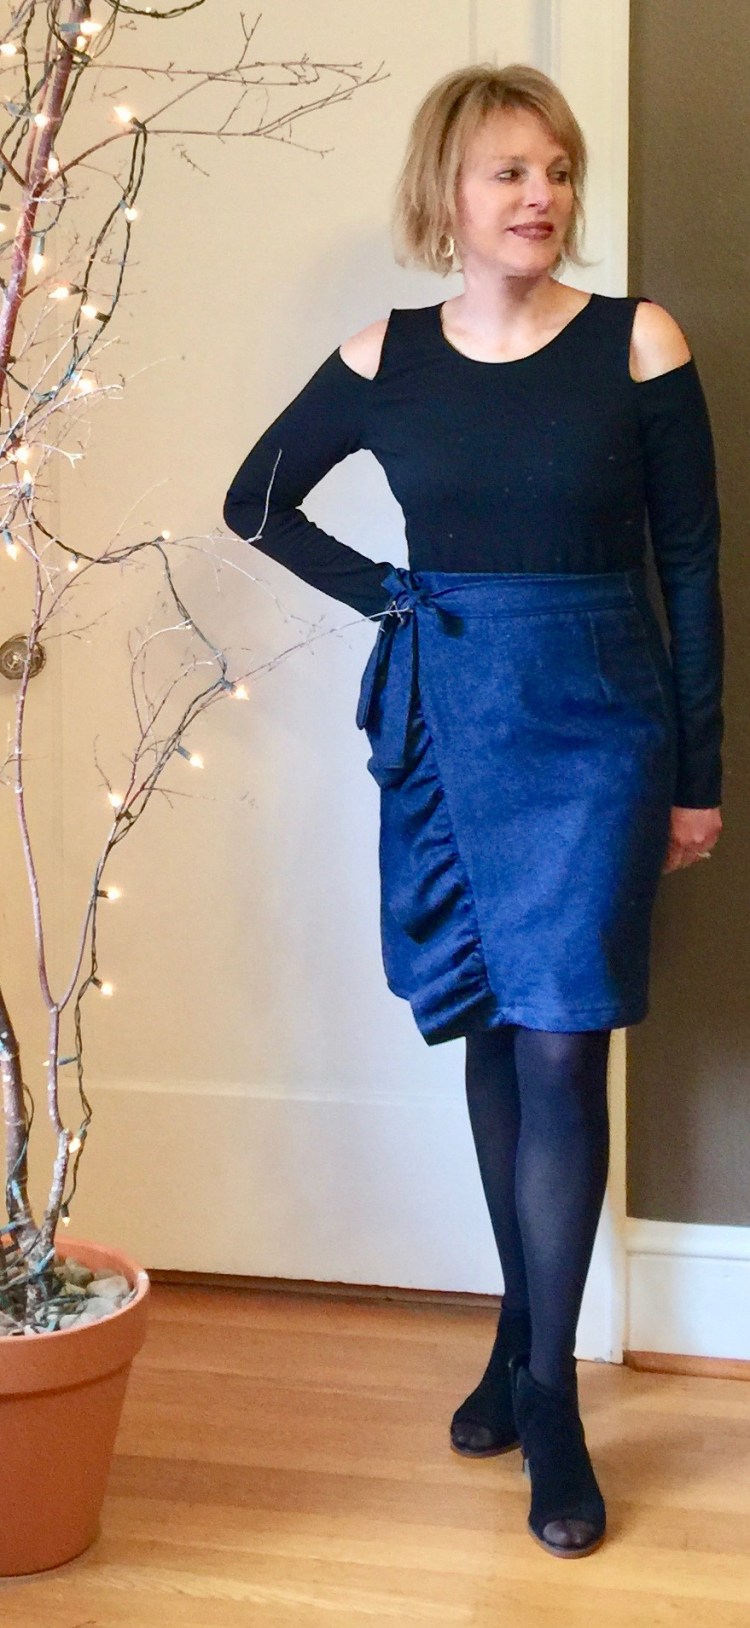
If you told me a year ago that I would be sewing a ruffle wrap skirt in denim for Spring, I would have laughed out loud. Ruffles have never been my thing. But if you show me enough of a trend, I am usually happy to hop on board!

Such is the case with this skirt.  I couldn’t resist modifying a simple skirt pattern to mimic some of the ready to wear ruffled gems I’ve been seeing around town.

IMG_3751In this photo, I am noticing that my bootie is unzipped. So ridiculous (!), but I had to include this shot because the ruffles on the front of the skirt are so easy to see. Honestly, this modification was easy. I measured the front edge of the right front of the skirt. I made my ruffle 1 and a half times that length (to allow for gathering), and 6″wide. I love how a simple modification can completely change the look of a pattern.

This skirt is Simplicity 1322. It’s meant to be a mock wrap with a front and back yoke and back zipper. But I made it into a real wrap skirt be eliminating the yokes and cutting a waistband and tie instead. I used  a lightweight denim; a cotton/linen blend. It’s been in my stash for so long, I have no idea where I bought it.

IMG_3771I’m happy with this skirt, but I’m not sure about the length. I might need to shorten it a couple of inches? Opinions? I won’t wear this with tights when it warms up around here and it might look more Springy if it’s a bit shorter?

This cold shoulder top (another trend I have happily embraced) is my first Style Arc Pattern. I wanted a basic top I could wear with anything, so I chose black ponte knit with moderate stretch and lots of body. This fabric was perfect to support the shape of the cut out shoulders.

IMG_3747I’d heard that Style Arc patterns are challenging because there are very few instructions. In the case of this pattern, the instructions were sparse (less than one page), but the instructions were enough to get the job done. There aren’t any facings to deal with on this top. The neck is finished with a turned edge as are the shoulder cut outs, so there just isn’t that much to say! It fit perfectly without modification, a rarity for me, so I’m fairly impressed with this pattern!


I’m more comfortable wearing ruffles when they’re paired with something that is simple and not so fussy, like this top. So, I imagine I’ll wear this skirt with simple knit tops most of the time.

IMG_3741I’m pretty happy with this make, and it was a stash buster too. What do you think of the ruffle trend? Thumbs up or down? And do you have any Style Arc Tried and True’s that I should try?

I hope it’s warm and sunny where you are, because it definitely isn’t here, which is not great for my Spring Sew-Jo. Nevertheless, there is a silver lining to the weather. Rain is a perfect excuse to ignore my yard and sew…. Happy sewing and thanks for stopping by!