Summer Making Journal 2: a Patchwork top, Inari hacks and Free Range Slacks

IMG_1094Hi all! July was a busy month in the sewing room. Recently, I cleaned my closet and donated several ragged tops (made so long ago!). I’ve been on a mission to replace them, while honoring a pledge I made to myself to use up my remnants. That pledge led me here…to my first pieced top.

IMG_1116I have never been able to throw away even the smallest scrap of linen. It’s too wonderful to toss! So, when the #JoinupJuly challenge started on Instagram, I was challenged to join up some of my linen scraps into a top.

The process of making a patchwork top isn’t difficult at all. Basically, with a quarter inch seam, you piece blocks and bits of fabric together, varying the colors. Then, when your pieced creation is large enough, you lay your pattern pieces on it and cut! My top is made using the Inari pattern from Named clothing(also made here). The lines are simple so it showcases piece work nicely.  It was so fun to figure out how to combine the linens into a pleasing pattern.

IMG_1185Here, I’m wearing my new pieced Inari with my first ever Free Range Slacks,a lovely pattern from Sew House Seven. I’ve been wanting to make these pants for ages. I used linen from my stash for this version.  I love the boxy shape of the pants, the cool seams and the deep pockets. But I found the fit to be more generous than I expected. Because the pants are high waisted and I’m short waisted, the fit of the rise was challenging. I’m pleased with the result, but my advice is to remember the loose fit when you’re choosing the size to cut. A toile would be a good idea too!

IMG_1153As you can see, the fit isn’t perfect yet. There are creases in the crouch. I’ll adjust the rise a bit more next time.

IMG_1339Here’s another Inari, this one with sleeves. I made this from rayon scraps left over from my Sew Over It Wrap skirt (see it here).I do love this rayon! It’s from art Gallery and it is so sumptious to wear. It flows so nicely too! This pattern, the Inari, is a keeper too, simple but stylish and so easy to modify to make it your own! The shorts I’m wearing are Simplicity 8841. This is a easy pattern with great fit! It has a elastic waist so you can make it quickly.IMG_1238I’m wearing my Inari here with the paper bag Burda shorts I made last summer (Here)…Love these! The linen just gets better with time. I wear them constantly!

My last Inari was also made from linen scraps, left overs from this summer dress.IMG_1274Again I used the Inari. Because I had oddly shaped pieces of fabric, I had only enough for a cropped version of the front and back bodice. So, I added a short peplum also pieced from scraps. Luckily the gathering of the peplum hides the many seams:). The sleeve bands are cut from a contrast linen.

That’s it for me for now. I’m in the process of cleaning and reorganizing my sewing room using Ikea modular shelves. And even though I recently reorganized my stash, I’m revisiting the scheme. Isn’t that the way it is with this hobby? It seems like there’s always a better way to organize your fabric, notions and patterns.

Stay safe and healthy. Happy sewing! Thanks for stopping by.


Sewing a Patchwork Shirt from Remnants

If you’ve been sewing for as long as I have, you’ve likely accumulated a large stash of fabric remnants. I find it hard/impossible to part with the lovely leftover bits when I’ve finished a project, so my remnant stash is HUGE, and overwhelming. Recently, I decided to sort and catalog the pieces. That’s when I made a lovely discovery… the colors and textures all work together.

So I decided to use the pieces to make this shirt.

Pattern: For my project, I used a tried and true shirt pattern so that fit would not be an issue. McCalls 6124 has a back yoke, two piece sleeves, a collar band and princess seams…so many opportunities to explore!

Process: Because I patchworked both the front and back, I was able to use three types of shirting and three colors of linen, about a quarter of a yard of each. Sewing was easy as I’ve made this shirt a time or two.

The best part of this project was figuring out fabric coordination and placement. In fact, I enjoyed it so much, I had a ‘moment’ when I imagined myself as a quilter. (Just what I need…a new reason to accumulate fabric, LOL!!)

I’m pleased with my shirt and am so glad my remnant stash has shrunk a bit. The good news is my shirt works well with the denim skirt I made a couple of years ago, so I know it will be worn again and again.

Of course, I’ll still be on the look out for new ways to use my lovely leftovers, so if you have ideas…please share!

Although I’ve had a bit of a challenge easing back into sewing ‘post vacation’, I’m definitely inspired by the Fall colors here in Oregon. Our cool weather has me thinking about sweaters and jackets and coats…ideas are brewing! How about you?

Happy sewing, and thanks for stopping by.

A Burda top you can make in an afternoon and Dior Exhibit

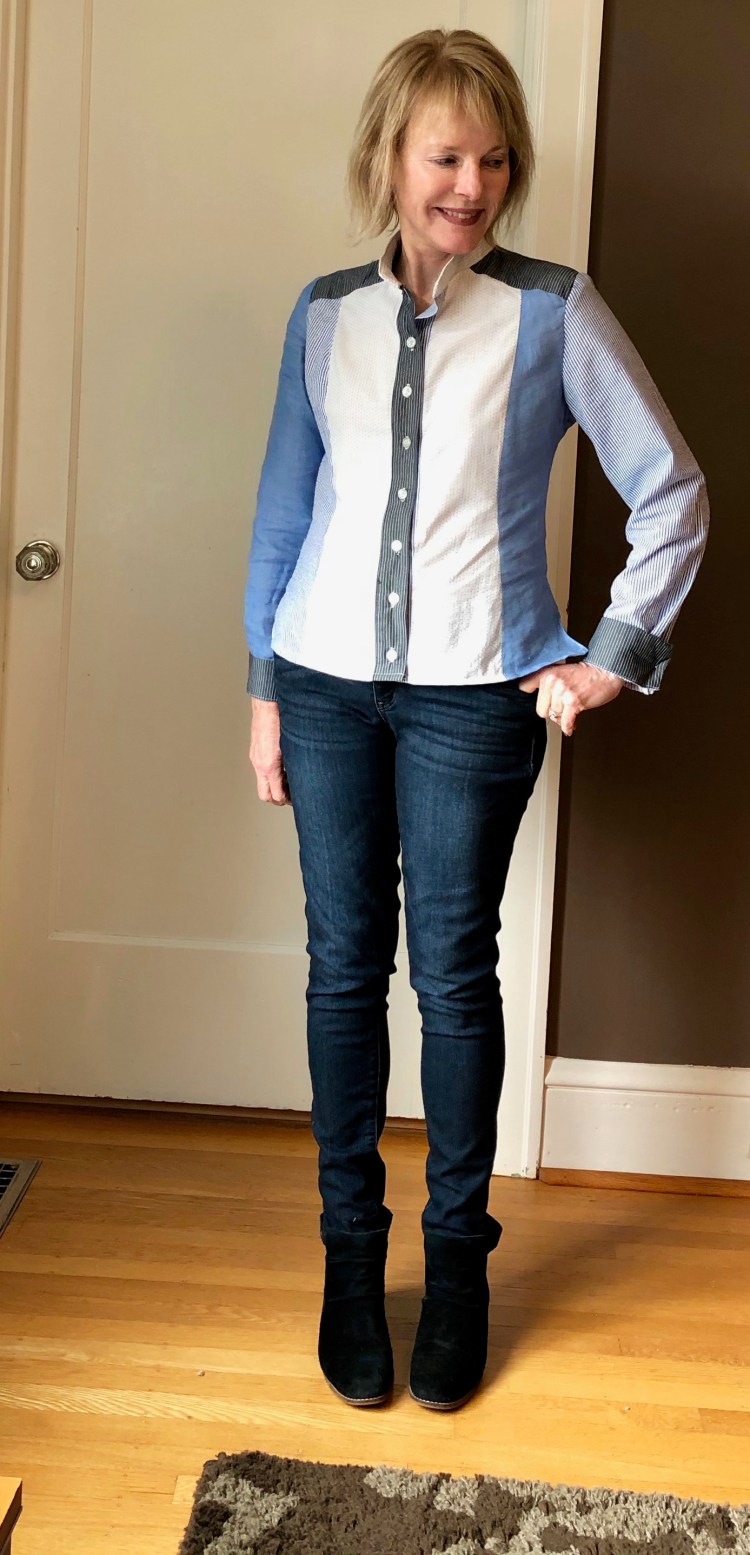
A Burda top and Dior….a lovely combination, eh?

First, the Burda top…..My box of precious fabric bits and lacy remnants is overflowing these days, so I’ve adopted a new ‘tidying up’ rule. If I can’t find a use for a remnant within six months of adding it to the box, it must go. So, I was thrilled to find this lovely pattern that seems designed to use up my bits and pieces.

Burda Style 12/2018/103 ticks a lot of boxes for me. Since my daily uniform of choice is a knit top with jeans, this one has the potential to stretch my every day wardrobe significantly.  I also have a thing for peplums (here and here), so I couldn’t resist this assymetrical version. Then there’s the opportunity here to mix fabrics…a big plus when you’re working with remnants.

103_large

Because I could see lots of potential here, I decided it would be worth the extra step of tracing the pattern from the magazine insert (usually a hard sell for me!!). Luckily, this  pattern only has four pieces to trace (a front and back bodice, and a front and back peplum) so it took me less than a half hour – – Score!! Also, since Burda patterns don’t include seam allowances, I’ve taken to tracing a size up to avoid the process of adding seam allowances to each piece. So far, this method has worked well for me.

Recommended fabrics are knits for the bodice, and softly draping blouse fabrics for the peplum. I used a rayon knit for the bodice of both my versions. On the white version, I used a remnant of eyelet lace for the peplum and a remnant of silk for the blue peplum.


The blue silk was a bit tricky to work with. It’s sheer and my Bernina wanted to eat it:). I’ve found that to sew with silk, I have to use the right needle in my machine..the sharper the better!

IMG_0796

The sheer fabric really dresses up the top, so the torture was worth it. I used my rolled hem foot to put a narrow hem on this peplum.  I didn’t have enough of the bodice fabric for the sleeves so I cut them from a remnant of solid blue rayon jersey – – another piece from the pile!! I always feel so virtuous when I use a remnant, don’t you?

This top was an easy sew.  The neck is finished with a bias strip, and I used my twin needle to hem the sleeves and the lace. All of the seams are serged, but you could use a zig-zag stitch as well. Instructions on Burda Style patterns can be a bit brief, but in this case, there really wasn’t much of a need to elaborate. One other note…the fit on this top is loose and very forgiving, so I didn’t find I needed any adjustments.

IMG_0770

I was able to complete both of the tops in an afternoon. There’s nothing like a quick project on a Sunday afternoon, don’t you think?

In other news, I visited the Dior exhibit in Denver last week and was completely blown away by the exquisite designs and fabrics and finishings. Here are a few shots to enjoy…

(If only I was a better photographer…) The first dress here is embroidered with branches and leaves and flowers…so beautiful!  The green dress was worn by Nicole Kidman to the Oscars. It has netting, embroidery and fur trim! And let me tell you, this dress is….well, tiny.

The dress on the left is covered with equisitely made tassels. The red dress here is embroidered with flowers and studded with pearls and sequins. The white dress is tassled too. Touching these gowns was out of the question of course, but wouldn’t that be fabulous? We sewists are tactile creatures, aren’t we? After leaving the exhibit, I could hardly wait to get home to sew.

This week, I’ll be working on my look for the Day/Night Dress Challenge.  I’ll be posting my look on February 22. There’s a community challenget too and prizes…join us! dandc2019I

Happy sewing and thanks for stopping by!


My #Sewing Top Five Misses 2018

Each year, I enjoy a review of my #Sewing Top Five Misses almost as much as my best top five. I always learn so much from my mistakes. So without further ado, here they are!top-5-of-2018.

IMG_0169

  1. Vogue top – Okay, when I made this,  I felt pretty clever because I constructed this top from odds and ends in my fabric stash. Ha! It’s such a mashup of colors and textures, I feel oddly distracted when I wear it. What was I thinking? New Motto – – keep it simple. To the donation pile!

IMG_3804

2. Aernite pants. I really loved these when I made them, but the color of the linen turned out to be problematic. It didn’t really work with anything in my wardrobe and it made me feel blah too. Lesson learned….I will avoid peachy beiges and tans in the future.

IMG_7747

3. The Darling Ranges dress by Megan Nielsen is a new favorite (I made three (3) versions!), but this version did not work for me. Again, the issue is the color of the stripes in the linen. It’s too peachy for me. Also, I think the dress is too long(?) so I feel rather frumpy in it. So many problems here. Ugh. The embroidered linen is so gorgeous though…too lovely to part with. I’m going try to modify the dress (shorten it to a top?) or reuse the fabric in some way.

IMG_5665

4. Simplicity Vintage top: What? you say. But this one is Blue! How can it be a miss?

This top is a clear miss because it’s so annoying to wear. I kid you not. Because it’s basically a wrap top with only a front and back panel, it depends on the tie to hold in the sides. That means when the tie loosens as you wear it, you enter the danger zone. If you don’t run off to a private place to re-tie, you will soon be showing all sorts of things best left covered.  Bummer as I made three of these. Thumbs down on this one….to the pile!

IMG_3283

5. Long Kimono top; I should love this one…the fabric, the kimono style…but I’ve never worn it. I cannot seem to find an appropriate venue/occasion. There’s something so awkward about it…maybe the length? A head scratcher for sure because I do love, LOVE this fabric so much and the style gets a big thumbs up from me.  Maybe I’ll shorten it next summer or recut it as something else. Hmmmm. I’ve got some thinking to do on this one.

Lessons learned – –

  1. Fabric in tan or beige-y tones is a no-no for me. (sigh).
  2. Avoid patterns where the design includes an element that might potentially be awkward or where you might be naked if it comes ‘undone’, LOL!
  3. Even though I love the look of a long cardigan or kimono, long isn’t always that easy to wear.
  4. Fabric that isn’t in my color palate is best left behind.
  5. Simple fabric, simple designs…they always work!

Well, that pretty much sums up the good and the not so good of 2018. I have no complaints. All in all, it was a very good year. That being said, I’d like 2019 to look a bit different. I’m hoping for some new creative adventures to sweeten my sewing experience and am thinking a lot about how to make that happen.

A fresh year, a fresh start. How was your 2018?

Happy sewing and thanks for stopping by!


An Anthropologie Inspired Burda Top


mL2l3J35Qjulp7CwY9UopA_thumb_11013If you ask me, the November and December issues of Burda Style magazine were so great, they more than justified the hefty price of U.S. subscription. This Anthropologie inspired make is from the November issue, and it’s just one of five patterns that I marke to trace. Yes, I always dread the task of tracing the patterns from the magazine…there are so many crazy lines to sort through! But the results were worth the effort!

Here’s the Velvet top from Anthropologie that inspired me to make this.  4110348695280_070_b

This Burda Style top is really close, minus the gathers at the shoulders.

rZMxr0WtSIumRgbFb3O9OA_thumb_110f3

Navy blue is such a hard color to photograph so I’m not sure how clearly you can see the waist-pleat detailing, but it adds a nice touch and it was easy to sew. This Burda Style pattern is 11/2018 Style 110.


The magazine version is made from stretch jersey so I made my version from stretch velvet. If you try it yourself, I highly recommend a stretchy jersey with lots of drape. I cut the smallest size and the fit is great. I did forget to add the seam allowances when I first traced the pattern pieces and had to retrace them. UGH. There are so many crazy lines going every which way on those pattern inserts. I guess you could avoid that frustrating step by paying for a download of the pattern from the website, but to me, that feels like paying for the pattern twice which I could not justify, since, in the US, a subscription is already a sizeable investment. Fortunately, there aren’t alot of pieces to this pattern so the tracing wasn’t too hard.

x2MmSKnwSw2mxLcTjL4YJg_thumb_110cb

The required sewing was quite easy! I’m always impressed at how well Burda Style patterns come together.  The instructions feel so abbreviated to me, yet the projects always seem to work out! The front bodice and neckline are finished with facings and they’re very simple to attach. The sleeves are set in and they went in easily. The tie is just inserted before attaching the facing. No big deal. Machine sewn hems finish both the bodice and sleeves.


I always worry about fit when I make a wrap top. There’s so much that can go wrong in terms of gaping in the front. Because of that, I celebrate when I find one that fits well. Since this one is a clear winner, I’ll likely try it again. I might even add a few inches for a dress. It’s a great addition to the wardrobe since it can be worn alone or with a white collared shirt. Probably a lacy tee would look great under it too.

It’s always great to add a new velvet piece to my wardrobe, since I am such a fan! I’m hoping to sew a few more things before I do my yearly wrap up, but it could be wishful thinking on my part:). Happy sewing and thanks for stopping by!


Blackwood Cardigan vs. McCalls 6844

You can never have too many cardigans. I feel quite certain about that. That’s why, each Fall, I find myself yearning for a new one…or two.  I’ve made several in the past (here and here) but today I want to talk about the two cardigan patterns I reach for time and again – –  the Blackwood cardigan by Helen’s closet and McCall’s 6844 (OOP but available on-line). Both patterns are easy to sew and friendly to a variety of knit fabric options. It’s the neckline that is usually the deciding factor in why I choose to make one over the other.

IMG_9104 3This version of McCalls 6844 is a coatigan of sorts. I found this thick sweater knit at Joann’s. The weight is perfect for this time of year, and the stretch recovery is great for this pattern.

6844line

I made view B but lengthened it by six inches. I love long cardigans these days (my Pinterest page is proof of that). The wide shawl collar makes it so warm, and by cutting the front bodice pieces a bit wider than I normally need, I was able to make the closure have a bit of an overlap, which makes it appropriate for windy weather.

IMG_9093 2Next up is (no surprise) the Blackwood cardigan by Helen’s Closet. Who doesn’t love this pattern?

IMG_9242I’ve made this before, but this time, I really wanted a stripe along a solid front band for contrast, as I’ve seen that detail on RTW cardigans.

IMG_9225 3With this striped fabric, I got lucky! The selvege edge of my fabric was solid navy with a thin purple stripe, and I had enough fabric to manage to cut the entire neck band from it!! Such a perfect opportunity to add a fun easy detail to this cardigan.  Again, I made this version very, very long. The advantage is that the longer look makes a shrimp like me feel tall. The bad news? It’s so long, none of my coats cover it. Such problems….

My new cardigans are so wardrobe friendly since they go with everything in my closet. I know they’ll get alot of mileage! What’s your favorite cardigan pattern these days?

The holidays are coming and I cannot let the season go by without a new velvet make so that’s on my sewing to do list. Oh, I guess I’ll have to go on Pinterest and start a new ‘velvet inspiration’ page, don’t you think?

Happy sewing and thanks for stopping by!


Burda Style Raglan Sleeve Dress

IMG_6210

It’s been so hot and smoky here in Oregon. Heavy wildfire smoke has settled over Portland, a depressing reminder of last summer’s fire catastrophe in the Columbia Gorge.

But today, things are looking up! The wind is clearing the smoke away, the outside temperature is moderate and it’s safe to be outside again. It’s the perfect day to wear a simple summer dress.

IMG_6265

Did you see the August issue of Burda Style magazine? There were so many great styles I could hardly decide where to start! I was attracted to this Burda dress by the relaxed but fitted style.

770x967_BS_2018_08_101_front_large

Most of the shape is created by an elastic waist, and elastic bands on the Raglan sleeves, so there aren’t any darts or waistbands with tricky fit issues. There’s another big advantage of this pattern has…It’s only three pieces!!

101_large

Burda 08/2018 #101 is traceable or available for download.  The fit on this dress was spot on for me, and it was pretty simple to trace the pattern pieces since there were so few.

As with all Burda magazine patterns, the instructions provided were minimal. However, since there are very few seams, construction was straightforward. Of course, inside finishing is never discussed in Burda instructions, so I just finished the neckline with bias tape and serged the seams for a polished inside finish.

This rayon (Fabric Depot) has the perfect drape for summer dress. It’s just the right weight for the gathering at the waist. I’m not a big fan of exposed elastic so I did make a tie belt from matching fabric.

IMG_6270

IMG_5965

I don’t know why I don’t sew with Burda patterns more often. Maybe it’s because I have to trace the pattern?? Really though, compared to the time it takes to assemble a PDF pattern, it’s nothing. From tracing to hemming this dress only took a couple of hours…an easy Saturday afternoon make!

Hmmm, there may be more Burda style patterns in my future. What about you…fan or not?

Happy sewing and thanks for stopping by!


Vacation Countdown: Skirt and Vintage Wrap Top

IMG_5670

It’s vacation countdown time at my house and I’m sewing like a mad woman as I plan my travel wardrobe. These new ‘makes’ scored high in the versatility category, so I’m sure they’ll both find a place in my suitcase.

IMG_5699

When I first saw this Simplicity top, I was taken with the vintage look; the peplum detail, the wrap at the waist and the oversized cut in sleeves. Must haves!! When I wear this, I love the bright blue of course, but I feel a bit like I’m channeling Kate (Hepburn, of course)…. never a bad thing!!

This wrap top is Simplicity 8593 and the construction is so intriguing. There aren’t any side seams.

simplicity-vintage-blouse-1940s-miss-pattern-8593-front-back-view

simplicity-vintage-blouse-1940s-miss-pattern-8593-envelope-front

Instead, the ties on the inside and the wrap belt keeps everything together. Not only is the style unusual, but it’s so easy to sew. I love the tropical print on the envelope version. If I find that fabric, there will be another of these in my future!


IMG_5669

This top is so comfortable to wear and, even without side seams, the coverage feels secure. I made the smallest size, and it was still very roomy. Even though the top looks unstructured, there are two darts in the back and front, giving it some needed shape. There’s nothing hard about this pattern at all. If you can gather and sew a seam, you’re good to go. For my version, I used a batik rayon (Fabric depot) and I think it’s the perfect weight and drape for this design.

The skirt is definitely a winner too as it seems to go with everything in my wardrobe! IMG_5837

Here, I’m wearing it with a tee top (simplicity pattern to be blogged), a ruffled shirt I made last summer (see it here), and a linen shirt I made but never blogged.

Butterick 6326 has two versions, a high waisted skirt and a gathered waist option.

I’m such a fan of anything high waisted, so this was an easy choice for me. I used a stretchy denim (Mill End Store) that is perfect for this pattern. It has just enough weight to hold everything in, yet it’s stretchy enough for comfort. According to the pattern measurements, I chose a size 8 and it fit perfectly without adjustments. There’s a zipper in the back, but other than that, this is a quick and easy pattern! I topstitched with black thread, but it would look really great to stitch with a contrasting thread which I will likely do if I make it again.

With these makes, I’m feeling more confident about my travel wardrobe, which is great because I have less than four weeks (!!) to get my act together. This skirt will be easy to mix and match with short and long sleeve tops, making it an multi-season item.

IMG_5665

I think for this trip, I will pack more separates that I can mix and match, and only a dress or two. In the past, I’ve leaned toward dresses, but I’m not sure they have as much mileage as a good skirt or a pair of pants. Opinions appreciated!

Happy sewing and thanks for stopping by!

Vogue 9313: Ruffled wrap dress

IMG_4968We’re experiencing a heat wave in Oregon, and the humidity is so high, my hair flips and frizzes, no matter what I do :). When it’s this hot, only a cotton dress will do, and this wrap dress is perfect for these sweaty days.  I became a fan of wrap dresses when I made this one last year. It was so cool in high summer.

IMG_5019 2

My pattern is Vogue 9313, a wrap dress with lots of “easy” options.  It has custom fit options with A-D cup sizes so it’s pretty easy to get the fit right. I modified the pattern a bit after trying on this dress at Anthropologie.

4130276110001_085_b14

  1. I re-drafted the shape of the full skirt to make it take out a bit of the fullness. (Too much fabric makes me hot in the summer). Also, I modified the two front skirts by rounding them into a tulip skirt shape so that it would work better with a ruffle.

IMG_4849 2

2. Instead of finishing the skirt fronts with bands as the pattern suggests, I added a 3 inch ruffle to each skirt front where the band would be and extended the ruffle into the hemlines as well. The ruffles are folded strips of fabric that are 1 and 1/2 times the length of the skirt fronts and hems. I gathered each ruffle with a long stitch then sewed them to the skirt fronts with a 5/8 inch seam.

4. I eliminated the front and back waist bands and lengthened the front and back bodices by two inches to make up for it.

5. The sleeves were too wide for me, so I added a tie instead of a hem. I cut a 4″ opening in each sleeve to accomodate the tie, then finished the openings with narrow hems. For the tie,  I cut a narrow strip (5″) of fabric that was two times the circumference of the sleeve. I attached it to the sleeve hem as though it was a sleeve band or cuff.

IMG_4999

I came pretty close to my goal with this make. It’s casual and comfortable but can be dressed up with a few good accessories. This cotton fabric from Fabric Depot is perfection. It has a bit of texture, but isn’t too heavy so it drapes really well and doesn’t seem to wrinkle much. Another travel dress?? Hmmm – – time will tell. I’ll know after I wear it a bit more.

Cotton and linen are my go to fabrics in the heat – and I wear dresses all the time. My Kalle shirt dress is in heavy rotation right now. What do you prefer to wear in the heat?

Happy sewing and thanks for stopping by.


A New Top to Add Some Drama

IMG_2208

Me-Made May is winding down, but not without a few more revelations that are worth mentioning. I used to wear solids and very few prints – – Not so anymore! My wardrobe is dominated by prints and textures. There isn’t anything bad about this, but I miss the drama that solids bring to the table. A well-cut top or dress with drape and style looks sophisticated and polished when there isn’t the distraction of a print.

IMG_2293

Ha – – Look at the volume in these sleeves! You have to admit – this top is dramatic, much more than I realized when I chose  McCall’s 7658.

There are many views and options with this pattern (Yay!), but I chose the long sleeve version because it’s still (always) on the chilly side in Oregon.  Because of the overlay, recommended fabrics for this pattern include chiffon, Georgette and sheers. I didn’t have any of those in my stash, but I did have a lightweight sheer knit so I gave that a try.

IMG_2258

This style looked complicated to me, but the construction steps weren’t hard at all. The long sleeve version has the sleeves built right into the overlay, so makes them a breeze to sew. The trickiest part of the make was the sleeve cuff. You’re supposed to insert elastic to give the cuff a gathered look. I chose to skip that part, since you’d never see those details on my fabric anyway, so I just inserted the cuff without the elastic. The finish of the overlay is simple – – you just turn under the edge and stitch.

IMG_2298

Voila! A half hour to cut this pattern, one and half hours to sew! Not a bad way to go…:)

The bat wing sleeves really give this overlay some style and drama. It’s pretty obvious though, that the wrong fabric choice would make this style look, well, pretty hideous, LOL. So, if you’re inclined to give this one a try, stick with lightweight fabrics with lots of movement and drape.

IMG_2268


I’m happy to say, there were no adjustments necessary on this pattern for me! I know some people aren’t fond of  sleeves with volume, but I think I love this look….it’s sort of cape-like and fun. I just might have to make it again for summer with the pleated overlay in a lightweight chiffon…but wait. I hate sewing with chiffon. Hmmm, what else would work? Any thoughts?

Happy sewing and thanks for stopping by!