A Nano Iro Summer Coat

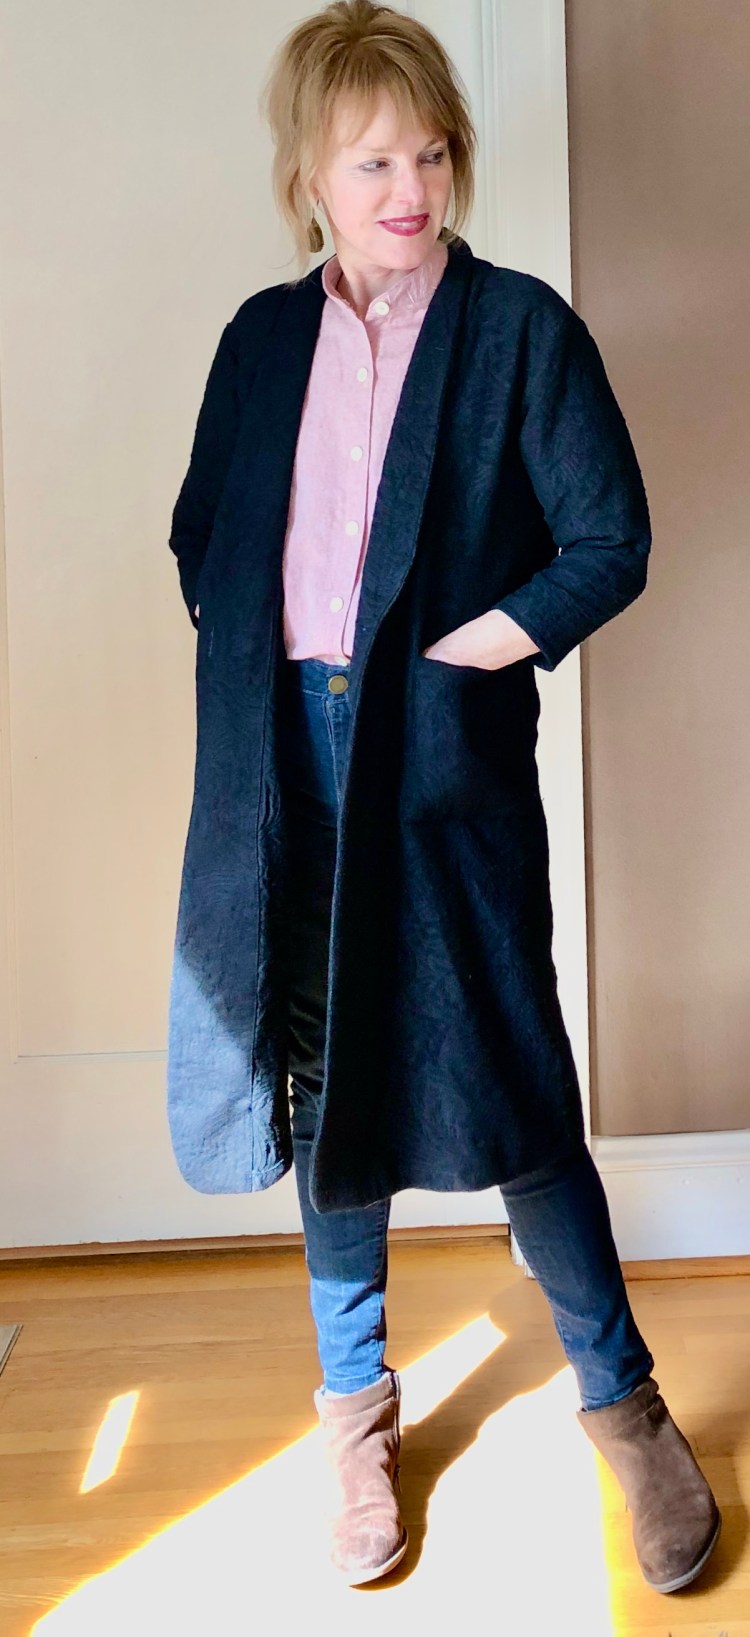
I told myself when the ‘stay at home’ time began, that I would use it as an opportunity to tackle sewing projects that were either time consuming or that had been on my to-do list for awhile. This project falls into both categories.

This coat is from the Nano Iro sewing book, by far my favorite sewing purchase of 2019! I love japanese sewing patterns, and here, they are conveniently translated. 

This pattern is called, appropriately, the summer coat. It’s unlined and best made in cotton or linen, two fabrics I can’t get enough of. I made it before, here and absolutely love wearing it. 

For this version of the summer coat, I used a really special piece of fabric I purchased in Rome last September at an amazing fabric store, Azienda Tessile Romana. 

If you visit Rome, do not miss this fabric store. The fabrics are gorgeous and when I visited, the staff was so helpful and generous with their time. You will not be disappointed. (Hopefully, we’ll all be free to visit there soon.) 

This fabric is a amazing cotton Jacquard and the texture is perfect for this coat (Black is hard to photograph, and these photos don’t do justice to this fabric!) It has just enough body to support the lapels and to give this loose-fitting coat a bit of structure. I wish I had more of this fabulous fabric!

Construction of the coat was easy. The lapels are cut into the coat, then faced. The trickest part for me was the neck facing. Even though I’d made this pattern before, I must admit, I struggled! The diagrams in the instructions helped, but for some reason, it was counterintuitive for me. I couldn’t make the facing fit to the jacket. Eventually, I realized it was because I was trying to fit the wrong side of the facing to the neck opening. Once I came to terms with that, it fit easily. 

I do love this jacket. In fact, the patterns in this book are all on my to-do list. The photos in this book are inspirational too. The fabrics they chose are enviable – – double gauzes and linens in bright colors.  I’m so glad I ticked this coat off my to-do list as it will be absolutely perfect to wear on cool Spring days.

Next up is a Tamarack Jacket. I hope to show that to you soon. 

Sewing is helping me to get through these strange days. Good health and happiness to you all. Thanks for stopping by! 

A Sierra Jacket in Forest Green

Whoa….It’s been awhile since I’ve posted!  My mother-in-law died recently and it’s been a sad, low energy time for me. I drifted into a space where I had very little time or mental space to create. The experience of being away from sewing deepened my appreciation of it though. I’m so happy to be back with a new make, the Sierra Jacket from Closet Case Patterns. 

The design of this unlined jacket has such a cool ‘french’ vibe to me. From what I understand, Heather of Closet Case Patterns was inspired by a old canvas maker’s jacket she owned. The pattern includes two views, a long version that’s cinched at the waist and a shorter, boxier version with buttons down the front. 

Of course, an unlined jacket is the perfect opportunity to practice some nice seam finishings. I flat-felled most of the seams to keep the inside looking neat, then added some bias binding in a contrasting stripe to the front facing. It makes me so happy to look at the inside of this jacket!

The fabric I chose is a medium weight twill in deep forest green. It’s the perfect weight for days when you need a light layer. It’s pretty cold here now, so I’ve been wearing my Sierra like a blazer under my coat, but will use it as outwear in the Spring and Fall. 

Details I love…There’s a cool side tie and an extra pocket inside the front for carrying your cell phone or what ever. You can even put a pocket on the sleeve. I didn’t have enough fabric for that this time around, but will definitely add that next time. I love the two piece sleeves too, and the cinched waist. The shorter version has buttons and sleeve pockets. Trust me…I’ll make that one soon, maybe out of corduroy .

The fit of this jacket is oversized and a bit boxy so be forewarned. I like it that way, but will cut one size smaller next time. Construction steps are well explained as is the usual with this company.


I’m in love with this jacket in part because of the color… forest green. For some reason, it seems hard to find these days! The jacket is so fun to make and wear..I know I’ll make the shorter version soon!

Happy sewing and thanks for stopping by.

Sewing a Patchwork Shirt from Remnants

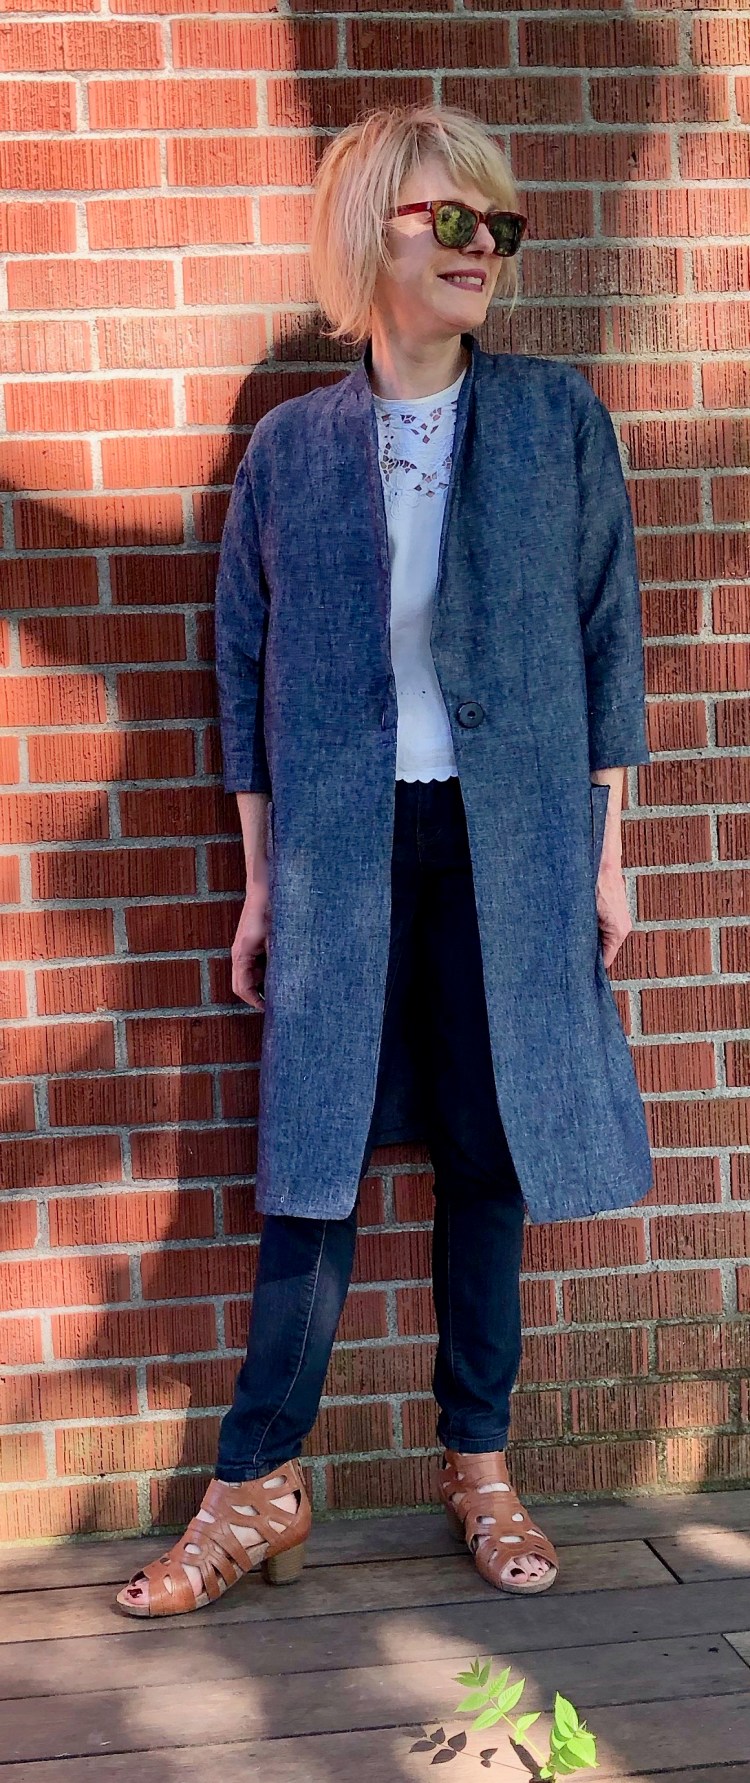
If you’ve been sewing for as long as I have, you’ve likely accumulated a large stash of fabric remnants. I find it hard/impossible to part with the lovely leftover bits when I’ve finished a project, so my remnant stash is HUGE, and overwhelming. Recently, I decided to sort and catalog the pieces. That’s when I made a lovely discovery… the colors and textures all work together.

So I decided to use the pieces to make this shirt.

Pattern: For my project, I used a tried and true shirt pattern so that fit would not be an issue. McCalls 6124 has a back yoke, two piece sleeves, a collar band and princess seams…so many opportunities to explore!

Process: Because I patchworked both the front and back, I was able to use three types of shirting and three colors of linen, about a quarter of a yard of each. Sewing was easy as I’ve made this shirt a time or two.

The best part of this project was figuring out fabric coordination and placement. In fact, I enjoyed it so much, I had a ‘moment’ when I imagined myself as a quilter. (Just what I need…a new reason to accumulate fabric, LOL!!)

I’m pleased with my shirt and am so glad my remnant stash has shrunk a bit. The good news is my shirt works well with the denim skirt I made a couple of years ago, so I know it will be worn again and again.

Of course, I’ll still be on the look out for new ways to use my lovely leftovers, so if you have ideas…please share!

Although I’ve had a bit of a challenge easing back into sewing ‘post vacation’, I’m definitely inspired by the Fall colors here in Oregon. Our cool weather has me thinking about sweaters and jackets and coats…ideas are brewing! How about you?

Happy sewing, and thanks for stopping by.

Italy: My Favorite Linen Travel Dress

Hi All! I had a wonderful trip to Italy and am now easing back into real life. I’m still battling the effects of the 9 hour time difference, but last night I slept through the night so things are looking up!

Although the weather here in Portland is a bit on the cool side, I wanted to share the dress I wore the most in Italy – – a linen dress that I finished the day we left, LOL!!! As usual, I decided at the last minute to add a dress to my travel wardrobe.

These photos were taken in the Villa Cimbrone Garden in Ravello Italy, a breath taking town perched on a cliff high above the Amalfi coast.

This linen dress was my go-to garment on the trip because the weather was warmer than expected. I thought I’d wear this dress with a tee shirt under it to protect my upper arms from the sun, but it was hot so the tee shirt stayed in the suitcase. I chose to stand in the shade often and managed to avoid a sunburn.

Dress Construction – To sew this dress, I modified my favorite loose fitting top pattern, the Grainline Hadley. The cut of this top is so flattering on everyone I think, with two neck options to choose from.

For the dress bodice, I used the sleeveless Hadley without the back pleat and lengthened the Hadley bodice by 6 inches. This became the A-line shaped bodice of the dress, complete with high – low hem.

The back button placket is a non-functional add on, just for looks. To make it, I sewed together two long strips of fabric then added buttons. After the placket was in place, I focussed on drafting the skirt. I cut two huge rectangles, that were 1 and a half times the bottom width of the Hadley. These I sewed together, then gathered and attached them to the bottom of the bodice. That’s all there was to it.

Fabric – Linen was the perfect fabric for Italy. It made me comfortable no matter what the weather. Personally, I could care less about the wrinkles. For this dress, I used a solid blue linen from my stash, purchased last season at the Mill End Store. The striped linen is from Joann’s.

This dress is so fun to wear!

Swinging wasn’t in my vacation plans, but when you’re on the Amalfi coast, why not? I enjoyed wearing linen so much on my trip, I’m determined to find ways to sew with it year round! Any thoughts on this idea?

Sewing plans – As the travel fog lifts and I put away my summer clothes, I know I’ll be inspired to sew a few fall things. I hope there will be a new trench coat, maybe a short wool coat too so watch for those posts.

Happy sewing and thanks for stopping by!

#sewjapaneseinjuly meets #tableclothrefashion

July was a big month for sewing challenges. There were so many on Instagram, I coudn’t keep track of them all. For me, two challenges stood out above the rest: #sewjapaneseinjuly and #scarfrefashion, which also includes tablecloths. Yes, my last post was about a tablecloth refashion, but as you all know, one thing always leads to another for me, and that project was so fun. I guess it isn’t too surprising that I had to do another revashion before July was done.

But first, my #japeneseinjuly make…

IMG_2306 This is the Summer Jacket from the Nano Iro sewing studio book.


Nano Iro is a watercolor artist who creates beautiful textiles. Her designs are transferred to cotton and linen, which are perfect for clothing. Not only does she create beautiful textiles but she is an author. On a recent shopping trip to Bolt fabric here in Portland, I discovered that her recent book has been translated to English! Of course, I couldn’t resist….this is the summer jacket from that book.

images

To me, Japanese sewing books are great because the styles are simpler and cleaner which allows the fabric to take center stage. That’s why, for this jacket, I reached deep into my stash for one of my favorite pieces of linen.


IMG_2318My linen has the tiniest bit of sheen which makes the denim color really pop.

IMG_2241I love the classic lines and the shawl collar of this summer jacket. The construction is basic but clever…the shawl collar is supported by a back neck facing that keeps the neck from rolling.  The pockets are patched onto the jacket, which gives it a utility jacket feel, so on-trend! It’s unlined so construction is a breeze. If you can set in a sleeve and attach a basic collar, you’re good to go! Use a medium weight fabric for this project with a bit of drape.  IMG_2305This style works with everything in my closet – – I suspect this jacket will be in my suitcase when I go to Italy this September!

On to the  tablecloth refashion…

IMG_2284This is the Basic Blouse, cut from a circular vintage table cloth purchased at an estate sale. I wish you could see from these photos that the cut detailing is embroidered with blue thread – – Love!!


Construction of this top was simple..The sleeves are cut into the bodice so there’s nothing much to it. The trick was in the layout….I had to place the cut detailing appropriately. I used the scalloped edge of the tablecloth as the hem and the center of the tablecloth as the yoke of the bodice. The sleeves are highlighted with more cut detailing, and after some tricky maneuvering I managed to get the sleeves to mirror each other. IMG_2287I added a back slit at the neckline and finished it with bias binding.

IMG_2246 2

I love my new outfit…and to think both pieces were inspired by sewing challenges! What challenges are you inspired by?

IMG_2190 Happy sewing and thanks for stopping by!


Linen Tablecoth Top for #scarfrefashion and #so50vintage

IMG_2015

I have a love/hate relationship with Instagram, I must admit. I love seeing everyone’s makes but I find the limitations imposed by the IG algorithm to be so frustrating. Sometimes, my feed is so edited by Instagram, I don’t see the content I choose. Nevertheless, as you all know, I do love a good sewing challenge and Instagram is full of them! So, I will stop complaining and get on with it….:)

IMG_2046

This linen top (a bit wrinkled having just been worn) was inspired by two sewing challenges on Instagram: the #scarfrefashion challenge (includes tablecloths too) sponsored by @sewstoney and @sewdalaridada, and the #so50vintagechallenge. I happened upon a vintage linen tablecoth with beautiful cut work and mitred corners at a estate sale. I’ve made tops from tablecloths before (here and here) so I knew this one was perfect for a top. I couldn’t resist giving the challenge a whirl.

With a little over a yard of fabric to work with, my style options were a bit limited. After perusing my extensive (!!) pattern stash, I came upon Simplicity 8090, a pattern from 2016 that has all sorts of possibilities.

I chose view C because it doesn’t take alot of fabric and it’s cropped, which allowed me to use the finished edges of the tablecloth as the hem for the top.

The pattern was so easy to sew. The sleeves went in perfectly. The front placket was really easy because I used the finished edge of the tablecloth for that. I only made one modification – I added a collar stand.

I do love the french darts on this top. They look so crisp in linen.

IMG_2008

This top has a seam down the back so I positioned the bodice pieces so that the tablecloth’s cut detailing would be on either side of the seam. I cut the sleeves to use the tablecloth detailing and hem too.

IMG_2045

The inside of the shirt looks fabulous because the hem of the tablecloth finished all the seams for me, LOL!!

All in all, it was a fun project, and I’m pleased with how it turned out. The biggest challenge was the laying out the pattern properly, of course, but the extra time involved was worth it.  I do love the boxy cut of this top and know I’ll use this pattern again. Vintage linen is so lovely to work with, I’ll never be able to resist an old tablecoth again!

IMG_1977

Are you taking on any sewing challenges this summer? Let me know so I don’t miss it! I love seeing everyone’s makes….

Happy sewing and thanks for stopping by!

New Pattern Release: Sew Over It Bonnie Top/Dress

IMG_1008 3Hi All – – When I saw the sketches of the new Bonnie Top from Sew over It London I was thrilled. If you’re like me, you have a closet full of high waisted pants/skirts, but no tops to go with. I knew that this lovely ‘cropped’ top would fill a hole in my wardrobe. Not only that, but the Bonnie top has pleats! IMG_1005 2The Bonnie has a 1940s vibe with its defined waist, button up front and vertical pleats. It has a cute flat collar and short sleeves with little turn-up cuffs, a design detail that is subtle but effective. I like that the button placket is concealed – – it makes it a bit more polisihed – – a top that can go to a dress up event. There’s a dress version as well that has a knee length gathered skirt and a comfortable elastic waist.  I do love the pleats, but if you want a faster make, there’s a version of the Bonnie without pleats too. I know there will be a version of that view in my future.

I used a lightweight rayon for my version of the Bonnie, and it worked perfectly. Sew Over It recommends rayon/viscose, lightweight crepes, georgette, chiffon or very fine cotton voiles, in other words anything soft and drapey. I’d warn against anything heavier like a stiff cotton. The pleats wouldn’t have a chance to shine. If you are making the pleated version, the wider the fabric the better, as you need lots of room to lay out the front bodice as the pleats make it fairly wide.

IMG_1003.jpeg

Fit and sizing – – I made my size according to my measurements and it fit nicely, without adjustment. I spent a bit of time fussing about the fit of the waistband, but I shouldn’t have bothered. The buttons don’t extend there so the waistband falls open ever so slightly…the fit isn’t tricky at all.

Construction– -When it comes to the pleats, I found the trick was to carefully mark them on my fabric. From there, construction was simple…. All I had to do is fold, press and sew!  Thankfully, the Bonnie  has very clear markings. I transferred them using a chaco marker. Once I’d accomplished that, pleat constructions was easy and fast. The concealed front placket was pretty simple too  once I had the markings transferred.

IMG_0998.jpegI love my new Bonnie top and plan to wear it with my high waisted skirts (the skirt I’m wearing is blogged here), pants, perhaps even with jeans. I can imagine an even dressier version out of silk or chiffon, and the dress version is on my ‘must-make’ list. Really, the Bonnie is one of my favorite Sew Over It patterns! Thanks to the Sew Over It London team for giving me the opportunity to make this lovely pattern!

Happy sewing and thanks for stopping by!

As a Sew Over It Pattern Insider, I received a download of this pattern for free, but the opinions expressed here are my own. 

An Easy Burda Dress You Can Sew in Two Hours

IMG_1018This dress was a spur of the moment project. I decided the morning of an event that I wanted a new dress to wear that afternoon. There’s nothing like waiting  until the last minute, eh?! It’s too bad that #Jiffyjune is over because, honestly, this project has jiffy written all over it. It took less than two hours from start to finish.

IMG_1028 2

Fortunately, I had the perfect pattern for a last minute sew waiting in my stash.

This Burda pattern (6345) is a real keeper. I understand from the Burda Style website that it was featured in the magazine in 2016 (6/2016/101). I didn’t subscribe back then, so missed it, but it was instant love when I saw it in the Burda pattern book this summer.

This dress is so easy, yet the design is so visually interesting. The sleeves are part of the yoke, which makes sewing so simple.

IMG_1026I used a medium weight jersey that I had in my stash (yeah, a stash buster).  The pattern suggests using stripes because the design is such a perfect canvas for ‘stripe play’. I love how changing the direction of the stripes on the yoke really makes this dress pop! There isn’t a zipper to install…the dress just slips over your head. The neck is simply finished with a gand cut on the bias – so easy!

Because this pattern is made for knits, fit issues for me were next to none. I cut my usual size, and it fit without adjustments. I finsihed the seams with my serger, so even though this was a quick sew,  the inside of the dress looks great.

IMG_1020I’m so pleased with my spur of the moment dress! It will likely be my garment of choice tomorrow for the Fourth of July; Independence Day here in the states, since red, white and blue are the colors of the day.


I do love a quick, jiffy sew (am I the only one who sews a garment 2 hours before a party?). I have a bin in my pattern stash that’s marked ‘jiffy and some of my favorite patterns live there (hmmm, might be a future post?). It’s so nice to add this lovely new pattern to my  bin.  Thanks, Burda!!

Happy sewing and thanks for stopping by!      

The Saraste Shirt, my Me-Made-May Hero

IMG_6940

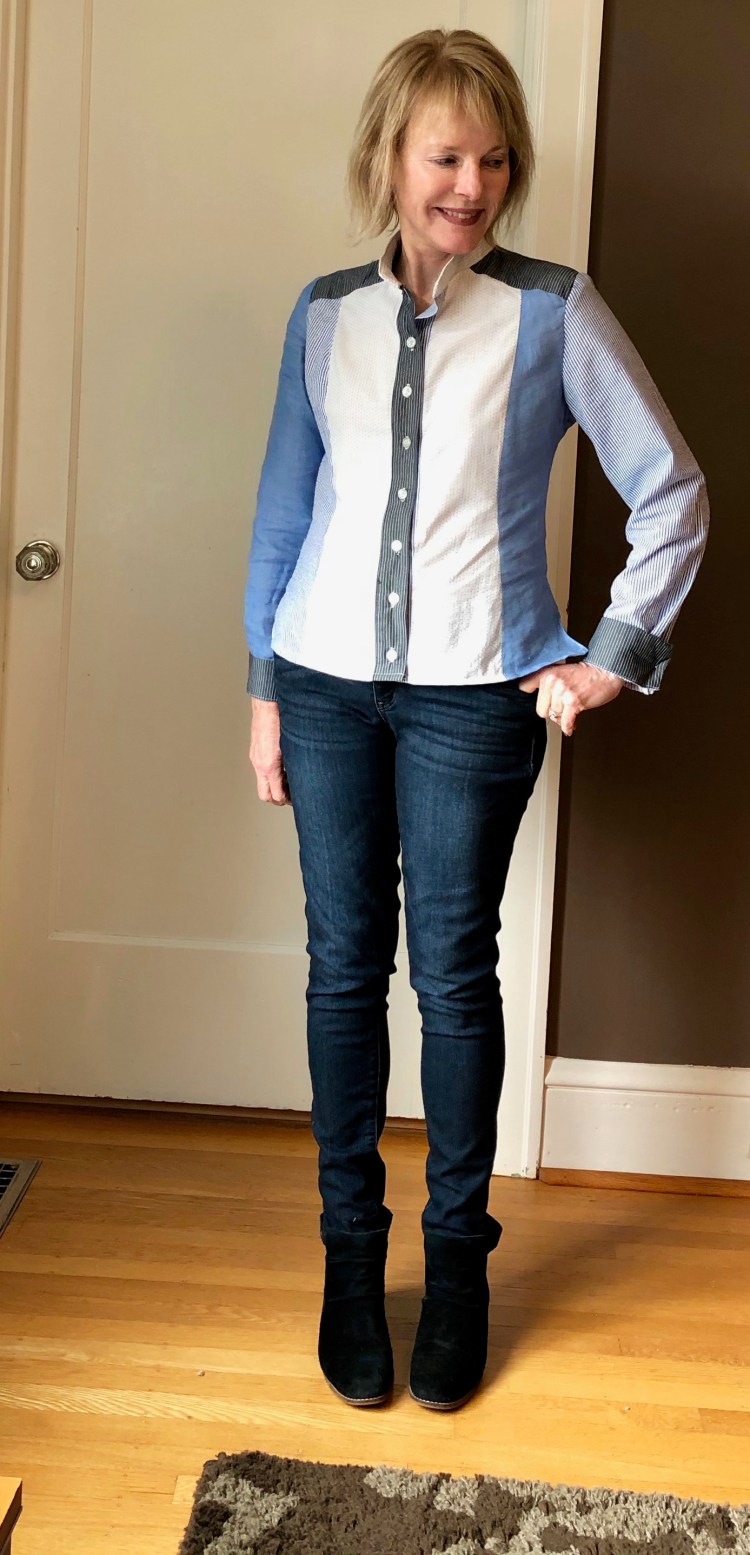
When I completed the Saraste shirt, I wasn’t totally ‘in-love’ with it. In fact, I immediately pushed it to the far right side of my closet, the place where the ‘never to be worn’s’ go. It’s a sad corner and it makes me feel a bit guilty. It’s all the me-mades that were fun to sew, yet, when all was said and done, I couldn’t imagine actually wearing it.

That was the sad story of this recent reject, but everything changed when Me-Made May rolled around. This year, my pledge was a bit different. Since I already wear me-mades every day, I pledged to wear the ones that I abandoned, and try to analyze why. This is one of those makes.

IMG_6970

It might be the fabric that put me off. It’s a floral print and, when I purchased it, I thought it was a random print. When I laid it out on my cutting table, I discovered that there’s a strong repeat….pattern matching would be involved! Ugh. That discovery made me a bit cranky as I wasn’t sure I’d purchased enough fabric to make this work, but I managed to pull it off, carrying the pattern through on the sleeves and the back.

IMG_6946

I do love the fit of this shirt! The Saraste shirt is a pattern from Named Clothing’s book,  ‘Breaking the Pattern’.

COVER

I’ve made several of the patterns in this book now (here), and they’ve all been fabulous. The Saraste shirt is one of my favorites with many elements I love: princess seams down the front, a back yoke, optional sleeves and a small collar that fits my short neck. The surprise detail is small cut- outs at the shoulder, which I love.

IMG_6950

They were a bit of a challenge though. My tip is to be sure to trace the pattern carefully, noting all of the markings accurately. I hadn’t done that and had to go back and add them in. Once I had that accomplished, it wasn’t too hard to make everything work. However, I’m a bit disappointed that the cut-outs don’t show that well in my print. I’m going to have to give this lovely pattern another try in a solid colored linen, so that those slits can shine!

My Me-made analysis – – I do love the print now, but at first glance, I wasn’t too excited about it in this shirt. However, I have worn it many times this month and have discovered that it goes with everything in my closet. The fit is perfect and the shirt is easy to wear. In fact, people compliment me when I wear it:)

Lesson learned…my first take on a make shouldn’t be my last.   IMG_6959

How are you doing with Me-Made May? Any new revelations?

Happy sewing and thanks for stopping by!

A Spring Jacket with Triangle Bound Buttonholes

IMG_6299
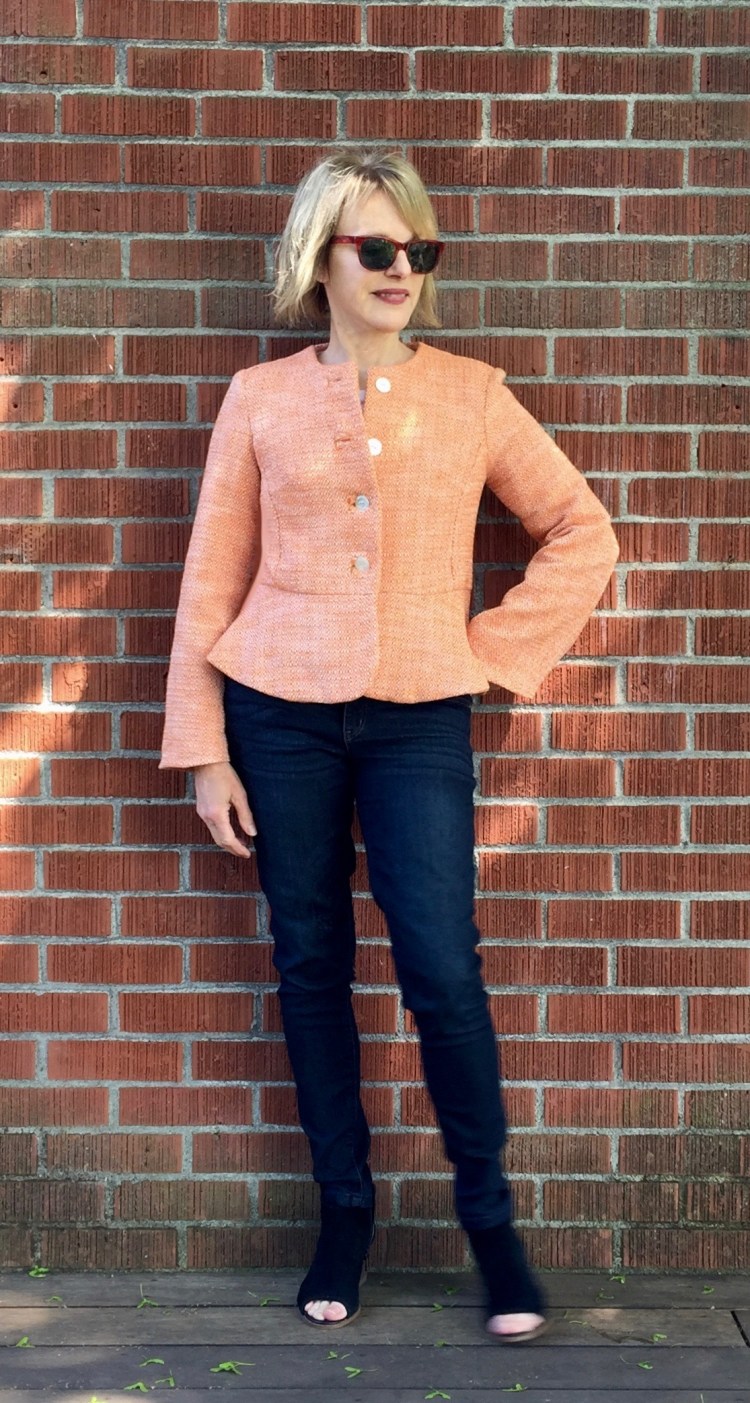
For years, my sewing bucket list has included “Jacket with Bound Buttonholes.” Well, this jacket has triangle shaped bound buttonholes and I’m saying, close enough! Yes, they were a bit fussy to sew, but I’m glad I took the leap to do them on this project. I will admit that the first two were ‘nail biters’ for sure, made possible only by the able hand-holding of my jacket class instructor, the Marvelous Marla! I was so fortunate last week to attend a three-day jacket making class lead by her. She makes everything so easy. If you ever have a chance to attend one of her classes, I highly recommend them.

I’m always attracted to peplum style jackets and shirts (here and here), so when this Simplicity pattern was released last Spring, it was an immediate add to the ‘must-have’ list. The front of the jacket is simple, so I decided it was the perfect opportunity to try a new buttonhole. IMG_6228

Triangle shaped buttonholes are very much like bound buttonholes. Marla taught me the method that’s in the Palmer Plestch Couture handbook.  Also, there’s a good explanation on-line at the Seamworks website, as well as a few U-tube videos on the subject. cfc8da3ec10d207d781d2a9d04676495e052556dThe good news…Creating a triangle bound buttonhole isn’t that hard! The bad news…There is a bit of unavoidable risk when you have to actually cut into your fabric to create the hole:) I recommend that you try out the process using scraps of fabric to start. It is a bit tricky, but very worth it, if you ask me.

IMG_6351I love this fabric, a lovely cotton boucle’ from Bolt Fabric,  but it was not ideal for this project. The weave was so loose, it unraveled at a mere glance. However, I knew it would be perfect for this pattern so I was highly motivated to push through the challenge! I used my serger to finish the edges but had to be careful not to cut off any seam allowances as I did so. I also had to be careful not to stretch the fabric as I pressed the jacket seams. The front of the jacket is completely interfaced and I lined the jacket with a simple rayon lining.

IMG_6292


The fit of this pattern is a bit tricky as there is a side seam panel, rather than straight side seams.

simplicity-peplum-jacket-pattern-8604-front-back-view

That being said, the jacket fit great without alot of adjustments.  I chose my size based on my measurements and it was really close! I shortened the waist a bit (I’m short waisted) and made a slight shoulder adjustment, but that was it. I had planned to add a mandarin collar, but when I basted it in, I didn’t like the look so left it off.

IMG_6302

The construction of the jacket wasn’t hard at all. In fact, if you’re looking for an easy, first jacket pattern to try, this would be a good candidate. The pattern instructions are edited by Threads magazine so they include finishing tips that are quite helpful.

I love my new jacket, but to be honest. I’m not really sure about this color. Melon/orange is a new color for me, but I decided it’s high time I stretched my wings a bit. I’m wearing this jacket with jeans because I couldn’t figure out what other colors would work with it. Ideas?

IMG_6338

Next on my sewing ‘to do’ list is a trench and a new Sew Over It Pattern Insider project that I’m anxious to share. Stay tuned.

Happy sewing and thanks for stopping by!