First Make of 2020: Another Cocoon Coat

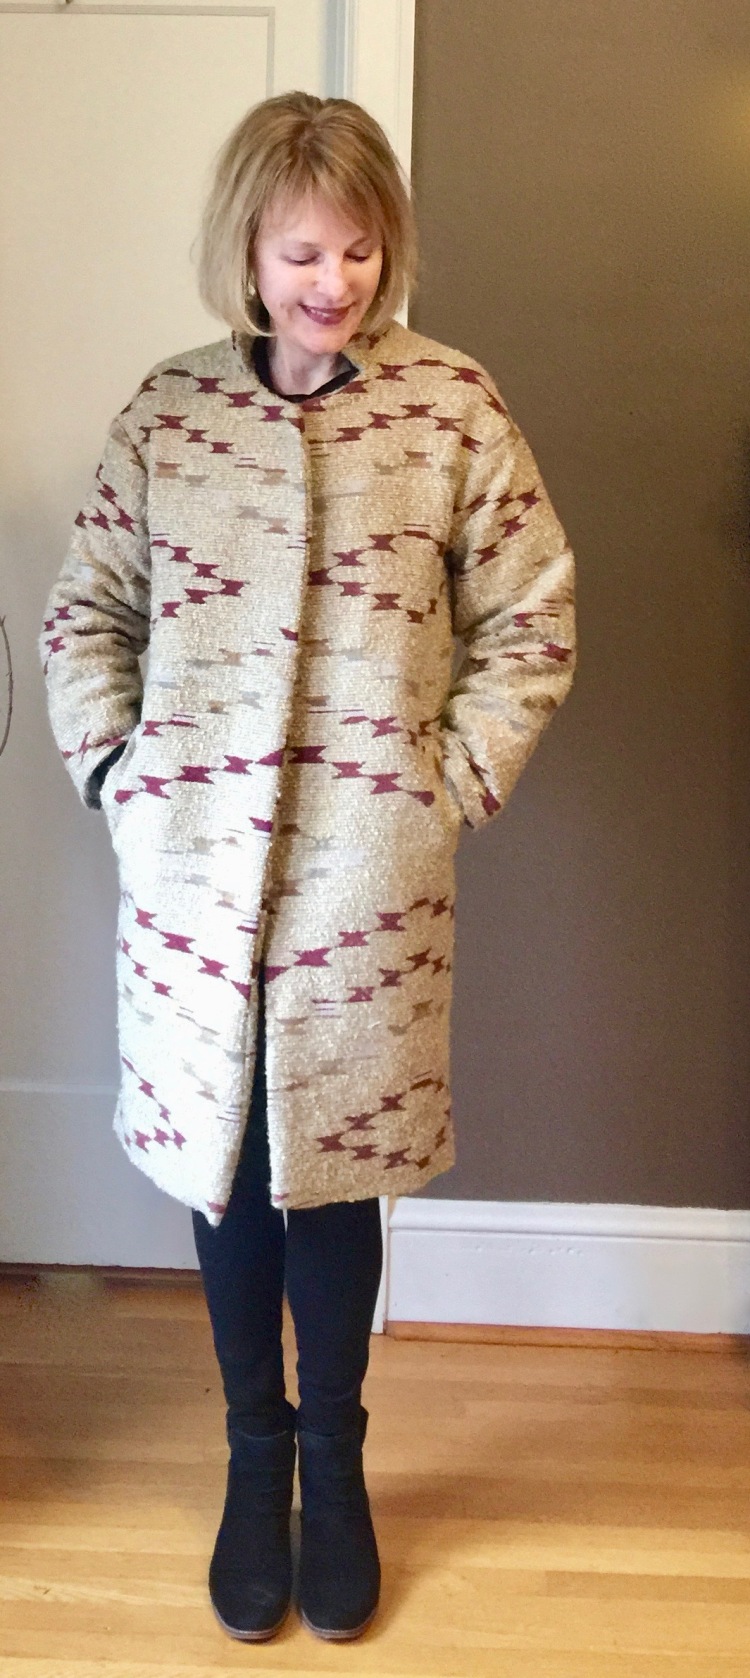
Happy New Year! This is my first make of 2020 and I am happy to say it was a success. It’s always good to start a new year with a project that you love.

I’ve made the Coccon Coat before (see it here), based on a version Sew Over It released as part of Lisa Comfort’s magazine. Now they’ve released it as a PDF pattern, available on their website (I received a free copy as a Pattern Insider). I loved the pattern so much the first time, I had to give it another go!

There are many things to love about this pattern. The cocoon shape of the coat is modern but classic. There are two piece sleeves and two pocket options. I chose the welt pockets, which can be challenging, but with their in-depth instructions made it seem easy.

Pattern Construction and Modifications: The Cocoon Coat is meant to be worn open, but that just isn’t an option that works very well in Oregon. So, I extended the front lapels by an inch and added hidden snaps to secure the opening. It changes the look of the lapel and collar a bit from the intended design, but I still like the look, and it makes it much more wearable for me. My coat is made of a good medium weight wool (Millendstore) and lined with silk from my stash.

Construction of this coat is a breeze. The lines are simple so there aren’t any tricky fit issues to resolve. I think the Cocoon coat would be a good option for someone who has never made a coat before.

2019 was a pretty successful sewing year for me with 39 blog posts:). It seems as though the number of sewing blogs has thinned out a bit in response to the growing presence of Instagram and the option to post quickly and often. I understand that, but I quite like the longer format of a blog post and the chance for a more detailed discussion. So, in 2020, I’ll continue to post here too. Thanks for reading and for keeping me company here.

Happy sewing and thanks for stopping by!

First Make of the New Year: Sew Over It Cocoon Coat

img_0492 2

If you read my post on my sewing ‘Misses’ for 2018, you know that I’ve sworn off wearing or buying fabric with beige and brown tones.  Yet, I’m here today with a beige/tan coat, LOL! Well, I had to ignore my new rule, because I had this lovely wool in my stash, and couldn’t pass up the chance to use it!

I found this wool at the Mill End Store here in Portland. Honestly, that store is amazing. They have the best assortment of coat quality wools I have ever seen. If you plan to visit our city (PR Weekend 2019?!), you must make time to shop there. It’s a large store, so plan a good hour to explore.

The pattern: If a coat has a ‘cocoon’ shape, I’m a big fan (here’s the Sapporo coat I made last summer). I love this version from Lisa Comfort of Sew Over It.

460-2

Unfortunately, it isn’t available as a standard PDF pattern, but is offered as part of an issue of Lisa’s magazine, so you have to download the magazine to get the instructions and pattern. It’s easy to do ( the same as downloading a pattern), but it’s a bit unusual.


img_0403 2

Pressing is such a huge part of constructing a coat. This wool is really thick, so it was really hard to press, but the texture and yummy feel of the wool made it well worth the effort.  Thankfully, I have a gravity feed steam iron, so the task was made a bit easier. I can’t believe I struggled with the decision to buy one. It’s been such a great addition to my sewing room. This project would have been impossible without it.  If you’re considering purchasing one, I must recommend my Silver Star, but there are lots of other options on Amazon.0ff7fb1a-3683-4b25-9f9f-3ba2da8947dd_1.5f12e5f980943d7780f23b881a3d0b0c


The construction of the coat was pretty straightforward. The pattern instructions are adequate, but not overly detailed, but in terms of a good first pattern for a coat, this would be a great place to start.  The cocoon style makes fitting pretty easy. I think I’d call the style oversized (even though it doesn’t really look like that in the pattern photos.) I cut the smallest size and I had plenty of room to spare.

The trickiest part for me, was laying this coat out on my patterned fabric. I did pretty well with the matching of the pattern, but when the coat is closed (It’s meant to be worn open, but honestly in Oregon, that is so impractical), the front diamond looks a little bit off. This is because I overlapped the front to get some closure. I like the overlap and the snaps so much, I’ll live with the pattern being a little off to gain some comfort on blustery days.

All in all, I give a big thumbs up to this pattern! I’m really in love with the shape, and can imagine it in a solid wool, or maybe even in linen.


img_0481 3

Is there anything more satisfying than sewing a coat? In our climate, a coat gets alot of use, so I know this one will be reached for again and again. It took about 8 hours to make, but it was time well spent. And yes, I said ‘tans and brown tones’ were a no-no for me, but I feel pretty good in this coat…go figure. Maybe it’s because the tone has a bit of rust in it? Or maybe it’s because there’s a bit of contrast in the pattern that makes it work?

My first make of the new year!! I love this time of year as it’s a chance for a fresh start and a chance to plan the future. It’s so fun to see everyone’s posts on Instagram for the ‘make nine’ challenge. I’m working on my plans and pattern wish list for the year, and hope to share it soon.

Happy sewing and thanks for stopping by!

A Coat in Spring Green


IMG_9769

I finished sewing this wool coat a few weeks ago, and wanted to share it, but the weather hasn’t been great for taking photos outside. The fact is, the sky probably won’t be clear for another month or so, and by then, it will be too warm to wear wool (fingers crossed). So today, I gave up and took photos indoors!

IMG_9734

This coat is Butterick 6292, a pattern that caught my eye when I saw the versatile collar!


I love coats with a military vibe (i.e.Burberry), and the button placement on this design definitely gives it that look.

IMG_9641 2

The wool is, well…green, a color I don’t usually gravitate towards, but this wool from Mill End Store was too cozy to resist. It has a very soft hand though, so I decided to underline the front of the jacket to give it a bit of body to hold the shape of the front lapels. I think this was a good move, because even underlined, the wool still retains its character, yet holds its shape. I lined the coat with rayon and used very thin shoulder pads to give the shoulders some definition.

Challenges:

  • This wool is thick – so making buttonholes on a double layer of fabric was a absolute night mare. I thought I’d lose my mind. My machine couldn’t seem to manage moving across the thick nubby wool so I put a thin layer of interfacing over each buttonhole before stitchng it. It worked! Then, when the buttonhole was finished, I trimmed the interfacing away.
  • Lining – – Even though I cut it according to the pattern instructions, it was an inch too long. Not sure if others had this problem, but it added a step because I had to trim it.
  • Back pleat – I eliminated this as I thought my soft wool wouldn’t hold a pleat. The coat still has enough room to accomodate a wide stride without it.
  • Button placement was a bit tedious – -there are alot of them 🙂 But I love the look so the end result made the effort worth it!

IMG_9748

I love my new coat, and, well…(don’t hate me)…I hope the weather doesn’t improve too quickly so that I can wear it!!! The pattern is definitely a keeper, one that I should probably make again, but will I? Hmmm, there are so many coat patterns in my stash that I want to try, so I’m not sure this one will make it into the queue again. Although I can imagine a version from twill or tweed….

Have you put your stash of wool away until next winter, or are you a die-hard like me?

Happy sewing and thanks for stopping by!


About the Jacket my Husband Hates


IMG_5308
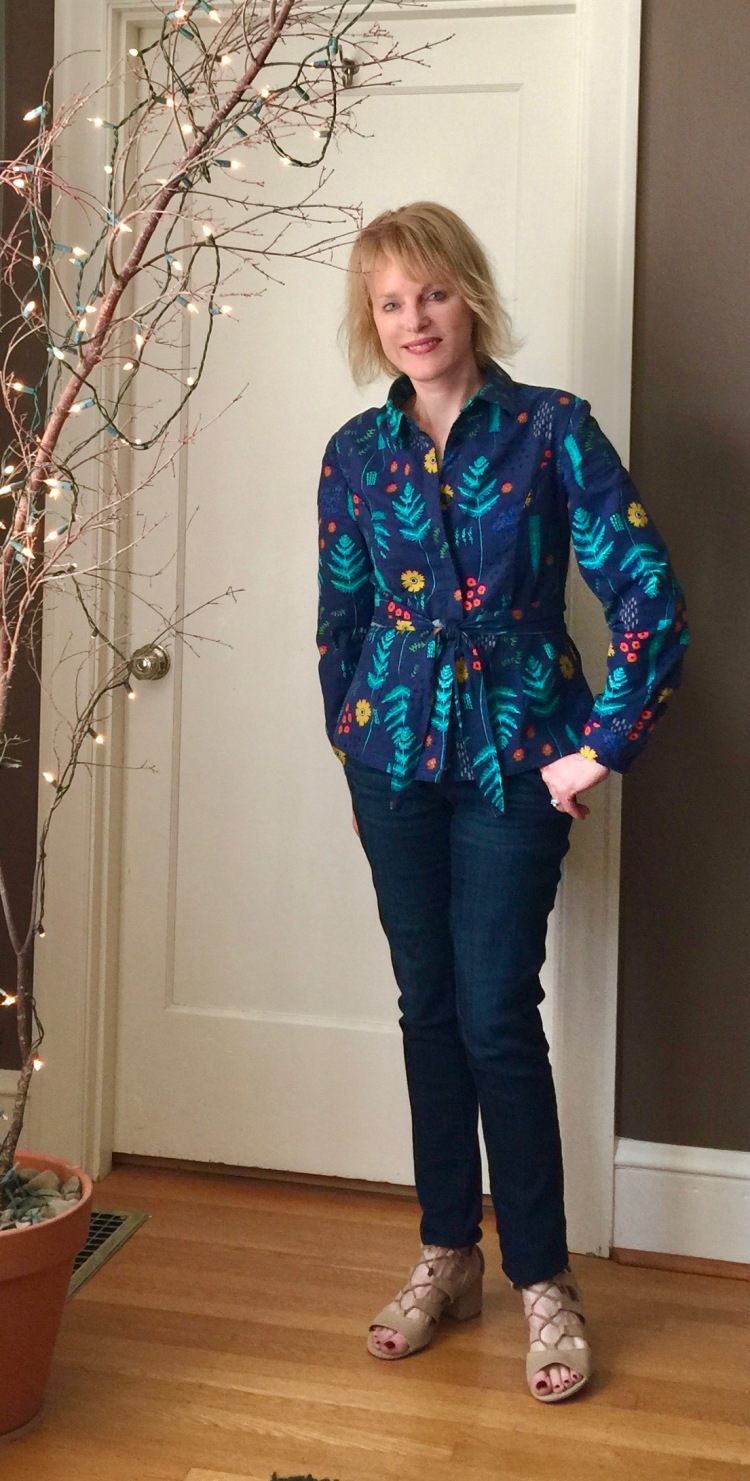
Hi All – – My husband is usually quite generous with compliments when I finish a make. But this coat got a strong, very negative reaction out of him! It caught me so off guard, I had to run to my girlfriends for reassurance. Yes, this coat isn’t the classic style I usually gravitate to, but I can’t always wear or sew the same old thing, am I right? That’s why I was drawn to this coat’s interesting hemline, and of course, that’s the detail, that makes my husband squirm.  IMG_5481It reminds me a bit of this Burberry wrap coat I saw on line.


3f6f53dc9543ab57b9f395117c3a8a2ef7b45d0cOf course, the challenge of this make was the plaid matching, made even more so by the fact that I have not changed my ways when it comes to buying fabric. I tend to buy on the short side….and that’s really crazy when the fabric is a plaid. When will I learn? Because I was short on fabric, I had some panicky moments as I tried to get the sleeve plaid to match the bodice plaid, but eventually, it worked. And let me tell you, after all that work, there’s no way I’m going to let one man’s opinion keep me from wearing this coat! Ha!

IMG_5470

The pattern is Vogue, 9037, a double breasted style. The lovely wool is from the Mill End Store here in Portland. They have a fabulous wool selection…I feel so lucky to live close to them! The wool is a loose weave so I decided to line it with silk. This makes the coat so yummy to slip into. The pattern is easy to fit and sew. It doesn’t have darts or a complicated collar, and the shape is created by long tucks in the front and back bodice.

The pattern is out of print now…which is a shame if you ask me. This pattern has three easy collar choices and it’s a dramatic style so why not keep it around forever? I’m not sure how they decide when a pattern goes out of print, but some of the decisions completely baffle me. In this case, I’m not sure the envelope illustration did it justice, so maybe folks didn’t buy it? Who knows…

IMG_5484 2


Okay, so the style isn’t a classic, but it is fun, don’t you think? Maybe the shaped hem and interesting collar make this coat qualify as a…. statement piece?

Happy sewing and thanks for stopping by!

M7546 – Happiness is florals and shaped darts

IMG_5423My first outdoor photo of the Spring! Yes, it’s warmed up around here, and today, the sun was out, so I tried to take photos in the side yard. For a moment, the light was good, then hazy clouds came so I had to move back inside. Never the less, I remain optimistic about our Spring, and this new shirt makes me feel as though sunny days are coming our way!

IMG_5558

I love this cotton lawn. Of course, it is blue, but the Cotton and Steel print is what really drew me to it (Fabric.com last summer). I call this print a ‘floral’, but maybe botanical is a better word? There are lots of colorful ferns mixed in with the flowers which is kind of unique.

When I saw McCalls 7546 it was instant love… I’m such a fan of  attached sash/ties and shaped darts. Together, they make me feel like I have a waist! IMG_5550

The pattern is McCalls 7546, a fitted shirt that has shaped darts and a cold shoulder variation. Yes, I do like the cold shoulder look (and have a couple of cold shoulder tops in my closet), but the day I cut out this shirt, it was really cold and wet, so I wasn’t in the mood to expose any part of my body to the elements.

I made view D, but cut it to the length of B. I like the long look. I just didn’t have enough fabric. Maybe next time…

I cut my usual size and didn’t have to make any adjustments to fit. McCall’s describes this shirt as ‘close-fitting’ and I would have to agree. It tapers nicely at the waist, and the attached tie gives the waist even more shape. The shaped darts looked challenging to sew, but they really weren’t. The trick was marking them carefully so that the sewing was easy. The front button placket is covered which is nice because if you don’t have a great buttonhole attachment on your machine, well, the evidence is nicely hidden.The self tie is easy -the tie just inserts into the back seam…easy! My only complaint is that the tie itself isn’t double faced, so if you don’t tie carefully the wrong side of your fabric will show.

IMG_5544 2

I plan to wear this top with jeans, shorts, skirts, everything in my closet basically. It’s a pretty versatile print I think, that will go with lots of colors.

Next up for me, will likely be another pair of jeans. At least that’s what’s in my sewing queue. My queue has been pretty fluid lately. I usually match patterns and fabrics right after I make a purchase, but I’ve ignored my ‘system’ this Spring. Whenever something inspires me, I shift everything around to accomodate my new obsession. It’s fun, I suppose, to sort of go with the flow, but it does slow down my creativity a bit to always be shifting gears. And it’s a bit chaotic in my sewing room.  I used to keep my projects (fabric and patterns) each in their own individual plastic bins and lined them up on my sewing table. But that was a HUGE mess and it took up too much room. Not sure what the answer is…How do you manage your sewing queue? Would love ideas on how to get organized…

Speaking of florals, here’s the real deal…Wild flowers at Catherine Creek in the Columbia Gorge. Happy Sewing and thanks for stopping by!

IMG_5174

A Missoni Inspired Boho Poncho

img_0769

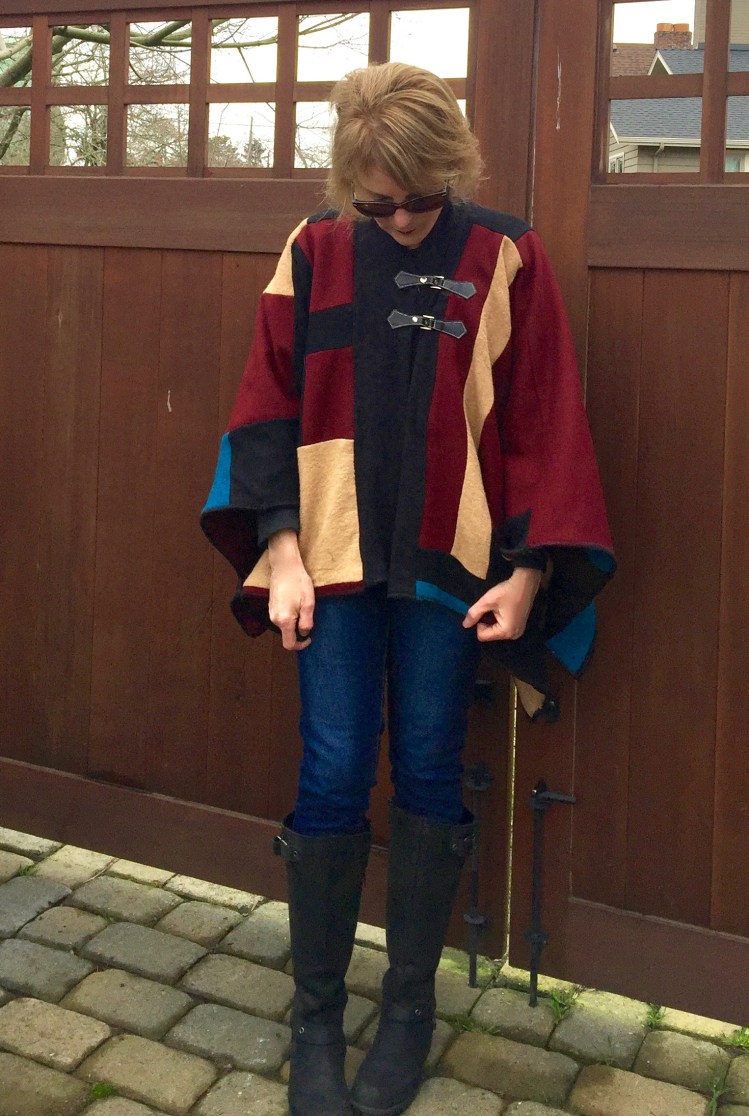
Hi all! The weather outside is frightful but wearing a poncho is so delightful! With this cozy new make, I’m well prepared for the possiblity (fingers crossed…) of a white Christmas.

img_0784

Will it happen? I doubt it, but I’m glad I made this easy poncho. I loved laying out the pattern pieces so that the fabric’s cool weave would shine. What I didn’t like about this project? The Blanket Fringe. Yes, it looks easy, but OMG! The process went on forever. It took so many hours, I blew through my usual ‘sewing’ diet of old movies and binge worthy television series. So what did I watch? Old episodes of the Gilmore Girls. Remember that show? Such a  blast from the past, a show full of the optimism that comes from a fictional but perfect small town world. In spite of that cheery back drop, I was pretty cranky by the time this fringe was done. Still, I do love the look!

The inspiration for my poncho was a Missoni original that I’ve worshipped from afar. That makes my poncho worthy of Designin’ December, don’t you think?

missoni

Besides the cool fringe, I love the Missoni version’s hood and contrast trim. In rainy Oregon, hoods are not optional, so I was quite pleased to add one.

img_0789

I trimmed my hood with fleece binding, and used wool yarn for the blanket fringe. Blanket fringe is pretty easy to do. There are lots of U-tube tutorials, but here’s a quick summary. You poke a hole in your fabric then you pull doubled strands of yarn through the hole with a crochet hook. It’s a breeze, really, but I truly underestimated how much time and yarn it would take to fringe this poncho (Slow death by fringe).

img_0807

The pattern I used is Butterick 5715, View D. The pattern is out of print, but available on Etsy.

5715

I used a wool blend from my stash. I thought the front yoke detail might make this pattern complicated, but it went together quickly. I trimmed the front opening with contrasting fleece, but left off the buttons, opting for a looser, less structured look to mimic the Missoni version.

img_0776I love my new poncho so much, we’re destined to be inseparable! This is the way I like to dress- – in warm layers that are comfortable, easy, but that have ‘a look’.  And I have to confess. I think the fringe makes it. So maybe it was worth the crazy hours I spent on it? Hmmm….but there must be an easier way. Have you fringed anything? Did you do it the way I did? Was it torture?

I love looking to the designer runways for inpiration, which is why I love Designin’ December. For more about it, visit Linda’s fabulous blog – –Nice Dress, Thanks I made it. And join in!

I hope your holidays are joyful! Happy sewing and thanks for stopping by!


Sew the look: Patchwork Cape

IMG_8118

Hi all – If you follow sewing blogs, you’ve probably heard that February is UFO month, unfinished objects, as in projects that have languished on your sewing table and need to be completed. True confessions. I have PLENTY of those. This cape is a perfect example, a stash busting project I started a year ago, but couldn’t seem to finish.

I was inspired to make this cape by the Burberry capes I saw on the fall runways.

Image 2-16-16 at 3.50 PM

I loved the lovely color blocked blanket look, and decided by doing a bit of patch work I could get something similar.

The pattern I used is Vogue 9038, an easy cape you can sew in an evening.

I used the pattern pieces as a template as I began to piece together bits of wool I had in my stash. Although the pattern offers a rounded version and a squared off version, I chose the squared off version so that I could block solid pieces of wool together without having to deal with curves! I used five colors, about 1 yard of red, 1/2 yard of turquoise, 1 yard of black, 1/3 a yard of camel, 1/3 yard of brown. I made the smallest size of View A as I am only 5’4″.

I patch-worked two versions of the cape so that it would be double faced and reversible.

Here’s side one.IMG_8129

Side two.

IMG_8141

I laid the pieces of fabric on my sewing table and just cut rectangles and squares, sewing them together with 5/8″ seams until I had the shape of the cape filled in. This took about two hours per side, as I stopped frequently to decide what color to use next. I didn’t use a template..I just cut and sewed. There wasn’t any method to my madness other than I knew I wanted to have one side predominately red, and the other predominantly black.

It was an easy fun project, perfect for a day of binge watching. The sewing is all straight sewing, no curves, collars etc. So mindless and fun! After sewing my two capes together to make one, I finished the edges with a overlock stitch, using heavy thread. On one side, I sewed two leather toggles (not sure if that’s really what you call those things) so that if it was a windy day, my cape would stay securely fastened. Sometimes though, I’ll just throw it over my shoulder and go.

IMG_8153

I don’t know why I waited so long to finish this. Sometimes it’s the simplest projects that  seem to stump me. I dithered about how to finish the edges, then I procrastinated on sewing on the leather toggles (with see-through thread). But I’m glad it’s finished now, because it’s so wearable. It’s so easy to throw on for a quick trip to the store, or for an evening out with friends.

What projects are you finishing this February? Happy sewing and thanks for stopping by!


Linen and velvet all wrapped up!

Yes, it’s a busy time of year, far too busy to take on a sewing project, right?  Of course, but if you’re like me, inspiration often strikes when you have the least time to do anything about it!

Here’s my story: I was cleaning out my messy fabric bins, making room for the purchases I’m destined to make in 2016, when I found a treasure…a bit of  crinkled velvet in winter white that I’d completely forgotten existed. Suddenly, I absolutely had to have a winter white top, NOW.

IMG_6787

To keep the project’s fun quotient up and the frustration element low, I chose a tried and true pattern, Vogue 8815. For fun, I mixed things up a bit by combining a few of my favorite things; velvet for the bodice, linen for the skirt, and dotted mesh lace for the sleeves. There isn’t much to say about the construction of this top. (I reviewed it before here). I’m pleased with how it turned out, but it is a bit light- weight to wear in the winter.

Still, I was determined, so….enter a new idea… a quick wrap to keep me warm.

IMG_6826

Perhaps you’ve seen a wrap like this before at one of your favorite RTW retailers. It’s called a five-way wrap, and I tried one on at Nordstrom’s awhile back. It’s really a clever concept. You take a big circle of fabric and, by placing the armholes strategically, the wrap becomes amazingly versatile.

IMG_6824

It looked cozy and easy, so I decided to make my own. The fabric is plaid (love!) wool from Fabric Depot. I used a pattern from Indygo Junction, and the layout they show you is quite clever. You fold the fabric into quarters then lay your pattern piece on top of the four layers of fabric before cutting. When you unfold the cut fabric, your circle is symmetrical and perfect. Then, you cut the armholes, and voila! You have a wrap that you can wear several different ways.

Here it is, pinned at the neck….

IMG_6832IMG_6805

By putting it on with the armholes low, you have a short, cape-like version. Cozy!

You can belt it.

IMG_6828

Or wear it open, a long on-trend vest!

IMG_6790

I like the long vest look the best, but the coziest way to wear it may be the short  cape-like version. So warm and fun!

Truthfully though, I like the concept better than my finish version. While I was trying to take photos, I became frustrated with the way the folds in the front have to be constantly rearranged. I think this is a function of my fabric choice, not the pattern. Because I chose to use a  wool blend, the wrap is a bit stiff. Also, I bound the wrap’s edges to keep it from unraveling,  but I think this made the front from cascading in nice easy folds. If you choose a softer fabric, or serge the edges rather than bind them, it will hang nicely. Even though it isn’t perfect, still, I’m sure this wrap will come in handy, especially with my linen top.  (Now that I see how easy this wrap is, I wish I’d made a five way wrap for each of my girlfriends, but alas, it’s too late now…isn’t it?)

Are you finding time to sew during the holiday rush? Do you pick easy projects or do challenges appeal when you’re busy? Happy sewing and thanks for stopping by!


Butterick 5927: A warm front of plaid wool

IMG_2162
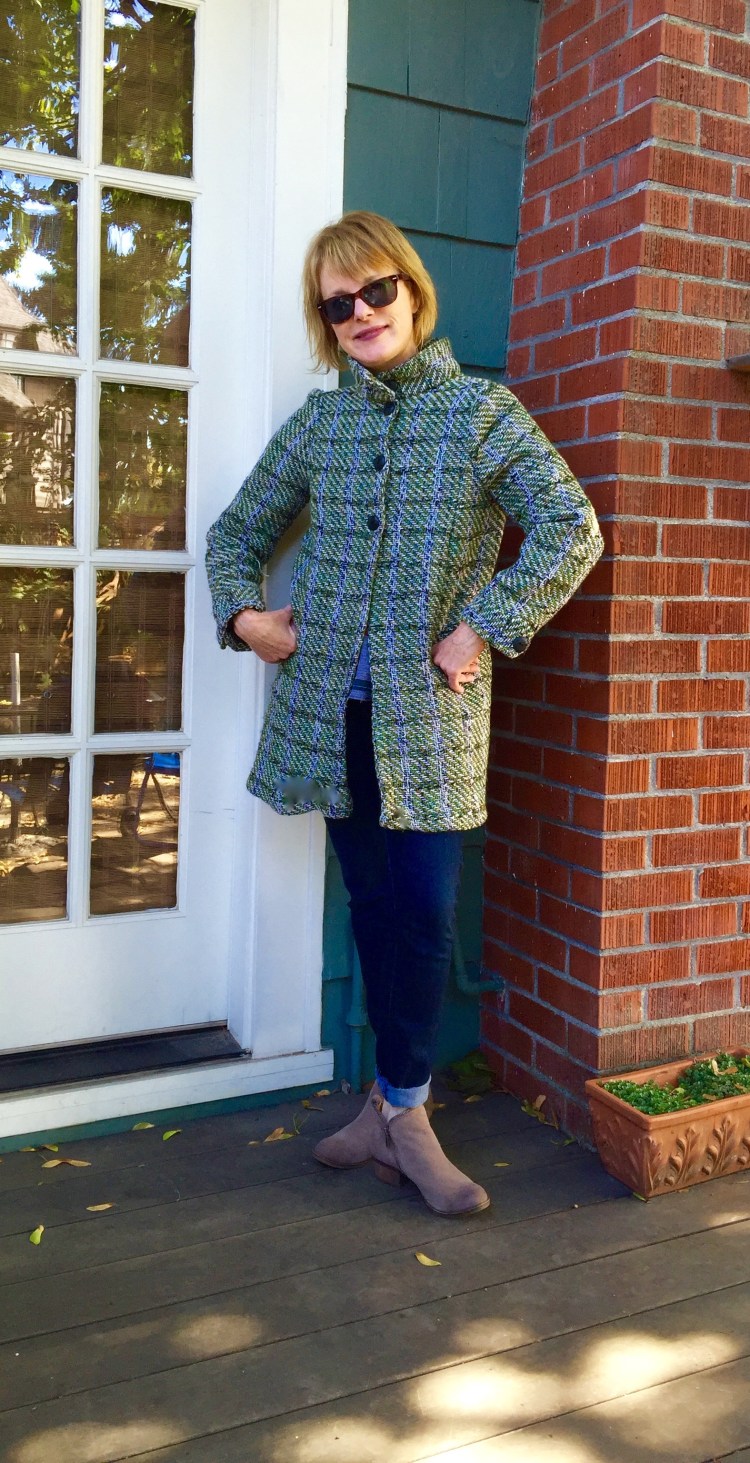
This plaid coat is my most recent attempt to brighten up my outerwear wardrobe with color.  The base color of the loose weave is avocado green, a trendy color this fall that pays homage to some 70’s legends, namely Kitchenmaid, Sunbeam and Kenmore (harvest gold or burnt orange, anyone?).
Plaid used to be the last thing I’d include in my wardrobe as it reminded me of private school uniforms. But plaid is all grown up now. It’s such a fashion mainstay, it made an appearance on more than one fashion runway this fall. Love the combination of colors and textures in these Prada plaids!
_MON0137
_MON0317
If only the fabric fairy would bring me some of this!
 
This fall, I wanted to add a loosely structured, easy-to-wear coat to my wardrobe, something to just ‘throw on’ over jeans and cords and skirts. I also wanted a stand up collar to keep out cold wind.
This proved to be a tall order, since many coat patterns had fussy lapels, details I didn’t want. I finally settled on  Butterick 5927, a lined jacket with front variations and a stand up collar.
B5927
I modified the pattern, adding 6 inches to the front and back bodice to make it less of a jacket and more of a coat (albeit a short one). I also added a couple of inches to the stand up collar with two buttons to make it a bit cozier and to protect against winter winds. To make the sleeves more weather proof, I added self drafted cuffs with buttons. 
 IMG_2170
The pattern is a nice basic shape and the coat went together easily. The biggest challenge I faced was the fabric. It frayed like crazy!! So I had to take extra care with the seam finishings. Even as I finished them, they frayed – frustrating! But other than that, it was a pretty fast sew, really. I did the seams, collars, the cuffs, all of the hard stuff. But, when it came to the lining, I stalled. Don’t ask me why! I couldn’t get myself to just finish it. The beautiful black cotton/silk blend just sat on my sewing table for weeks. What the…?
IMG_2196
True confession, here. This is a recurring problem for me. I frequently stall when it comes to the lining. I dither around. Of course, lining a garment isn’t hard at all. So why not just do it? Good question! Anyway, to make a long story short, I finally broke down and cut the lovely silk and sewed it in. No big deal. And the coat looks so finished now. Hope I can remember that next time I make a lined garment!
IMG_2308
The mornings are cold here, and some of the days are gray, but the good news is, my outwear isn’t… It’s Kitchenmaid green! 
My fall sewing frenzy is in full swing now. I’m dreaming of projects with cold weather in mind, coats and jackets and layers. How about you?
Happy sewing – and thanks for stopping by!

A Spring Coat like Betty’s

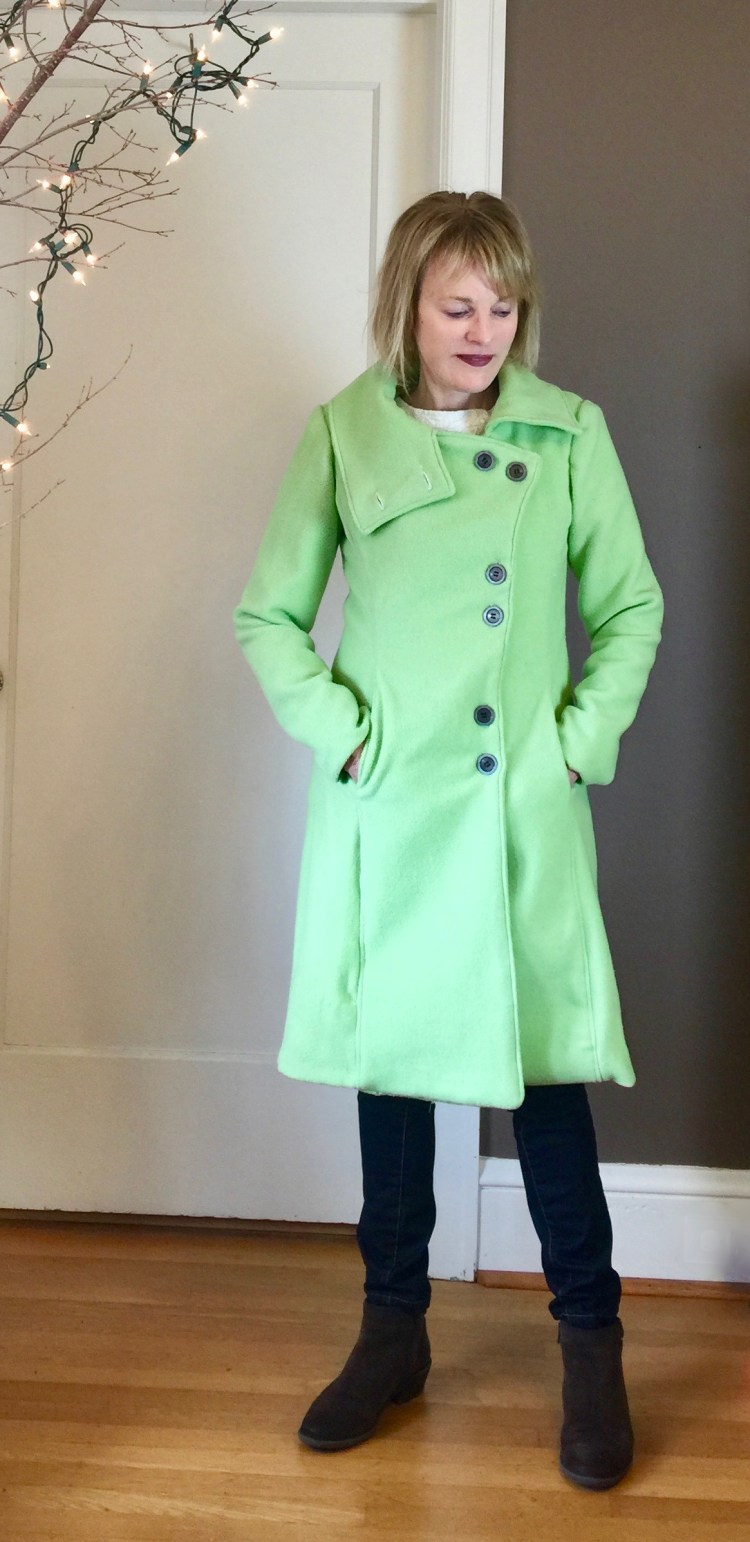
Betty Draper was my inspiration for this coat. Do you all remember the blue coat she wore in season one, when she was still in love with Don?
betty1bluecoat-web
A statement coat to be sure! And look at her hair, how it curls under so perfectly! No wonder Don had to have her.
I made my version of her coat from a Butterick pattern from my own extensive (!!) archives. It’s Butterick 5569, a coat pattern designed by The Cut Line that has princess seams and a big collar that gives the style a retro feel.
DSC02471
The fabric is from Mill End, an incredible fabric store here in Portland that has a wool department that beats all. My coat is made from a thick, double-faced wool in black, dotted with flecks of white.
To sharpen the details, I trimmed the coat’s front lapel and collar with piping, then finished it with vintage buttons I found in Stars Antique Mall in Portland.
DSC02483
Because the wool is double-faced, it’s very heavy, so I didn’t want to line the coat because I thought it would be too hot to wear. So, I finished the seams with binding so that they wouldn’t fray, giving the inside of the coat a finished look.
The coat’s comfortable and warm. I even braved the elements and wore it when I visited Anthropologie last week (okay, true confession. I do not make everything I wear, LOL), and I did not feel out of place in my me-made garment, which makes it a win, right?
DSC02481
Soon, it will be so warm here in Portland, I won’t want to wear this coat (says the optimist).  But right now, Summer feels years away, so coats are a must.
DSC02686
I love retro fashion, but prefer to sew from modern patterns with their fabulous fit. What about you? Have you used vintage patterns? Good experience or bad?