Summer Making Journal 2: a Patchwork top, Inari hacks and Free Range Slacks

IMG_1094Hi all! July was a busy month in the sewing room. Recently, I cleaned my closet and donated several ragged tops (made so long ago!). I’ve been on a mission to replace them, while honoring a pledge I made to myself to use up my remnants. That pledge led me here…to my first pieced top.

IMG_1116I have never been able to throw away even the smallest scrap of linen. It’s too wonderful to toss! So, when the #JoinupJuly challenge started on Instagram, I was challenged to join up some of my linen scraps into a top.

The process of making a patchwork top isn’t difficult at all. Basically, with a quarter inch seam, you piece blocks and bits of fabric together, varying the colors. Then, when your pieced creation is large enough, you lay your pattern pieces on it and cut! My top is made using the Inari pattern from Named clothing(also made here). The lines are simple so it showcases piece work nicely.  It was so fun to figure out how to combine the linens into a pleasing pattern.

IMG_1185Here, I’m wearing my new pieced Inari with my first ever Free Range Slacks,a lovely pattern from Sew House Seven. I’ve been wanting to make these pants for ages. I used linen from my stash for this version.  I love the boxy shape of the pants, the cool seams and the deep pockets. But I found the fit to be more generous than I expected. Because the pants are high waisted and I’m short waisted, the fit of the rise was challenging. I’m pleased with the result, but my advice is to remember the loose fit when you’re choosing the size to cut. A toile would be a good idea too!

IMG_1153As you can see, the fit isn’t perfect yet. There are creases in the crouch. I’ll adjust the rise a bit more next time.

IMG_1339Here’s another Inari, this one with sleeves. I made this from rayon scraps left over from my Sew Over It Wrap skirt (see it here).I do love this rayon! It’s from art Gallery and it is so sumptious to wear. It flows so nicely too! This pattern, the Inari, is a keeper too, simple but stylish and so easy to modify to make it your own! The shorts I’m wearing are Simplicity 8841. This is a easy pattern with great fit! It has a elastic waist so you can make it quickly.IMG_1238I’m wearing my Inari here with the paper bag Burda shorts I made last summer (Here)…Love these! The linen just gets better with time. I wear them constantly!

My last Inari was also made from linen scraps, left overs from this summer dress.IMG_1274Again I used the Inari. Because I had oddly shaped pieces of fabric, I had only enough for a cropped version of the front and back bodice. So, I added a short peplum also pieced from scraps. Luckily the gathering of the peplum hides the many seams:). The sleeve bands are cut from a contrast linen.

That’s it for me for now. I’m in the process of cleaning and reorganizing my sewing room using Ikea modular shelves. And even though I recently reorganized my stash, I’m revisiting the scheme. Isn’t that the way it is with this hobby? It seems like there’s always a better way to organize your fabric, notions and patterns.

Stay safe and healthy. Happy sewing! Thanks for stopping by.


A Spring Jacket with Triangle Bound Buttonholes

IMG_6299
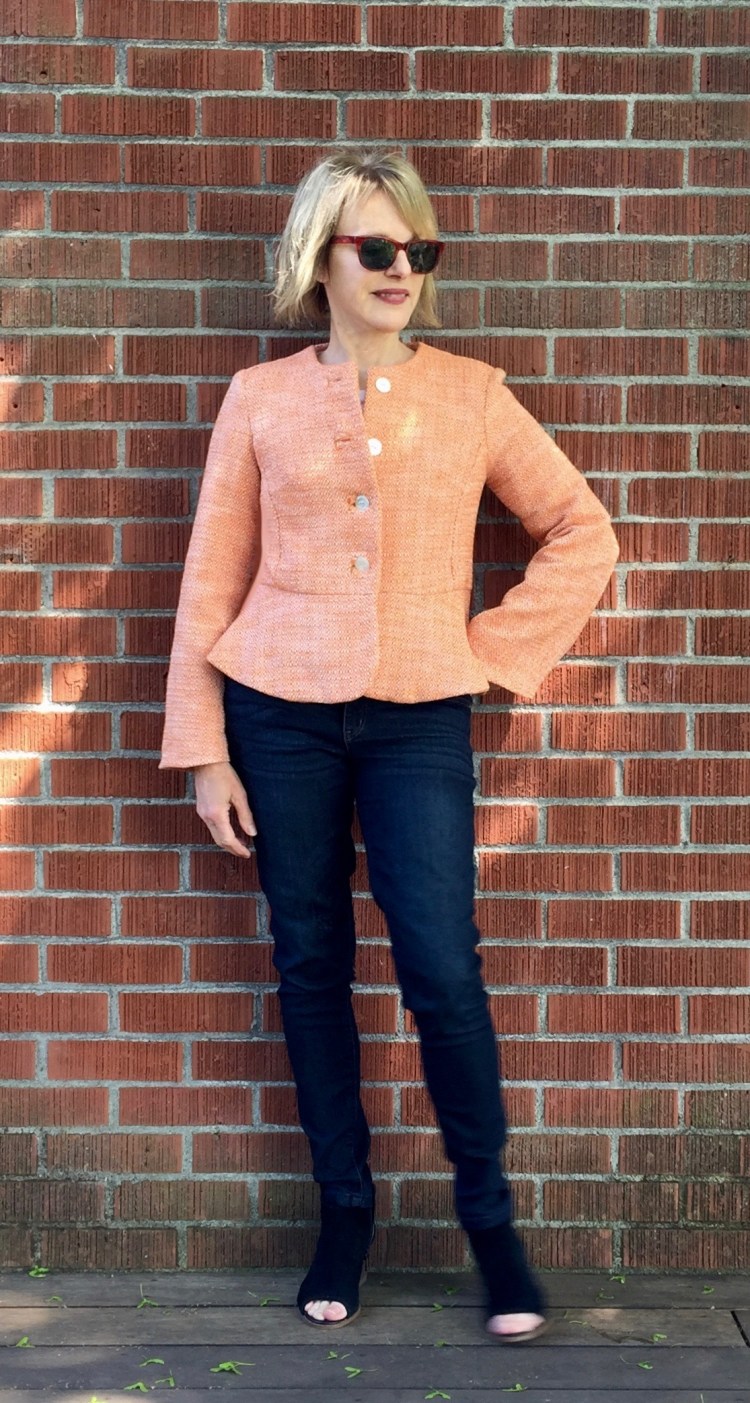
For years, my sewing bucket list has included “Jacket with Bound Buttonholes.” Well, this jacket has triangle shaped bound buttonholes and I’m saying, close enough! Yes, they were a bit fussy to sew, but I’m glad I took the leap to do them on this project. I will admit that the first two were ‘nail biters’ for sure, made possible only by the able hand-holding of my jacket class instructor, the Marvelous Marla! I was so fortunate last week to attend a three-day jacket making class lead by her. She makes everything so easy. If you ever have a chance to attend one of her classes, I highly recommend them.

I’m always attracted to peplum style jackets and shirts (here and here), so when this Simplicity pattern was released last Spring, it was an immediate add to the ‘must-have’ list. The front of the jacket is simple, so I decided it was the perfect opportunity to try a new buttonhole. IMG_6228

Triangle shaped buttonholes are very much like bound buttonholes. Marla taught me the method that’s in the Palmer Plestch Couture handbook.  Also, there’s a good explanation on-line at the Seamworks website, as well as a few U-tube videos on the subject. cfc8da3ec10d207d781d2a9d04676495e052556dThe good news…Creating a triangle bound buttonhole isn’t that hard! The bad news…There is a bit of unavoidable risk when you have to actually cut into your fabric to create the hole:) I recommend that you try out the process using scraps of fabric to start. It is a bit tricky, but very worth it, if you ask me.

IMG_6351I love this fabric, a lovely cotton boucle’ from Bolt Fabric,  but it was not ideal for this project. The weave was so loose, it unraveled at a mere glance. However, I knew it would be perfect for this pattern so I was highly motivated to push through the challenge! I used my serger to finish the edges but had to be careful not to cut off any seam allowances as I did so. I also had to be careful not to stretch the fabric as I pressed the jacket seams. The front of the jacket is completely interfaced and I lined the jacket with a simple rayon lining.

IMG_6292


The fit of this pattern is a bit tricky as there is a side seam panel, rather than straight side seams.

simplicity-peplum-jacket-pattern-8604-front-back-view

That being said, the jacket fit great without alot of adjustments.  I chose my size based on my measurements and it was really close! I shortened the waist a bit (I’m short waisted) and made a slight shoulder adjustment, but that was it. I had planned to add a mandarin collar, but when I basted it in, I didn’t like the look so left it off.

IMG_6302

The construction of the jacket wasn’t hard at all. In fact, if you’re looking for an easy, first jacket pattern to try, this would be a good candidate. The pattern instructions are edited by Threads magazine so they include finishing tips that are quite helpful.

I love my new jacket, but to be honest. I’m not really sure about this color. Melon/orange is a new color for me, but I decided it’s high time I stretched my wings a bit. I’m wearing this jacket with jeans because I couldn’t figure out what other colors would work with it. Ideas?

IMG_6338

Next on my sewing ‘to do’ list is a trench and a new Sew Over It Pattern Insider project that I’m anxious to share. Stay tuned.

Happy sewing and thanks for stopping by!


McCall’s 7780; A cold shoulder top for Fall

IMG_6450
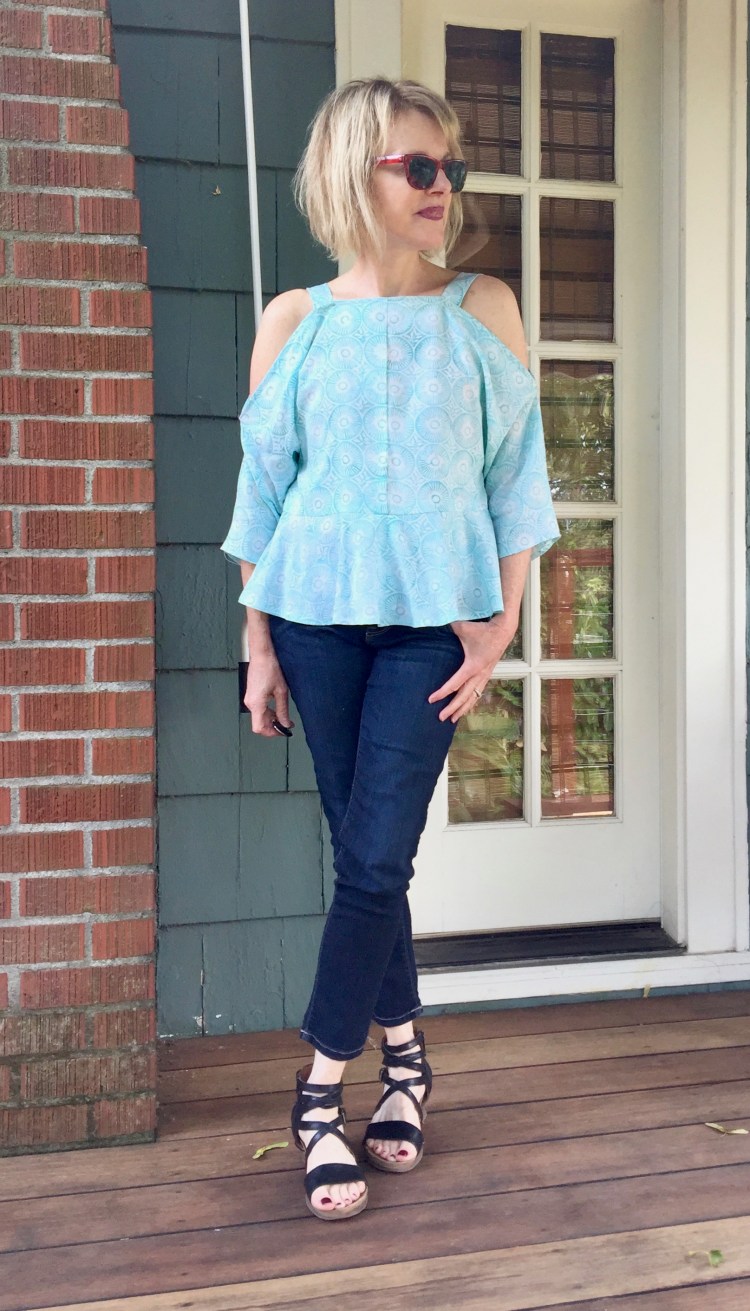
It took me awhile to fall in love with this new pattern by McCall’s. The cold shoulder style put me off at first. I thought I was over that look, but this summer, I’ve discovered that the cold shoulder tops and dresses I made last year (here,  and here and here) are the ones I reach for time and again. The style is perfect when hot days turn to cooler evenings. IMG_6486There are design details I really like about this pattern – – the sleeves cut into the bodice, the flounce detailing on the bodice, the off-the-shoulder look, the wide shoulder straps. I’m not particularly found of the front and back bodice seam, although I didn’t think much about that until I started to cut my fabric. Because my fabric had a horizontal print, I had some pattern matching in the front which I hadn’t planned for. Thankfully, I did have enough fabric!

McCall’s 7780 has so many fun options. You can make the top with straps that tie, you can add a front flounce or a sleeve flounce, or make the top without any flounces at all. I love the solid white on the pattern envelope, but since I have more than my fair share of white tops, I chose to use a rayon print instead (fabricdepot.com). I made version C with the straps of view B without the ties. I’m not wild about ties at the shoulders as they tend to tickle and annoy me.

IMG_6482 2

Construction challenges:

  • As I mentioned, the front and back center seams required pattern matching…I barely pulled this off.
  • The sleeves are cut into the bodice so their shape is created by folds in the fabric. If your fabric is too stiff, the sleeve folds might look too distinct and the openings for the cut shoulder could lack the soft drape they need to look right.  A soft linen, or rayon or silk would be perfect. Also, I have narrow shoulders and the shoulders fit me perfectly. If you have broad shoulders, I’d do a tissue fit or muslin to make sure they won’t be too tight.

IMG_6162

Besides those challenges, I found the construction of this top, easy and straightforward. I love the style and am glad I finally fell in love with it. It’s the perfect date-night top, or for a lunch out with a friend. The length of the sleeves makes it comfortable on a cool evening too – – great to wear as we transition into Fall!


I usually start my Fall sewing mid way through August, but our weather has been so warm, I’m still inspired to make warm weather clothes. Perhaps, I should be cutting into heavier fabrics, but it’s hard for me to sew something I can’t wear right away….not sure if I’m the only one? I love a bit of instant gratification, I guess. So, until the weather changes, I remain a linen/cotton/rayon obsessed seamstress! How about you?

Happy sewing and thanks for stopping by!

An Anthro Inspired Peplum Top X 4

PicMonkey Collage-7Yes, I’ve gone a little off the deep end over this pattern! What can I say? When I find a favorite pattern, I tend to go a little berzerk, imagining all of the variations…and then, before you know it, I have four versions in my closet! No, I did not sew all of these tops since my last post. They were sewn over the last couple of months, using fabric from my stash (YAY!).

And regarding the style — well, yes, this top has a peplum. I was pleased on a recent trip through Anthropologie to discover that peplum tops are still hanging on their racks.


Whew…so good to know, since I have four of them.!

I’m always amazed at how fabric choice changes the look of a pattern. So I really love doing posts where I show multiple versions. This top is Butterick 6486. I also used the angled peplum on McCall’s 7052 on a couple of versions (OOP, but you don’t really need it to pull off this style). B6486 pattern was really easy to sew – perfect for a beginner. The only modification I needed was to lengthen the bodice by a inch so that the peplum would be just above my waist.

il_570xN.1321868872_dk9p


IMG_3339

This top (version A) is really casual and easy to wear in large part because of the fabric. It’s rayon from Cotton and Steel. This fabric was released last year, a result of their collaboration with the  Rifle paper company. This is top notch fabric, my friends. It wears and sews like a dream. To make this version, I shortened the peplum by 2 inches. I’m not usually drawn to fabrics witl small prints, but I do love this one. The color palate is definitely in my wheelhouse.

This version is in cotton gauze (FabricDepot).

IMG_3541

I made this version for one reason…to wear it with the necklace I have on! It was designed by a local artist using crocheted linen and linen tassles and I needed a top that would allow it to be the center of attention. For this version I used the angled peplum from M7052. This double gauze has extraordinary drape and is comfortable even on a muggy day.

This version is a stiffer quilting cotton.

IMG_3504

It also has a assymetrical peplum, but because the cotton has more body, it looks like a different top!  The stiffer fabric gives the peplum more structure. This fabric has a coarser weave too, so the vibe of this top is casual.

Last but not least, a dressier version from a poly blend fabric with cut outs.

IMG_3448

Of course, I couldn’t resist trying a version out of something lacy! I had this fabric in my stash, purchased last summer, and only had a yard and a third, not enough for sleeves. To let the cutout design of this fabric shine, I lined the bodice with peach colored lining. This version is fun to wear with jeans/pants, but also with a skirt.

Phew – – My minor obsession with this pattern might be over now….we’ll see! Next up, I’ll be working on some pants and skirts to go with these. I’m heading to France in September so am thinking travel wardrobe as I sew right now.

In another sewing news..This week on Crafting a Rainbow, (great blog, check it out!!) Gillian drafted a great post calling for a blogging renaissance. Her thoughts really resonated with me, so I thought I’d share some of my own thoughts on the topic.  In spite of the way Instagram has grabbed the sewing world’s attention, I remain committed to this blog and to following lots of others (see the side bar for my favorites).  Instagram is a fun place to get a quick fix, but I’m constantly frustrated by the fact that there seems to be absolutely no way for me to control what shows up in my feed. I follow alot of people, yet I only see a very curated collection of posts based on some strange algorithm defined by the folks at Instagram. (Is anyone else frustrated by this?!?)  Since I like to control my personal feed,  and since I like the personal story behind the makes…(the details, the inspiration), I head to sewing blogs for that conversation. I do visit Instagram too, but only a couple of times a week. More just stresses me out. I’d love to know your thoughts….

I really appreciate you, and hope we can continue to share and chat for a long time to come.  Happy sewing and thanks for stopping by!


An Anthro Lace Dress Knock-Off

PicMonkey Collage-5

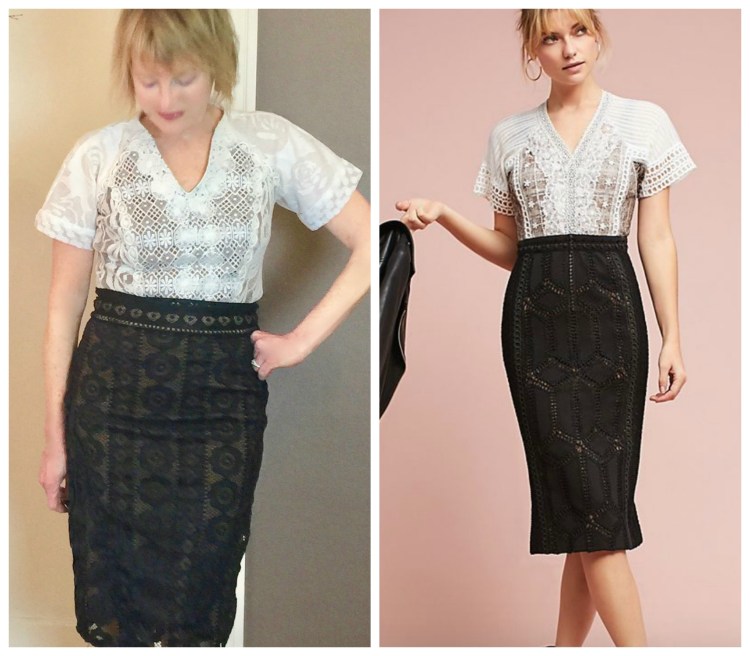
Which one is from Anthropologie? Ha, just kidding. As you all know, I have a thing for lace and when I saw the above dress from Anthropologie, I wanted it in the worst way. The lace is gorgeous, but the style is a bit edgy, a must have if you ask me! But the price tag stopped me in my tracks. $728.00. Okay, it might be worth it with all of those gorgeous layers of lace, carefully sewn in place. But, hey, we can do that; am I right? Enter the Pattern Review Bargainista contest, just the motivation I needed to get it done! IMG_8867

I used Simplicity 1699 as my basic template for this dress.

1699

It’s a simple design, a peplum top or dress with raglan sleeves and a simple rounded neck line. Since, I’d made it before I knew it would fit me, freeing me to focus on the design elements I wanted instead.

First, even though the Anthropologie dress is one piece I saw it more as a skirt and top. So I split the dress at the bodice and added a waistband to make it a skirt.

Then, I started in on the bodice/top. I cut the lining pattern pieces first then cut corresponding pieces from the lace (contrasting pieces of white lace, purchased at Joanns.) and sewed them together. I wanted a v-neck, so I cut that too.

IMG_7326 Once I had the basic bodice constructed, I took little bits of lace and layered them over the first layers of lace, focussing on placing eye popping elements on the princess seams and neckline. Then, I finished the seams, added a zipper and hemmed the bodice so that it would be a top that could be tucked in or worn out.

IMG_1973By the time all that detail work was completed, I was ready for simple tasks. I was glad the process for the skirt was much easier. I just cut it from the lace, added a waistband, and lined it – phew!

IMG_8884

The process of layering the lace on the bodice/top took some time, but it was so satisfying. Deciding where the bits of lace should go was fun, and hand stitching them into place was a calming process. I often forget just how therapeutic hand stitching is!

The good news? My new dress/ensemble is close enough to the original that my credit card is no longer in danger of being used.

IMG_8863

  • Here’s how the costs broke down using the Pattern Review contest formula – – Column dress designed by Byron Lars for Anthropologie – – $728.00
  • 2.5 Yard Fabric for lining (top and skirt) – Joanns – $12.99 per yard on sale for $9.00 x 2.5= $22.50
  • white lace fabric; (3) 1/2 yard pieces for contrast on bodice front and back (1.5 yds total)  $6.99 X 1.5 = $10.48
  • Black Lace for skirt overlay 1.5 yards x 12.99 yard on sale for 9.00 = 13.5
  • 18” zipper for top – $2.99
  • Bits of lace for top embellishment purchased at a thrift store – $5.00
  • 7” zipper for skirt (invisible) $3.99
  • Total: 58.46
  • $728.00 – $58.46 = 669.54
  • $669.54 / $728.00 = .91969 =91.9 % savings

IMG_8861

There’s nothing like a Pattern Review Contest to get the creative juices flowing. Be sure to follow the link  to check out all of the entries – there are some amazing creations and some incredible Bargainista’s out there!

Happy sewing and thanks for stopping by!

An easy DIY Date Night Top and a Challenge

IMG_7161

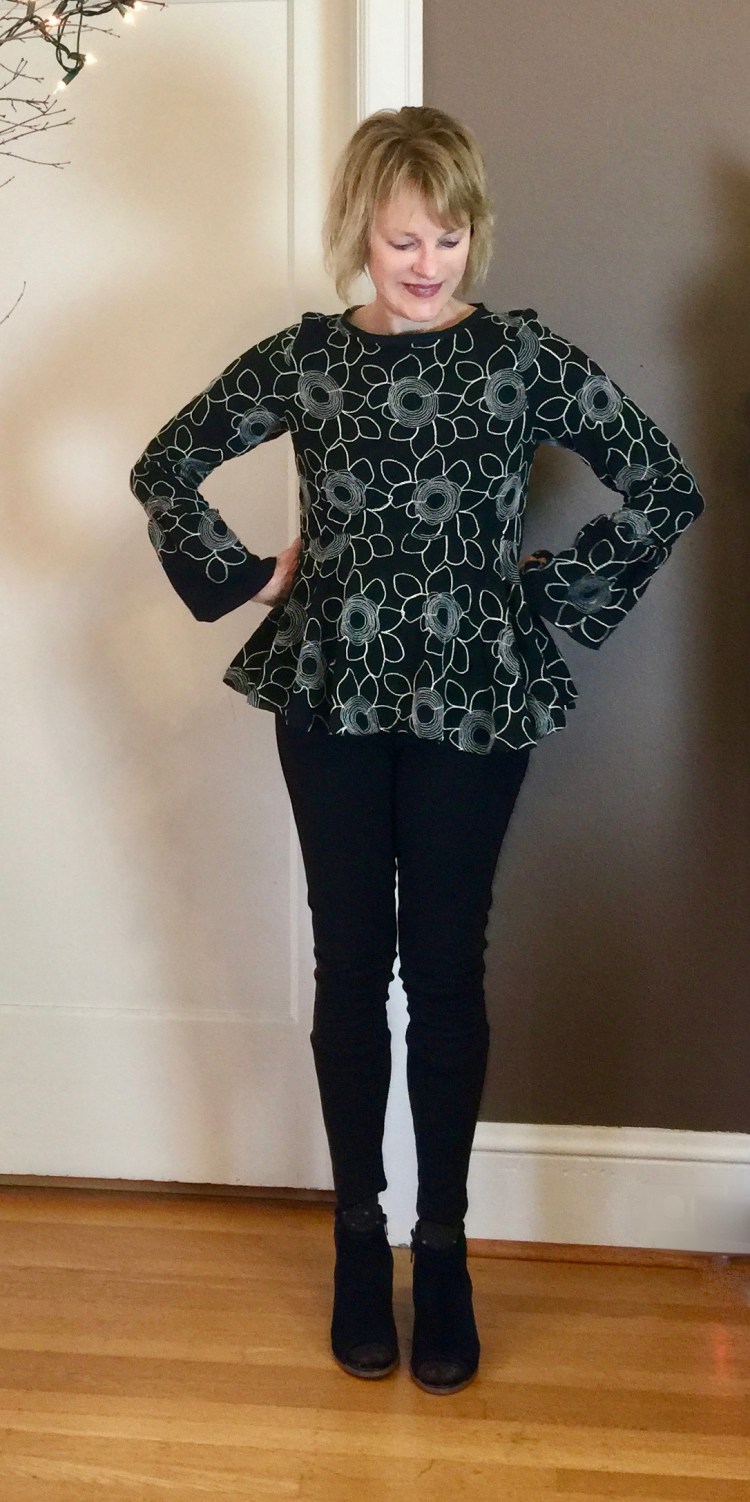
Next week I’m celebrating my wedding anniversary, and will be going out for a date with my husband. As usual, the January weather isn’t really great for wearing a dress (gray, dark and rainy, blah!), so I decided to sew a date night top from a springy floral to perk myself up!

For a special night out, I always want to wear something with a bit of drama, so it was the perfect excuse to sew another fun peplum top.

IMG_7144

You all know, I’m a big fan of peplums (sewn here, here and here). Every time I think I’m over them, I discover a new version to try. This top is Vogue 9084, a very easy pattern that has some really dramatic peplums, if you’re in the mood! I was attracted to the curved seam where the peplum meets the bodice – I just had to have it!


I love this fabric (fabricdepot.com). It’s embroidered rayon and it hangs like a dream.  Unfortunately, I didn’t have enough fabric to do view C with the dramatic high low peplum. Not sure my husband would have loved that look anyway, since he wasn’t a fan of my coat with the interesting hem (here), LOL. Maybe next time. Although this pattern is marked ‘easy’ I did have a few challenges with fit. The neck doesn’t look big, but on me it was huge, even though I cut the smallest size and took a narrow back adjustment. I ended up taking a couple of short darts at the neckline in the back before finishing the neckline with seam binding. This did make it fit much better, but it was frustrating as I had already taken some ease out of the back with my narrow shoulder adjustment.

IMG_7099

Unfortunately, my print doesn’t really show the cool curved seam in the front, so next time, I’ll likely make it in a solid fabric. For fun, I modified the sleeves a bit and added a 6 inch wide bell cuff so that it would look more dressy for ‘date-night’. To do this, I cut off 6 inches of the sleeve length. Then, for the bell cuff, I cut a 8 inch wide piece of fabric. The length was 1 and a half times the circumference of the sleeve opening. Once the cuff was gathered, I just inserted it into the sleeve bottom.

At this time of year, going out in the evening means wearing a heavy coat and pants so I’m glad I’ll have this fun top to make me feel dressed up when I reach my destination.

IMG_7094

In other news, Elizabeth at Elizabeth Made This is hosting the Day/Night dress Challenge again this year. Last year, I loved participating in the challenge because it inspired me to make two dresses that I wear all the time and I met some really fun bloggers. So I was so pleased when she asked me to participate again this year. daynightchallenge18logohashtag

The theme is coffee and cocktails, a brillant way to capture the essence of the challenge, which is to sew a dress you’d wear if you were meeting a friend for coffee, and another to wear for cocktails! Any one can participate. The details are on Elizabeth’s blog, but it’s really simple. You can tag your entries on Instagram with #dayandnightdresshchallenge and tag Elizabeth at Elizabethmadethis too. There are prizes, heh, heh and great sponsers. I’ve started planning my dresses and can’t wait to see yours!

Happy sewing and thanks for stopping by!


A Peplum Jacket For Layering

IMG_5932

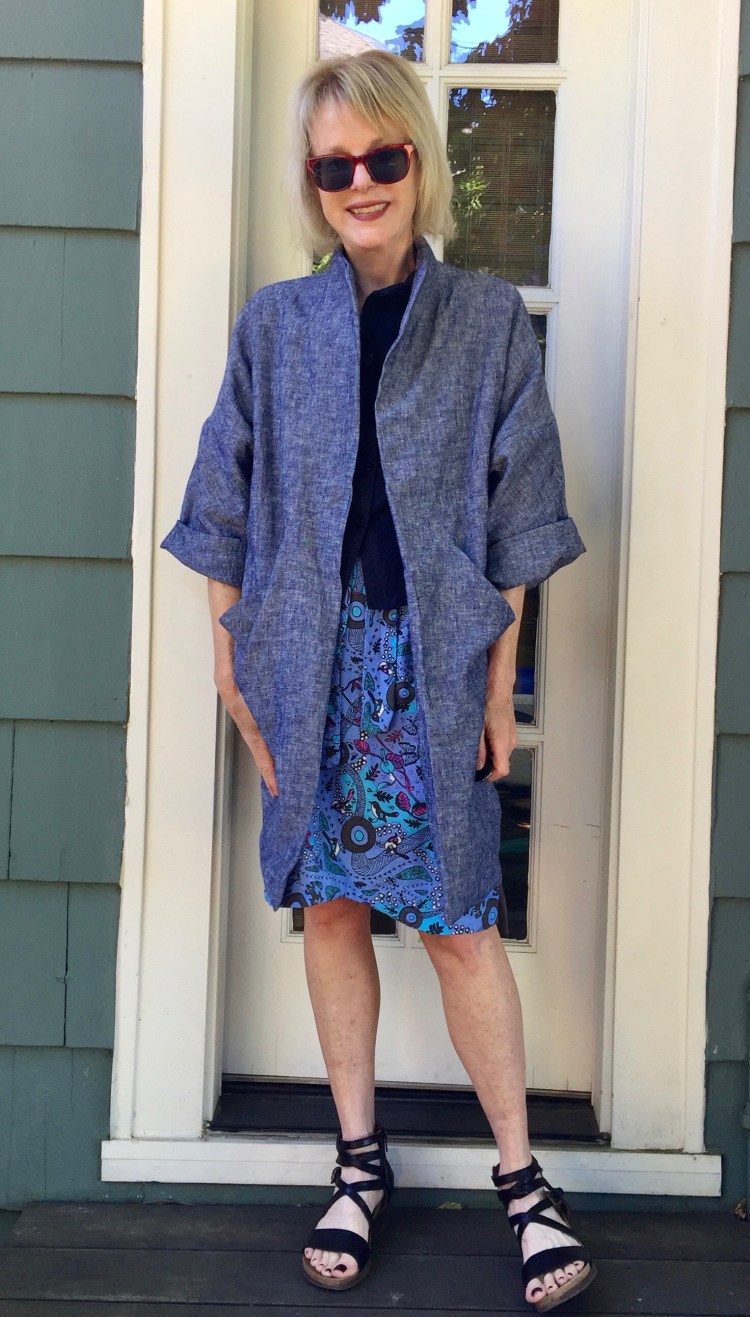
A love the four Helmis I made this year, so much so, they might make it into my Top Five Hits for 2017!  But unfortunately, those shirts aren’t warm enought to wear alone at this time of year. So, my Helmis became the perfect excuse to sew a new jacket!

IMG_5971

As you all know, I love anything with a peplum, so when I found Vogue 9214, it was instant love. It’s a knit jacket, which means it’s super comfortable to wear with a cute pleated peplum and an exposed zipper down the front.

V9214_a

Vogue 9214 is a Very Easy Vogue too, which means it’s fast and easy. The collarless neckline is finished with bias tape.  It’s close fitting through the bust, so it’s a nice smooth layering piece. I love the exposed front zipper and the pleated peplum.

I was surprised and pleased at how easy this jacket was, and for me, the fit was spot on. I used a ponte knit from my stash in a cranberry red (a conveniently seasonal choice), that manages to look good with two of my Helmis. The exposed zipper was reallyt easy to insert. In fact, it seemed easier than the last standard insert zipper I tackled. The neckline is a breeze, because it’s just a bias tape finish. The peplum is created with four pleats, and as long as you have them marked well, it’s not hard at all. That means this is a very doable project at a very busy time of the year. I was able to cut and sew this in an afternoon.

IMG_5984

It’s always great to find a quick easy pattern with a bit of style that you can whip up without a struggle! I’m inspired to make this again out of a sweater knit. All sorts of ideas are churning around in my head!

Another project I finished this week, a collection of  glittery paper ornaments. If you follow me on Instagram, you’ve seen these, but they were so fun to make, I had to share them here too.

IMG_5841 2

I’ve been trying to figure out how to do something similiar with fabric scraps, as I saw a ornament in a store that was fabulous. The paper version has accordian folds that are fanned out to make the circle. I just can’t figure out how to do the same thing in fabric so that the folds stay put. Thoughts? Maybe spray starch?

Happy sewing and thanks for stopping by!


Remnant Busting Tops Inspired by Anthro

Peplum tops are still in style! I swear it’s true. Just when I thought they were ‘out’, Anthropologie added a category under ‘tops’ called ‘peplums and swing tops’. That’s where I found this inspiring photo.4112368730007_041_b2

What caught my eye was the fact that the bodice fabric did not match the peplum. In fact, it’s not even in the same color family. So easy, and cute! That photo inspired me to dig through my remnant stash.

IMG_3729

This one has a sweatshirt fleece bodice and a cotton jersey sleeve with a rayon jersey peplum. As luck would have it, the black dye used in those two mismatched jerseys was a close match. I used some random black ribbing in my stash for the neck. I managed to squeeze the bodice out of a little over a half yard.

IMG_3671

This off-white version is a ponte knit bodice with a ribbed knit skirt, cuffs and neck. I made it specifically to go under this cardigan sweater (posted here) which matches the boots I bought in Spain this summer. IMG_3682

The pattern is one I’ve made before, Vogue 9056. It’s a pretty quick make ( a couple of hours if you’re comfortable with sewing tops).  I modified it as follows – –

  • Added 4″ in length to the bodice (it’s still pretty cropped),
  • Added a 3″wide neck band at the neck.
  • Added 4 ” ribbed cuffs on the off white version.
  • Raised the neck opening by 2 inches (it was just too wide on me.) IMG_3835

It’s hard to see in all the photos, but an interesting thing happened when I stretched the ribbing to attach the skirt to the off-white ponte knit bodice. It had an interesting effect on the ribbing that makes the stripes look sort of….artsy?  It was an accident but I like how it looks, although I do think I prefer the black version.

IMG_3729

Remnants are something that most sewers have a philosophy about. I have rules about mine. If I have a piece that is 1/2 yard or more when I finish a project, and I really love it, I’ll keep it for one year. If it’s still around at that point, it goes to the donation bin.  I have alot of remnants right now though, so not sure if my rule is working (LOL!!). I’m curious how others manage their remnants – toss or keep?

Happy sewing and thanks for stopping by!

My Mini Wardrobe with Indie Patterns

IMG_0340Hi All! Indie Pattern month is winding down over at the Monthly Stitch. The last challenge was to create a mini wardrobe from Indie patterns and I decided it was the perfect motivation to pull out the lovely Indie patterns I’ve been meaning to try, but haven’t. After looking at my patterns and my fabric stash, I decided the theme for my wardrobe would be ‘layers’ and transitions, as I wanted my mini wardrobe to take me from summer to fall.  To make my outfit, I combined the Orsola dress by By Hand London with a Modified Alder Shirtdress by Grainline Studios, and topped it all off with the Sapporo coat by Papercut Patterns.

First up the Orsola dress. I love this design!

IMG_0170

The dress pattern was a dream to sew. The instructions are spot on and the sizing was perfect too. Since this was my first BHL pattern, I wasn’t sure if it would be true to the displayed pattern measurements, but it was, Hooray! The bodice is lined which makes for a nice clean finish on the inside.

IMG_0420

I love the way it wraps in the back.

IMG_0165

I made it from a lightweight cotton print, and lined it with rayon. The drape is really nice in this fabric, but I can imagine it would be perfect in rayon, silk or linen (I’ve already purchased linen for another one.) If you hate darts, beware!!  This pattern has eight! But the good news is there isn’t a zipper, LOL!! One word of caution…you must commit to the length of the dress right away as the hem is faced. I love the detail of the dip in the hem. I think this style would be flattering on anyone!

Next up, is a shortened version of the Alder shirt dress in blue linen. I shortened the pattern so that it would function as a jacket or topper.

IMG_0386

Using the Archer pattern sleeves, I modified by adding a sleeve to the Alder without a cuff so that it would look more like a little jacket ( I rolled them up in this photo as it is so….hot here.) I left off the collar, and used only the collar band. I also took out a little of the fullness in the peplum so that it would be a little less puffy of a silhouette. I love this linen – and I know I’ll wear this new Alder constantly as a topper, or just with my jeans.

IMG_0236

Last, but definitely not least is the Sapporo Coat by Papercut patterns.

IMG_0286

I’ve been eyeing this one for awhlle and IPM was the perfect excuse to jump right in. I made it from linen and lined it with rayon. This pattern is definitely a departure from my usual style, but I love the cocoon shape, a new obsession of mine!

IMG_0271

It’s a very unstructured look, so there is ALOT of ease in this pattern and I do mean a lot. I cut the size XS, and ended up taking in the side seams even more to get it to fit. I love the construction of this coat – the collar is built in and the sleeves are faced so that you can roll up cuffs if you want.

IMG_0421

The pockets are my favorite part of the design and I love the slouchy look they give the coat. Be forewarned though. There’s isn’t a mechanism for shortening the bodice – so I tried a quick muslin to make sure it fit. If you love this style, go for it! The construction of this jacket was really pretty easy! This is my new favorite coat and I know I’ll love it for fall. I might try it again in a wool blend or cotton boucle’.

IMG_0307

Phew!! I’m really glad that Indie Pattern month only comes once a year!  I do a crazy amount of sewing as there is just something about seeing everyone’s makes that just inspires me to jump right in! I’m really glad I tried new patterns this year. I love By Hand London and Paper-cut Patterns and I’m loving the results and the styles. Have you tried their patterns? If so, any recommendations?

Happy sewing and thanks for stopping by!

McCalls 7314: Burberry knock-off

IMG_1397

As you all know, I’ve got a thing for Burberry’s classic designs, and the Spring 2016 collection was one of the best. Being peplum obsessed, I couldn’t help but fall in love with this cute shirt.

203f3d87fd36b410af8e9c14c87692ac49df2e6d

Okay, as Burberry prices go, the tag on this one wasn’t totally ridiculous…only $350. Yes, it’s a lot, but I could probably justify a splurge like that if  (1.) I didn’t have a fabric stash worth a small fortune (2.) I didn’t have an expensive shoe thing that is almost as bad as my Burberry obsession and (3.) I could commit to never buying another RTW, or piece of fabric for the rest of the year (ha, we all know that’s not going to happen!)

IMG_1399 (1)

So, a knock off it is!

The fabric: A plaid cotton gauze from Mill End Store. (They take phone orders, BTW. Although there isn’t much of this fabric left I noticed.)

The pattern: McCall’s 7314, a shirt dress pattern with a gathered skirt, elastic waist and sleeve options.

Modifications: I shortened the skirt by twelve inches. I cut my usual size, but made a small adjustment for my narrow shoulders. Other than that, no adjustments. were necessary. The sleeves are shorter on me than they are in the photo, by the way. Be forewarned…if you have long arms, and want 3/4 sleeves, cut them a bit longer.

The skirt on this dress isn’t fitted at all. You add a bit of elastic to the back to make the dress taper at the waist. You can cut the elastic as you wish, so that it’s as fitted (or not) as you want. This makes this top/dress so comfortable!!!

Challenges: Plaid matching! OMG, a nightmare!  I did okay, but I’m not happy with the sleeves. IMG_1421

I wanted them to match perfectly, but they’re a little off. I’d like to blame this on the gauze-y texture of this cotton, rather than on me, but we all know the TRUTH. The cotton is amazing to wear, well worth the effort it took to keep it straight. I have a bit of fabric left over, and might try to recut the sleeves, since I notice this mistake (LOL, you all know how this is!!) I should’ve used more pins and weights to keep it still. The skirt was impossible to line up, a fact I obsessed about until I realized, the Burberry one didn’t look much better. Still, I obsessed. Not perfect, but that’s how it goes.

This shirt is so comfortable! And I love the wide plaid. The cost: This shirt cost me less than $20 to make, since the pattern was on sale at Joann’s, and the fabric was purchased during a 25% off sale at Mill End. Yes, you have to figure in your time, but still….this is a good deal, right? Of course, the Burberry fabric is to die for….if only…

IMG_1403

I’d love to have more wide plaids in my stash because I love the look, but can’t seem to find many in the fabric stores. If you have a source, let me know. Another question..should I recut those sleeves? Opinions welcome!

Happy sewing and thanks for stopping by!