My #Sewing Top Five of 2018

PicMonkey Collage_1Even though I prefer to look forward, I love doing this retrospective post at the end of every year. Thanks to Gillian of Crafting a Rainbow for inspiring the #SewingTopFive. So here we go…my top five makes for 2018.

  1. The layered lace Anthropologie knock off (full post here).


I chose this Anthropologie knock off as one of my best, not because I wore it alot, but because I had such a great time making it.  Even the first step of the process was fun. I visited all the local fabric shops, searching for bits of lovely lace, then layered them to create this textured bodice. It took alot of time, but I loved what I was doing so much, I didn’t really notice.

2. This New Look dress took me by surprise! The two versions are here and here, but I’m counting them as ‘one’ for the purposes of my ‘best of’ list.

IMG_8946


IMG_9692

I didn’t really expect this drop waist loose-fit dress to become a favorite. It was a such a simple project…but sometimes it’s the ‘easy sews’ that yield the best results.

3. Pastel Green Coat (full post here)

IMG_9641

This was the only ‘serious’ coat I made in 2018 and it has become a strong favorite. The wool was a great find; gorgeous and soft. I’m so glad I decided to line the coat in silk. Pastels aren’t on my list of favorite colors as a rule, but I always feel like a ‘cool girl’ when I wear this coat.

4. Another Anthropologie knock-off made it into my top five list, the cordoroy shirt dress.

IMG_8454After multiple washings, the cordoroy has softened. I enjoy wearing this so much.

5.The floral kimono wrap top: IMG_1212

I always feel great in a wrap top/dress. This one is so fun to wear!

Here are a few Honorable Mentions: 

I would feel disloyal if I didn’t give a shout out to these me-made garments that have served me so well this year.

This Kobe Top from Papercut patterns:

I love this pattern, and will be using it again. This was a fun project because I used a old linen tablecloth with embroidery.

The floral wrap dress;

IMG_8124

I was reluctant to cut into this fabric because I loved it so. Fortunately, the dress turned out well. It’s now a favorite of mine…

3. Blackwood cardigan

IMG_9225 3

I made several Blackwoods in 2018 and I love them all! This particular version was special because I was able to use the selvege to create a unique border along the front and sleeve bands.

The Inari Tee dress and top:

PicMonkey Collage-8

I’m not sure why I waited to try this cool pattern! I wear the linen dress all summer and the tops (modified with a low peplum) are favorites too.

How was your 2018? It was a productive year for me. I managed to sew and blog three or more garments each month. Motivation to sew was easy to find, as I joined the Ready to Wear Fast sponsored by Goodbye Valentino. If there was a ‘hole’ in wardrobe, I had to sew or go without!

The RTW fast has been an interesting experience. It’s shifted my sewing significantly from spontaneous, muse-driven sewing to ‘sewing with a purpose’. Intentional sewing meant I was able to fill some holes in my wardrobe that I’d ignored or filled with frantically purchased ready-to-wear garments. I’m glad I replaced those pieces with nicer me-made essentials. I also reduced my fabric stash significantly…a big win! I discovered that there are some things I just don’t like to sew, exercise wear, for example. I just don’t find the satisfaction quotient to be high enough to justify committing any of my cherished sewing time to it. It was good for me, so I will likely do the fast again!

In my sewing room, 2018 was a very good year. But alas, there were a few missteps along the way so I’ll post the Top Five Misses next.

I hope those of you who blog/instagram will post your top five too, as I love reading those posts. Happy sewing and thanks for stopping by!


Kobe Top in Embroidered Linen

I know many of you have started your Fall sewing, but I’m still enjoying working through my stash of linen and cotton. It’s just hard for me to switch gears when the weather is still so warm.

Linen is my absolute favorite fabric to wear in the spring and summer, and if it’s soft and a teeny bit worn, I’m in heaven! So, I love to pick up bits of linen (tablecloths, napkins etc) at garage sales, antique stores, anywhere I can find them. I was thrilled at a recent collectible market to find a large embroidered table-cloth that showed no visible damage or stains.

IMG_6128

I knew immediately that I wanted to sew a Kobe top by Papercut patterns, a pattern I’ve been interested in making for a while.

KobeLD_large

I was attracted to the Kobe because of the interesting back.  I love the way the pleat falls across the back neck opening.

IMG_6107

When I bought the pattern, I dreamed of making it from a sheer fabric but then, I saw this linen.  I knew it would be perfect. Actually, now that I’ve made the Kobe, I can imagine a whole host of fabric options for it! Sheer silk, chiffon, rayon challis, sheer lace, anything with flow and movement should work well.

IMG_6550


The challenge of course was pattern placement. I wanted the embroidered details to take center stage. Because the Kobe is simple with only a few main pattern pieces, this wasn’t as hard as I expected.  I centered the largest part of the embroidered pattern on the front center of the bodice and did the same with the back. The trickiest part was figuring out how to do the hem, as I wanted to utilize the lovely embroidered edge. In the end, I did a muslin version to make sure I understood where the length of the front and back would fall on me. I’m really glad I did this because the Kobe is likely designed for someone who is quite a bit taller than me (5’4”). So I did a mid bodice adjustment of an inch. This really brought it up to a reasonable length.   

IMG_6568

On the sleeves, I used the same strategy – -I centered the pattern, and used the scalloped edges as a hem. This did make this a fast project – – no hemming needed!

I love my new summer top. Yes, it wrinkles, but hey, linen is worth it. And I’m happy to say, I don’t feel like I’m wearing a old table-cloth when I wear this, LOL. Have you ever made anything from an old table-cloth?

Happy sewing and thanks for stopping by!


McCall’s 7780; A cold shoulder top for Fall

IMG_6450
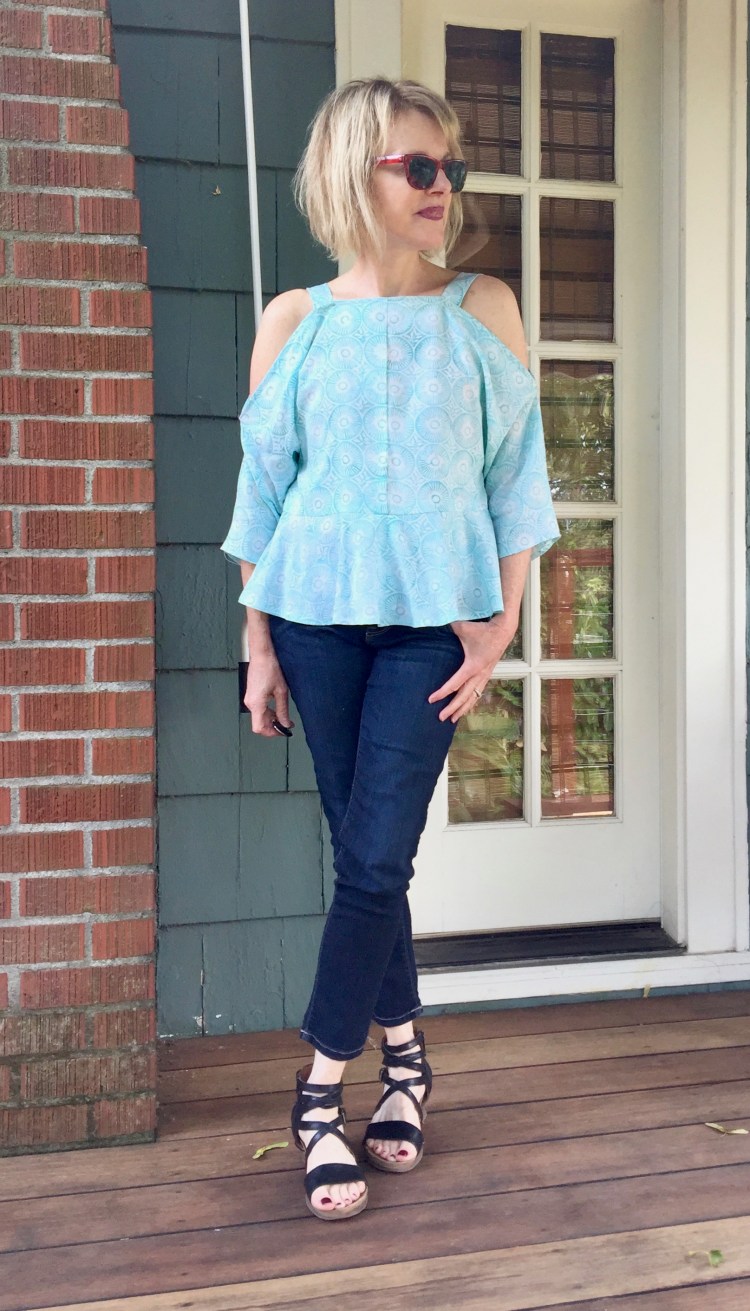
It took me awhile to fall in love with this new pattern by McCall’s. The cold shoulder style put me off at first. I thought I was over that look, but this summer, I’ve discovered that the cold shoulder tops and dresses I made last year (here,  and here and here) are the ones I reach for time and again. The style is perfect when hot days turn to cooler evenings. IMG_6486There are design details I really like about this pattern – – the sleeves cut into the bodice, the flounce detailing on the bodice, the off-the-shoulder look, the wide shoulder straps. I’m not particularly found of the front and back bodice seam, although I didn’t think much about that until I started to cut my fabric. Because my fabric had a horizontal print, I had some pattern matching in the front which I hadn’t planned for. Thankfully, I did have enough fabric!

McCall’s 7780 has so many fun options. You can make the top with straps that tie, you can add a front flounce or a sleeve flounce, or make the top without any flounces at all. I love the solid white on the pattern envelope, but since I have more than my fair share of white tops, I chose to use a rayon print instead (fabricdepot.com). I made version C with the straps of view B without the ties. I’m not wild about ties at the shoulders as they tend to tickle and annoy me.

IMG_6482 2

Construction challenges:

  • As I mentioned, the front and back center seams required pattern matching…I barely pulled this off.
  • The sleeves are cut into the bodice so their shape is created by folds in the fabric. If your fabric is too stiff, the sleeve folds might look too distinct and the openings for the cut shoulder could lack the soft drape they need to look right.  A soft linen, or rayon or silk would be perfect. Also, I have narrow shoulders and the shoulders fit me perfectly. If you have broad shoulders, I’d do a tissue fit or muslin to make sure they won’t be too tight.

IMG_6162

Besides those challenges, I found the construction of this top, easy and straightforward. I love the style and am glad I finally fell in love with it. It’s the perfect date-night top, or for a lunch out with a friend. The length of the sleeves makes it comfortable on a cool evening too – – great to wear as we transition into Fall!


I usually start my Fall sewing mid way through August, but our weather has been so warm, I’m still inspired to make warm weather clothes. Perhaps, I should be cutting into heavier fabrics, but it’s hard for me to sew something I can’t wear right away….not sure if I’m the only one? I love a bit of instant gratification, I guess. So, until the weather changes, I remain a linen/cotton/rayon obsessed seamstress! How about you?

Happy sewing and thanks for stopping by!

An Anthro Inspired Peplum Top X 4

PicMonkey Collage-7Yes, I’ve gone a little off the deep end over this pattern! What can I say? When I find a favorite pattern, I tend to go a little berzerk, imagining all of the variations…and then, before you know it, I have four versions in my closet! No, I did not sew all of these tops since my last post. They were sewn over the last couple of months, using fabric from my stash (YAY!).

And regarding the style — well, yes, this top has a peplum. I was pleased on a recent trip through Anthropologie to discover that peplum tops are still hanging on their racks.


Whew…so good to know, since I have four of them.!

I’m always amazed at how fabric choice changes the look of a pattern. So I really love doing posts where I show multiple versions. This top is Butterick 6486. I also used the angled peplum on McCall’s 7052 on a couple of versions (OOP, but you don’t really need it to pull off this style). B6486 pattern was really easy to sew – perfect for a beginner. The only modification I needed was to lengthen the bodice by a inch so that the peplum would be just above my waist.

il_570xN.1321868872_dk9p


IMG_3339

This top (version A) is really casual and easy to wear in large part because of the fabric. It’s rayon from Cotton and Steel. This fabric was released last year, a result of their collaboration with the  Rifle paper company. This is top notch fabric, my friends. It wears and sews like a dream. To make this version, I shortened the peplum by 2 inches. I’m not usually drawn to fabrics witl small prints, but I do love this one. The color palate is definitely in my wheelhouse.

This version is in cotton gauze (FabricDepot).

IMG_3541

I made this version for one reason…to wear it with the necklace I have on! It was designed by a local artist using crocheted linen and linen tassles and I needed a top that would allow it to be the center of attention. For this version I used the angled peplum from M7052. This double gauze has extraordinary drape and is comfortable even on a muggy day.

This version is a stiffer quilting cotton.

IMG_3504

It also has a assymetrical peplum, but because the cotton has more body, it looks like a different top!  The stiffer fabric gives the peplum more structure. This fabric has a coarser weave too, so the vibe of this top is casual.

Last but not least, a dressier version from a poly blend fabric with cut outs.

IMG_3448

Of course, I couldn’t resist trying a version out of something lacy! I had this fabric in my stash, purchased last summer, and only had a yard and a third, not enough for sleeves. To let the cutout design of this fabric shine, I lined the bodice with peach colored lining. This version is fun to wear with jeans/pants, but also with a skirt.

Phew – – My minor obsession with this pattern might be over now….we’ll see! Next up, I’ll be working on some pants and skirts to go with these. I’m heading to France in September so am thinking travel wardrobe as I sew right now.

In another sewing news..This week on Crafting a Rainbow, (great blog, check it out!!) Gillian drafted a great post calling for a blogging renaissance. Her thoughts really resonated with me, so I thought I’d share some of my own thoughts on the topic.  In spite of the way Instagram has grabbed the sewing world’s attention, I remain committed to this blog and to following lots of others (see the side bar for my favorites).  Instagram is a fun place to get a quick fix, but I’m constantly frustrated by the fact that there seems to be absolutely no way for me to control what shows up in my feed. I follow alot of people, yet I only see a very curated collection of posts based on some strange algorithm defined by the folks at Instagram. (Is anyone else frustrated by this?!?)  Since I like to control my personal feed,  and since I like the personal story behind the makes…(the details, the inspiration), I head to sewing blogs for that conversation. I do visit Instagram too, but only a couple of times a week. More just stresses me out. I’d love to know your thoughts….

I really appreciate you, and hope we can continue to share and chat for a long time to come.  Happy sewing and thanks for stopping by!


A off-the-shoulder look inspired by Theory

PicMonkey Collage-7

As you all know, I love a good designer knock-off, and Theory is one of my favorite designer lines. Last fall, a friend of mine wore the Theory shirt (on the left) to a dinner at my house, and I was smitten. She wore the shirt a bit off the shoulder and I loved the way the the gathered neckline was created by a drawstring.

IMG_2792

To create my knock off version, I used Simplicity 8550 as a template.

simplicity-off-shoulder-shirt-pattern-8550-envelope-front

The best news about this pattern is that I found it for a $1.99 at Joann’s!!  I have so many sewing patterns, I can only justify an addition if it’s a bargain. Yes, Indie patterns are great options, but you can’t beat the price when the Big Four go on sale.

simplicity-off-shoulder-shirt-pattern-8550-front-back-view

The neckline of the Simplicity top is similar to the Theory shirt in design, but it’s a bit wider. Also, it doesn’t have a drawstring closure.PicMonkey Collage-6To add a drawstring at the neckline: First, I adjusted the neck opening to make it a bit smaller. To do this, I took a half an inch out of the front and back bodice pattern at the center front and center back. Because the cut of this shirt is so loose in the shoulders and bodice, that adjustment did nothing to the comfort or fit of the top. To make the channel for the drawstring (a simple black ribbon), I replaced the neck facing with a strip of bias tape, and inserted the ribbon through that. Pretty simple modification…

Other adjustments: I tapered the bodice a bit by adding two eyelash darts in the back from the shoulders to the waist. Even though the Theory shirt is collarless, I couldn’t resist adding some drama with a big collar.

I was tempted to use Chambray for the top for my knock off, but decided I have too much blue in my wardrobe. It’s time for a new color…red! This cotton is from Fabric Depot and it has just the right amount of body for the collar – yet isn’t too stiff for the drawstring/gathered neck.


IMG_2789

This top was definitely a fly-by-the-seat-of-my-pants project, and I feel lucky that it turned out so well:) I love the fact that, with a tug on the drawstring, I can adjust the neckline of this shirt as the mood strikes. The color is nice for a change too. This top won’t be a wardrobe orphan because it works so well with my favorite Ginger jeans and with my denim skirt too.

Well, I think this officially begins my summer sewing. Fingers crossed that I get to wear it soon! Happy sewing and thanks for stopping by!

Three Versions – Simplicity Waist-Tie Top

PicMonkey Collage-5

Packing for a trip always points out the flaws in your wardrobe, don’t you think? A planned visit to the already muggy east coast made me realize – I have very few easy-to- wear, easy-to-pack tops that are humidity friendly.

Enter Simplicity 8601 – – An ‘easy-to-sew’ top with lots of variations.

simplicity-tie-front-top-pattern-8601-envelope-front

Version 1; Rayon

IMG_1234 2

This lovely batik rayon was purchased last Spring (Millendstore). I used some of it for this dress last spring. This rayon has a lovely, soft drape, so even though I was short a quarter of a yard, I worked hard to squeeze this 3/4 sleeve top from it. I was really lucky it worked because the drape of rayon is so perfect for this style!

One thing to note about this pattern – – It has a seam down the front, a necessity because of the tie at the waist. Stripes, plaids etc need to be positioned strategically. Even though this rayon has a polka dot print, it’s a batik with a noticeable pattern to it so I had to do some strategic matching around that front seam.

I loved this top right away! Encouraged by the immediate gratification this pattern offered, I pressed on and sewed a few more…..

Version two: Medium weight cotton

IMG_1279

This is View A with bell sleeves, the perfect shape for layering under sweaters.  I was a bit concerned that the stiffness of this Cotton and Steel print would be a bit much for the waist tie…but it worked! Not only is this medium weight cotton great  in humid weather, it supports the shape of these sleeves.

Version 3; Cotton Double GauzeIMG_1337

When the weather is a bit sticky, double gauze always makes me feel great, so I just had to use a cotton gauze remnant in my stash for version B. I am so glad I did! There’s a reason people use double gauze for baby blankets – it’s so soft.  Wearing this top is like wearing pajamas, which makes me wonder…..Why don’t I make everything out of double gauze?

I’m pleased with all three versions so Simplicity 8601 so it gets a big thumbs up from me. I have plans to make View D as well (flutter sleeves) and who knows what else I might whip up.  From start to finish each version of this top took only two hours to sew – – a perfect saturday or evening project. The instructions are great and the fabric options that work with this pattern are endless. I have some linen I will use for a flutter sleeve version. I will likely make a flannel version in the fall.

IMG_1332

IMG_1291


IMG_1234 2

I was pleased to see several similar RTW tops at Anthropologie last week with a waist tie, so give this look a try. What version do you like best? Have you ever made a top from double gauze?

Happy sewing and thanks for stopping by!

A Ruffled Top Done 3 Ways

Sometimes when you first meet a pattern, you can see so many possibilities. That’s the way it was with me and this simple pattern. I made one view, then couldn’t resist immediately trying another and….well, another. Three versions of one pattern…overkill maybe, but why fight it?

IMG_2016

When you have alot of children, you aren’t supposed to pick favorites, but I refuse to believe that rule applies to sewn garments too. The above version is my favorite, and as usual, it’s all about the fabric. Linen knit might be the finest fabric to wear on this planet. It’s like wearing pajamas every day, and easy to sew with too. The seams need to be overlocked to prevent unraveling, but otherwise it’s a dream with a perfect drape for this top.

When I pulled that linen from my stash, I happened on this white linen gauze that I’ve been saving for too long, waiting for the perfect project…very lightweight, and well, flounce-appropriate. So, as the song says, one thing leads to another.IMG_2120

Of course, my timing wasn’t so great on this summer-perfect make. As I’m typing this post, rain is pounding the deck outside. For once, I’m glad to see it  as we have high hopes the rain will put out the fire that is destroying our spectacular Columbia River Gorge. (Fingers crossed!!) I do expect we’ll have a few more days of warm weather though because I need to take this linen version out for a test run.

Then, there was this lonely piece of rayon that I’d dithered about for months….

IMG_2066

Voila, a simple version was born, no flounce at the yoke, only on the sleeves. Three fun  and very wearable versions….Now, that’s what I call a great pattern!

I probably don’t need to tell you that this is an easy pattern since there are three versions in one blog post, LOL.  Simplicity 8454 may be easy, but it does have nice details, so it’s destined to be made a few more times before it’s time is done.

simplicity-ruffle-blouse-pattern-8454-envelope-front

I’m always looking for tops with sleeve variations that can take it from one season to the next and this pattern meets the need. It’s meant to be made from a woven fabric, but I just sized down to make it from my linen knit. The design element that attracted me to it was the yoke and flounce combo, but I like the simple version too, without the flounce at the yoke, and can imagine variations with lace at the yoke and sleeves. The flounce is very simply finished, and if you had a fabric that didn’t unravel, you could actually just skip the finish, and leave the edges raw…so easy!

I don’t think you’ve seen the last of this pattern on my blog. It’s just too fun to make! Have you ever made three versions of  a pattern one right after another? Do you love it or does it bore you? It’s a great way to get alot of sewing done because you have immediate feedback regarding fit on one version to try out on the next.

I find it so fascinating to see how just a change of fabric can make a pattern look so different! A slight change in drape and texture, and voila, a new look is born.

Happy sewing and thanks for stopping by!

Tencel Love

IMG_5861

Since completing this pair of gray Jalie Jeans, I’ve been in a frenzy, sewing fun summer-y tops to go with them, hence – – this shirt!  I can tell it’s going to be a favorite because it’s made from Tencel, better known as lyocell, a fabric I grew to love when I bought a Tencel shirt at Anthropologie a few years ago. Not only is Tencel comfortable, it’s a sustainable fabric, regenerated from wood cellulose. It feels similar in hand to rayon and bamboo, both regenerated fabrics. I think I love this fabric because it has weight, yet it feels comfortable, even when it’s hot and humid. That’s because Tencel boasts the ability to absorb perspiration and quickly release it into the atmosphere, so it’s resistant to developing odors.

It sounds like the perfect ‘travel’ fabric to me! That’s why I chose it for my latest make; a button up shirt that will travel with me to Spain and Portugal this summer. It will be hot there, so I know this top will be in my suitcase!

IMG_5822

My pattern for this shirt is McCalls’ 7387, a pattern I had to have because of the cool back pleat.

IMG_5846

It’s those sort of little details that take a make from ho-hum to fabulous. This pleat is so cool. It’s a double pleat In other words you make one pleat then, fold another one over the top of it, creating this criss-cross look.

McCall’s 7387 took me about four hours to make from cut-out to hem. It probably would have taken less time if I’d resisted the urge to binge watch, “How to Get Away with Murder. “(I confess… I had to concentrate to follow the plot. The bonus for perservering though is the eye candy of Viola Davis’ wardrobe… she looks ‘chic’ but invincible. ) If you aren’t binge-watching, you could probably make this shirt in three hours.IMG_5804

Pattern Modifications: I left the flap off the front fly that covers the buttons because I wanted them to show. I visualized white buttons down the front of this shirt when I decided on this fabric, so I had to drop the flap. I added buttons to the pocket flaps too.

I also changed out the collar and replaced it with a collar band. I did this because I plan to wear this in warm weather and sometimes collars make me feel hot. To do this, I drafted a collar band by copying one from a tried and true button up shirt pattern.

IMG_5817

I’m smiling because I’m wearing blue Tencel!  This fabric was in the category of ‘special’, so I was a nervous when I decided to try a new pattern. I was so lucky that the pattern fit without modifications….phew!

My sewing energy is focussed on travel clothes right now. I’m trying to use the skills I gained from the Pattern Review Sudoku challenge to help me coordinate my travel wardrobe so that I can pack efficiently. Nevertheless, my efforts are a bit scattered. What will my neutral colors be? Do I pack skirts, shorts and tops, or do I just take a couple of dresses and call it good? What I do know for certain is that this shirt is going with me!

I’ve never traveled with Tencel, and one questions looms in my mind. Will it wrinkle? Have you sewn with Tencel? Thumbs up or down?

Happy sewing and thanks for stopping by!

Stash Buster: Simplicity 1377

IMG_3440

Hi all …As most of you know, one of my goals for 2017 is to reduce the size of my huge (re: out -of-control) stash. To that end, I’ve produced my own Little Black Book, a three-ring binder that holds my catalog of fabrics.

Yes, it’s a bargain basement binder, but it holds the key to my heart…a record of my glorious, but soon to be significantly reduced, supply of fabrics. My method of recording is simple…I just take a snip of the fabric, note the amount I have and whether or not the fabric is woven or stretch, and what ‘bin’ it’s located in (big plastic containers I purchased at Target). I track all fabric that is at least a yard or more. Smaller pieces make it into the notebook if they are unique (sequins, silk, feathers, LACE….!).

Some fabrics stay in their bin for a long time….the longer the stay, the more special they become! This particular fabric lived in my stash for a couple of years before my mind could find something suitable for its vibrant turquoise.

IMG_3455

There were two barriers to making this fabric into something special – – It’s a substantial flannel, the sort of fabric that doesn’t know what the word ‘drape’ means and — – my piece was a yard and a quarter (11/4); not enough for the usual flannel styles like a button up shirt  or a style with long sleeves. (Side note: My stash is overflowing with small pieces like this…remnants from other projects, or small pieces I picked up on sale..too little for most things, but too much to toss!)

Simplicity 1377 was the solution.

Simplicity-1377 (1)

This simple pattern is one I’ve used before. It has a front and back bodice, two neck facings, and short sleeves with drop shoulders. Because I’m only 5’4″, I don’t need much length in the bodice, so I was able to cut this top as well as a pocket and sleeve tabs from my small piece of fabric.

IMG_3381

Pattern Modifications (Simplicity 1377:

  • My version uses the neckline of view D and the sleeves of View E.
  • The short sleeves in view E have been lengthened by 2 inches (roll-up length).
  • I added self drafted button-up sleeve tabs.

IMG_3457

  • I self drafted a 5 inch square pocket to the bodice front and trimmed it with fringe from the fabric selvage.

IMG_3421

  • I used extra fabric to draft a tie belt.
  • I added a side vent to the hem line.

IMG_3476

March is a chilly month here in Oregon, and I know I’ll enjoy this warm flannel shirt with tee under it for weeks to come, and then in a few weeks (I hope) without a tee under it. Unfortunately, cozy is still an important word here, and I’ll be wearing my heavier clothes off and on for the next few months.

I love my new top!

IMG_3475

It’s comfy and colorful with an added bonus – – it was a Stash-Buster. I  got to pull another swatch out of my Little Black Book!

How do you manage your stash? Do you catalog it formally, or are you more relaxed about the process? And what about my fascination with collecting (hoarding) small pieces of fabric? What do you do with your one-yard wonders?

Happy Sewing and thanks for stopping by!


Butterick 6456- A Boho Top with Statement Sleeves

IMG_3187
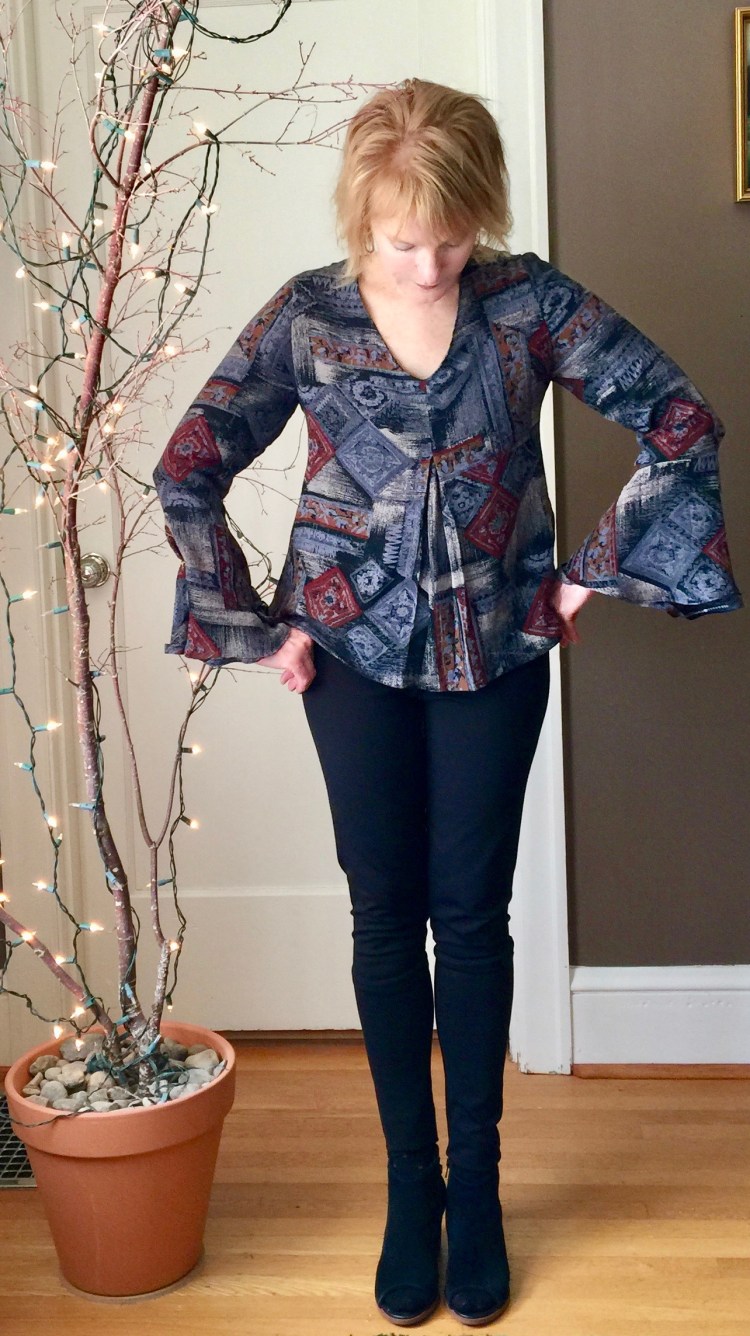
Do you ever get obsessed with a trend? I’ve been known to go overboard with a new look, and in my case, statement sleeves are my new ‘thing’. This Spring, it seems they are everywhere, and I am clearly jumping on the band wagon! Sure, I like the look (flow-y, care free, maybe even a bit boho), but I also like the challenge of a new sleeve shape. Each pattern is a new adventure in sleeve construction with new techniques to learn.

IMG_3260

I was attracted to Butterick 6456 because of the sleeve options but also because of the v-neck and front pleat, both a rarity in my wardrobe. I also like the flow-y boho look of this top, which is a little different from the structured statement sleeve tops/dresses I’ve made in the past.

I chose a printed rayon from the Mill End Store . I wanted a lightweight fabric with drape, and this fit the bill.

IMG_3248 2The pattern when together nicely. The v-neck, the front pleat, the bell sleeves were all explained well and fairly easy to execute. The challenge was in the fit (that is an understatement). I cut the smallest size, but the v-neck was still pretty large. I mean, we are talking cleavage exposure here folks, and that was just not where I wanted to go with this top (LOL). So, I did a bit of modifying. There is a back seam as you can see from the line art.

B6456So, my strategy was to take that seam in by about an inch. I also eliminated the neckline opening in the back and just sewed the seam closed. That seemed to do the trick.  The neck opening is large enough that the top just slips over my head!

IMG_3252

I love my new top, but wearing it will limit my activities. I cannot imagine cooking or performing cleaning duties of any kind while wearing it. Oh, darn. Hopefully, those sleeves will not get into my dinner, as this is clearly a Date Night top that will see a restaurant or two.  I’m glad I figured out how to modify the neck because I love the fabric. I’m sure this top will get lots of wear from early Spring through Summer. The flow-y rayon was a good choice for this pattern and I can imagine trying it again with silk. I’m not sure a crisp cotton would work well, although I do think a linen with soft hand would be good.

This was a fun make, but I don’t think I’m done with statement sleeves yet.  Next up, a McCall’s pattern from my stash that has five (!!) different sleeve options. So much to learn! Can’t wait to try that next. I’d love to know where you stand on statement sleeves? Also curious if any of you have run into problems with v-necks and fit and how you’ve modified them?

Happy Sewing and thanks for stopping by!