#sewjapaneseinjuly meets #tableclothrefashion

July was a big month for sewing challenges. There were so many on Instagram, I coudn’t keep track of them all. For me, two challenges stood out above the rest: #sewjapaneseinjuly and #scarfrefashion, which also includes tablecloths. Yes, my last post was about a tablecloth refashion, but as you all know, one thing always leads to another for me, and that project was so fun. I guess it isn’t too surprising that I had to do another revashion before July was done.

But first, my #japeneseinjuly make…

IMG_2306 This is the Summer Jacket from the Nano Iro sewing studio book.


Nano Iro is a watercolor artist who creates beautiful textiles. Her designs are transferred to cotton and linen, which are perfect for clothing. Not only does she create beautiful textiles but she is an author. On a recent shopping trip to Bolt fabric here in Portland, I discovered that her recent book has been translated to English! Of course, I couldn’t resist….this is the summer jacket from that book.

images

To me, Japanese sewing books are great because the styles are simpler and cleaner which allows the fabric to take center stage. That’s why, for this jacket, I reached deep into my stash for one of my favorite pieces of linen.


IMG_2318My linen has the tiniest bit of sheen which makes the denim color really pop.

IMG_2241I love the classic lines and the shawl collar of this summer jacket. The construction is basic but clever…the shawl collar is supported by a back neck facing that keeps the neck from rolling.  The pockets are patched onto the jacket, which gives it a utility jacket feel, so on-trend! It’s unlined so construction is a breeze. If you can set in a sleeve and attach a basic collar, you’re good to go! Use a medium weight fabric for this project with a bit of drape.  IMG_2305This style works with everything in my closet – – I suspect this jacket will be in my suitcase when I go to Italy this September!

On to the  tablecloth refashion…

IMG_2284This is the Basic Blouse, cut from a circular vintage table cloth purchased at an estate sale. I wish you could see from these photos that the cut detailing is embroidered with blue thread – – Love!!


Construction of this top was simple..The sleeves are cut into the bodice so there’s nothing much to it. The trick was in the layout….I had to place the cut detailing appropriately. I used the scalloped edge of the tablecloth as the hem and the center of the tablecloth as the yoke of the bodice. The sleeves are highlighted with more cut detailing, and after some tricky maneuvering I managed to get the sleeves to mirror each other. IMG_2287I added a back slit at the neckline and finished it with bias binding.

IMG_2246 2

I love my new outfit…and to think both pieces were inspired by sewing challenges! What challenges are you inspired by?

IMG_2190 Happy sewing and thanks for stopping by!


Blackwood Cardigan vs. McCalls 6844

You can never have too many cardigans. I feel quite certain about that. That’s why, each Fall, I find myself yearning for a new one…or two.  I’ve made several in the past (here and here) but today I want to talk about the two cardigan patterns I reach for time and again – –  the Blackwood cardigan by Helen’s closet and McCall’s 6844 (OOP but available on-line). Both patterns are easy to sew and friendly to a variety of knit fabric options. It’s the neckline that is usually the deciding factor in why I choose to make one over the other.

IMG_9104 3This version of McCalls 6844 is a coatigan of sorts. I found this thick sweater knit at Joann’s. The weight is perfect for this time of year, and the stretch recovery is great for this pattern.

6844line

I made view B but lengthened it by six inches. I love long cardigans these days (my Pinterest page is proof of that). The wide shawl collar makes it so warm, and by cutting the front bodice pieces a bit wider than I normally need, I was able to make the closure have a bit of an overlap, which makes it appropriate for windy weather.

IMG_9093 2Next up is (no surprise) the Blackwood cardigan by Helen’s Closet. Who doesn’t love this pattern?

IMG_9242I’ve made this before, but this time, I really wanted a stripe along a solid front band for contrast, as I’ve seen that detail on RTW cardigans.

IMG_9225 3With this striped fabric, I got lucky! The selvege edge of my fabric was solid navy with a thin purple stripe, and I had enough fabric to manage to cut the entire neck band from it!! Such a perfect opportunity to add a fun easy detail to this cardigan.  Again, I made this version very, very long. The advantage is that the longer look makes a shrimp like me feel tall. The bad news? It’s so long, none of my coats cover it. Such problems….

My new cardigans are so wardrobe friendly since they go with everything in my closet. I know they’ll get alot of mileage! What’s your favorite cardigan pattern these days?

The holidays are coming and I cannot let the season go by without a new velvet make so that’s on my sewing to do list. Oh, I guess I’ll have to go on Pinterest and start a new ‘velvet inspiration’ page, don’t you think?

Happy sewing and thanks for stopping by!


Inari Tee/ Dress Three Ways

PicMonkey Collage-8
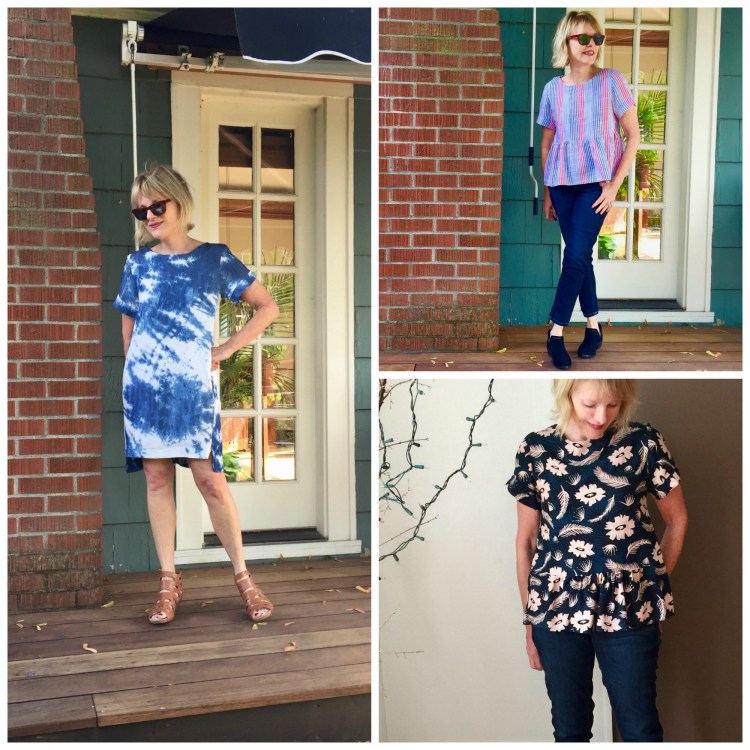
As luck would have it, I have another ‘three versions’ post for you this week. The Inari tee/dress is such a versatile pattern, it’s impossible to resist a bit of experimentation once  it’s on the cutting table!

The lovely Inari tee/dress by Named Clothing has been around for a while, but it hasn’t lost its appeal for me.

IMG_7864

I love the boat neck, the high low hem, the relaxed cocoon fit and the side slits that give the look a bit of an edge. Then, there are the lovely finishing touches, the sleeve bands, the hem stitching….it’s the little things that elevate this pattern to bring the look home!

The pattern includes two variations: A loose-fitting tee dress and a cropped A-line tee. The dress is slightly cocoon-shaped, with an uneven hemline. There are slits at the sides of the dress and you can finish the neckline with a facing or a separate neckband. This pattern works with a light to medium weight fabric, either woven or stretch which makes it doubly versatile! The instructions are really complete and easy to understand on this pattern. I think even a beginner would find it instructive and satisfying to sew.

IMG_7877

My fabric is a linen/rayon blend from Joann’s that is medium weight with a nice drape. I love the way the side seams wrap around to the front on this dress, causing the cocoon shape. There’s something so ‘cool-girl’ about a cocoon shape:).

My other versions evolved from the cropped tee version. I am not a big fan of cropped tees unless they’re on a teen, and this tee is really cropped. So, I added a ruffled bottom to the hem of the bodice.

IMG_7958

This is my buddy, Mitchell…he had to be in these photos. His twin, Maggie is too shy to participate, but Mitchell loves all the attention he can get. He’s about six months now, such a funny, outgoing guy! Don’t worry about Maggie, though. She can definitely keep up. I’m guessing she’ll be pushing her way into photos soon enough.

IMG_7917I loved working with this rayon from Fabric Depot, and it feels so cool and light on. To make this version, I cut a hem band that was 1.5 X the width of the hem, and made it seven inches deep so that when hemmed, it would add six inches to the length of the bodice. I gathered it with a long sitch then sewed it to the bodice and hemmed it.

IMG_8015

My next version is made of lightweight shirting from Joann’s. The stripe on this fabric is so striking….just had to have it. For this version, I shortened the bodice on the cropped tee by two inches and widened the ruffled bottom by two inches as well so that the top would have more of a raised waist look. I wear this one constantly! The weight of this cotton is light, but it launders so nicely and wears well in any temperature.

IMG_7995

All of my Inari makes will transition well into Fall because they’re perfect with a long cardigan or a short jacket. If you haven’t given this pattern a try, I highly recommend it. There are lots of inspiring versions in blog land and on Instagram, so give it a look!

In sewing happenings, Indie Pattern Month starts next week on the Monthly Stitch. I plan on participating in at least two of the challenges. I hope you’ll join me.

Happy sewing and thanks for stopping by!

Vogue 9313: Ruffled wrap dress

IMG_4968
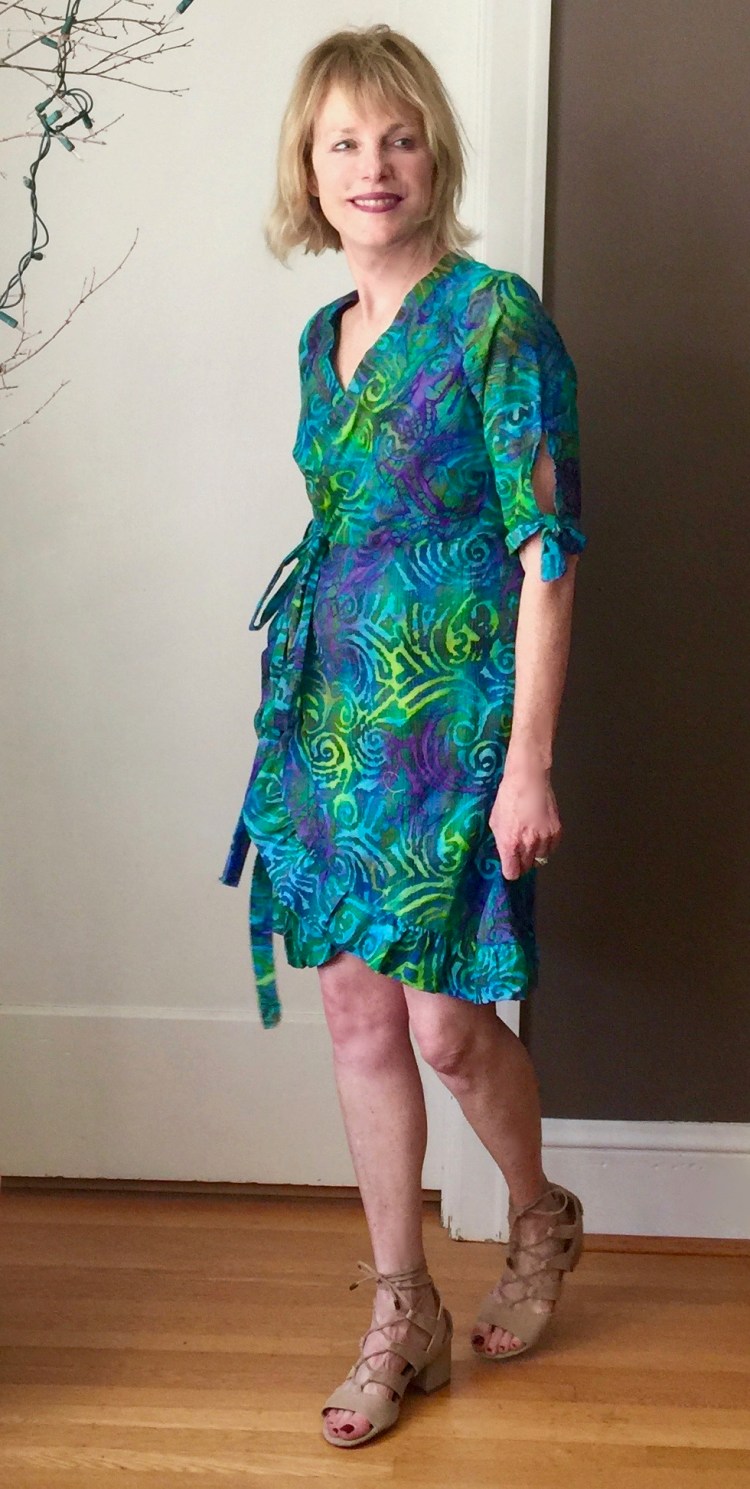
We’re experiencing a heat wave in Oregon, and the humidity is so high, my hair flips and frizzes, no matter what I do :). When it’s this hot, only a cotton dress will do, and this wrap dress is perfect for these sweaty days.  I became a fan of wrap dresses when I made this one last year. It was so cool in high summer.

IMG_5019 2

My pattern is Vogue 9313, a wrap dress with lots of “easy” options.  It has custom fit options with A-D cup sizes so it’s pretty easy to get the fit right. I modified the pattern a bit after trying on this dress at Anthropologie.

4130276110001_085_b14

  1. I re-drafted the shape of the full skirt to make it take out a bit of the fullness. (Too much fabric makes me hot in the summer). Also, I modified the two front skirts by rounding them into a tulip skirt shape so that it would work better with a ruffle.

IMG_4849 2

2. Instead of finishing the skirt fronts with bands as the pattern suggests, I added a 3 inch ruffle to each skirt front where the band would be and extended the ruffle into the hemlines as well. The ruffles are folded strips of fabric that are 1 and 1/2 times the length of the skirt fronts and hems. I gathered each ruffle with a long stitch then sewed them to the skirt fronts with a 5/8 inch seam.

4. I eliminated the front and back waist bands and lengthened the front and back bodices by two inches to make up for it.

5. The sleeves were too wide for me, so I added a tie instead of a hem. I cut a 4″ opening in each sleeve to accomodate the tie, then finished the openings with narrow hems. For the tie,  I cut a narrow strip (5″) of fabric that was two times the circumference of the sleeve. I attached it to the sleeve hem as though it was a sleeve band or cuff.

IMG_4999

I came pretty close to my goal with this make. It’s casual and comfortable but can be dressed up with a few good accessories. This cotton fabric from Fabric Depot is perfection. It has a bit of texture, but isn’t too heavy so it drapes really well and doesn’t seem to wrinkle much. Another travel dress?? Hmmm – – time will tell. I’ll know after I wear it a bit more.

Cotton and linen are my go to fabrics in the heat – and I wear dresses all the time. My Kalle shirt dress is in heavy rotation right now. What do you prefer to wear in the heat?

Happy sewing and thanks for stopping by.


A off-the-shoulder look inspired by Theory

PicMonkey Collage-7

As you all know, I love a good designer knock-off, and Theory is one of my favorite designer lines. Last fall, a friend of mine wore the Theory shirt (on the left) to a dinner at my house, and I was smitten. She wore the shirt a bit off the shoulder and I loved the way the the gathered neckline was created by a drawstring.

IMG_2792

To create my knock off version, I used Simplicity 8550 as a template.

simplicity-off-shoulder-shirt-pattern-8550-envelope-front

The best news about this pattern is that I found it for a $1.99 at Joann’s!!  I have so many sewing patterns, I can only justify an addition if it’s a bargain. Yes, Indie patterns are great options, but you can’t beat the price when the Big Four go on sale.

simplicity-off-shoulder-shirt-pattern-8550-front-back-view

The neckline of the Simplicity top is similar to the Theory shirt in design, but it’s a bit wider. Also, it doesn’t have a drawstring closure.PicMonkey Collage-6To add a drawstring at the neckline: First, I adjusted the neck opening to make it a bit smaller. To do this, I took a half an inch out of the front and back bodice pattern at the center front and center back. Because the cut of this shirt is so loose in the shoulders and bodice, that adjustment did nothing to the comfort or fit of the top. To make the channel for the drawstring (a simple black ribbon), I replaced the neck facing with a strip of bias tape, and inserted the ribbon through that. Pretty simple modification…

Other adjustments: I tapered the bodice a bit by adding two eyelash darts in the back from the shoulders to the waist. Even though the Theory shirt is collarless, I couldn’t resist adding some drama with a big collar.

I was tempted to use Chambray for the top for my knock off, but decided I have too much blue in my wardrobe. It’s time for a new color…red! This cotton is from Fabric Depot and it has just the right amount of body for the collar – yet isn’t too stiff for the drawstring/gathered neck.


IMG_2789

This top was definitely a fly-by-the-seat-of-my-pants project, and I feel lucky that it turned out so well:) I love the fact that, with a tug on the drawstring, I can adjust the neckline of this shirt as the mood strikes. The color is nice for a change too. This top won’t be a wardrobe orphan because it works so well with my favorite Ginger jeans and with my denim skirt too.

Well, I think this officially begins my summer sewing. Fingers crossed that I get to wear it soon! Happy sewing and thanks for stopping by!

Day/Night Dress Challenge Reveal

Hi all.  Today, I have a guest post on Elizabeth Made This, the reveal of my dresses for the Day and Night Dress Challenge, 2018.  Here’s a sneak peak of my coffee and cocktail dresses.

IMG_8531

IMG_8773

I hope you’ll visit Elizabeth Made This for the full post.

This is the second year of the Challenge (here are last year’s makes for the challenge) and it’s been alot of fun. There’s a blog team and all of their makes are fabulous. I hope you’ll take a moment to check out them out as Elizabeth posts them on her blog.

blogtour-1

There’s a community challenge and prizes too, and it’s not to late to join!

sponsorcollage-1

I’ve really enjoyed this challenge – much thanks to Elizabeth for the opportunity! Happy Sewing and Thanks for stopping by.


A Remant Busting Top X 3

PicMonkey Collage-4

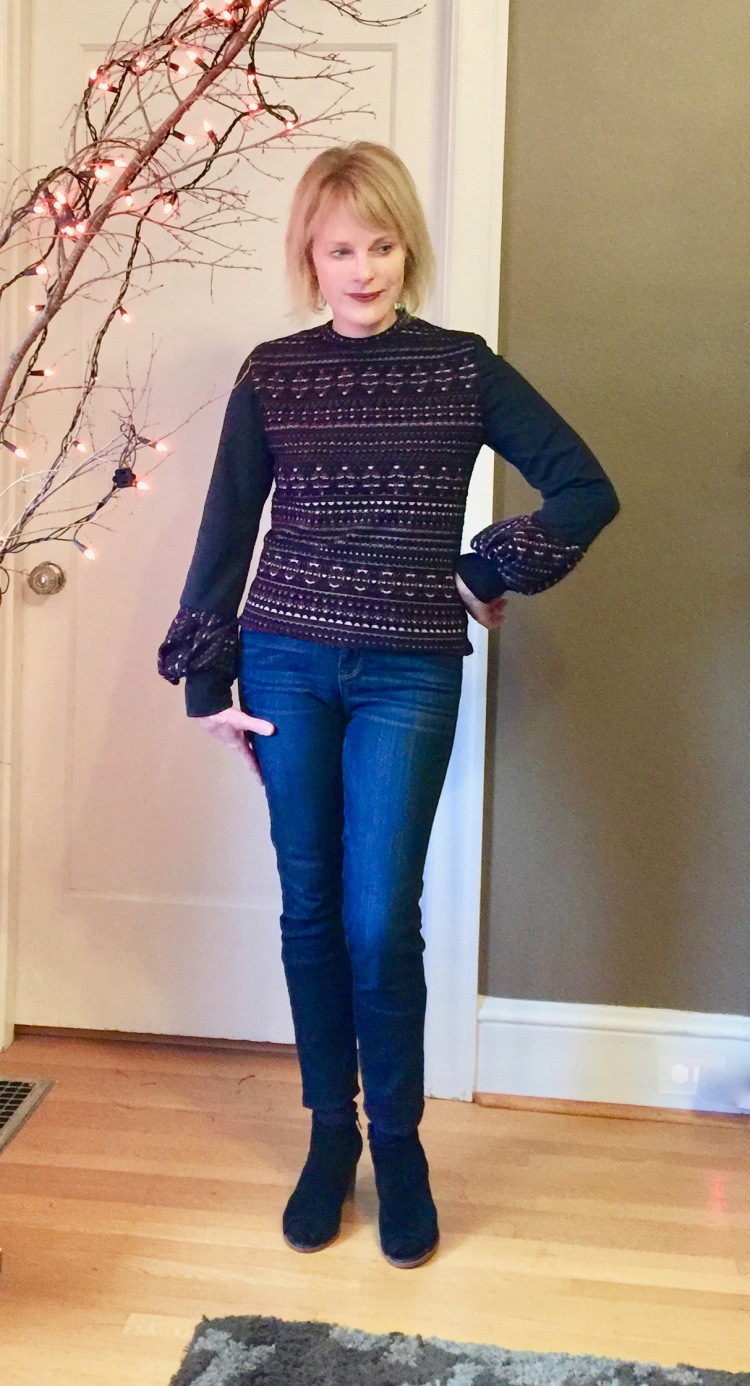
I think I’ve found a new tried and true top pattern to add to my go-to collection. This one is a favorite because it’s perfect for knit remnants! As you all know, I can’t bear to part with sweater knit pieces, no matter what the size or shape, so I have quite the collection of lovely bits. It’s so great to find a pattern that accomodates my need to save them!

IMG_7478

My preferred wardrobe choice at this time of year is pants and a top, so cute options are always on my to-sew list. I really love the curvy raglan sleeves on this pattern! It’s the sort of detail that takes this top from ordinary to something I’ll reach for again and again.

IMG_7607

On this version, I added a large cuff to the sleeve just for fun. I love this fabric, and am so glad I saved this lovely remnant. I didn’t have enough fabric to do the entire shirt so the back is a solid black.

IMG_7521

This top is made from remnants of two different sweaters and I added narrow cuffs to the sleeves to make it look a bit more polished.

This Melissa Watson design is McCalls 7574.

It’s an easy sew, the perfect diversion from a more demanding project (my night dress for the Day/Night Dress challenge, soon to be revealed.). I was pleased that this top fit me right out of the envelope with no adjustments. It has two options on the neckline, either a narrow band or a collar. I used the collar option twice and the neckband on the bright floral version. Both were really easy to sew and are so comfortable to wear. I think the dress version of this pattern would be great to try.

I love the efficiency of sewing several versions of a pattern back to back. By the time I was sewing version three, I was able to complete the top in less than an hour, LOL!

It’s nice to have some fresh options in my closet to go with jeans. If I had to choose a favorite, it would probably be this one. The textured wool knit is so colorful and I love the bold print. Which do you prefer?

IMG_7596

Do you save bits of knit or am I the only one who can’t bear to let them go? Happy sewing and thanks for stopping by!


Two Cozy Knit Dresses for January

This Butterick pattern has shown up on alot of blogs since it was introduced in 2016 and I can see why. It’s fun to sew and to play around with! Since committing to the 2018 Ready-To-Wear Fast, I’ve also been committed to filling some significant holes in my wardrobe. Casual dresses to wear when it’s chilly and damp have topped the list.

IMG_7253

This sweater knit (fabricdepot.com) is perfect for this dress because it’s fairly dense and textured with a moderate crosswise stretch.

In contrast, this stretch terry is also cozy, but it behaves differently since it has less body and no texture, and a bit more stretch.IMG_7218

It’s always interesting to see how different knits can change the look and feel of a pattern! The side seams are an interesting detail of this design and I like how they show up with the contrasting fabric.

I was attracted to Butterick 6388 because of the cozy collar, the side seam detail and the in seam pockets.


It also has a shaped collar that overlaps and a back yoke. To give my striped version a bit of an athletic look, I added a contrasting sleeve band at the dropped shoulder seam before attaching the lower sleeve.


As far as sewing challenges, there were very few with this pattern. After comparing my measurements to the pattern, I concluded I needed a size small and the fit was pretty spot on. I did my usual narrow shoulder adjustment. The in seam pockets were easy to insert and I love how they’re given some definition with top stitching. There’s top stitching at the collar and back yoke too which makes the dress look polished. To insert the curvy back yoke, you do need to do a bit of stretching so making sure your fabric has some cross wise stretch. I also clipped the seams to make this easier. To make sure the collar isn’t floppy, a knit with some body and stability is important. This dress was really a fun, speedy make. I was able to cut and sew it in an afternoon, a plus if you ask me!


Both of these knits were so nice to work with! High quality knits are always worth the extra money in my opinion, because they’re easy to handle and wear.

IMG_7253

IMG_7219


I’m not sure which version I like best, but when I wore the textured knit version out last weekend, my friends gave it a big  thumbs up. Which one is your favorite?

The athletic/leisure look is so popular right now, and this dress makes me feel like I’m following the trend, LOL! Obviously, I have a new favorite pattern here. Might have to make the shorter top version too. Do you have a favorite knit dress pattern? Please share!

Happy sewing and thanks for stopping by!


A Peplum Jacket For Layering

IMG_5932

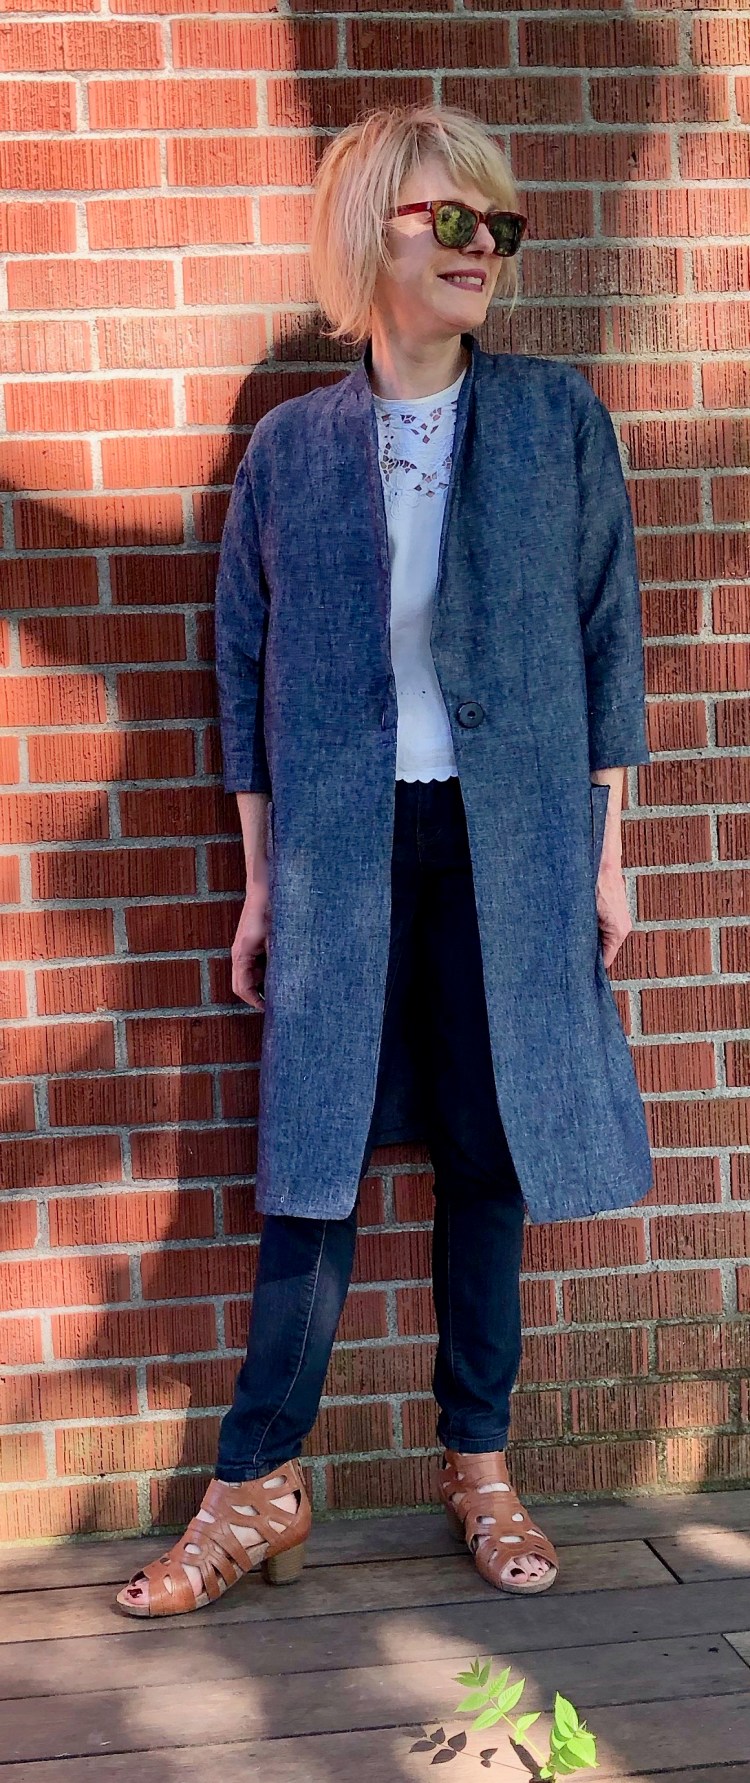
A love the four Helmis I made this year, so much so, they might make it into my Top Five Hits for 2017!  But unfortunately, those shirts aren’t warm enought to wear alone at this time of year. So, my Helmis became the perfect excuse to sew a new jacket!

IMG_5971

As you all know, I love anything with a peplum, so when I found Vogue 9214, it was instant love. It’s a knit jacket, which means it’s super comfortable to wear with a cute pleated peplum and an exposed zipper down the front.

V9214_a

Vogue 9214 is a Very Easy Vogue too, which means it’s fast and easy. The collarless neckline is finished with bias tape.  It’s close fitting through the bust, so it’s a nice smooth layering piece. I love the exposed front zipper and the pleated peplum.

I was surprised and pleased at how easy this jacket was, and for me, the fit was spot on. I used a ponte knit from my stash in a cranberry red (a conveniently seasonal choice), that manages to look good with two of my Helmis. The exposed zipper was reallyt easy to insert. In fact, it seemed easier than the last standard insert zipper I tackled. The neckline is a breeze, because it’s just a bias tape finish. The peplum is created with four pleats, and as long as you have them marked well, it’s not hard at all. That means this is a very doable project at a very busy time of the year. I was able to cut and sew this in an afternoon.

IMG_5984

It’s always great to find a quick easy pattern with a bit of style that you can whip up without a struggle! I’m inspired to make this again out of a sweater knit. All sorts of ideas are churning around in my head!

Another project I finished this week, a collection of  glittery paper ornaments. If you follow me on Instagram, you’ve seen these, but they were so fun to make, I had to share them here too.

IMG_5841 2

I’ve been trying to figure out how to do something similiar with fabric scraps, as I saw a ornament in a store that was fabulous. The paper version has accordian folds that are fanned out to make the circle. I just can’t figure out how to do the same thing in fabric so that the folds stay put. Thoughts? Maybe spray starch?

Happy sewing and thanks for stopping by!


A Top That Could Go to a Party

Last week, I had the pleasure of singing at a holiday event in the beautifully decorated Pittock mansion here in Portland. It put me in a holiday mood, so much so, one of my requirements of any sewing project this month is, ‘can it go to a party?’ I can happily answer ‘yes’ for this make. This top meets all of the requirements.

First, we have statement sleeves, always a conversation starter, if nothing else!

IMG_5617 2Second – – we have a stretchy knit! One can eat and drink as the mood strikes, without a second thought!

IMG_5185

Third, the top can be dressed up and worn with black pants or a lacy skirt.

I love this new pattern; McCall’s 7660.

It has lots of versions, but I chose the statement sleeve version for both makes. And, as luck would have it, the sleeves were the trickest part of this make. There is alot of fabric in the balloon on these sleeves. It must be gathered together at the bottom, then sewn into the cuff. So much fabric in the balloon and a very small cuff…need I say more? I had to unpick one of the sleeves to get it right (not fun when you’re working with knit).  I love the final result though. This task would be less challenging with a lighter weight knit, but I wanted a heavy, cozy knit, so it’s my own fault…

The top is designed to be loosefitting so the fit is easy.  It’s a pullover top too,  so a very stretchy knit is required to get that raised collar over your head.  Both of my fabrics are from Fabric Depot. The fit of this pattern was really spot on for me. I cut the smallest size and it fit perfectly, no adjustments in the shoulders or neck.

IMG_5615

IMG_5151I love both tops, and the fit and design of this pattern.  I think the striped version is probably my favorite, because I love the color and texture of the knit, but I do like the bigger bell on the white version…I think it looks dressier. Opinions welcome!

The Holiday season is off to a roaring start here, and I’m glad to have a couple of cute, comfy tops to wear to informal gatherings of friends. Happy sewing and thanks for stopping by!