Four Linen LB Pull Overs

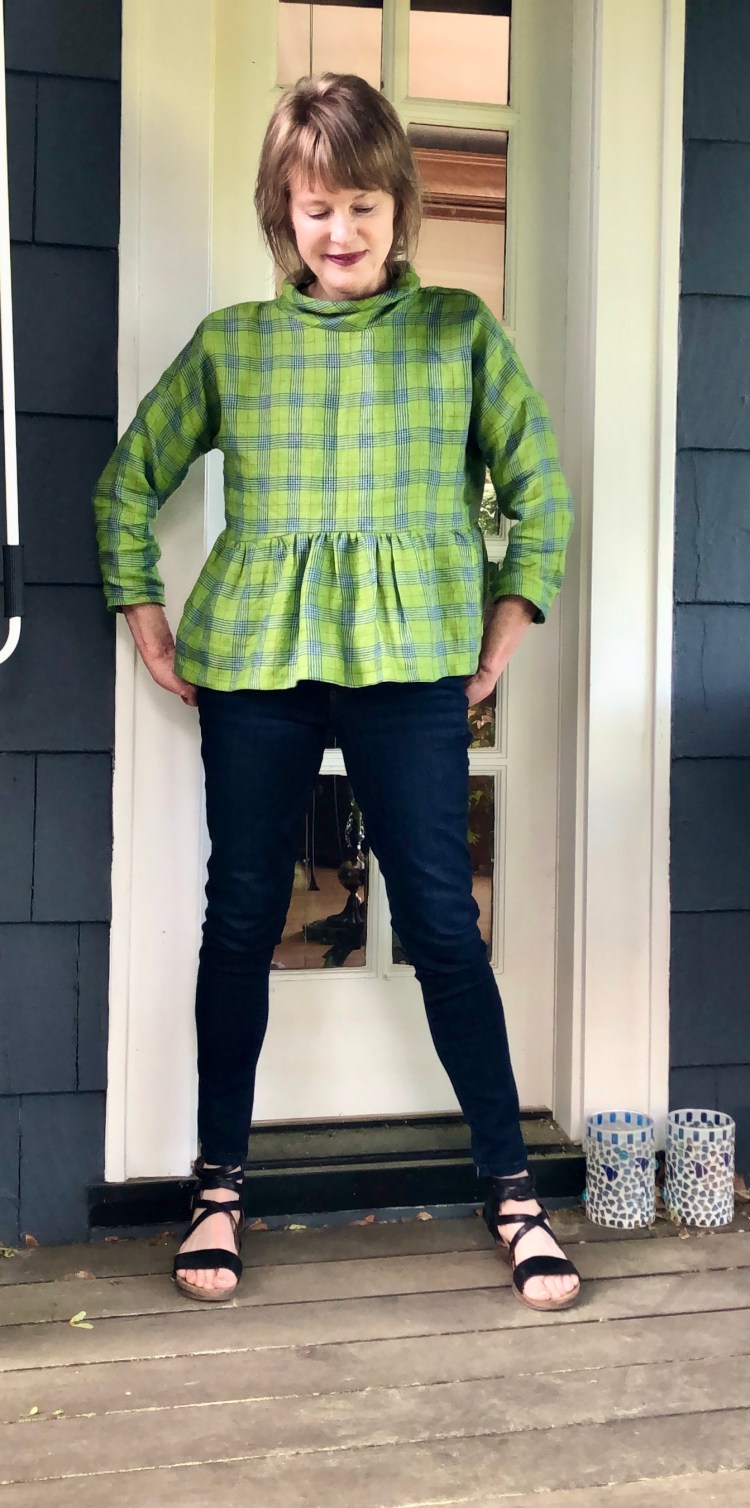
Even though I didn’t post photos during Me Made May, I’ve been taking stock of my me-made wardrobe. To my surprise, my Spring wardrobe includes 4 linen LB pullovers! What’s even more surprising, is that I’ve never written a blog post about one of my favorite patterns. It’s time to rectify that situation.

If you’re unfamiliar with the LB pullover by Paper Theory, here’s a quick run down. It’s a loose-fitting top that is suitable for wovens or knits. It has drop shoulders and long sleeves which you can modify to any length you want. There are two neck finishes, a turtleneck version or crew neck. I love this pattern because the look changes with your fabric choice. Also, it’s fun to hack!

My first linen version was simple.

This is a straightforward, out of the box version from lightweight linen (Josephines fabric.) Instant love. Immediately, I cut another in a lightweight linen (from Britex).

This time, I cropped the bodice by 6 inches and added a 8 inch peplum. To figure out how wide to make the peplum, I measured the width of the fabric at the bottom of the bodice and multiplied that by 1 1/2. Then I gathered the peplum using long stitches before stitching it to the shortened bodice. So easy! I love the loose fit of this version.

I used a remnant in my stash for this violet colored version. I absolutley love the soft feel of this linen. I cropped this version a bit, shortening the bodice by three inches. The sleeves are 3/4 length and I love to roll them up. I used the turtle neck pattern, but took a 1.5 inches off the width. This top is so easy to wear. It’s in heavy rotation.

This last version is color blocked with two linen remnants.

When the weather is hot, this hankerchief linen version is my favorite. It’s so great to work with a pattern that looks so different based on your fabric choice. I have two more LB pullovers on my cutting table, this time in knit fabrics. More on those in another post.

I hope you are well and happy during this strange, challenging time. I am grateful for the joy sewing brings and for our fabulous community of makers. Happy sewing and thanks for stopping by!


A New Gelato Top for the Holiday

Yes, it’s a busy time of year, but I managed to squeeze in a bit of sewing…a Gelato top! This lovely relaxed top might be my holiday attire of choice. I don’t know about you, but on Christmas, I prefer a day of relaxed fun…cooking and eating with friends and family, playing games, sitting on the floor by the fire, maybe even a holiday movie! Given my agenda for the day, relaxed dress isn’t optional, but required. This gelato top in bright poppy and teal will work perfectly.

This pattern is lovely for many reasons, but the detail that caught my eye was the button-up back.

I first saw this top on the blog, Girls in the Garden. Lori’s version was so cute, I had to try to make my own. The cut of the top, is relaxed and loose, but fun and flirty. The Gelato top is designed by Liesl and Company. It comes with two views – – a top like mine or a long shift -style dress.

I quite like both options, don’t you?

I made my version out of a beautiful rayon with lovely drape. Because of the oversized nature of the bodice on this top, you wouldn’t want to make it from a stiff fabric.

Construction: The button back detail looks harder than it is. The tab for the buttons is made by folding the fabric twice and stitching. The toughest part is the buttons and button holes which I made with my machine. Fit was easy because it’s a loose fitting pattern. The neck is finished with bias binding…also quite easy! The top came together in three hours including pattern layout and cutting.

I love my new top and am so glad I squeezed a bit of sewing time into the holiday schedule.

Happy holidays and thanks for stopping by!

Sewing a Patchwork Shirt from Remnants

If you’ve been sewing for as long as I have, you’ve likely accumulated a large stash of fabric remnants. I find it hard/impossible to part with the lovely leftover bits when I’ve finished a project, so my remnant stash is HUGE, and overwhelming. Recently, I decided to sort and catalog the pieces. That’s when I made a lovely discovery… the colors and textures all work together.

So I decided to use the pieces to make this shirt.

Pattern: For my project, I used a tried and true shirt pattern so that fit would not be an issue. McCalls 6124 has a back yoke, two piece sleeves, a collar band and princess seams…so many opportunities to explore!

Process: Because I patchworked both the front and back, I was able to use three types of shirting and three colors of linen, about a quarter of a yard of each. Sewing was easy as I’ve made this shirt a time or two.

The best part of this project was figuring out fabric coordination and placement. In fact, I enjoyed it so much, I had a ‘moment’ when I imagined myself as a quilter. (Just what I need…a new reason to accumulate fabric, LOL!!)

I’m pleased with my shirt and am so glad my remnant stash has shrunk a bit. The good news is my shirt works well with the denim skirt I made a couple of years ago, so I know it will be worn again and again.

Of course, I’ll still be on the look out for new ways to use my lovely leftovers, so if you have ideas…please share!

Although I’ve had a bit of a challenge easing back into sewing ‘post vacation’, I’m definitely inspired by the Fall colors here in Oregon. Our cool weather has me thinking about sweaters and jackets and coats…ideas are brewing! How about you?

Happy sewing, and thanks for stopping by.

Linen Tablecoth Top for #scarfrefashion and #so50vintage

IMG_2015

I have a love/hate relationship with Instagram, I must admit. I love seeing everyone’s makes but I find the limitations imposed by the IG algorithm to be so frustrating. Sometimes, my feed is so edited by Instagram, I don’t see the content I choose. Nevertheless, as you all know, I do love a good sewing challenge and Instagram is full of them! So, I will stop complaining and get on with it….:)

IMG_2046

This linen top (a bit wrinkled having just been worn) was inspired by two sewing challenges on Instagram: the #scarfrefashion challenge (includes tablecloths too) sponsored by @sewstoney and @sewdalaridada, and the #so50vintagechallenge. I happened upon a vintage linen tablecoth with beautiful cut work and mitred corners at a estate sale. I’ve made tops from tablecloths before (here and here) so I knew this one was perfect for a top. I couldn’t resist giving the challenge a whirl.

With a little over a yard of fabric to work with, my style options were a bit limited. After perusing my extensive (!!) pattern stash, I came upon Simplicity 8090, a pattern from 2016 that has all sorts of possibilities.

I chose view C because it doesn’t take alot of fabric and it’s cropped, which allowed me to use the finished edges of the tablecloth as the hem for the top.

The pattern was so easy to sew. The sleeves went in perfectly. The front placket was really easy because I used the finished edge of the tablecloth for that. I only made one modification – I added a collar stand.

I do love the french darts on this top. They look so crisp in linen.

IMG_2008

This top has a seam down the back so I positioned the bodice pieces so that the tablecloth’s cut detailing would be on either side of the seam. I cut the sleeves to use the tablecloth detailing and hem too.

IMG_2045

The inside of the shirt looks fabulous because the hem of the tablecloth finished all the seams for me, LOL!!

All in all, it was a fun project, and I’m pleased with how it turned out. The biggest challenge was the laying out the pattern properly, of course, but the extra time involved was worth it.  I do love the boxy cut of this top and know I’ll use this pattern again. Vintage linen is so lovely to work with, I’ll never be able to resist an old tablecoth again!

IMG_1977

Are you taking on any sewing challenges this summer? Let me know so I don’t miss it! I love seeing everyone’s makes….

Happy sewing and thanks for stopping by!

New Pattern Release: Sew Over It Bonnie Top/Dress

IMG_1008 3
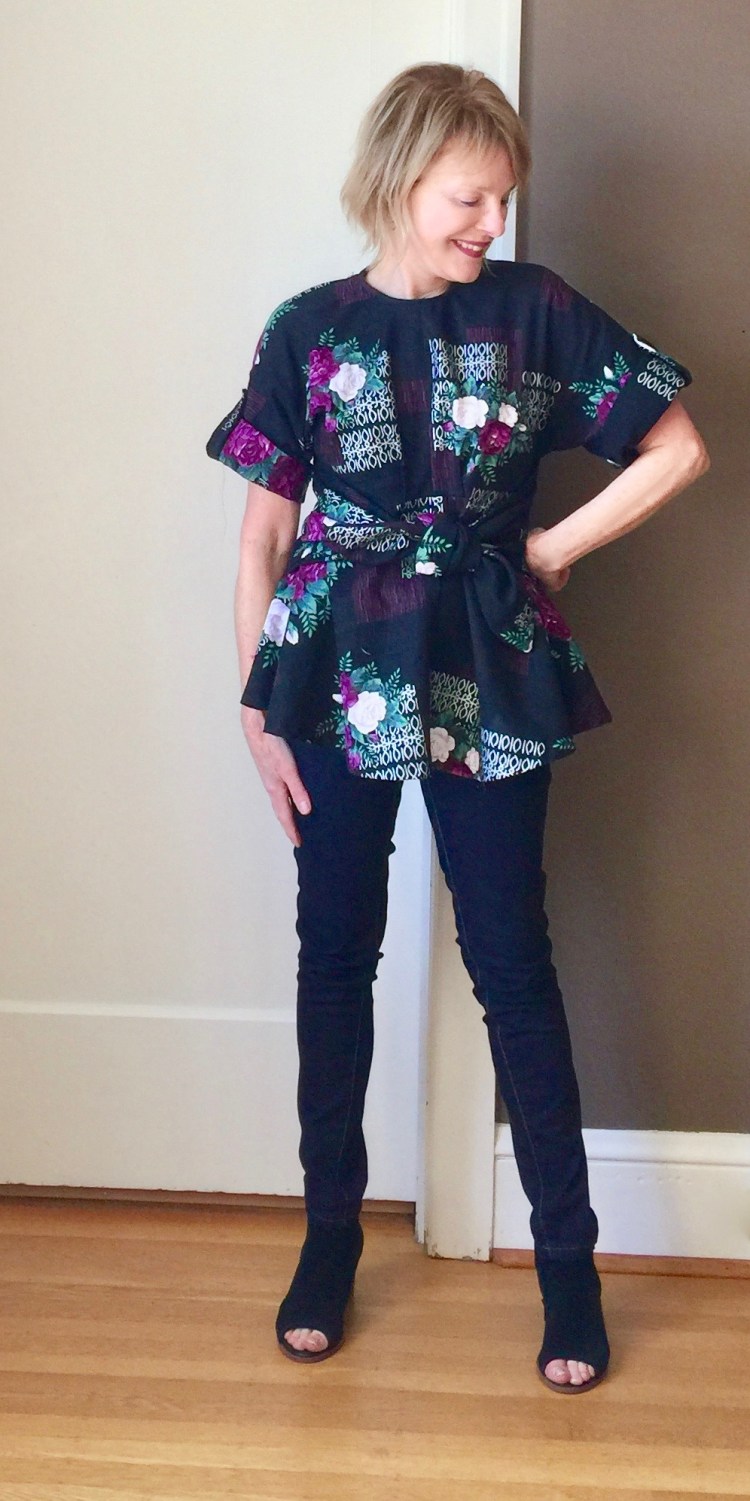
Hi All – – When I saw the sketches of the new Bonnie Top from Sew over It London I was thrilled. If you’re like me, you have a closet full of high waisted pants/skirts, but no tops to go with. I knew that this lovely ‘cropped’ top would fill a hole in my wardrobe. Not only that, but the Bonnie top has pleats! IMG_1005 2The Bonnie has a 1940s vibe with its defined waist, button up front and vertical pleats. It has a cute flat collar and short sleeves with little turn-up cuffs, a design detail that is subtle but effective. I like that the button placket is concealed – – it makes it a bit more polisihed – – a top that can go to a dress up event. There’s a dress version as well that has a knee length gathered skirt and a comfortable elastic waist.  I do love the pleats, but if you want a faster make, there’s a version of the Bonnie without pleats too. I know there will be a version of that view in my future.

I used a lightweight rayon for my version of the Bonnie, and it worked perfectly. Sew Over It recommends rayon/viscose, lightweight crepes, georgette, chiffon or very fine cotton voiles, in other words anything soft and drapey. I’d warn against anything heavier like a stiff cotton. The pleats wouldn’t have a chance to shine. If you are making the pleated version, the wider the fabric the better, as you need lots of room to lay out the front bodice as the pleats make it fairly wide.

IMG_1003.jpeg

Fit and sizing – – I made my size according to my measurements and it fit nicely, without adjustment. I spent a bit of time fussing about the fit of the waistband, but I shouldn’t have bothered. The buttons don’t extend there so the waistband falls open ever so slightly…the fit isn’t tricky at all.

Construction– -When it comes to the pleats, I found the trick was to carefully mark them on my fabric. From there, construction was simple…. All I had to do is fold, press and sew!  Thankfully, the Bonnie  has very clear markings. I transferred them using a chaco marker. Once I’d accomplished that, pleat constructions was easy and fast. The concealed front placket was pretty simple too  once I had the markings transferred.

IMG_0998.jpegI love my new Bonnie top and plan to wear it with my high waisted skirts (the skirt I’m wearing is blogged here), pants, perhaps even with jeans. I can imagine an even dressier version out of silk or chiffon, and the dress version is on my ‘must-make’ list. Really, the Bonnie is one of my favorite Sew Over It patterns! Thanks to the Sew Over It London team for giving me the opportunity to make this lovely pattern!

Happy sewing and thanks for stopping by!

As a Sew Over It Pattern Insider, I received a download of this pattern for free, but the opinions expressed here are my own. 

New Pattern: Sew Over It Kitty Dress

IMG_6897

As a Sew Over It Pattern Insider, I had the opportunity to test Sew Over It’s latest pattern, the Kitty Dress. I love a good shirt dress (here and hereand this one is perfect with lots of design details and options that make it unique – a shawl collar, a gathered or paneled skirt, and your choice of sleeves or no sleeves at all.

IMG_6724

It’s the design of the Kitty dress that makes it tick all the boxes for me. It’s so versatile- – two bodice and skirt styles that you can mix and match!  You can choose a princess seam bodice or a two-dart bodice. Both choices can be paired with one of two skirts: either paneled or a gathered option.  Both skirts feature in-seam pockets, and all versions are cinched in at the waist with a waistband, which makes them look great on everyone.

If I had to rate the difficulty of this pattern, I’d say it’s a great option for an intermediate sewer, or for a beginner who wants to learn some new skills. The instructions are detailed and helpful, so it’s easy to dive right in!

IMG_6920

It’s no secret that I love sewing patterns that give you options so that you can play and modify as inspired. At first, since I’m a fan of a bodice with princess seams, I was drawn to option 1, but when I made my fabric choice, I changed to option two. My rayon print is colorful, and I felt the princess seam detail would be lost in the fabric’s design. So, instead, I paired the double-darted bodice option with the gathered skirt.

I love long flow-y dresses in the Spring and Summer, so I made my Kitty dress from a lovely rayon from Joanns’. This rayon has a bit of texture to it, giving it a casual crinkled look that I love. The drape of this rayon is perfect for my mid-length Kitty because it gives the skirt some swish! For added style, I chose the shawl collar, which has a bit of a vintage vibe.

IMG_6716

The double darted bodice was easy to sew – -just two pattern pieces, both shaped nicely by bust darts and waist darts. Because I have a large waist relative to my bust measurement, I made a test version to make sure the fit was accurate, and I’m glad I did.  I quickly realized the darts needed to be widened slightly to compensate for my non-standard waist.

Fitting the gathered skirt was easy. I used my hip measurements to choose the size to cut and it worked great without adjustments. Gathered skirts are so forgiving and so easy to sew!! I love the way this skirt looks and swishes in the mid-calf length. It’s all I was hoping it woud be.

IMG_6912

I love my Kitty dress, so much, version one is in my sewing queue( princess seams and sleeveless), maybe in a cotton lawn or linen for summer. The updated version of the Kitty is available at Sew Over It now.

The weather here in Portland is improving – I hope to take my Kitty outside for a test run soon!

Happy sewing and thanks for stopping by.

.

Finding Violet and Vogue 9363

IMG_4895I’ve really enjoyed the #sew happy color challenge on Instagram. It’s inspired so many lovely posts by members of our sewing community! The premise of the challenge (created by @katiekortmanart) has been to explore combining complimentary colors in new ways. For me, it’s been an opportunity to look at the colors I love and to think about ways I can have more of them in my wardrobe and life.

This last week of #sewhappycolor features violet and blue. Blue…well, you all know how much I love that color (LOL). My wardrobe includes so many blue options, I could wear the color every day if I wanted. I love violet too, but my stash of fabric and wardrobe doesn’t really reflect that at all.

IMG_4849

So I took a trip to the fabric store, intending to buy a beautiful piece of violet fabric. Instead, I ended up with a print. It’s the scale of this one that caught my eye. The areas of solid black provide negative space that really allows the large violet flowers to pop. I really love this print….Hmmm, need/want more like this…

IMG_4980

Vogue 9363 is my pattern, new this Spring. I can’t resist a pattern with a front tie!  (see my other tie makes here, here and here)

Construction: Although the fabric recommendations include rayon and crepe (lots of drape), I chose Japanese cotton because I wanted the top to look more structured. It was such a such a dream to work with. It shapes beautifully and is a joy to press. The pattern is well drafted too. I cut my usual size and have absolutely no complaints about the fit. The curve of the front bodice seam gives it a unique drape, and the sleeves are easy as they are cut as part of the front and back bodice. There’s a zipper in the back and the loose fit is shaped by front and back bodice darts as well as the wide belt. It’s an easy top to fit and wear.

Changes modifications: I made the short sleeve version of the top/tunic. The pattern suggests the sleeves be finished with a machine hem, but since the print has a bit of a vintage vibe to it, I decided to add a rolled cuff to the sleeve with a buttoned sleeve tab. I really like the finished look of the rolled cuff on this generous sleeve.

IMG_4981

This lovely print has reinforced my love for violet. I’m hoping there will be more of this happy color in my future. For more inspiration and information about complimentary colors, check out Katie’s blog…it’s a wealth of information very enthusiastically presented. #Sewhappycolor was such brilliant idea – – Thanks Katie! Have you all enjoyed #sewhappycolor too? Any new revelations?

Happy sewing and thanks for stopping by!

A Burda top you can make in an afternoon and Dior Exhibit

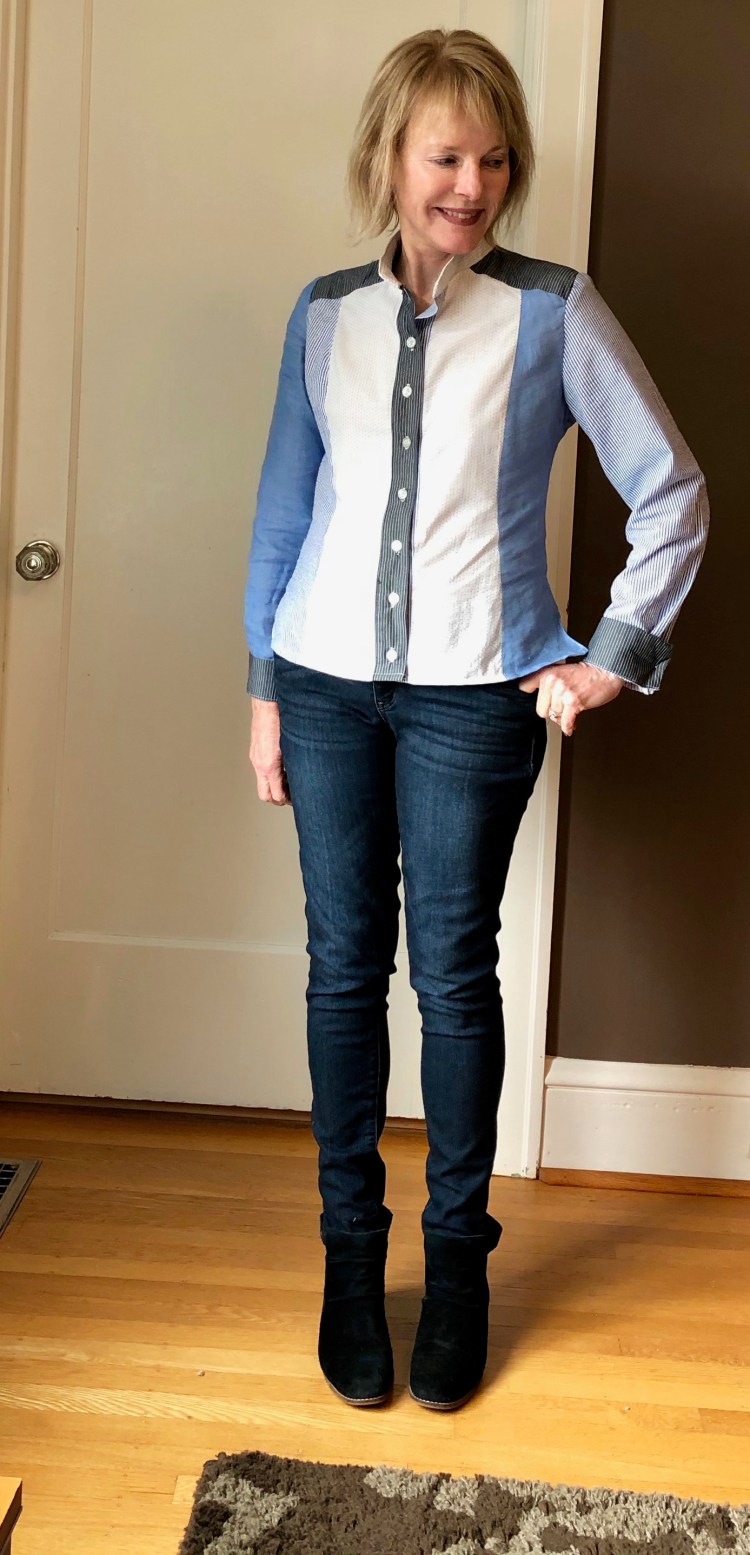
A Burda top and Dior….a lovely combination, eh?

First, the Burda top…..My box of precious fabric bits and lacy remnants is overflowing these days, so I’ve adopted a new ‘tidying up’ rule. If I can’t find a use for a remnant within six months of adding it to the box, it must go. So, I was thrilled to find this lovely pattern that seems designed to use up my bits and pieces.

Burda Style 12/2018/103 ticks a lot of boxes for me. Since my daily uniform of choice is a knit top with jeans, this one has the potential to stretch my every day wardrobe significantly.  I also have a thing for peplums (here and here), so I couldn’t resist this assymetrical version. Then there’s the opportunity here to mix fabrics…a big plus when you’re working with remnants.

103_large

Because I could see lots of potential here, I decided it would be worth the extra step of tracing the pattern from the magazine insert (usually a hard sell for me!!). Luckily, this  pattern only has four pieces to trace (a front and back bodice, and a front and back peplum) so it took me less than a half hour – – Score!! Also, since Burda patterns don’t include seam allowances, I’ve taken to tracing a size up to avoid the process of adding seam allowances to each piece. So far, this method has worked well for me.

Recommended fabrics are knits for the bodice, and softly draping blouse fabrics for the peplum. I used a rayon knit for the bodice of both my versions. On the white version, I used a remnant of eyelet lace for the peplum and a remnant of silk for the blue peplum.


The blue silk was a bit tricky to work with. It’s sheer and my Bernina wanted to eat it:). I’ve found that to sew with silk, I have to use the right needle in my machine..the sharper the better!

IMG_0796

The sheer fabric really dresses up the top, so the torture was worth it. I used my rolled hem foot to put a narrow hem on this peplum.  I didn’t have enough of the bodice fabric for the sleeves so I cut them from a remnant of solid blue rayon jersey – – another piece from the pile!! I always feel so virtuous when I use a remnant, don’t you?

This top was an easy sew.  The neck is finished with a bias strip, and I used my twin needle to hem the sleeves and the lace. All of the seams are serged, but you could use a zig-zag stitch as well. Instructions on Burda Style patterns can be a bit brief, but in this case, there really wasn’t much of a need to elaborate. One other note…the fit on this top is loose and very forgiving, so I didn’t find I needed any adjustments.

IMG_0770

I was able to complete both of the tops in an afternoon. There’s nothing like a quick project on a Sunday afternoon, don’t you think?

In other news, I visited the Dior exhibit in Denver last week and was completely blown away by the exquisite designs and fabrics and finishings. Here are a few shots to enjoy…

(If only I was a better photographer…) The first dress here is embroidered with branches and leaves and flowers…so beautiful!  The green dress was worn by Nicole Kidman to the Oscars. It has netting, embroidery and fur trim! And let me tell you, this dress is….well, tiny.

The dress on the left is covered with equisitely made tassels. The red dress here is embroidered with flowers and studded with pearls and sequins. The white dress is tassled too. Touching these gowns was out of the question of course, but wouldn’t that be fabulous? We sewists are tactile creatures, aren’t we? After leaving the exhibit, I could hardly wait to get home to sew.

This week, I’ll be working on my look for the Day/Night Dress Challenge.  I’ll be posting my look on February 22. There’s a community challenget too and prizes…join us! dandc2019I

Happy sewing and thanks for stopping by!


An Anthropologie Inspired Burda Top


mL2l3J35Qjulp7CwY9UopA_thumb_11013If you ask me, the November and December issues of Burda Style magazine were so great, they more than justified the hefty price of U.S. subscription. This Anthropologie inspired make is from the November issue, and it’s just one of five patterns that I marke to trace. Yes, I always dread the task of tracing the patterns from the magazine…there are so many crazy lines to sort through! But the results were worth the effort!

Here’s the Velvet top from Anthropologie that inspired me to make this.  4110348695280_070_b

This Burda Style top is really close, minus the gathers at the shoulders.

rZMxr0WtSIumRgbFb3O9OA_thumb_110f3

Navy blue is such a hard color to photograph so I’m not sure how clearly you can see the waist-pleat detailing, but it adds a nice touch and it was easy to sew. This Burda Style pattern is 11/2018 Style 110.


The magazine version is made from stretch jersey so I made my version from stretch velvet. If you try it yourself, I highly recommend a stretchy jersey with lots of drape. I cut the smallest size and the fit is great. I did forget to add the seam allowances when I first traced the pattern pieces and had to retrace them. UGH. There are so many crazy lines going every which way on those pattern inserts. I guess you could avoid that frustrating step by paying for a download of the pattern from the website, but to me, that feels like paying for the pattern twice which I could not justify, since, in the US, a subscription is already a sizeable investment. Fortunately, there aren’t alot of pieces to this pattern so the tracing wasn’t too hard.

x2MmSKnwSw2mxLcTjL4YJg_thumb_110cb

The required sewing was quite easy! I’m always impressed at how well Burda Style patterns come together.  The instructions feel so abbreviated to me, yet the projects always seem to work out! The front bodice and neckline are finished with facings and they’re very simple to attach. The sleeves are set in and they went in easily. The tie is just inserted before attaching the facing. No big deal. Machine sewn hems finish both the bodice and sleeves.


I always worry about fit when I make a wrap top. There’s so much that can go wrong in terms of gaping in the front. Because of that, I celebrate when I find one that fits well. Since this one is a clear winner, I’ll likely try it again. I might even add a few inches for a dress. It’s a great addition to the wardrobe since it can be worn alone or with a white collared shirt. Probably a lacy tee would look great under it too.

It’s always great to add a new velvet piece to my wardrobe, since I am such a fan! I’m hoping to sew a few more things before I do my yearly wrap up, but it could be wishful thinking on my part:). Happy sewing and thanks for stopping by!


A Vogue Vintage Jacket in Plaid

IMG_9618 2 
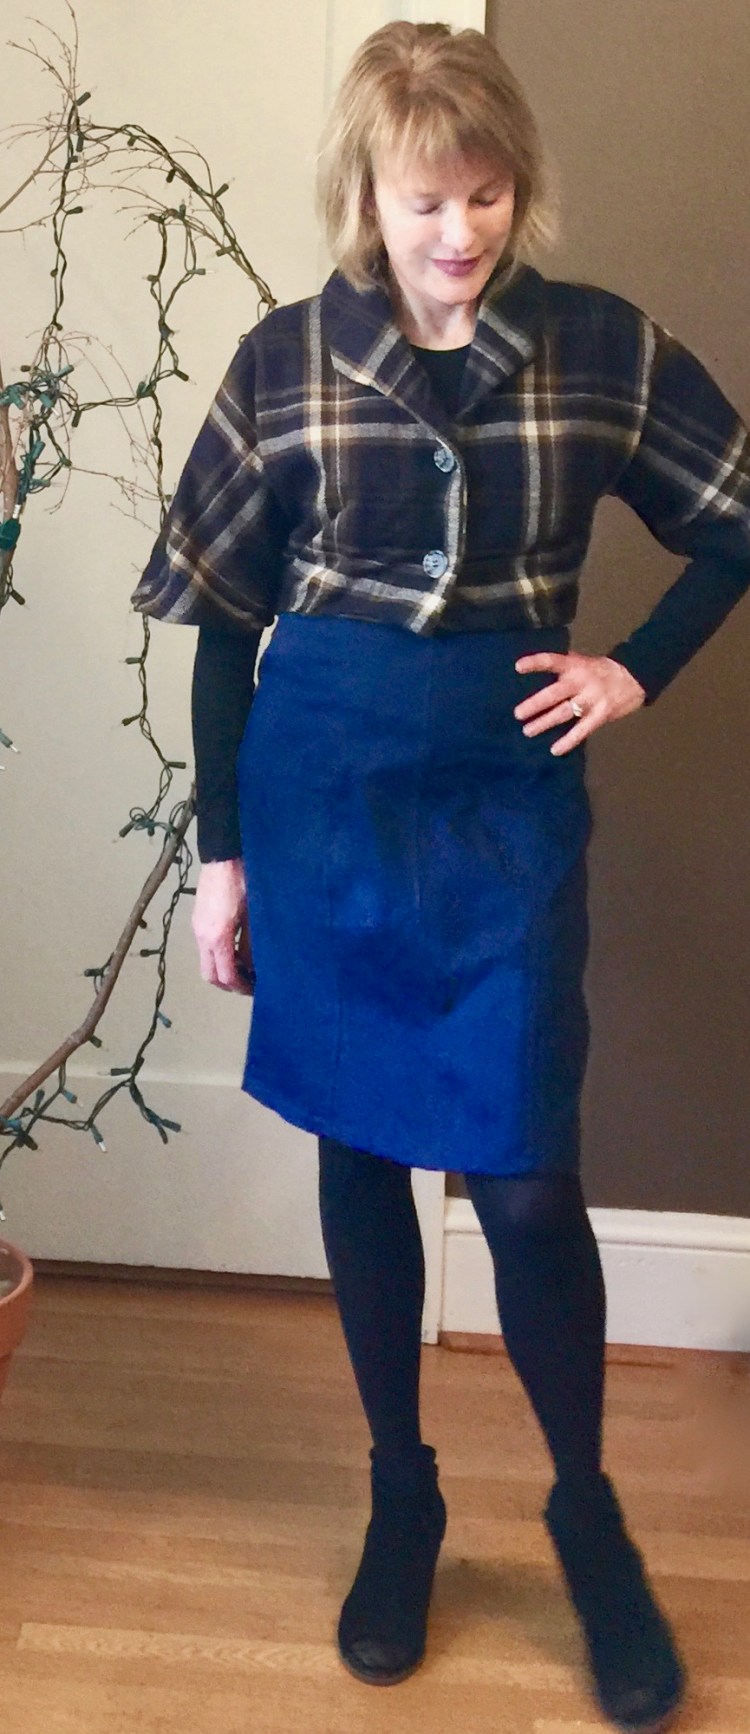
Hi all! I’m back from a bit of a holiday break with a plaid jacket, inspired by one I saw in Vogue pattern Magazine. If you’re like me, you look forward to each issue of the Vogue Pattern magazine because there is always something there that will spark an idea for a project. This issue was one of my favorites as it was all about PLAID.

vpm_product_0

Love the plaid coat on the cover!! Inside, a vintage Vogue jacket caught my eye, and I knew I’d have to make my own version.

IMG_9631


It’s hard not to love a good Vintage Vogue design! Vogue 9082 is especially appealing because it has a cute cropped jacket.


I made my jacket from a plaid I found at the Mill End Store here in Portland on my usual Fall visit there. I’m always on the lookout for classic but fun plaids, and, as usual, they did not disappoint. This fabric is really lovely in person; photos don’t do it justice. It has a bit of olive green and gold in it, and it’s so soft, a blend of wool and acrylic. I was lucky enough to get the last two yards on the bolt.

IMG_9598 2


Challenges: The pattern is pretty straightforward and pretty easy, but hey, I had to complicate things by making mine from plaid. It was a bit of a challenge to lay the pattern out because the sleeves are cut as part of the bodice. This means you must be sure that you place the plaid on the bodice carefully because that line follows down the sleeve. The good news is…because you don’t set in the sleeve, it means you get to avoid the whole sleeve to bodice matching ordeal, The bad news…the wrong placement could mean you’d have plaid sitting awkwardly on your shoulder. My plaid was large so a mistake would be glaring but I think it worked out well. By the way, my success rate with matching plaid has increased considerably since I started using Wonder Clips to hold things in place while cutting and sewing. s-l640

I love these things so much! Just posting a photo of them makes me want to buy a zillion more. You can find them at Joann’s, at craft stores, on Amazon. They are so useful and all the colors….I could go on and on!!

More about the challenges – – those collar points!!  From the line diagram, it appears that the collar is designed to look a bit more angular and pointed than in my version. Not sure why, but mine aren’t quite as dramatic as I expected. I think the error happened when I cut the bodice. When I inspected the pattern pieces later, to my surprise, I’d cut the collar points as I expected them to be, rather than how they were. Perhaps it was because I was binge watching Outlander. Blame it on Clare and Jamie.

IMG_9602 2


I think the cropped style works best with my highwaisted denim skirt (made here). It would probably work with jeans too!

Future posts and plans….

The holiday season is in full swing around here. It’s my favorite time of year because I get to sing in several Christmas concerts with my choir, which is such a privilege and joy. It also means I’ll be sewing a few fun EASY gifts for friends…Curious if you are too?  My next post will probably be about that. In other news, the year is coming to an end, as is the 2018 RTW fast and I’ve been thinking alot about that experience and what it’s meant to my sewing journey so I’ll share those thoughts too. Then, of course there will be a hits and misses post for 2018. So much to talk about!

I hope you had a nice holiday with family and friends. Happy sewing and thanks for stopping by!