2020 in Review: Sewing Hits and Misses

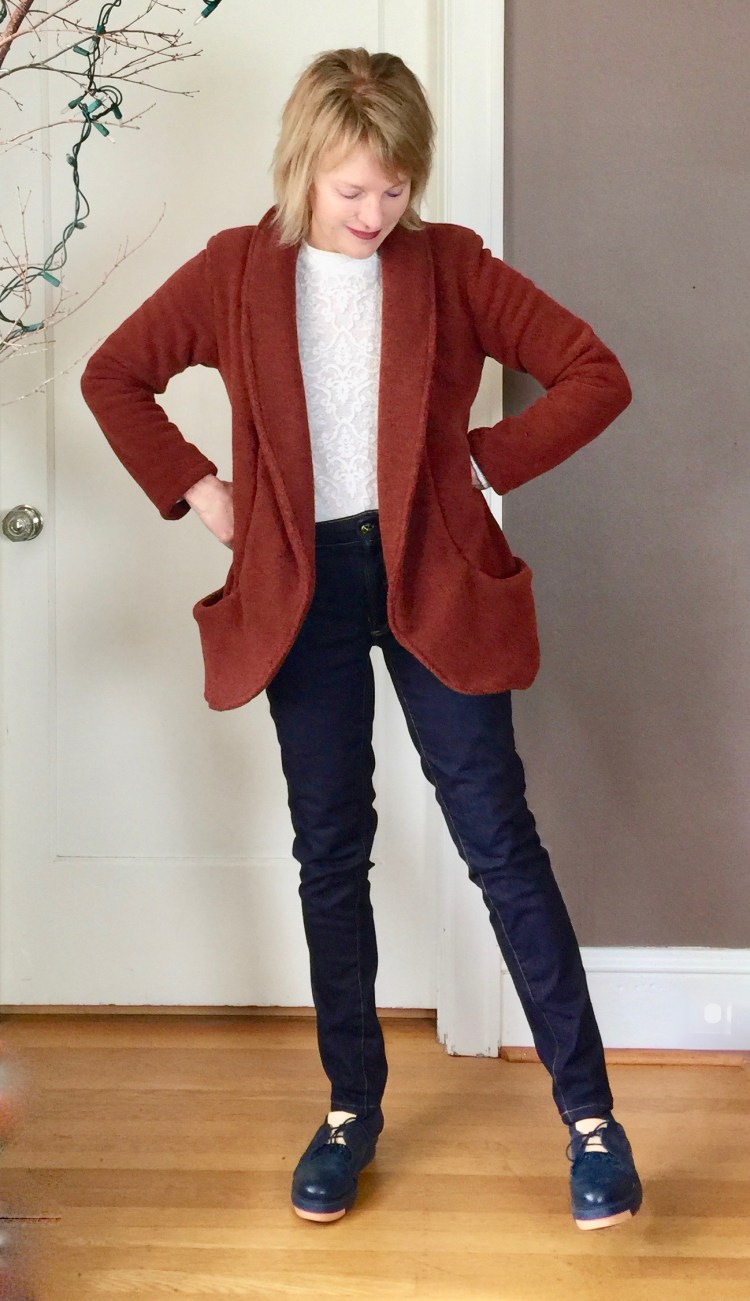
Hi all – -Even though 2020 has been rough, I do look forward to reviewing my hits and misses each year. So in spite of the fact that I’d like to forget much of this year quickly, here we go!

Some hits……

IMG_8719

The Tamarack Jacket (Grainline). Can I just say, what took me so long? I love wearing this jacket both outside and in. It is my go to ‘topper’ and I hope to make another one soon. This quilted Merchant and Mills fabric was such a fabulous splurge, but worth every penny. It makes this jacket such a pleasure to wear.

IMG_8310

Kantha Cloth Haori (Wiksten) – -Yes, there is a bit of a theme developing here…my new found love of quilted jackets! The colors in this fabric make me smile and the chambray lining is fabulous against the skin. If you haven’t made a Wiksten Haori, reconsider!

IMG_4898 2

1960s coat (Sew Over It) This was a challenging make but so worth the effort. The boucle wool was a splurge and I lined the coat in silk, a investment I will never regret. I love the classic style of this coat and wear it all the time.

IMG_0819

Denim Scrap Haori: Jackets were my jam this year and this one was as fun to sew as it is to wear.  I added topstitching everywhere just for the heck of it. I had an aha moment while making this. I love, love mixing and matching fabrics so much. As a result of this project, I actually tried a quilting project. More about that later.

IMG_5172

Carolyn Pajamas in Lady McElroy cotton lawn The joy in this make for me was placing the pattern pieces on the lively print in a way that was pleasing.  I love wearing these so much!

IMG_E1116 2

Patchwork Linen Inari (Named Clothing) This project combines two of my big sewing loves….Linen and playing with fabric scraps.

IMG_4339 Isca Shirt Dress in linen: This is my go to dress during all seasons and will be forever. I love the gathers, the raised waist and the cool inset. I made two, but will likely make more!

Fails

I learn something from every project I make so when something doesn’t work, it’s usually easy to talk myself out of a funk.  Famous last words….

IMG_6153.jpeg

Jasika Blazer – -Whoa…this was a huge fail that haunted me. I even made a mock up, but I still got the pocket placement too low. Unfortunately, I didn’t figure it out until the blazer was finished. The drape of the velvet was funky too, so wrong for this pattern.  It was no one’s fault but my own. Still, ouch. I have fabric for another one, but I think I’ll put this pattern away for a while!

IMG_7312.jpeg

Farrah Jumpsuit (Sew Over It) Great pattern, but the style is just not me. I just can’t do it. Live and learn. I should stick with classic shapes.

IMG_8566.jpeg

Freida top (Sew Over It) – Cute pattern, but wrong fabric. Yes, this fabric was on sale but it was not a good purchase. It’s really see-through. It’s already been donated.  I do like this pattern though. Perhaps I should make it again.

IMG_1699

I also made a quilt with scraps too which took me a bit out of my comfort zone, but I thoroughly enjoyed it. I will likely make another soon.

All in all, a pretty successful sewing year. Even though I was sewing alot, I didn’t post as often but when I did, I enjoyed it more. I hope to continue blogging this year, and to post on Instagram too. I try to keep a healthy relationship with Instagram but sometimes I fall prey to the desire to sew what’s trendy rather than what’s right for me. I hope this year I can keep that in check:).

Through this strange, sobering year, sewing has been my refuge. I’m so appreciative of the joy this lovely hobby gives me and of our community of makers. Thanks for reading! IMG_1704.jpeg

July Making Journal: A Wiksten Haori, A Libby Shirt, a Peplum Top

Although we’ve all felt the strain of the unknown over the past months, for me, there have been some positive things about the quarantine. I’ve truly appreciated the gift of time. It’s been lovely to slow down and savor making things. As Oregon gradually reopens, I hope I can resist the urge to rush!

Denim Wiksten Haori

When considering what to do with several old pairs of jeans, it’s probably no surprise that I reached for my well-used Wiksten Haori pattern. I do  love creating from scraps.

IMG_0870

 My last two versions are soft now and well worn (hereand here).

For this Haori, I mixed and matched the legs of several pairs of jeans, all from different colors of denim.

IMG_0894

To get enough denim for the front and back bodice, I cut pieces from the legs. I also ripped off pockets and added them to the front and inside of the jacket.

To tie it all together, I used white topstitching thread and double stitched where ever possible. For lining, scraps of soft chambray came in handy.  I hardly noticed the time as I ripped and cut and sewed. It’s a lovely weight, perfect for our cooler summer evenings. This will be one of my entries for #joinupjuly on instagram.

IMG_0819

Libby Shirt

This month, I enjoyed revisiting one of the older Sew Over It patterns, the Libby shirt. This easy button-up top is cropped and loose fitting for a modern look. I made both versions from rayon. Even though it’s easy to sew, the pattern has lovely details. I love the vintage collar and cute cuffs.  Rayon is a great fabric for this one. Since the fit of this top is loose, I cut the smallest size.

IMG_0734

IMG_0917

McCalls 7052

My last make is a tried and true top that I’ve made so, so many times. It’s a easy-fitting top with a swing-y peplum, McCalls 7052 (also made here). I love this top because you can throw it on and feel put together, even though the style is relaxed and easy. This is project you can finish in an afternoon – -instant gratification! I’ve used different fabrics for other versions, but love the feel of it in rayon.

IMG_0844

The journal/diary format I’m using here on the blog today is new for me.  It seems to make sense when I’m reviewing makes I’ve sewn before. What do you think?

I hope you’re enjoying your sewing projects as much as I am these days.  Happy sewing and thanks for stopping by!

A Kalle Shirtdress Becomes a Coat

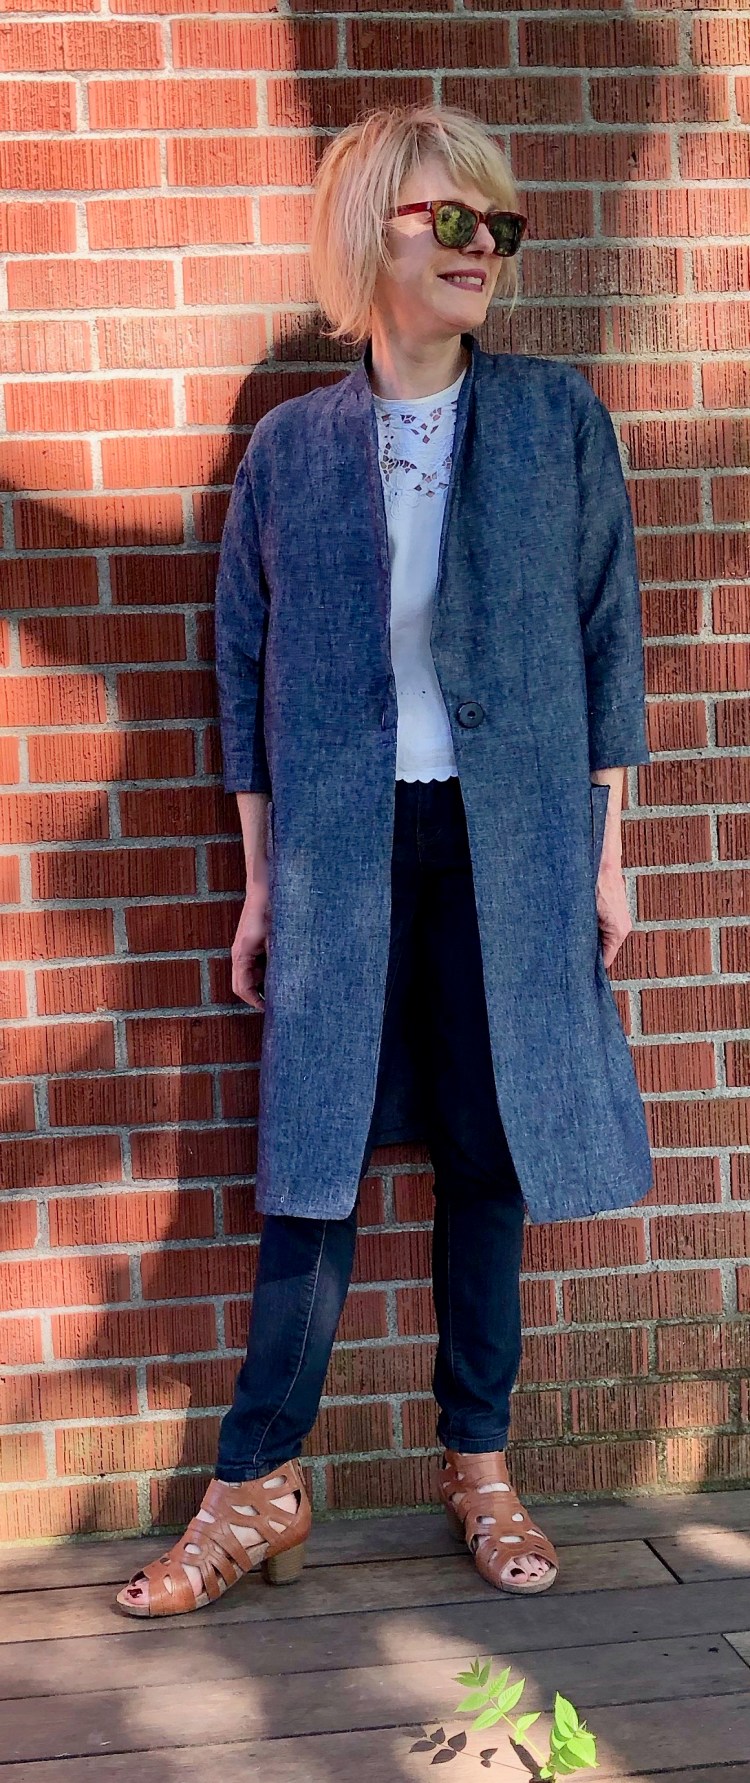
This week, I marked the beginning of Fall by completing my first cold-weather sewing project. My new denim walking coat was just the kind of project I needed to cope with ‘post vacation blues’. It’s a topstitching extravaganza, just the therapy I needed. Some sewists find topstitching to be stressful, but for me, the focus required is actually a relief that my brain craves when I’m down. 

My inspiration for this coat was a denim coat, designed by Madewell. I saw Cobie Smulders wear it on the already cancelled show, “Friends from College.” It’s a loose-fitting coat, made of mid-weight denim with a hidden placket and a tie belt. 

Although Colbie wore it as a dress on the show, I saw it as a long coat for Fall. Many of my knit dresses (here and here) are below my knees, so this coat will accomodate that length easily.

Pattern: To make the coat, I modified a tried and true pattern, the Kalle Shirt Dress. This pattern has so many options, I recommend it highly.

I chose this pattern because the fit is great, but loose and classic. To make it coat length, I added six inches to the bodice. To create the back vent, I eliminated the back pleat and added a seam instead, open at the bottom. Otherwise, I left the pattern pretty much as is.

 The orginal pattern has short sleeves, but I purchased the long sleeve extension from the Closet Case website. Instead of the classic french cuffs suggested by them, I eliminated the closure on the cuffs, and just folded them back.

Fabric: I used a medium weight denim from my stash for the with a darker denim for the collar, cuffs and pockets. The Kalle has one pocket, but I drafted three more. I used double topstitching on the pockets to make them pop.

I always love using a tried and true pattern in an unexpected way. As a coat, the Kalle does not disappoint! With this make, I’m officially accepting that Fall is here. It’s time to pull out the knits and wools from my stash and sew cozy

Happy sewing and thanks for stopping by!

#sewjapaneseinjuly meets #tableclothrefashion

July was a big month for sewing challenges. There were so many on Instagram, I coudn’t keep track of them all. For me, two challenges stood out above the rest: #sewjapaneseinjuly and #scarfrefashion, which also includes tablecloths. Yes, my last post was about a tablecloth refashion, but as you all know, one thing always leads to another for me, and that project was so fun. I guess it isn’t too surprising that I had to do another revashion before July was done.

But first, my #japeneseinjuly make…

IMG_2306 This is the Summer Jacket from the Nano Iro sewing studio book.


Nano Iro is a watercolor artist who creates beautiful textiles. Her designs are transferred to cotton and linen, which are perfect for clothing. Not only does she create beautiful textiles but she is an author. On a recent shopping trip to Bolt fabric here in Portland, I discovered that her recent book has been translated to English! Of course, I couldn’t resist….this is the summer jacket from that book.

images

To me, Japanese sewing books are great because the styles are simpler and cleaner which allows the fabric to take center stage. That’s why, for this jacket, I reached deep into my stash for one of my favorite pieces of linen.


IMG_2318My linen has the tiniest bit of sheen which makes the denim color really pop.

IMG_2241I love the classic lines and the shawl collar of this summer jacket. The construction is basic but clever…the shawl collar is supported by a back neck facing that keeps the neck from rolling.  The pockets are patched onto the jacket, which gives it a utility jacket feel, so on-trend! It’s unlined so construction is a breeze. If you can set in a sleeve and attach a basic collar, you’re good to go! Use a medium weight fabric for this project with a bit of drape.  IMG_2305This style works with everything in my closet – – I suspect this jacket will be in my suitcase when I go to Italy this September!

On to the  tablecloth refashion…

IMG_2284This is the Basic Blouse, cut from a circular vintage table cloth purchased at an estate sale. I wish you could see from these photos that the cut detailing is embroidered with blue thread – – Love!!


Construction of this top was simple..The sleeves are cut into the bodice so there’s nothing much to it. The trick was in the layout….I had to place the cut detailing appropriately. I used the scalloped edge of the tablecloth as the hem and the center of the tablecloth as the yoke of the bodice. The sleeves are highlighted with more cut detailing, and after some tricky maneuvering I managed to get the sleeves to mirror each other. IMG_2287I added a back slit at the neckline and finished it with bias binding.

IMG_2246 2

I love my new outfit…and to think both pieces were inspired by sewing challenges! What challenges are you inspired by?

IMG_2190 Happy sewing and thanks for stopping by!


A Quick Cozy Jacket and Ginger Jeans

After completing my two dresses for the Day/Night Dress Challenge, I needed something to cleanse my sewing palate. Usually, when I’m in that mood, I choose a simple pattern to complete. But this time, I decided to make a fun outfit including a new pair of Ginger Jeans. So in this post I’ll talk about the jacket first followed by the jeans.IMG_9097 3The jacket – – Yes, it’s March but it’s still cold and damp here. That’s why I decided to make my jacket from fleece, a first for me!

IMG_9073I  love slouchy jackets with big pockets so I couldn’t resist Simplicity 8468, a jacket with curved seams, deep pockets and cozy lapels.

8468

I made it from double sided fleece that I found at Mill End Store. Fleece is easy to sew too, if you know a few tricks.

  1. You don’t have to finish your seams because fleece doesn’t unravel. I did choose to serge my seams though, but only because I like the finished look it gives to the inside of the jacket, but it isn’t a crime if you don’t.
  2. To keep bulk down, trim your seams and clip your curves.
  3. Topstitching can be tricky because the fabric is so thick. Walking foots are nice for this, although I managed without.

The fit of this jacket is loose so I cut the smallest size but still had room to spare. It was a quick fun sew (less than four hours with cutting time). The jacket is unlined and the fit comes from the curved seams so it’s a breeze to sew. I’m so happy with this make. It’s the sort of jacket I love to wear, casual but polished. I’m sure I’ll make this pattern again!

IMG_9143

My first Ginger Jeans: Even though I’ve made several pairs of jeans before, I still feel some trepidation when I consider sewing another pair, especially when it means trying a new pattern.  There’s the time committment involved for one thing (this pair took 6 hours), and even if you put the time in, there’s the very real possibility the darn things will not fit or feel or look the way you want. It’s the risk factor that kept me from realizing my dream of Ginger jeans for so long. But, Wow! It was worth the risk because I love this pattern. I’m so glad I took the leap!

IMG_9157

Things I learned:

  • I find that a block of dedicated time is necessary to make a pair of jeans so I dedicated an entire Saturday to this project. If I take a break, I lose momentum and it’s hard to get my head back in the game at a later time.
  • I made View B (high rise version) and used a dark very stretchy denim (Modern Domestic) that isn’t too heavy.
  • If you can, use two sewing machines, one threaded for topstitching.
  • I use wonder tape (I should invest in the stuff) to hold things in place at tricky moments (pocket facings, waistband, zipper). Pins can fall out of denim at critical moments.
  • Baste side seams so that you can rip them out if the fit isn’t just right.
  • Interfacing is optional on the waist band. I left it out and I’m glad I did for comfort.
  • Heather (Closet Case pattern’s designer) suggests that you cut the legs out one at a time, rather than cut them on doubled fabric. That way you’re assured each leg is on the straight of the grain which prevents twisting once they’re sewn.
  • Pocket facings – – okay, I really struggled with this step (it was hell, honestly). It could be just me, but the instructions made no sense. I ripped the pocket facings out twice before I resorted to referring to my favorite pair of RTW jeans and mimicking their construction.  I also referred to the on-line tutorial on the Closet Case Files website, which really helps.
  • Back pocket placement – -The marked placement seemed low to me, so I raised them as high as they could go.

IMG_9185


IMG_9183 2

Okay, maybe they aren’t perfect but they’re close enough and so comfortable! The legs bag a little which is likely because I left them a bit long as I’m always nervous they will shrink again down the road (Ha, yes, this is probably impossible, but I freak out over these sorts of things). There might be a bit of a twist on the left leg, or maybe I’m standing in an odd way :), but it’s not too bad. Otherwise, I love these jeans!  I’m really pleased with the fit. I think I may like this pattern even better than the Jalie’s I made here. I think I’ll cut out another pair soon. I need to make another pair before I forget how I did the pocket facings, LOL!!

IMG_9122


A new outfit that will be transitional for Spring, yay! What’s your go to jeans pattern? Have you ever made a jacket from fleece?

Happy sewing and thanks for stopping by!


Maisa by Named in 3 Denims

IMG_3518

Finally, I can cross ‘denim jacket’ off my sewing bucket list! This amazing pattern is part of the Named SS17 collection, the Maisa jacket and I’ve had my eye on it since it was released.

Maisa_Jacket

The photo on the pattern envelope is made from recycled jeans, and I orginally planned to do the same with mine, but I couldn’t find enough denim in the color palette I had in mind, so I used a few denim remnants instead, purchased at Mill End.

Here are a couple of the runway versions that inspired me to take on this project – the first is Dior. The second is Dolce and Gabana…love the patchwork.

I looked at several patterns – including the Style Arc Stacy, but ended up with the Maisa because of the oversized feeling it has. Also, it has two piece sleeves, and I love how the front of the jacket looks pieced.

IMG_3406

The instructions did not disappoint, but I did face a few challenges. 1. Sizing: According to the envelope, I was a size 6, but a when I placed the pattern pieces on my dress form, it was so big, that I cut a four instead. It’s great in the shoulders, but even the smaller size was way too big in the arms. I had to do some fancy maneuvering to get the two piece sleeves fit.

IMG_3583

2. Topstitching. There is alot, (which I love). Instead of topstitching thread I used double thread and my machine (Bernina) performed better. But the seams were so thick in some places, it couldn’t cope and the stitches were uneven. I posted a question on instagram and (Thanks remakeremodelrecycle and fauxgetaboutit) I received a couple of tips I will pass on. Pound the seams with a hammer and they will flatten, making stitching easier. Also, you could use a thinner fabric for the underside of the pocket flaps, cuffs to reduce bulk. I tried both and it worked – smooth sailing all the way.

IMG_3512

Be forewarned, there are no handpockets on the Maisa, a fact I should have noticed, but didn’t until I was done. I’m a big fan of pockets, since it’s pretty crisp around here in the fall. I wish I’d added some.

One of my favorite parts of this project – – Hammering in the buttons!

IMG_3390

In terms of sewing satisfaction, the Maisa project was a huge winner. It was time consuming, (probably clocked in at about fifteen hours with the buttons) but worth it, and I do love the intricacy of this pattern! I wear this jacket with jeans, dresses, and skirts, and the proportions make it perfect with them all.

IMG_3395

Another winner from Named patterns. What do you think of their new collection? Will it be on your wish list?

Happy sewing, thanks for stopping by!

A White Shirt and Jeans: Classics Recharged

IMG_5707I’m such a fan of wearing classics – jeans, button-down shirts, tee shirts to name a few, so it’s always fun when you see an updated classic that brings something new to the game.

_100282034

When I saw this white Vince Camuto shirt in the Nordstrom catalog, I just had to make a DIY version. It’s a classic redefined with bell sleeves. I love this version except for one thing. The Vince sleeves are a bit too long for me. They’d end up in my soup. So my DIY sleeves are a little shorter.IMG_5635

For the shirt, I used a tried and true pattern, Butterick 5526 (made here) and modified the sleeves. This shirt is one of my favorites because it has princess seams and fits well. 5526

I used a linen/cotton blend from Fabric Depot. It has just the right amount of body to support my bell sleeves. To make the bell, I used the bell off of another pattern, Butterick 6456 (made here). It was just my luck that the top of the bell sleeve on that pattern fit the shirt sleeve of B5526 perfectly! If it hadn’t, I would have tapered it slightly to make it fit.

IMG_5691 My jeans were inspired by the Nordstrom catalog too. I used the  Jalie Jeans pattern for my DIY version, and used stretch denim from Modern Domestic, one of the awesome fabric stores here in Portland. This is my second pair of Jalie’s so they went together without too much struggle. I did forget how to do the front pockets though. So I referred to a great tutorial on this blog, Jillie Be Joyful. It was so helpful! I kept the design on back pocket pretty simple this time.

IMG_5722 2To make the jeans straight legged, I tapered the pattern’s legs by using a ready to wear pair that I love to guide me. For a little variety, I added some of the raw jeans salvage to the hem as a border. It’s a popular look in ready to wear so I couldn’t resist giving it a try.

I like the fit of these jeans, but I’m a bit frustrated with the knees. As I took these photos, wrinkles started to appear. Grrr. I might make a pair of legging jeans next (maybe Mimi G’s version?) to see if that works better in the knees.

IMG_5674

DIY jeans are fun when you’re a top stitching maniac like me. I’m determined to get a pair with perfect fit though, so I’m considering ‘rubbing’ a favorite RTW pair to copy them. Have any of you ever tried that? Does it work? How about legging jeans? Do you have a favorite pattern?

Happy Spring sewing and thanks for stopping by!

A Moto Jacket, part of a..capsule wardrobe?!?

IMG_5087

When Pattern Review announced their Wardrobe Sudoku Contest, I said, Never!  10 garments in two months that all have to coordinate with each other and shoes and accessories? Too mind-boggling for me. So I told myself I’d play along and use only fabric from my stash.

Well, the phrase, ‘never say never’ now clearly applies to me. I suppose my reluctance to join the fun had to do with the fact that I throw a hissy-fit whenever someone suggests I might sew with a plan (SWAP). I prefer to sew on a whim! But I’ve also secretly envied those who have used their sewing skills to achieve their dream capsule wardrobe too, which is basically what the Sudoku Challenge is all about.

sudoku_big

Here’s my completed Sudoku wardrobe.

PicMonkey Image

The grid shows ten combinations that work together, but the truth is, there are many, many more. The Mimi G jacket is one of the key pieces because it goes with everything, so it’s an accessory on the grid. I’ve wanted to sew this jacket for a long time. It’s a cool girl thing, you know? And this one is designed by Mimi G, no less! Definitely on my sewing bucket list, but it took this contest to get me to push through.

IMG_5109 2


I’ll wear it open, closed, over jeans, skirts and dresses. Here it is with other pieces in my Sudoku wardrobe.

The pattern; Simplicity 8174 is cute, but it’s not an easy make, to say the least. It’s a well designed pattern, but very complicated. It has a side zipper, back shoulder insets, epaulets, a waistband with carrier and belt detail, and inset zippered pockets, and it’s lined. There are lots of pattern pieces to manage, but once I got them labeled clearly, things started to work better. Here’s a shot of the back waistband, and the back shoulder panels. Cool details, eh?IMG_5094 2

I used brushed twill from my stash and cut my usual size, comparing my measurements to those on the envelope. It turned out to be perfect! Challenges….Construction took awhile, and required my full concentration. For me, the shoulder panels were the most frustrating part. They’re faced with another piece of fabric which gives them stiffness and makes them look cool when they’re top stitched. But, I found the instructions confusing. Mimi G’s video on U tube saved the day. In fact, I used it constantly through the process. It really helped, although I did find a few challenges even with that. She constantly says, do the same thing to the other side. That works for everything but the front bodice which has a right and left side.  In error, I applied the facings to both sides, but in reality, you have to wait on the left side until later in the process so that you can insert the front angled zipper correctly. So, I had a few stitches to rip out.

I did cheat on the belt carriers on the top epaulets and on the waist band. I could not get my thick fabric to turn, so I just winged it, making carriers without turning them.  My fingers were grateful.

This complex pattern had so many twists and turns, I had to turn off my new binge-watching obsession, Bloodline, so that I could concentrate. It was worth it though. I know this jacket will get worn alot, a key piece in my spring wardrobe.

Check out the contest over on Pattern Review.com for some great inspiration. I just love seeing how everyone puts together a wardrobe, and many are only using their stash like me. One of my favorite wardrobes is Elizabeth’s of Elizabeth Made This, so inspiring! Check out her fabulous makes on her blog.

My wardrobe is done and posted now,(my denim ruffled skirt is one item) and it feels good to have it behind me. Over the next few days, I’ll do some posts on my other makes, including two statement sleeve tops, a safari jacket, an alder shirt dress and a long blue cardigan. I stayed with blues and neutrals, which seems to be all I have in my stash these days!

Will I always sew with a plan? I doubt it….no new leaf being turned over here. How about you? Happy sewing and thanks for stopping by!!

A Ruffle Skirt and Cold Shoulder Top

IMG_3737 2
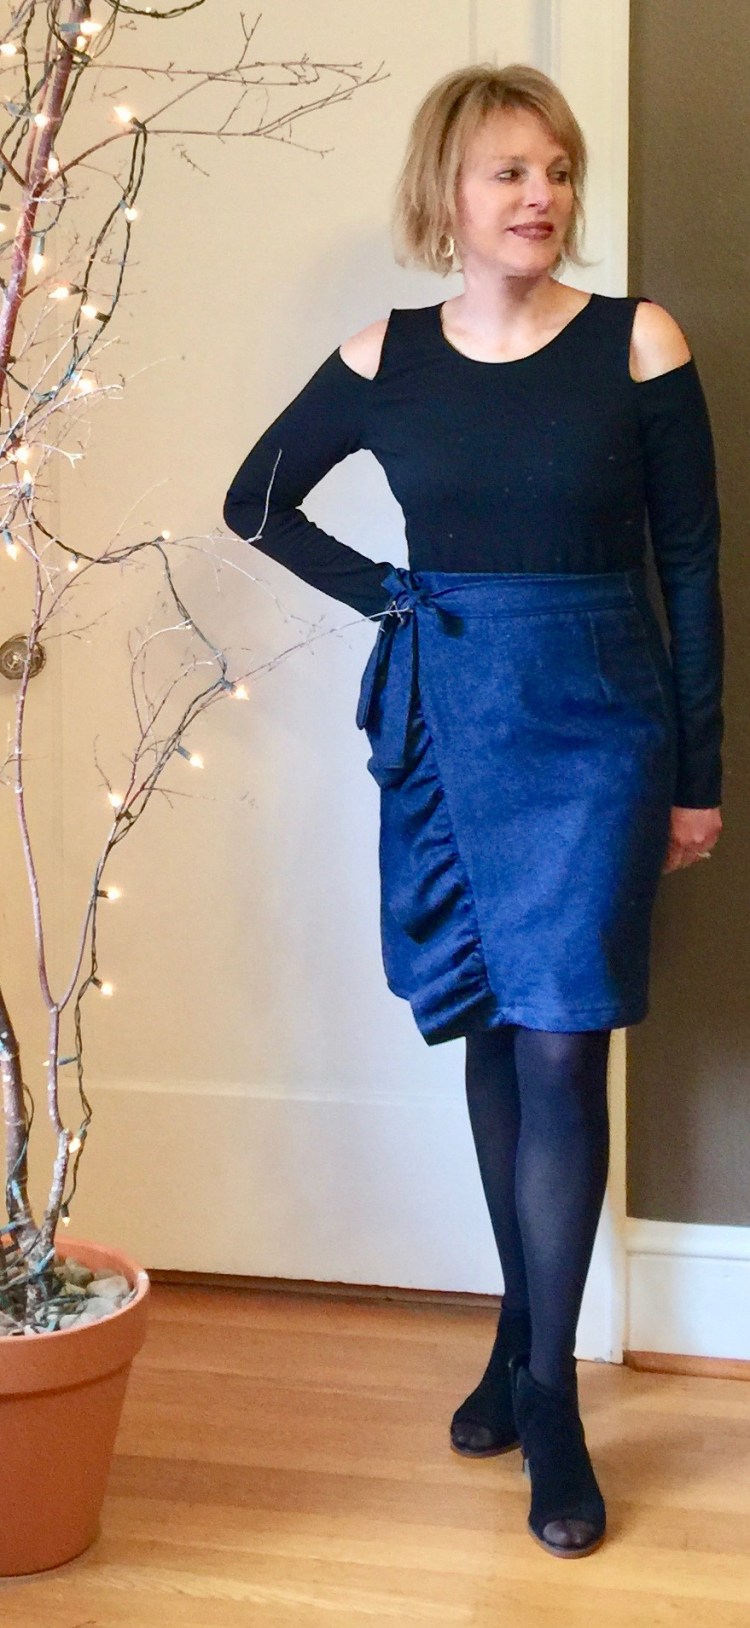
If you told me a year ago that I would be sewing a ruffle wrap skirt in denim for Spring, I would have laughed out loud. Ruffles have never been my thing. But if you show me enough of a trend, I am usually happy to hop on board!

Such is the case with this skirt.  I couldn’t resist modifying a simple skirt pattern to mimic some of the ready to wear ruffled gems I’ve been seeing around town.

IMG_3751In this photo, I am noticing that my bootie is unzipped. So ridiculous (!), but I had to include this shot because the ruffles on the front of the skirt are so easy to see. Honestly, this modification was easy. I measured the front edge of the right front of the skirt. I made my ruffle 1 and a half times that length (to allow for gathering), and 6″wide. I love how a simple modification can completely change the look of a pattern.

This skirt is Simplicity 1322. It’s meant to be a mock wrap with a front and back yoke and back zipper. But I made it into a real wrap skirt be eliminating the yokes and cutting a waistband and tie instead. I used  a lightweight denim; a cotton/linen blend. It’s been in my stash for so long, I have no idea where I bought it.

IMG_3771I’m happy with this skirt, but I’m not sure about the length. I might need to shorten it a couple of inches? Opinions? I won’t wear this with tights when it warms up around here and it might look more Springy if it’s a bit shorter?

This cold shoulder top (another trend I have happily embraced) is my first Style Arc Pattern. I wanted a basic top I could wear with anything, so I chose black ponte knit with moderate stretch and lots of body. This fabric was perfect to support the shape of the cut out shoulders.

IMG_3747I’d heard that Style Arc patterns are challenging because there are very few instructions. In the case of this pattern, the instructions were sparse (less than one page), but the instructions were enough to get the job done. There aren’t any facings to deal with on this top. The neck is finished with a turned edge as are the shoulder cut outs, so there just isn’t that much to say! It fit perfectly without modification, a rarity for me, so I’m fairly impressed with this pattern!


I’m more comfortable wearing ruffles when they’re paired with something that is simple and not so fussy, like this top. So, I imagine I’ll wear this skirt with simple knit tops most of the time.

IMG_3741I’m pretty happy with this make, and it was a stash buster too. What do you think of the ruffle trend? Thumbs up or down? And do you have any Style Arc Tried and True’s that I should try?

I hope it’s warm and sunny where you are, because it definitely isn’t here, which is not great for my Spring Sew-Jo. Nevertheless, there is a silver lining to the weather. Rain is a perfect excuse to ignore my yard and sew…. Happy sewing and thanks for stopping by!


2016: Top Five Hits

1Hi All! It’s almost time to ring in the new year, so I thought I’d take the opportunity to review my top five makes of 2016.

Looking back at my sewing projects always makes me a little nervous, because I can’t bear to face the facts. Sometimes the makes that are the most fun to finish or the most time consuming, are not the ones I love to wear (sigh). They hang in my closet, lonely and ignored. Huh. But without further analysis, here they are….my top five of 2016.

img_8454

  1. This little coat:  This topper makes it into the top five because I wore it more than any other make this year! It was so versatile, more than I expected. I wore it constantly. The sewing pattern is great too….Butterick 5927, a new favorite.

IMG_3525

2. The linen and lace dress – – Well, of course I love it. It’s blue, it has statement sleeves and lace trim. This dress made me a fan of clothes with simple lines. I love to wear it.img_8499

3. This coat: OMG, it’s so warm! The stretch wool…the quilted collar…love. To make things even better, when I step into Anthropologie wearing it, the girls that work there swoon, the ultimate compliment. It was supposed to inspire me to rake leaves, but that didn’t happen.

img_9345

4. This blouse: Well, because it’s blue. Need I say more?

img_0776

5. This poncho: Okay, it had to make the list because wearing it makes me so happy. Yes, fringing it was a nightmare, but the end result made this poncho such a wardrobe stand- out. I have a ‘boho’ moment every time I put it on, something I sorely need.

Honorable mentions:

I was obsessed with denim this year too, so I just have to mention these ‘makes ‘. I didn’t wear them quite as much as I expected though (not sure why?), so I won’t give them ‘top five’ status.

IMG_3166 (2)

1. This button up denim skirt: What fun this was to make! The top stitching, the ‘jeans’ buttons up the front…my favorite things.

IMG_8749

2. This denim shirt dress: I love a good shirt dress, and I felt so great when I finished this one! I also learned about snaps. They look great, and you also get to pound them in…If you haven’t tried it, do!

There were a few misses in 2016, but who wants to talk about those? Overall, I had alot of fun at my sewing machine, which is the true test of success for me. I even made my first pair of jeans.

But the best part of 2016 was meeting all of you. I love our community and our conversations. You and your makes are a constant source of inspiration and joy for me. I want to thank you for visiting here and for being a part of my life.

Here’s to an even better 2017! And thanks to Gillian of Crafting a Rainbow for encouraging us to celebrate a fabulous year with our Top Five Makes.

Happy New Year, and thanks for stopping by!