Simplicity 1160-A Cut-Out Tee

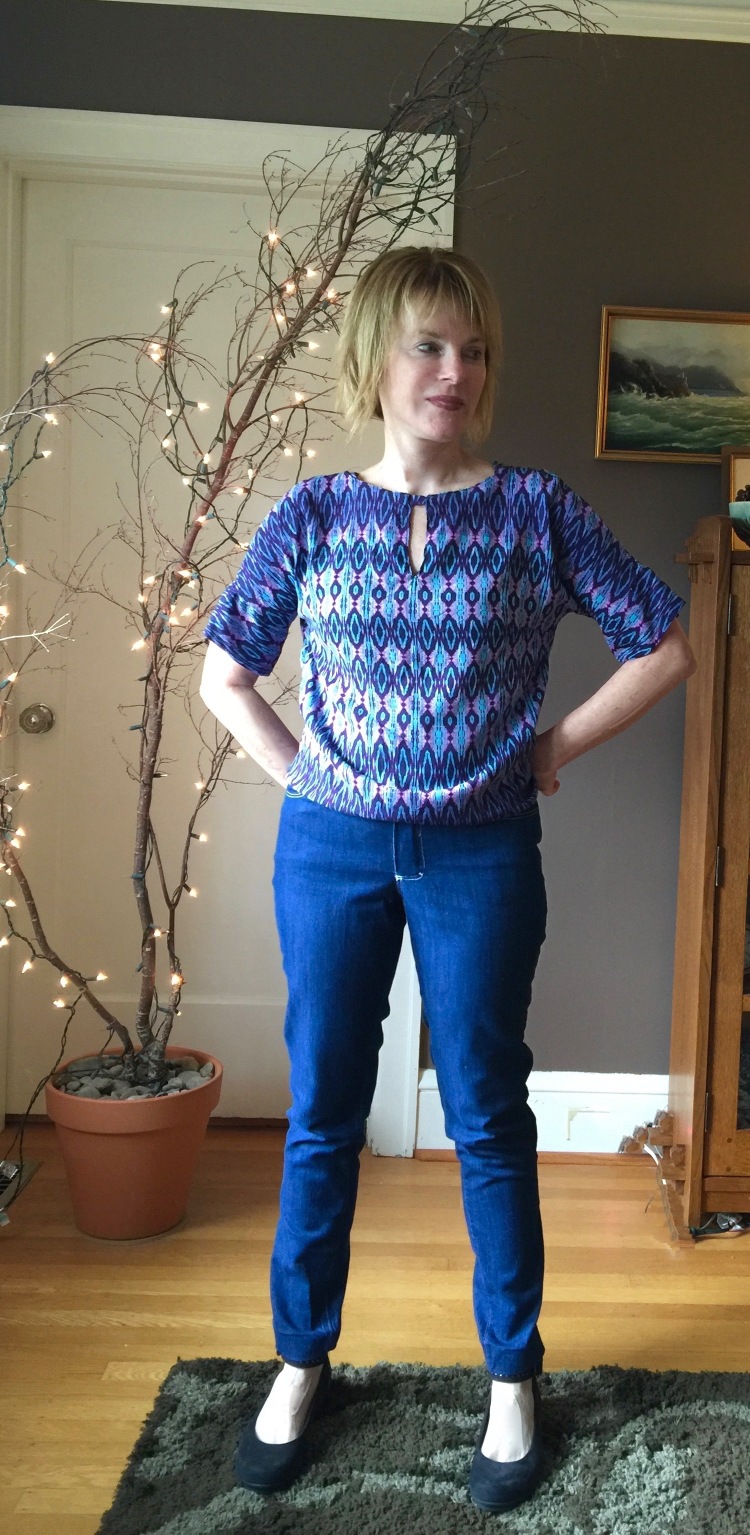
Hi all! After completing my denim skirt last week, I needed to find an easy, fun, ‘instant gratification’ project to cleanse my sewing palate.  This little tee was the answer, inspired by a recent visit to Anthropologie. I found so many wonderful tees to admire there. I’m always amazed at how they can take a simple, every day top and with a single detail, turn it into something special.  Here’s the Anthro tee:

Many of the tops I saw in RTW were ‘swing’ tees. It’s a great shape to wear for comfort and ease. I loved the back detail on this one (hated the color on me), although I thought the ties would drive me crazy.  Still, it started a bit of an obsession. I had to sew a tee with a back cut out!! After reviewing a zillion tee shirt patterns, I finally found one that was a decent match. Enter Simplicity 1160, a tee with a scoop neck, a swing shape and a cut-out back.

When I saw the line drawings, I expected that the cut-out would be tricky to sew. Here’s the good news. It’s really not.IMG_3480

The cut out detailing is faced with bias tape, the way you would finish a tee shirt neckline. It isn’t hard to do and the pattern instructions are pretty easy to follow.

The fabric I chose is a cotton jersey with moderate stretch and a soft drape. I think a ponte knit would be too stiff for this, but would love to try a flowy rayon knit next time.

IMG_3658

This pattern seemed risky for me because I have a narrow-back.  I’m happy to report, fit wasn’t an issue at all. The only change I would probably make next time around is to raise the front neckline. It’s a bit low for me, although in the peak of summer, I may love it. Otherwise, this pattern is a winner and I will make it again. After all, I’m ‘all in’ when I find a fun project you can finish in an afternoon.

IMG_3218 (2)

Hey look! It goes with my new denim skirt, although it looks a bit wrinkled here…Hmmm, too many wardrobe changes in this photo shoot, I guess! Let’s see. I’ve made a top that goes with my skirt….Does this mean I can say I have a capsule wardrobe?? One thing is clear. If I keep buying blue fabric at my current rate, eventually, everything in my wardrobe will go together.

This tee was so fun to sew, I’m on the search for others with interesting shapes. Style Arc has quite a few; the Tamara, the Kylie and the Maris, but I’ve never sewn a Style Arc pattern before and have heard they’re a bit daunting as the instructions aren’t that great. Any experience to share with Style Arc?

Happy sewing, and thanks for stopping by!


Having a 70’s Moment: Denim Button-up Skirt

IMG_3160

Hi all!  In anticipation of summer travels, I’ve been sewing up a storm! I’ve also been aware of a huge gap in my me-made separates wardrobe that must be fixed before I travel. I have very few skirts and almost no pants. My recently completed jeans helped to fill the gap, but I still need skirts, and, as luck would have it, there’s a skirt competition this month at Pattern Review, the perfect motivation!

Being a fan of denim and blue, I couldn’t resist giving a jeans skirt a go. The pattern I chose was Mc Call’s 7392, a fitted skirt with a waistband, a front band, button closure, side front and back seams, and optional pockets and carriers.

I love the design of this skirt. The front and back ‘princess’ seams make ‘fit’ a breeze and the  a-line shape and front button closure are so seventies. To satisfy my craving for ‘jean skirt’, I added some additional details like front pockets and contrast topstitching.The pattern instructions were easy to follow.

IMG_3166 (2)

My only criticism….I disliked the way the carriers are attached. They are basted to the waistband, then sewn into the waistband seam. If you want to topstitch that waistband, you can’t because the carriers are in the way. So disappointing. Next time, I will sew the carriers on the way you do with jeans. I’ll just turn the ends under and stitch them in place outside the waistband. Because this pattern has princess seams, I found it easy to modify it to fit my shape. This gets a big ‘thumbs up’ from me, since I have a wide waist that’s out of proportion to the rest of me.

IMG_3169

Fabric Used: I used dark denim, so hard to find but available at Fabric Depot.

Pattern alterations or any design changes you made: I double topstitched everything. I modified the patterns back pockets and side front pockets.

IMG_3172

Since I’m not a fan of side front pockets as I think they make my waist look shapeless, I used the back pockets as a template for two smaller front pockets, which I sewed in place, patch style. To get the smaller size for those pockets, I just traced the back pocket and reduced the size by 5/8 inch all around. I topstitched each pocket and added a chevron style ‘V’ for fun. I hesitated when it was time to put the back pockets on, as I wondered if four pockets on one skirt would be overkill, but the truth is, I love pockets! So I added them.

To make the topstitching look sharp, I double threaded my needle with regular thread. Some might prefer topstitching thread, but my machine doesn’t like it, so double threading gave visual dimension to the topstitch without clogging my machine. I also topstitched the carriers and the waistband seams, even though the pattern didn’t call for them. For a jeans skirt vibe, I used  jeans buttons in an antique finish that you pound in place with a hammer. So satisfying! The button holes were made using the contrast thread.

IMG_3168

In summary, I do like this pattern and will likely sew it again. IMG_3133 (1)

With its many seams, this pattern is easy to modify for fit, and to add your own personal touch. The cut is ‘a-line’ but not too wide at the bottom, so hard to find in a skirt pattern. It definitely satisfied my urge for a seventies style denim button-up skirt. I’ll probably try this pattern again with other dense fabrics like wool or corduroy come fall

I’m curious if others have trouble using topstitching thread? Does it clog your machine? I would love to be able to use it and know there must be a trick that I just haven’t yet discovered.

It’s still cold here, but I remain optimistic and am sewing with linens and cottons…Happy sewing and thanks for stopping by.

A lace top inspired by Dolce & Gabbana

IMG_1544

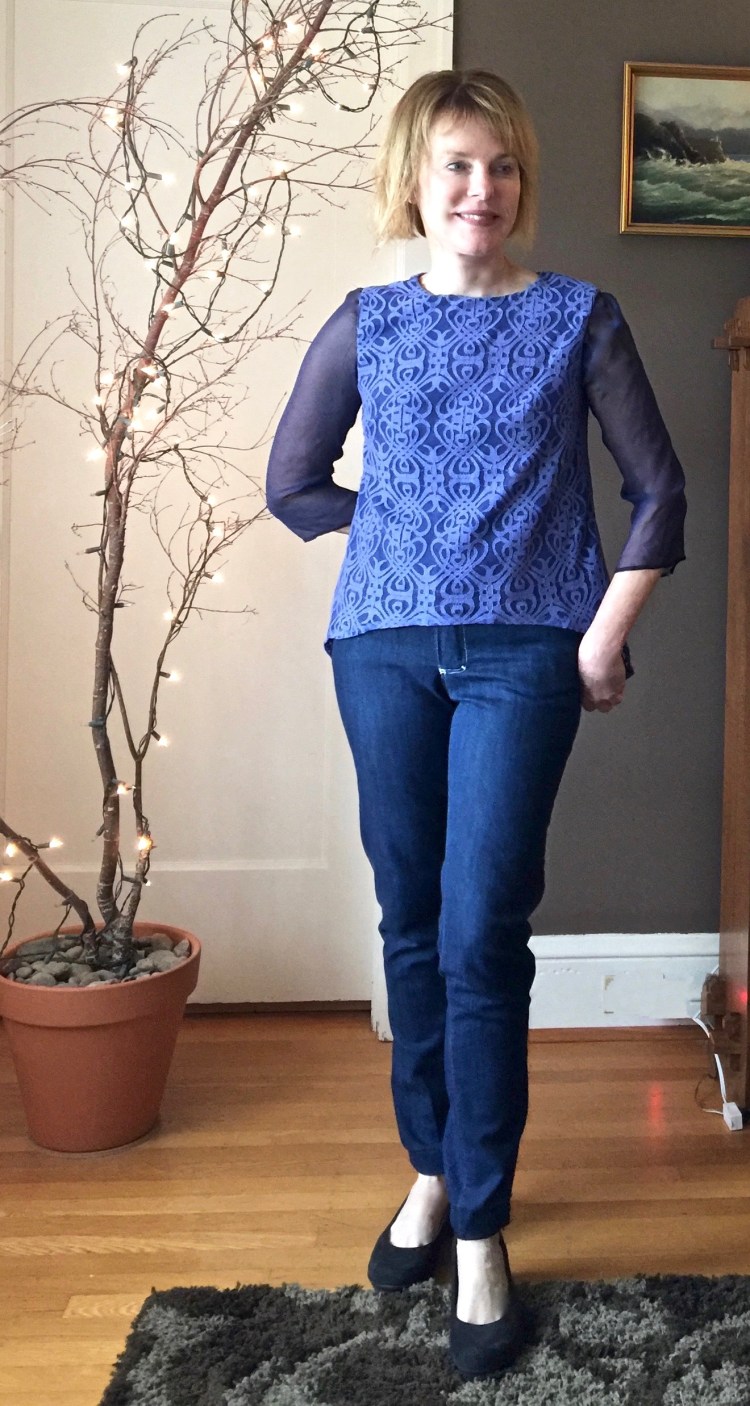
I used to think lace was reserved for prom dresses, frilly wedding dresses and other  hyper-girlie looks. But I think I’ve given that up. I can’t resist the combination of feminine lace with the edge of denim it seems. And if the lace is blue, I’m all in!

My inspiration for this top was this tunic length top/dress from Dolce and Gabbana.

37862084XH_13_F

I fully intended to go the whole way with lace on the sleeves and the longer length of the top/dress, but as luck would have it, when I ordered this lace (Fabric.com), I thought I’d ordered two yards, but ended up with one. Not sure if I pushed the wrong button or if the order was messed up at their end, but when I tried to order another yard, the lace was already gone!

I grumbled about it for awhile, then found a great sheer silk to use for the sleeves and lining. It’s so perfectly wonderful to touch and wear, I decided the mistake was a good thing after all. It forced me to use a contrast silk sleeve which is more comfortable than lace by a long shot.

IMG_1549

The pattern is one I’ve used before McCall’s 7285.

I made view D, and used the silk for the sleeves.

Other modifications:

  • I raised the neckline by an inch.
  • I made 3/4 length sleeves with a rolled hem.
  • The hem is cut ‘high-low’. Because my lace didn’t have a scalloped edge, I merely finished the bottom with a rolled hem.

It’s an easy pattern that’s well designed, a good template for your own creativity. The only challenge here was lining up the lace so that it was perfectly centered.

IMG_1505

I’m wearing this top with my recently completed Jalie Jeans and love the look! It’s comfortable but sufficiently dressy. I wore it to a party just last week.

IMG_1547I only wish I’d bought more of that lace! Honestly, I have got to get in the habit of buying more not less!  I think this top might travel with me this summer. The good thing about this lace? It doesn’t wrinkle, nor does the silk. I’m guessing this top would look dressy if I wore the right jewelry and skinny black pants?

I hope you’re enjoying all of the sewing events in the blog world right now.  I love what’s going on over at the Monthly Stitch. The McCall’s blog has been great too, with a shirt dress sew along. And Pattern Review is hosting a skirt contest. There are so many ways to find inspiration, I feel a bit spoiled. Are you participating in any of these events?

Happy sewing and thanks for stopping by!

DIY Jeans and a Burda Spring Top

IMG_1471

Hi all! Yes, I have FINALLY finished my first pair of jeans. My class at Modern Domestic here in Portland is over and I squeaked over the finish line with only five class minutes to spare! It feels sooooo good to have this project under my belt. I have wanted to sew a pair of jeans forever, but deep fear led to serious procrastination. But now I know. People, it is not that hard! Seriously, if I can, you can.  I’m already planning my next pair.

First, for those that don’t care about jeans, I’m going to give you a quick run down on this Burda top with a cool cutout in back.

IMG_1619

Pattern: Burda 114 from Issue 4/2016. Instructions were easy to follow (not always the case I have found with Burda) and you can make this top in about four hours or less. There’s also a dress length version. My fabric is a lightweight rayon that wanted to move around a lot, but after multiple tries, I did finally get the pattern pretty straight and centered on this wild print. Of course, the pattern doesn’t include seam allowances so don’t forget to add those :). One nice detail, the sleeves are short but finished with sleeve bands. I love the finished look this gives. It’s an easy pattern and the fit is very loose so I had no issues there.  I plan to make another one, maybe even a dress as I love anything with a bit of interest in the back.

The Jeans: There are so many tutorials in blog-land and on UTUBE that take you through the process of sewing jeans step by step so I will not bore you with that here. Since I’m generally impatient and easily frustrated, I took my first spin into Jeans Land under the Guidance of a Trained Professional, and I’m glad I did. My teacher was great and has made about 30 (?!?!) pairs of jeans. She has it down to a science and can whip out a pair in about four (4) hours. I think my pair took me only twelve (12) class hours. LOL

IMG_1445 (1)

Pattern: Jalie is the one we used in class because it has lots of sizes to play around with. The instructions are good, and the diagrams are clear. Yes, there are ALOT of steps, but they do a good job of holding your hand through them.I chose the low rise version and it was just right.


FIT: This is the part that scared me the most. The trick? Swedish Tracing Paper (I’m probably the last person to know about this great stuff?) It’s the same texture as interfacing so it doesn’t rip easily.  We traced our jeans pattern pieces onto it, then just basted those puppies together on the machine to check fit.

IMG_1622

Because this is durable paper, it doesn’t tear easily so you can try the paper jeans on then mark any necessary changes right onto the them before using them to cut out your jeans. HANDY! I hate making muslins (so much so that I never do which is not good) but this worked for me. BTW, the legs on this pattern are wide, so I straightened the cut of mine from the thighs down.

Interfacing: We used shape flex, which has a bit of give, a necessity on the waist of jeans. Tip…Cut it out with the grain (I forgot to do this first time through) so that you get a bit of stretch on the waistband when you need it.

IMG_1459

Topstitching: I used white thread (ARGH!!!). If I had to do it again, I would not. It made me crazy and my class got a good laugh as I took out things out over and over again. Pick a thread closer to your jeans color and save yourself some Grief. TIP; My Bernina isn’t fond of topstitching thread, so I used two spools of regular thread which could be pulled through the wider eye on a jeans needle. (don’t look too close at my white topstitching, LOL)

IMG_1451

Pockets: There are lots of templates on Pinterest for topstitching designs. Anything goes! I made up my own design and used a tracing pencil to mark it.

In summary, I like my jeans and will definitely make another pair using this pattern soon. The trickiest bits were the seams around the crouch and I didn’t love making bar tacks (not sure what that’s all about as it’s basically a tight zigzag stitch?), but I think those things will be much easier second time around. I also wish my knees weren’t so baggy. Not sure what to do about that?

What I will do differently next time. I will not topstitch with white. I will not topstitch with white. I will not topstitch with white. Ha, famous last words….

Happy sewing and thanks for stopping by!


Sew the look: Denim and Lace


IMG_0950My summer travel wardrobe is starting to take shape. I’m determined to pack efficiently, but this will be tricky. The trip includes a Danube River cruise and some evenings will be dress-up events. Of course, jeans are my go-to wardrobe staple, but they’re probably not ‘cruise-appropriate’ (LOL), so I’m sewing some separates that will dress-up with the right shoes and jewelry.

These two pieces; a lacy top and Denim pencil skirt will mix and match with other pieces in my wardrobe. I think both can be dressed up or down, as the mood strikes. Lace and denim are both having a fashion moment, so I love the fact that these pieces are comfy, versatile and a perhaps a bit trendy too.

IMG_0938The top is another version of McCall’s 7285, a semi-fitted pullover top that’s so easy and fast.This pattern is so well-written and designed, it’s becoming a tried and true for me.

I love the bell-sleeves and the hi-lo hem. You can make this top in an afternoon, which makes it perfect for summer sewing. This time, I used a light weight rayon from Fabric Depot for the bodice and added some black lace to the sleeves. I finished the seams with my serger. The top is so comfortable to wear, I feel like I’m in my pajamas!! I’m hoping the lace gives it a bit of a ‘dressed-up’ vibe. What do you think?

IMG_0932

The skirt has a simple pencil style. It’s Butterick 5760, (OOP) a 2012 lifestyle wardrobe piece that has a waist band, a back zipper and slit.

5760

The pattern is so simple and basic,  you could embellish it easily with pockets. I wanted to do that but didn’t have quite enough fabric (I am my own worst enemy, it seems!) and when I went back to the fabric store for more, there was none to be had. Yes, I am short, but I must learn that a skirt takes at least a YARD AND A HALF, not a yard. The fabric is a denim cotton blend with some lycra (from Fabric Depot) which makes it comfortable enough for travel.

IMG_0912

This photo is kind of dark, but I just had to show you how lush and green things are right now in Portland Oregon. Yes, we have a lot of rain, but this is the end result…almost worth it?!?

Both the skirt and top are so easy! As the weather improves, I am all about fast and easy sewing. What do you think? Is my top dressy enough for a cruise? Not sure about the skirt…..?

Me-Made-May is in full swing and I love seeing everyone’s posts on Instagram. Although I haven’t been very good about posting photos, I’ve been trying to wear me-made every day, but have found it difficult because I don’t have my jeans finished. I’m hemming them this weekend, and hope to have them to share with you soon. The class was so inspiring, I suspect I’ll become a jeans making machine this summer.

Happy Spring sewing and thanks for stopping by!

Sew the look: A denim shirtdress

IMG_8749

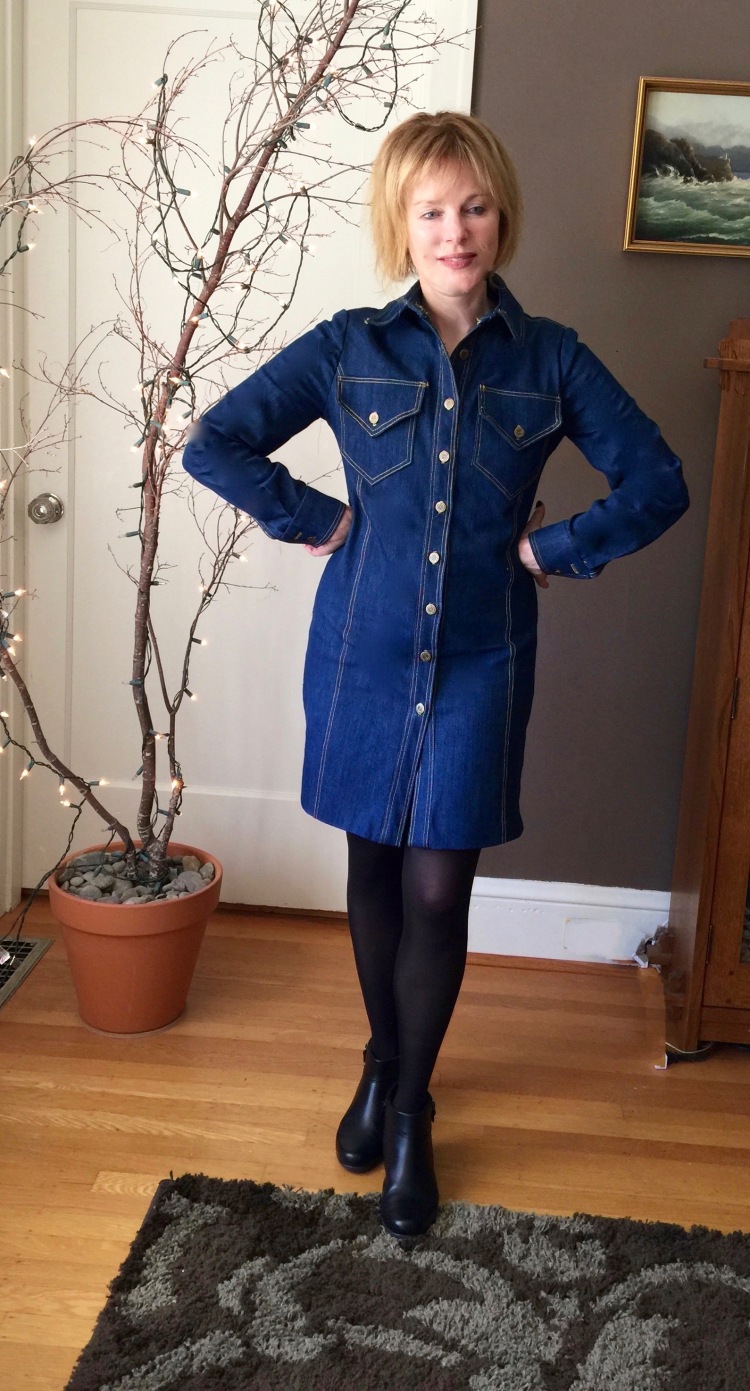
It’s Spring, the perfect time for shirt dresses. There’s nothing easier to wear when the weather’s warm than a simple dress, and if it’s made from denim…well, that’s even better!! Here are some of the shirt dresses that inspired me this Spring.

First up…Burberry’s version. Perfect in dark denim, with princess seams and topstitching. burberry-brit-dark-indigo-pippi-denim-shirtdress-blue-product-0-002385459-normal

Made well’s version is waistless and the denim looks so soft and comfy.

E9192_DM1262_m

This one from Chanel has tucks at the waist. The skirt is so cool…it’s an overlay, or is it a drop waist, or…well..I’m not sure? Love the puffy sleeves and the printed denim. I would die for this dress.

_CHA0758

Here’s mine…Straight cut, princess seams. I need the Chanel shoes with it, don’t you think?IMG_8737For my dress, I used McCall’s 6124, a classic shirt pattern that I used to make Alexa’s corduroy dress here. I love this pattern because it has princess seams, a classic collar with a band, and two-piece sleeves with cuffs; all the timeless design elements I want in a shirt dress.  Honestly though, there are other cool patterns out there too. For my next shirt dress, I’ll try a flared version like Simplicity 8014, Or McCalls 6696. All of those are in my queue, waiting for the perfect fabric to reveal itself.

IMG_8676

My fabric is 5 oz denim from Joann’s (Is it just me, or has that store upped their game lately with more natural fibers and on-trend fabrics?). This fabric has enough body to support the dresses’s structural elements like the pockets, collar and cuffs, but it has a soft feel too, and just the tiniest bit of lycra….which makes this close-fitting dress pretty comfortable to wear.

The details...

  • I added (2) 6″inch self drafted pockets with flaps to the front. I gave them a bit of a pointy edge this time, just for fun! I interfaced the flaps and added functional buttons too (no I will not be stashing money or car keys or my cell in those pockets, but nice to know I could if I wanted to :)).
  • I double top-stitched the dress using topstitching thread. Here’s my latest top-stitching process. To get the distance I wanted between the two rows, I lined up my trusty #57 presser foot (patchwork seam foot) with the seam for the first row. For the second row, I move the needle three clicks to the left of the first row to position it for the second row.I used topstitching thread in gold, and a stitch length of 3.  Love that #57 presser foot (pictured here) I could not have done all of this topstitching without it!

Question though…I used regular thread in the bobbin as my machine groaned when I tried topstitching thread there. Not sure if other’s have that problem?

  • I used bronze jeans buttons that you punch into the fabric. (Fun!!!)
  • I used french seams throughout to keep the insides looking crisp.
  • IMG_8733

Besides being comfortable, the 5 oz. denim has an added benefit. It didn’t wrinkle ever after I wore it all day!

IMG_8742Yes, it’s Spring, but it’s still cold and rainy outside, so these photos were taken indoors (sigh), but my furry friend quite likes the routine now.

This dress took a bit of time (top-stitching is like that, isn’t it?) but I think it’s a dress I’ll wear a lot, especially since I made a topper to go with it just last week. Hmmm…the word capsule keeps coming into my mind….

Sometime this Spring, I would love to make a drop-waist shirt dress like the Chanel I showed above, but how? Does anyone have pattern suggestions for that?

Happy sewing and thanks for stopping by!