A wrap jumper or a pinafore?


img_8240-1

When I think Fall, I think, it’s ‘jumper’ weather! To me, a jumper is a sleeveless dress that’s meant to be worn over a shirt or blouse. But to my UK friends, ‘jumper’ means a sweater. Maybe, it’s less confusing to call my new make ‘a wrap dress that I am wearing over a shirt’.

This dress is one of my favorite styles because it’s wrapped. To me ‘wrap’ means comfortable, but what I really love about the style is that it’s so flattering. A wrap dress is considered to be perfect for any figure type because it defines your waist (especially nice for those of us who don’t have a waist). Wrap styles are perfect at any age, and you can wear them dressed up or dressed down.

img_8227

My sleeveless wrap dress is McCall’s 6884.

The bodice of my ‘jumper’ is view B (without the gathered front), and the sleeves are view D. I eliminated the tie and made a mock closer with three buttons, arranged assymetrically across the wrap.The fabric is black ponte knit that has moderate stretch from my stash.

Under my jumper, I’m wearing a new button-down shirt, Butterick 5526.

img_8205

This pattern in a new favorite. I made View D, but used the sleeve tabs from View A for the days when long sleeves are just too much. I chose View D because it has princess seams which makes the fit perfectly tapered. This makes the shirt easy to wear either loose, or tucked in.The fit of this pattern seems a bit snug to me through the waist, so I cut a size up from my usual.

As fitted shirts go, this pattern is pretty straightforward, and the instructions are great. But, it did take a bit of time to complete. From cut to finish, this project clocked in at four and half hours. (BTW, I finished the seams with my serger rather than constructing french seams. If you’re going to do that, add another hour (LOL).

Princess seams are my FAVORITE. Who can resist that tapered shape? The fabric I used is 100% cotton that I found in the quilting department of Joann’s. Honestly, there are bargains to be had there! I paid $5.99 a yard for this perfect pring. The colors go with everything in my closet.

A friend who is very ‘fashion forward’ wears her wrap jumper open as a long vest. Yes, I love to throw long vests over everything, so thought I’d give it a try, but I’m not sure….

img_8266
Hmmm, probably not….? 

Here’s to Fall fashion; to jumpers and skirt and coats…all my favorite things to sew! What would you call this make; a jumper, a pinafore, or a sleeveless dress?  Would you ever wear it open as a vest?

Happy sewing, and thanks for stopping by!


Butterick 6378: Two tie neck tops

IMG_6452Sometimes, you make one version of a pattern, and you love it so much, you rush have to make another.

IMG_7328

It wasn’t just the versatility of the pattern that inspired me to sew two (2) versions, it was envy too. When I saw these versions in ready to wear, I had to have one (or two) for myself.

Version 1 is by Sea, and version two is Chloe. You can wear either one with the tie ‘tied’, or not, depending on your mood and it still works!


This pattern is part of Butterick’s fall collection. It offers several options, a narrow tie collar, and a broader tie that’s incorporated into the neckline.

Because the tops slip over your head, they’re easier than some to sew. But as usual, the devil is in the details. I found the two collar options to be quite different to sew.

The bow collar on this version is part of the neck line finish. It’s only two pieces which are sewed onto the collar opening….so easy!!! It becomes the facing and the collar – – so efficient. This version is made from a very stubborn rayon, that was a bit tricky to sew, but feels great to wear.IMG_6640

The fabric was very ‘shifty’. This version is ‘as designed’ with one modification. I eliminated the elastic on the sleeves and added a self-drafted 3″ cuff.

Version two is the narrow tie option. I made this out of a yummy rayon (fabric depot.com).

IMG_7261

This version (shown here with my jeans skirt) was a bit trickier to sew because there is a narrow collar that is sewn on after you insert the narrow ties. Narrow ties are hard to turn, for one thing (an understatement. My finger tips will never be the same). Then, the ties have to be placed just ‘so’ before you attach the teeny-tiny collar. Sure, it’s not impossible to get it right, but you need a bit of patience :).

I love both versions and can imagine making antoher in silk with, maybe….Hmmm….bell sleeves?!? I am not done with that look yet! Anyway, I’m giving this pattern a thumbs up. It’s a great transion look, I think, a nice bridge between the seasons, and if I could find some great fabric like the Chloe or Sea versions, I’d be all over making version number three.

Long sleeves….I think that makes this a ‘Fall’ project, even though the temperature is in the mid-90s here! Have you started your Fall sewing yet?

Happy sewing and thanks for stopping by!


Simplicity 1318 Kimono Love

IMG_5859

Hi all! I’m back from my travels, and, I’m happy to report, my travel wardrobe was put to good use. I’m now a big fan of the Danube, and my travels there were relaxing but inspirational too. So many of the communities along its shore have a rich history of handmade garments. Everywhere I looked there was something beautiful to see and enjoy.

In fact, a garment I spotted on the trip prompted the title for this week’s post: Kimono Love. This is a handmande child’s kimono from Rijksmuseum in Amsterdam (if you have a chance to visit this extraordinary museum, take it.) I could have stared at this all day.

IMG_4799

Another favorite:

IMG_4796

And here’s mine. Ha, not quite in the same league, but we do what we can!

IMG_4468

For this kimono, I used Simplicity 1318, a tried and true pattern I’ve made before (here) that’s so easy to sew!

simplicity-jackets-coats-pattern-1318-envelope-front

Because I knew it was a sure thing, I splurged and used silk. It’s a fabulous piece I found at Fabric Depot last Spring (gone now, sigh). For the front band, I used a silk in a solid contrasting gray. This is an unlined pattern, so I finished all the seams with my serger, but it would be lovely with french seams too.

IMG_5797

This kimono is a breeze to sew because the pattern has very few pieces. The style is loose and unstructured, so you don’t have to fuss with fit issues. The best fabrics for this are wovens with great drape, like this silk. Last summer, I made it from a sheer cotton which worked almost as well. I think a lightweight rayon would be great too, but really! Splurge and buy some silk! It’s so fabulous to wear and you deserve it :). I did prewash this silk, by the way, on the gentle cycle with some deteregent meant for lingerie. This made the fabric less slippery, and easier to cut and sew.

IMG_4440

I love the shape of this kimono and the high-low hem. This pattern must be a favorite of many of you, because it was one of the best loved patterns on Pattern Review for 2015.If you have a chance, take a look at the versions posted there. There are so many beauties! You’ll be glad you did.

My trip was fabulous, a much needed break, and I enjoyed the time I spent ‘unplugged’. But I missed visiting your blogs and chatting with all of you about your makes. I’ll be perusing all of your websites, catching up on things this week. I can’t wait to see what you’ve been up to!

Happy sewing and thanks for stopping by.

Having a 70’s Moment: Denim Button-up Skirt

IMG_3160

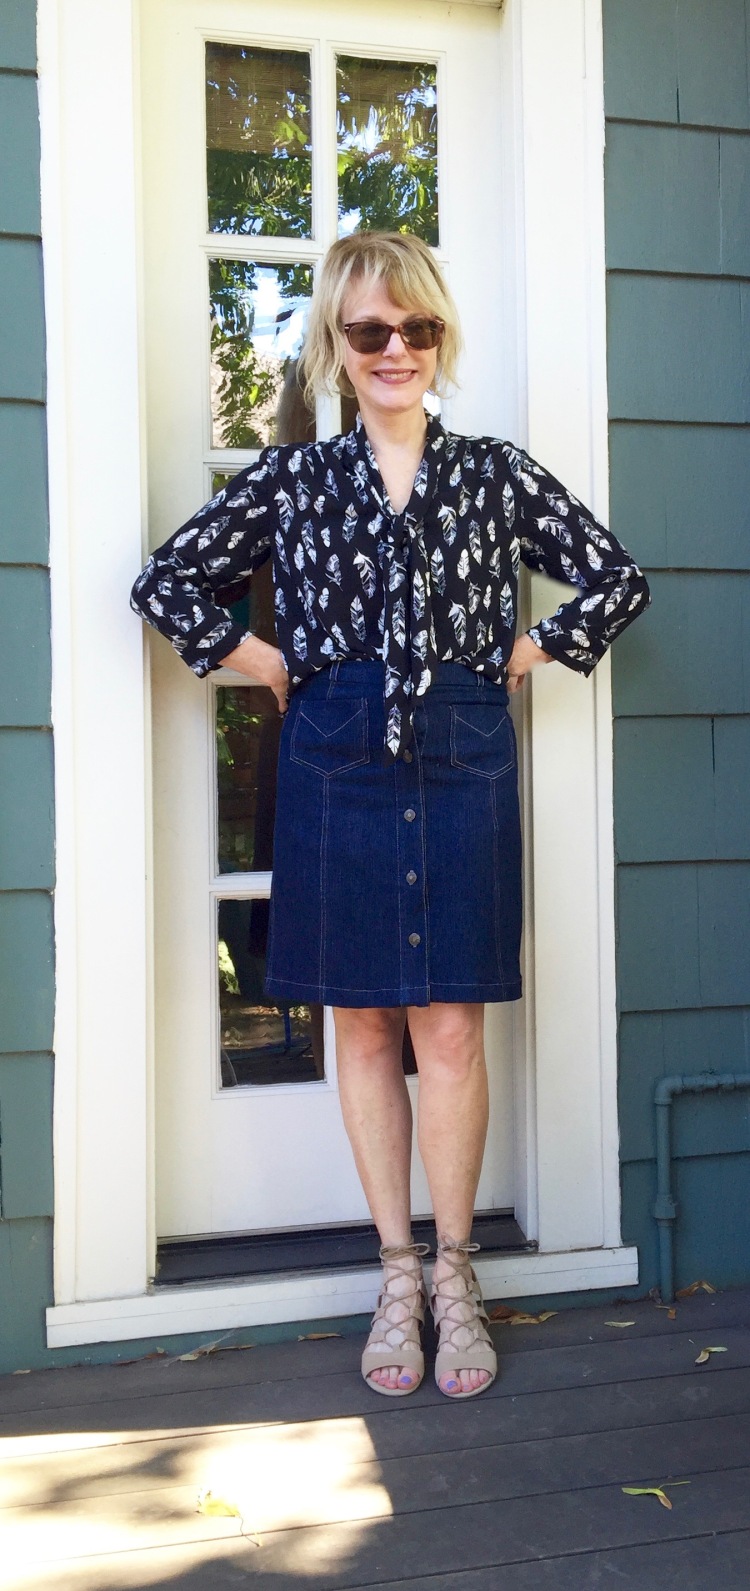
Hi all!  In anticipation of summer travels, I’ve been sewing up a storm! I’ve also been aware of a huge gap in my me-made separates wardrobe that must be fixed before I travel. I have very few skirts and almost no pants. My recently completed jeans helped to fill the gap, but I still need skirts, and, as luck would have it, there’s a skirt competition this month at Pattern Review, the perfect motivation!

Being a fan of denim and blue, I couldn’t resist giving a jeans skirt a go. The pattern I chose was Mc Call’s 7392, a fitted skirt with a waistband, a front band, button closure, side front and back seams, and optional pockets and carriers.

I love the design of this skirt. The front and back ‘princess’ seams make ‘fit’ a breeze and the  a-line shape and front button closure are so seventies. To satisfy my craving for ‘jean skirt’, I added some additional details like front pockets and contrast topstitching.The pattern instructions were easy to follow.

IMG_3166 (2)

My only criticism….I disliked the way the carriers are attached. They are basted to the waistband, then sewn into the waistband seam. If you want to topstitch that waistband, you can’t because the carriers are in the way. So disappointing. Next time, I will sew the carriers on the way you do with jeans. I’ll just turn the ends under and stitch them in place outside the waistband. Because this pattern has princess seams, I found it easy to modify it to fit my shape. This gets a big ‘thumbs up’ from me, since I have a wide waist that’s out of proportion to the rest of me.

IMG_3169

Fabric Used: I used dark denim, so hard to find but available at Fabric Depot.

Pattern alterations or any design changes you made: I double topstitched everything. I modified the patterns back pockets and side front pockets.

IMG_3172

Since I’m not a fan of side front pockets as I think they make my waist look shapeless, I used the back pockets as a template for two smaller front pockets, which I sewed in place, patch style. To get the smaller size for those pockets, I just traced the back pocket and reduced the size by 5/8 inch all around. I topstitched each pocket and added a chevron style ‘V’ for fun. I hesitated when it was time to put the back pockets on, as I wondered if four pockets on one skirt would be overkill, but the truth is, I love pockets! So I added them.

To make the topstitching look sharp, I double threaded my needle with regular thread. Some might prefer topstitching thread, but my machine doesn’t like it, so double threading gave visual dimension to the topstitch without clogging my machine. I also topstitched the carriers and the waistband seams, even though the pattern didn’t call for them. For a jeans skirt vibe, I used  jeans buttons in an antique finish that you pound in place with a hammer. So satisfying! The button holes were made using the contrast thread.

IMG_3168

In summary, I do like this pattern and will likely sew it again. IMG_3133 (1)

With its many seams, this pattern is easy to modify for fit, and to add your own personal touch. The cut is ‘a-line’ but not too wide at the bottom, so hard to find in a skirt pattern. It definitely satisfied my urge for a seventies style denim button-up skirt. I’ll probably try this pattern again with other dense fabrics like wool or corduroy come fall

I’m curious if others have trouble using topstitching thread? Does it clog your machine? I would love to be able to use it and know there must be a trick that I just haven’t yet discovered.

It’s still cold here, but I remain optimistic and am sewing with linens and cottons…Happy sewing and thanks for stopping by.

Sew the look: Denim and Lace


IMG_0950My summer travel wardrobe is starting to take shape. I’m determined to pack efficiently, but this will be tricky. The trip includes a Danube River cruise and some evenings will be dress-up events. Of course, jeans are my go-to wardrobe staple, but they’re probably not ‘cruise-appropriate’ (LOL), so I’m sewing some separates that will dress-up with the right shoes and jewelry.

These two pieces; a lacy top and Denim pencil skirt will mix and match with other pieces in my wardrobe. I think both can be dressed up or down, as the mood strikes. Lace and denim are both having a fashion moment, so I love the fact that these pieces are comfy, versatile and a perhaps a bit trendy too.

IMG_0938The top is another version of McCall’s 7285, a semi-fitted pullover top that’s so easy and fast.This pattern is so well-written and designed, it’s becoming a tried and true for me.

I love the bell-sleeves and the hi-lo hem. You can make this top in an afternoon, which makes it perfect for summer sewing. This time, I used a light weight rayon from Fabric Depot for the bodice and added some black lace to the sleeves. I finished the seams with my serger. The top is so comfortable to wear, I feel like I’m in my pajamas!! I’m hoping the lace gives it a bit of a ‘dressed-up’ vibe. What do you think?

IMG_0932

The skirt has a simple pencil style. It’s Butterick 5760, (OOP) a 2012 lifestyle wardrobe piece that has a waist band, a back zipper and slit.

5760

The pattern is so simple and basic,  you could embellish it easily with pockets. I wanted to do that but didn’t have quite enough fabric (I am my own worst enemy, it seems!) and when I went back to the fabric store for more, there was none to be had. Yes, I am short, but I must learn that a skirt takes at least a YARD AND A HALF, not a yard. The fabric is a denim cotton blend with some lycra (from Fabric Depot) which makes it comfortable enough for travel.

IMG_0912

This photo is kind of dark, but I just had to show you how lush and green things are right now in Portland Oregon. Yes, we have a lot of rain, but this is the end result…almost worth it?!?

Both the skirt and top are so easy! As the weather improves, I am all about fast and easy sewing. What do you think? Is my top dressy enough for a cruise? Not sure about the skirt…..?

Me-Made-May is in full swing and I love seeing everyone’s posts on Instagram. Although I haven’t been very good about posting photos, I’ve been trying to wear me-made every day, but have found it difficult because I don’t have my jeans finished. I’m hemming them this weekend, and hope to have them to share with you soon. The class was so inspiring, I suspect I’ll become a jeans making machine this summer.

Happy Spring sewing and thanks for stopping by!

Simplicity 1280: Crossover Top Times Two

I will admit. When it comes to sewing a top, I am a bit of a speed demon. I’m happiest when I’m sewing fast, and I will not stop until I’m done. Yes, I can leave a coat, jacket or dress on the sewing table to be completed another day, but a top? No way! Tops take ONE DAY, don’t you know?

IMG_0821

Enter Simplicity 1280: a cross-over top with a keyhole neckline. The top has a bit of a ‘ANTHRO’ vibe and it can be made in a day!

1280

I made two versions of this pattern, using a not-so-special rayon, and a fabric that I’d saved for just the right project (both from Fabric Depot). Wouldn’t you know it? The not-so-special fabric turned out to be the one with the best drape for the project. (Can you guess which one it is?)

I made view C with long sleeves and skipped the elastic on the sleeves as I wanted a bit more of a boho look.

IMG_0836

The top went together pretty well, and it was done in ONE DAY!!

IMG_0817


The pattern instructions are great. Here are some construction tips that I can offer after making two versions!

  • The neck is roomy. If you have narrow shoulders like me, you might want to do a muslin, or, at a minimum, baste the neck band on to make sure it doesn’t droop. I found the extra small to be a bit roomy and had to make it even smaller so that I wouldn’t have an ‘off-the-shoulder’look without intending to. Yes, it is trendy, but….
  • The construction of the front crossover pieces is interesting. The pattern instructions tell you to topstitch the two panels together before you have the back bodice attached to the front bodice. If you use a lightweight fabric like I did, you don’t really know if the drape is nice until the top is sewn together, so when you topstitch the two fronts, you can get some gathers and puckers that have to be corrected when the top is finally put together. Personally, I hate to unpick. So,  I’d take a pass on that topstitching step until after you’ve tried the top on and checked fit and drape. On my first version of this pattern, I had to unpick the topstitching and redo it after the back was sewn to the front because the drape was so different once the bodice was completed and there were so many strange puckers to fix!  Blah!!! Second version, I just basted the two front pieces together with a short stitch. Then, after I’d confirmed I had a good fit, I topstitched like I meant it.

The good news….Once you have these crossover pieces topstitched together, they will not gap or move as you wear the top! Yay!

  • The top really needs ‘drape’, so stiff fabrics will give a much different result. I used lightweight woven rayon, and could imagine it would have turned out even better if I had used silk. Next time….

Both fabrics were chosen in hopes that I could mix things up a bit by  wearing the  prints with my striped Morris Blazer. It’s a wardrobe challenge as only solid tee shirts seem to work with it. Alas, I’m not sure either of these prints works either..opinions welcome!

I keep hoping that I’m on the road to having a true capsule wardrobe, but, well, Hmmmmm. Maybe not today?

I hope your Spring sewing is going well. Me-Made-May, are you in or out? I might pledge one Me-Made a day, as Linda at Nice dress Thanks I made it, very wisely suggested. We’ll see.

Happy sewing and thanks for stopping by!!


Florals, Cut-Out Shoulders and Pants

IMG_0455

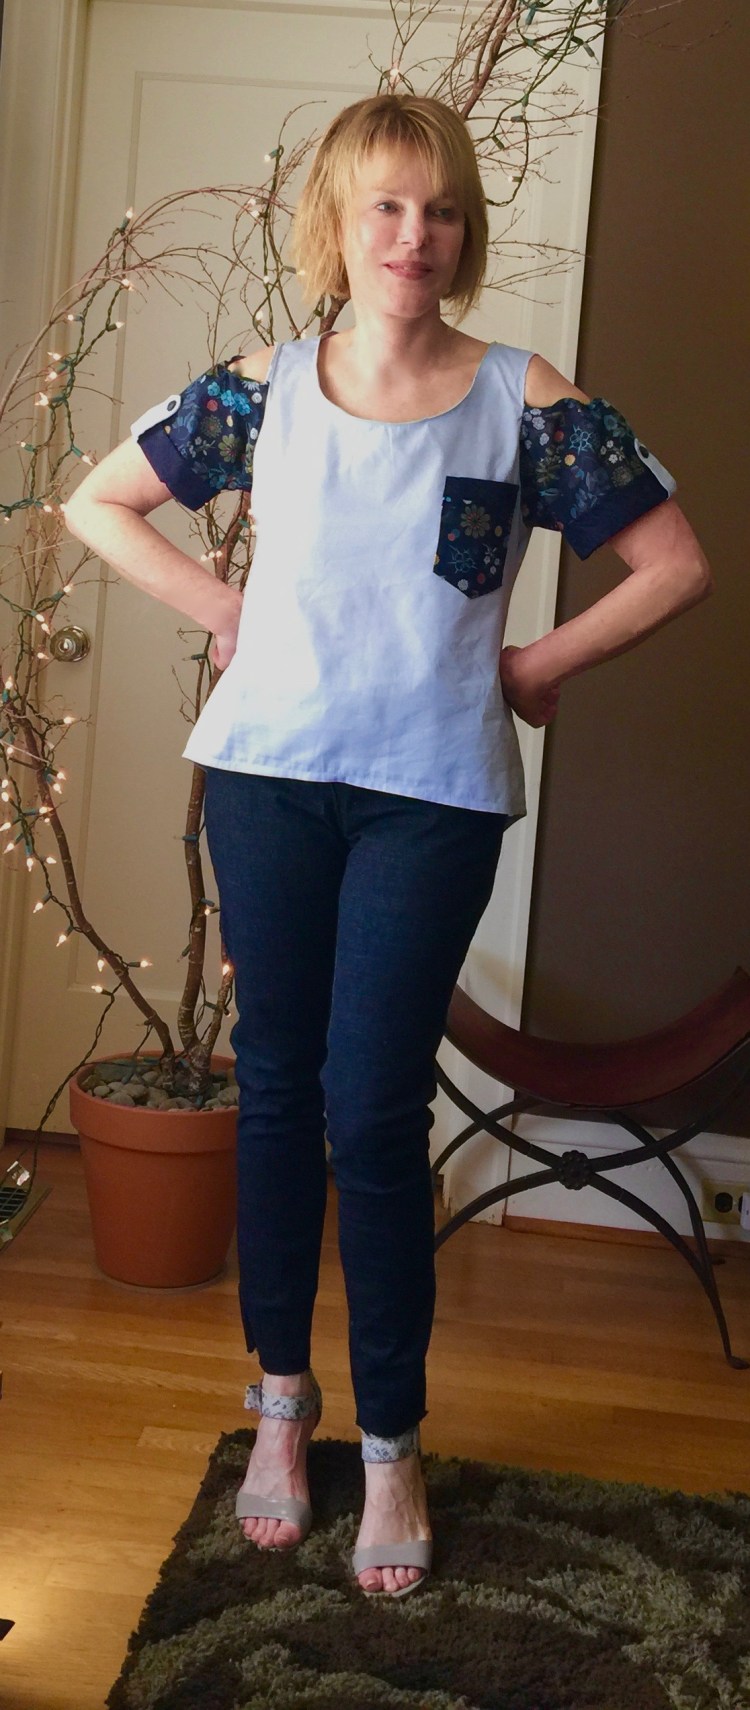
This summer, I’m going to be vacationing in Europe during the hottest days of July. Of course, this means a bit of wardrobe planning, a task I take on willingly! A quick review of my closet revealed the truth. I have very few summery tops, and I could use a few light weight skirts and pants too. So, let the sewing marathon begin!

My top was inspired by a recent visit to Anthropologie. Cut-out shoulders are everywhere this Spring and I love the cool, summery vibe. Butterick 6057 is a great pattern that replicates that look, a loose fitting pullover top with cut-out shoulders and a high-low hem.

There are lots of cool details on this top – – sleeve bands, tabs on the sleeves, a stitched down back pleat with button detailing. The pattern is marked fast and easy, but I doubted that was the case when I saw the details, but it is! Even the the sleeve cut out is simple.

The finished look is accomplished by sewing a long skinny facing piece to the cut-out’s curve, then turning the facing to the inside. Nothing tricky about it! And I love how the sleeve tabs are enhanced with a button. These easy details combine to give the top a unique look.

IMG_0448 (1)

I made this top out of cotton shirting (a remnant in my stash), and the sleeve and sleeve bands are both from cotton lawn. Both fabrics are a dream to sew and I love the easy fit of this top.

In fact, it was such a success I decided to…. (Drum roll….) make a pair of pants to go with the top. Yes, pants do intimidate me, but I’m taking a ‘jeans’ class and have just enough knowledge now to be dangerous (LOL). I used  a linen/cotton blend with a touch of lycra for that I purchased at Fabric Depot. It’s light weight but crisp, perfect for traveling.

IMG_0461 (1)

The pattern?  Butterick 6327, new this Spring from Katherine Tilton.

IMG_0444 (2)

The pattern instructions are well written, making the construction easy. As usual, the challenge is in the fit, and, as usual, I’m not entirely pleased with the result. Gaping at the knees! A ‘smile’ line at the crotch.  Argh! That being said,  I think these issues are more about my ability to tailor a pattern to fit my body shape than with the design of the pattern itself.

IMG_0450

Maybe I can adjust the leg side seams at the knee to tighten things up a bit? Not sure how to fix the smile lines? I do like how the pants taper at the ankle. Personal preference, but I think pants that come in a bit at the ankle are more flattering. Of the two projects, I’m guessing the top will get more wear than the pants, but we’ll see. These projects reminded me of one thing…I do so love sewing with crisp, cool cotton. It’s one of the best things about Spring!

The Monthly Stitch is having a Floral challenge this month, inspiring me to use two different florals for the sleeves and sleeve bands on my top. Pop on over there to see all the wonderful makes! It’s such a great community…so much there to explore.

I hope your Spring sewing projects are pleasing you! I’d love to hear what you’re doing. Any advice on how to get rid of the baggy knees and smile lines on my pants is appreciated. Happy sewing and thanks for stopping by!


Vogue 8346: A coat just in time for Spring

IMG_7897

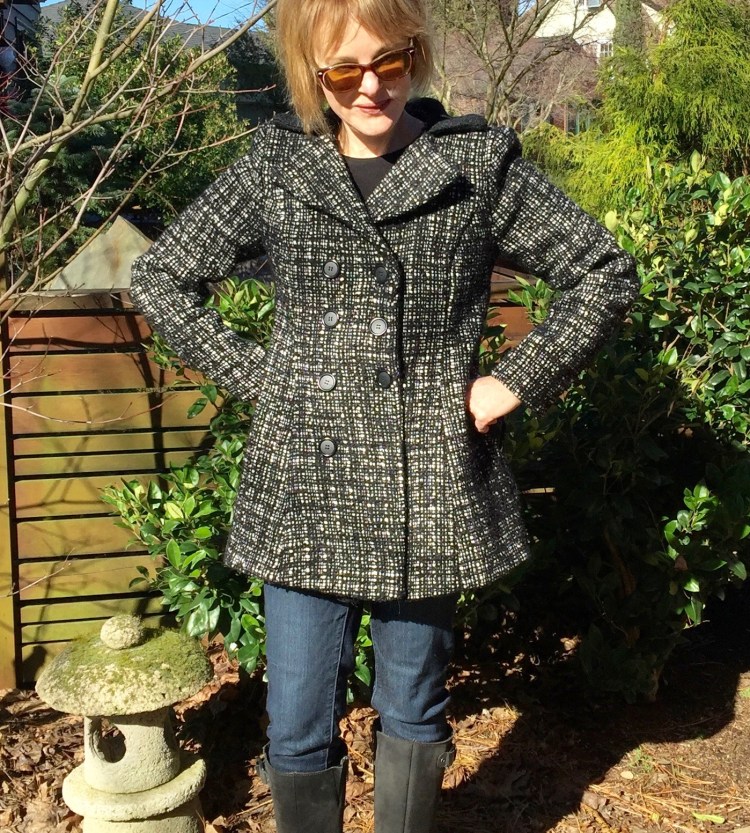
It’s sunny and warm in Portland today. Yet, I’m posting about a heavy winter coat! Yes, timing is everything, and mine isn’t impeccable, but here goes. I started this coat before Christmas, and just finished it because I worked on it in sporadically. So, here I am, wearing a wool coat when it’s sixty degrees outside. Of course, the weather here is a fickle friend, so it might be ‘bundle up’ weather tomorrow (is it evil to wish it would get cold again?). In any event, after all this work, this coat will be worn, no matter how hot it makes me!IMG_7948 (1)

This wool was purchased last year, and I loved it so much (and spent so much on it, LOL) I dithered a bit (actually a lot) before getting the nerve to cut it. I got all angsty over the choice of pattern, how to line it, whether I really needed to underline..(blah, blah, blah). Basically I was procrastinating. I do this whenever I contemplate a big project. Honestly, I drive myself crazy. Anyway, the weave of this wool was so beautiful, I couldn’t resist buying it from the Mill End Store when wool was on sale. I felt a little guilty as I splurged so I scrimped a bit on yardage, and wouldn’t you know? Now I wish I’d bought more. Once I started sewing it, I knew just how special it was. The weight, the weave, even the smell of this wool is heavenly (yes, I am weird). A long coat from it would have been so nice. Do overs, please?

The pattern I used for this coat is Vogue 8346, a classic style, with a bit of a flare.

Because my height almost qualifies me for petite status (only 5′ 4″ on a good day), I avoid styles with a lot of volume. Still, I loved the style of this coat but worried I’d look as though I was drowning in fabric.

So, I made a test coat from corduroy. This was a good move, as I realized after sewing only a few seams that the amount of flare on the design was too much for me. So I ripped it apart, recut the bodice pieces, tapering the flare a bit more, then tried again. That did the trick. Here’s my modified flare:

IMG_7898

I learned a valuable lesson from this process. The corduroy test version of my coat was great, but when I started working with the wool, I realized the drape of the two fabrics was very different. The thick wool made that little bit of flare seem quite exaggerated compared to the corduroy. So, I had to modify a bit more. All in all though, making the test coat was worth doing, as I learned a lot about the fit of the coat. The shoulders were in the right place and not too narrow, (no adjustment needed, yay), the waist was too long for me (raised it a half inch), and the sleeves were too full for me. Nothing too traumatic, but good to know.

The details: I underlined each piece to give the coat’s structure the support it needed to look crisp. This is not hard, but is time consuming, but well worth the effort. (For tips on underlining, take a look at House of Pinhero’s Peacoat Sew Along. In fact, just have fun looking around at all of her posts!) I used a polka dot silk for the lining, which feels like a dream. I highly recommend finding something luscious for the lining…you deserve it after working so hard on a coat, am I right?

IMG_7800

I added very thin shoulder pads to support the sleeve cap and an extra row of buttons because I love the ‘military’ look they add.

And, that’s about it!

IMG_7892The truth is, sewing a coat isn’t that hard, so who knows why I dithered around so much about this one? The challenge was the fit, I guess. Also, a coat with lining and underlining is a serious commitment of time and energy. But why not just jump in? Next time, I will. Sewing a coat is time well spent. I know I’ll wear this one again and again.

Do you dither around before starting a coat like I do? And what have you experienced when making a toile, (test garment) out of a fabric with a different drape? Thumbs up or down?

Happy sewing and thanks for stopping by!


Thursday Top: Vogue 8815

IMG_7737

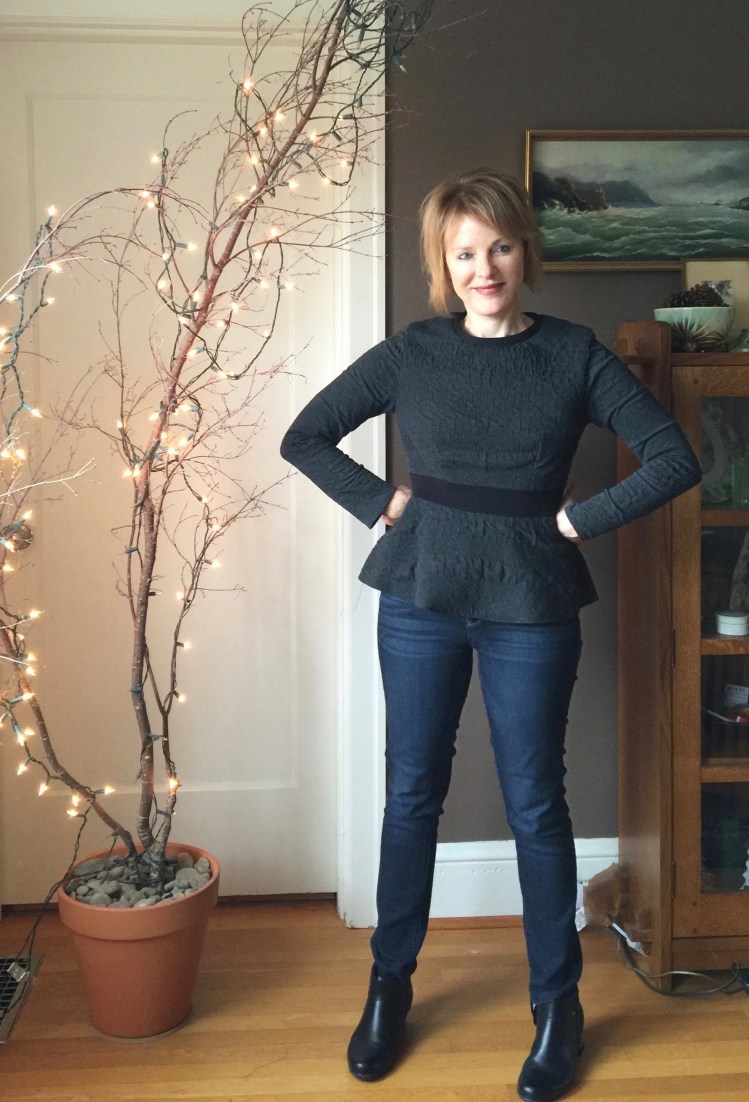
Well, here we are in February, the month that straddles the seasons.  The fabric stores are flaunting new lightweight cottons and linens. Yet, I’m still working through my stash of sweater knits.

At this point, it’s probably ridiculous to state the obvious – I am a fan of sweater knits. As I’ve confessed before, it’s not just because they’re cozy and comfortable. It’s because I can’t knit. Really. My brain gets ahead of my fingers and, well, chaos ensues. Sweater knits are the easy way out.

IMG_7750

And they are so comfortable! However, as you can see in the photo above, I’m discovering yet another cat hair on me. Knits do seem to attract fur of any sort, but doesn’t everything? Still, this particular sweater knit is wonderful, a thick cotton/lycra blend that’s textured and double faced. The result is a lush, thick fabric with a moderate amount of give that is so great to wear.

IMG_7739 I took a close up of the fabric so that you could see the texture. The pattern I used for this Thursday top is one of my TNT (tried and true) patterns, Vogue 8815.

I made it before Here. The pattern is designed for wovens, but when I found this knit, I could see it only one way – – as this top. Generally, when I decide to use a knit instead of a woven, I take the pattern down a full size. But I’ve discovered that each knit is so different, it’s hard to predict how they will behave.

This time, I tried a new method to allow for the stretch in the knit. I adjusted the seam allowances from 5/8″ to 6/8″. Because the stretch on this knit was so moderate, I didn’t want to cut out a smaller size, only to discover the knit wasn’t stretchy enough to warrant that large of an adjustment.

IMG_7748

In the end, I was glad I made the adjustment this way. The knit didn’t stretch enough across the shoulders to warrant any adjustment at all. Because I basted in the seams, it was easy to just let the back seam out where I needed to. Yahoo! So glad I didn’t screw up this great fabric 🙂

IMG_7041

Because the knit had moderate stretch, I used my Bernina’s overlock stitch rather than serging the seams. Here are my pattern modifications:

  • Because I used a knit, I didn’t insert a zipper. The neck slips over my head easily.
  • I added a solid band of knit at the neck (very stretchy so that it wouldn’t bind) in contrasting black.
  • I also added a solid black band of knit at the waist. To do this, I shortened the front and back bodice by two inches. Then I cut 2, two inch wide bands of solid knit fabric the same width as the bodice pieces.  I sewed the solid knit pieces to the shortened bodice pieces before sewing on the back and front peplum pieces.

IMG_7030

Done! One winter project down, and a few more to go. I’m getting antsy for Spring, though. I’ve been longing to work with linen again. I think my first spring project will be a shirt dress of some sort. Have you started sewing for Spring, or are you still working through winter projects?

Happy sewing and thanks for stopping by!

Vogue 8828: If Karl can, why can’t I?

IMG_7172 (1)

I rarely leave the house in anything other than pants and sweaters at this time of year, as the weather makes layering and covering up a matter of survival. But it gets old fast, don’t you think? Pants, jeans, blah! I long to wear a dress, but how? I don’t want to freeze to death.

My dilemma was unresolved until, in a holiday-induced frenzy, I perused the Chanel Couture Collection (I can dream, can’t I?). That’s when I noticed that several of Karl’s creations were actually quilted.


Of course, the Chanel fabrics are so gorgeous, they could do anything to them, and they would be fabulous. But I was caught up in Karl’s message. Dresses can be classic and beautiful, but warm too! Needless to say, creating a quilted dress became my new obsession.

IMG_7187

The pattern I used for my quilted dress is Vogue 8828, a classic style with princess seams, a fitted bodice, a raised waist, and a semi fitted or loose fitting skirt.

I decided to make the less fitted version as I’m in LOVE with A-line shapes at the moment.

I used two different quilted fabrics from Fabric Depot, a black knit and a gray knit. Both fabrics are stable knits, quilted in a diamond pattern, but of varying sizes, a fact I thought would add some contrast to the dress.

I used the black with the small diamonds for the bodice, the gray with the larger diamonds for the skirt. I thought the gray would provide some contrast for the black. But the REAL reason I picked the gray fabric for the skirt was because of the selvages. They were white and tufted, perfect to use as trim on the princess seams and neckline.

IMG_7191

Or course, as I was considering this strategy, I fancied I was mimicking Karl, since he uses trim everywhere. But OMG, what trim! Have you ever seen anything more beautiful than this?

_A2X0357

I made my own trim by cutting those selvages off the gray fabric in 1″ strips. Then, (carefully, let me tell you) I cut them down, reducing them to a width of  5/8″, zigzagging the edges so they wouldn’t unravel. Before sewing the seams, I basted my new trim at the seam line. Then, when I sewed the seams together, the lovely white part showed.

IMG_7154

Honestly, without that selvage trim, the dress would have been (dare I say it) boring? Black and gray are favorite colors of mine, but they can be a bit dull, to say the least. The lines of the princess seams are the best part of this dress and I’m glad the trim highlights them.

Vogue 8828 is a winner. I love this pattern. The style is classic, but fun and it went together easily. There are a few pattern pieces to manage, but in this instance, Vogue does a nice job of describing the construction steps so that it doesn’t make you lose your mind. Also, the sewing required to complete this dress is pretty straightforward. If you know how to insert a zipper, uou can’t go wrong! My only wish is that I’d used a invisible zipper. Oh well, there’s always next time.This dress is cozy, so it will get a lot of use.  I plan to wear it to several wintery evening events.  I plan to make this pattern again soon, from a dressier fabric.

My conclusion? As usual, Karl wasn’t wrong. Quilting doesn’t need to be limited to heavy overcoats and down jackets. Now, if I only could get my hands on some of his fabulous fabric!

Have you ever made a quilted garment? Did you wear it, or did it end up in the ‘recycle’ pile? Happy sewing, and thanks for stopping by!