Linen Tablecoth Top for #scarfrefashion and #so50vintage

IMG_2015

I have a love/hate relationship with Instagram, I must admit. I love seeing everyone’s makes but I find the limitations imposed by the IG algorithm to be so frustrating. Sometimes, my feed is so edited by Instagram, I don’t see the content I choose. Nevertheless, as you all know, I do love a good sewing challenge and Instagram is full of them! So, I will stop complaining and get on with it….:)

IMG_2046

This linen top (a bit wrinkled having just been worn) was inspired by two sewing challenges on Instagram: the #scarfrefashion challenge (includes tablecloths too) sponsored by @sewstoney and @sewdalaridada, and the #so50vintagechallenge. I happened upon a vintage linen tablecoth with beautiful cut work and mitred corners at a estate sale. I’ve made tops from tablecloths before (here and here) so I knew this one was perfect for a top. I couldn’t resist giving the challenge a whirl.

With a little over a yard of fabric to work with, my style options were a bit limited. After perusing my extensive (!!) pattern stash, I came upon Simplicity 8090, a pattern from 2016 that has all sorts of possibilities.

I chose view C because it doesn’t take alot of fabric and it’s cropped, which allowed me to use the finished edges of the tablecloth as the hem for the top.

The pattern was so easy to sew. The sleeves went in perfectly. The front placket was really easy because I used the finished edge of the tablecloth for that. I only made one modification – I added a collar stand.

I do love the french darts on this top. They look so crisp in linen.

IMG_2008

This top has a seam down the back so I positioned the bodice pieces so that the tablecloth’s cut detailing would be on either side of the seam. I cut the sleeves to use the tablecloth detailing and hem too.

IMG_2045

The inside of the shirt looks fabulous because the hem of the tablecloth finished all the seams for me, LOL!!

All in all, it was a fun project, and I’m pleased with how it turned out. The biggest challenge was the laying out the pattern properly, of course, but the extra time involved was worth it.  I do love the boxy cut of this top and know I’ll use this pattern again. Vintage linen is so lovely to work with, I’ll never be able to resist an old tablecoth again!

IMG_1977

Are you taking on any sewing challenges this summer? Let me know so I don’t miss it! I love seeing everyone’s makes….

Happy sewing and thanks for stopping by!

An Anthro Lace Dress Knock-Off

PicMonkey Collage-5

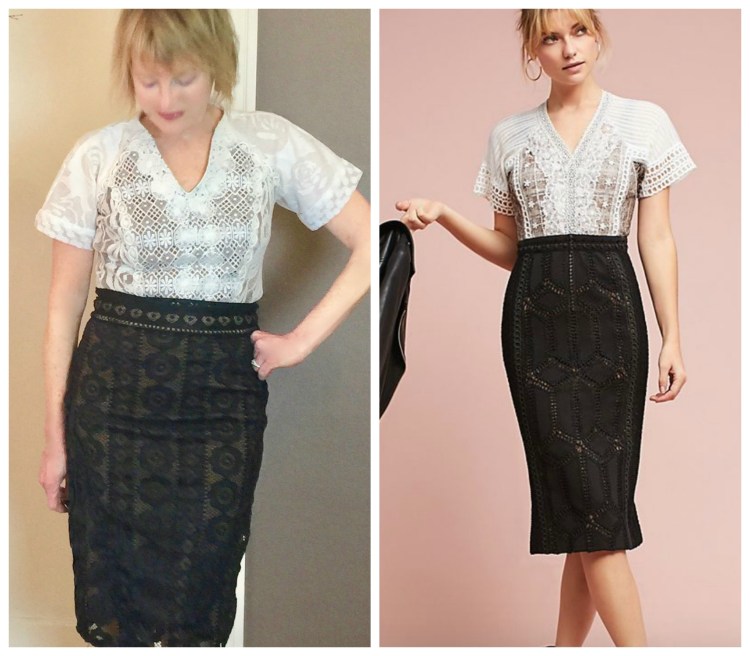
Which one is from Anthropologie? Ha, just kidding. As you all know, I have a thing for lace and when I saw the above dress from Anthropologie, I wanted it in the worst way. The lace is gorgeous, but the style is a bit edgy, a must have if you ask me! But the price tag stopped me in my tracks. $728.00. Okay, it might be worth it with all of those gorgeous layers of lace, carefully sewn in place. But, hey, we can do that; am I right? Enter the Pattern Review Bargainista contest, just the motivation I needed to get it done! IMG_8867

I used Simplicity 1699 as my basic template for this dress.

1699

It’s a simple design, a peplum top or dress with raglan sleeves and a simple rounded neck line. Since, I’d made it before I knew it would fit me, freeing me to focus on the design elements I wanted instead.

First, even though the Anthropologie dress is one piece I saw it more as a skirt and top. So I split the dress at the bodice and added a waistband to make it a skirt.

Then, I started in on the bodice/top. I cut the lining pattern pieces first then cut corresponding pieces from the lace (contrasting pieces of white lace, purchased at Joanns.) and sewed them together. I wanted a v-neck, so I cut that too.

IMG_7326 Once I had the basic bodice constructed, I took little bits of lace and layered them over the first layers of lace, focussing on placing eye popping elements on the princess seams and neckline. Then, I finished the seams, added a zipper and hemmed the bodice so that it would be a top that could be tucked in or worn out.

IMG_1973By the time all that detail work was completed, I was ready for simple tasks. I was glad the process for the skirt was much easier. I just cut it from the lace, added a waistband, and lined it – phew!

IMG_8884

The process of layering the lace on the bodice/top took some time, but it was so satisfying. Deciding where the bits of lace should go was fun, and hand stitching them into place was a calming process. I often forget just how therapeutic hand stitching is!

The good news? My new dress/ensemble is close enough to the original that my credit card is no longer in danger of being used.

IMG_8863

  • Here’s how the costs broke down using the Pattern Review contest formula – – Column dress designed by Byron Lars for Anthropologie – – $728.00
  • 2.5 Yard Fabric for lining (top and skirt) – Joanns – $12.99 per yard on sale for $9.00 x 2.5= $22.50
  • white lace fabric; (3) 1/2 yard pieces for contrast on bodice front and back (1.5 yds total)  $6.99 X 1.5 = $10.48
  • Black Lace for skirt overlay 1.5 yards x 12.99 yard on sale for 9.00 = 13.5
  • 18” zipper for top – $2.99
  • Bits of lace for top embellishment purchased at a thrift store – $5.00
  • 7” zipper for skirt (invisible) $3.99
  • Total: 58.46
  • $728.00 – $58.46 = 669.54
  • $669.54 / $728.00 = .91969 =91.9 % savings

IMG_8861

There’s nothing like a Pattern Review Contest to get the creative juices flowing. Be sure to follow the link  to check out all of the entries – there are some amazing creations and some incredible Bargainista’s out there!

Happy sewing and thanks for stopping by!

An easy DIY Date Night Top and a Challenge

IMG_7161

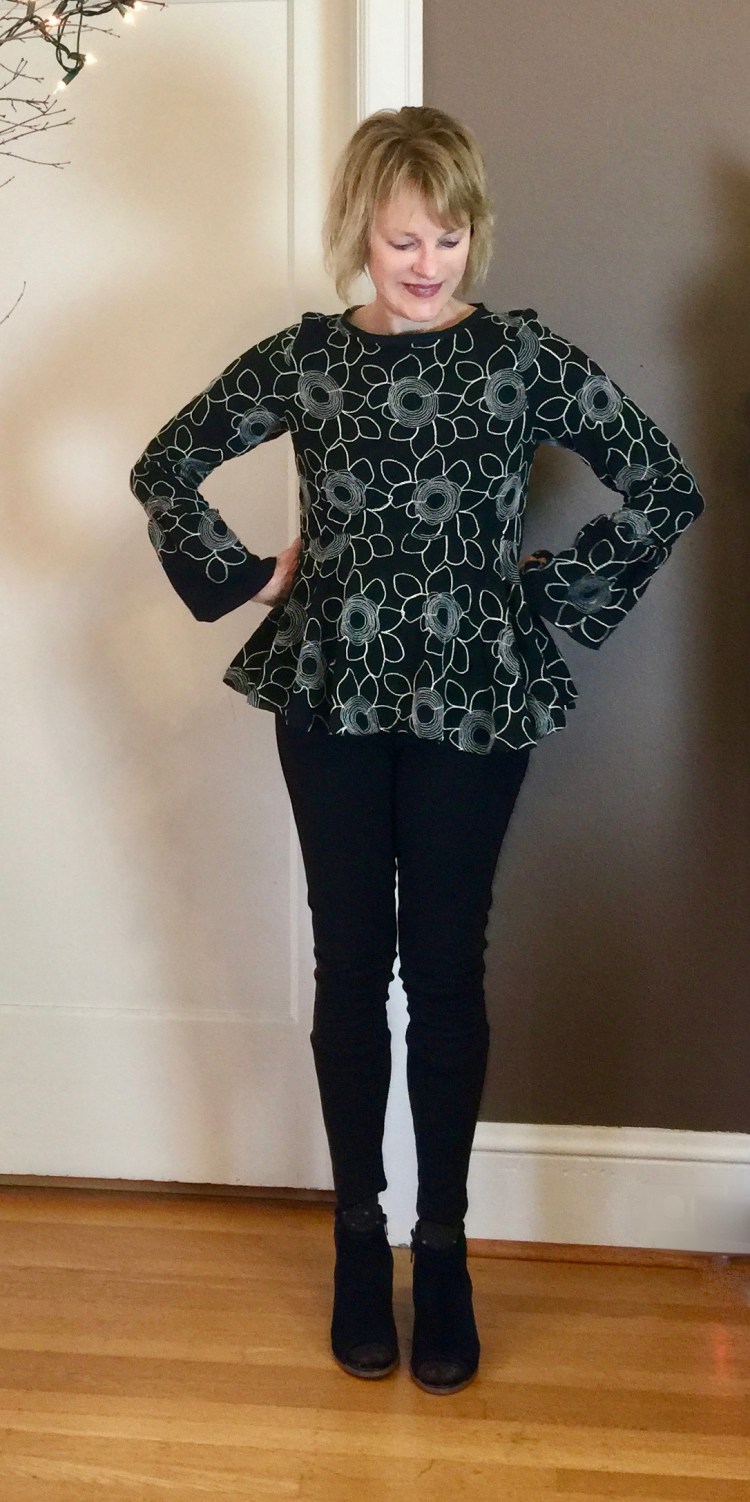
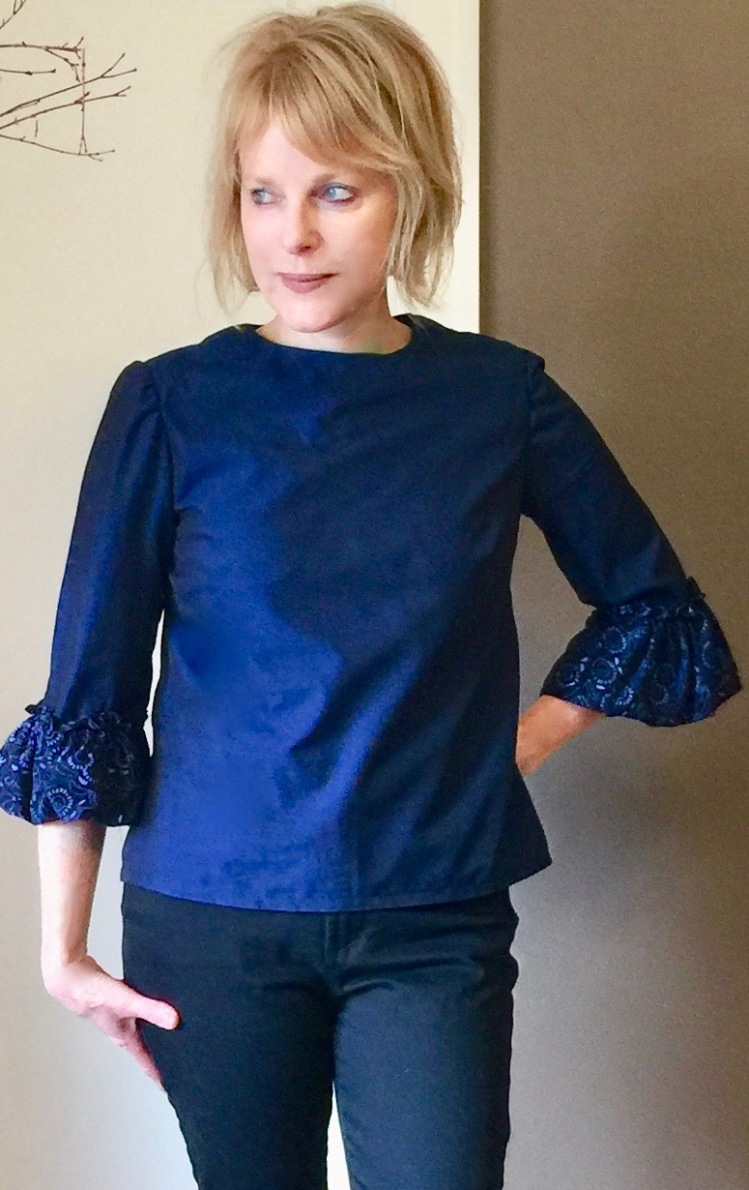
Next week I’m celebrating my wedding anniversary, and will be going out for a date with my husband. As usual, the January weather isn’t really great for wearing a dress (gray, dark and rainy, blah!), so I decided to sew a date night top from a springy floral to perk myself up!

For a special night out, I always want to wear something with a bit of drama, so it was the perfect excuse to sew another fun peplum top.

IMG_7144

You all know, I’m a big fan of peplums (sewn here, here and here). Every time I think I’m over them, I discover a new version to try. This top is Vogue 9084, a very easy pattern that has some really dramatic peplums, if you’re in the mood! I was attracted to the curved seam where the peplum meets the bodice – I just had to have it!


I love this fabric (fabricdepot.com). It’s embroidered rayon and it hangs like a dream.  Unfortunately, I didn’t have enough fabric to do view C with the dramatic high low peplum. Not sure my husband would have loved that look anyway, since he wasn’t a fan of my coat with the interesting hem (here), LOL. Maybe next time. Although this pattern is marked ‘easy’ I did have a few challenges with fit. The neck doesn’t look big, but on me it was huge, even though I cut the smallest size and took a narrow back adjustment. I ended up taking a couple of short darts at the neckline in the back before finishing the neckline with seam binding. This did make it fit much better, but it was frustrating as I had already taken some ease out of the back with my narrow shoulder adjustment.

IMG_7099

Unfortunately, my print doesn’t really show the cool curved seam in the front, so next time, I’ll likely make it in a solid fabric. For fun, I modified the sleeves a bit and added a 6 inch wide bell cuff so that it would look more dressy for ‘date-night’. To do this, I cut off 6 inches of the sleeve length. Then, for the bell cuff, I cut a 8 inch wide piece of fabric. The length was 1 and a half times the circumference of the sleeve opening. Once the cuff was gathered, I just inserted it into the sleeve bottom.

At this time of year, going out in the evening means wearing a heavy coat and pants so I’m glad I’ll have this fun top to make me feel dressed up when I reach my destination.

IMG_7094

In other news, Elizabeth at Elizabeth Made This is hosting the Day/Night dress Challenge again this year. Last year, I loved participating in the challenge because it inspired me to make two dresses that I wear all the time and I met some really fun bloggers. So I was so pleased when she asked me to participate again this year. daynightchallenge18logohashtag

The theme is coffee and cocktails, a brillant way to capture the essence of the challenge, which is to sew a dress you’d wear if you were meeting a friend for coffee, and another to wear for cocktails! Any one can participate. The details are on Elizabeth’s blog, but it’s really simple. You can tag your entries on Instagram with #dayandnightdresshchallenge and tag Elizabeth at Elizabethmadethis too. There are prizes, heh, heh and great sponsers. I’ve started planning my dresses and can’t wait to see yours!

Happy sewing and thanks for stopping by!


Tucks, Pleats, and Sewing through grief

IMG_1614

Hi all! It’s been a rough week around here. Dustin, our little buddy for sixteen years succumbed to renal failure last week. If you’ve visited here before, you may remember him from several photos. He loved to be in the middle of everything, and blog photos were no exception.


Such a character, and he always had something to say. He loved jumping on my sewing table and rolling around on the pattern pieces, hilarious! He was such a presence in our lives. Needless to say, his loss has been really hard.

Grief is such a miserable state to be in.  You want to get on with it, but you just can’t. Simple problems become hard. It wasn’t a week for big thoughts or new inspiration. It was a week for repetitve tasks, simple things. I found some comfort in the task of sewing pleats.

IMG_1612

Pleats are mindless, a bit tedious sometimes, but very calming to me. You just mark, pin, press and sew. It didn’t bother me at all that this Cynthia Rowley dress/tunic has forty pleats. But catch me at another time, and I might feel different!

I do love Simplicity 8414. Cynthia Rowley’s designs for Simplicity are always winners.simplicity-dress-cynthia-rowley-miss-pattern-8414-envelope-front

I wanted to make the dress with the ruffle, but then ran out of fabric so I settled for tunic length, which worked out quite well since the Pattern Review tunic contest is just winding down!  I might just get my entry in on time. My fabric is striped cotton shirting (Fabric Depot), that turned out to be perfect for this pleated design. The stripes became reference points that helped me to sew the pleats precisely. And there are alot of them! They give the sleeves their bell shape and the front and back bodice some fit that makes this dress flattering.


This pattern is time consuming, but not too hard. The trick is to mark the pleats clearly so that you can sew them precisely.  BE forewarned though. The fit of the dress is very loose. I cut an extra small and the fit is still roomy.  But to me, that’s what tunics are all about, comfort! My only complaint about this make is that the fabric wrinkles easily. Every time I move, another crease is born. I’m not entirely opposed to wrinkles, really. It’s just that sometimes you want to look crisp.

This is a fun pattern and it reminds me how much I enjoy sewing designs with pleat detailing. I can remember how taken I was once with the designs of Albert Nippon. Here’s a Vogue pattern he designed in the 80’s. Lots of pleats!

b070b22c7955f11c4e83553092e945fb--nipon-hurricane-katrina

Sewing as therapy….Do you find detailed sewing comforts you too?

Happy sewing and thanks for stopping by!


My Mini Wardrobe with Indie Patterns

IMG_0340Hi All! Indie Pattern month is winding down over at the Monthly Stitch. The last challenge was to create a mini wardrobe from Indie patterns and I decided it was the perfect motivation to pull out the lovely Indie patterns I’ve been meaning to try, but haven’t. After looking at my patterns and my fabric stash, I decided the theme for my wardrobe would be ‘layers’ and transitions, as I wanted my mini wardrobe to take me from summer to fall.  To make my outfit, I combined the Orsola dress by By Hand London with a Modified Alder Shirtdress by Grainline Studios, and topped it all off with the Sapporo coat by Papercut Patterns.

First up the Orsola dress. I love this design!

IMG_0170

The dress pattern was a dream to sew. The instructions are spot on and the sizing was perfect too. Since this was my first BHL pattern, I wasn’t sure if it would be true to the displayed pattern measurements, but it was, Hooray! The bodice is lined which makes for a nice clean finish on the inside.

IMG_0420

I love the way it wraps in the back.

IMG_0165

I made it from a lightweight cotton print, and lined it with rayon. The drape is really nice in this fabric, but I can imagine it would be perfect in rayon, silk or linen (I’ve already purchased linen for another one.) If you hate darts, beware!!  This pattern has eight! But the good news is there isn’t a zipper, LOL!! One word of caution…you must commit to the length of the dress right away as the hem is faced. I love the detail of the dip in the hem. I think this style would be flattering on anyone!

Next up, is a shortened version of the Alder shirt dress in blue linen. I shortened the pattern so that it would function as a jacket or topper.

IMG_0386

Using the Archer pattern sleeves, I modified by adding a sleeve to the Alder without a cuff so that it would look more like a little jacket ( I rolled them up in this photo as it is so….hot here.) I left off the collar, and used only the collar band. I also took out a little of the fullness in the peplum so that it would be a little less puffy of a silhouette. I love this linen – and I know I’ll wear this new Alder constantly as a topper, or just with my jeans.

IMG_0236

Last, but definitely not least is the Sapporo Coat by Papercut patterns.

IMG_0286

I’ve been eyeing this one for awhlle and IPM was the perfect excuse to jump right in. I made it from linen and lined it with rayon. This pattern is definitely a departure from my usual style, but I love the cocoon shape, a new obsession of mine!

IMG_0271

It’s a very unstructured look, so there is ALOT of ease in this pattern and I do mean a lot. I cut the size XS, and ended up taking in the side seams even more to get it to fit. I love the construction of this coat – the collar is built in and the sleeves are faced so that you can roll up cuffs if you want.

IMG_0421

The pockets are my favorite part of the design and I love the slouchy look they give the coat. Be forewarned though. There’s isn’t a mechanism for shortening the bodice – so I tried a quick muslin to make sure it fit. If you love this style, go for it! The construction of this jacket was really pretty easy! This is my new favorite coat and I know I’ll love it for fall. I might try it again in a wool blend or cotton boucle’.

IMG_0307

Phew!! I’m really glad that Indie Pattern month only comes once a year!  I do a crazy amount of sewing as there is just something about seeing everyone’s makes that just inspires me to jump right in! I’m really glad I tried new patterns this year. I love By Hand London and Paper-cut Patterns and I’m loving the results and the styles. Have you tried their patterns? If so, any recommendations?

Happy sewing and thanks for stopping by!

It’s going to be a Charlie Caftan Summer!

IMG_9411

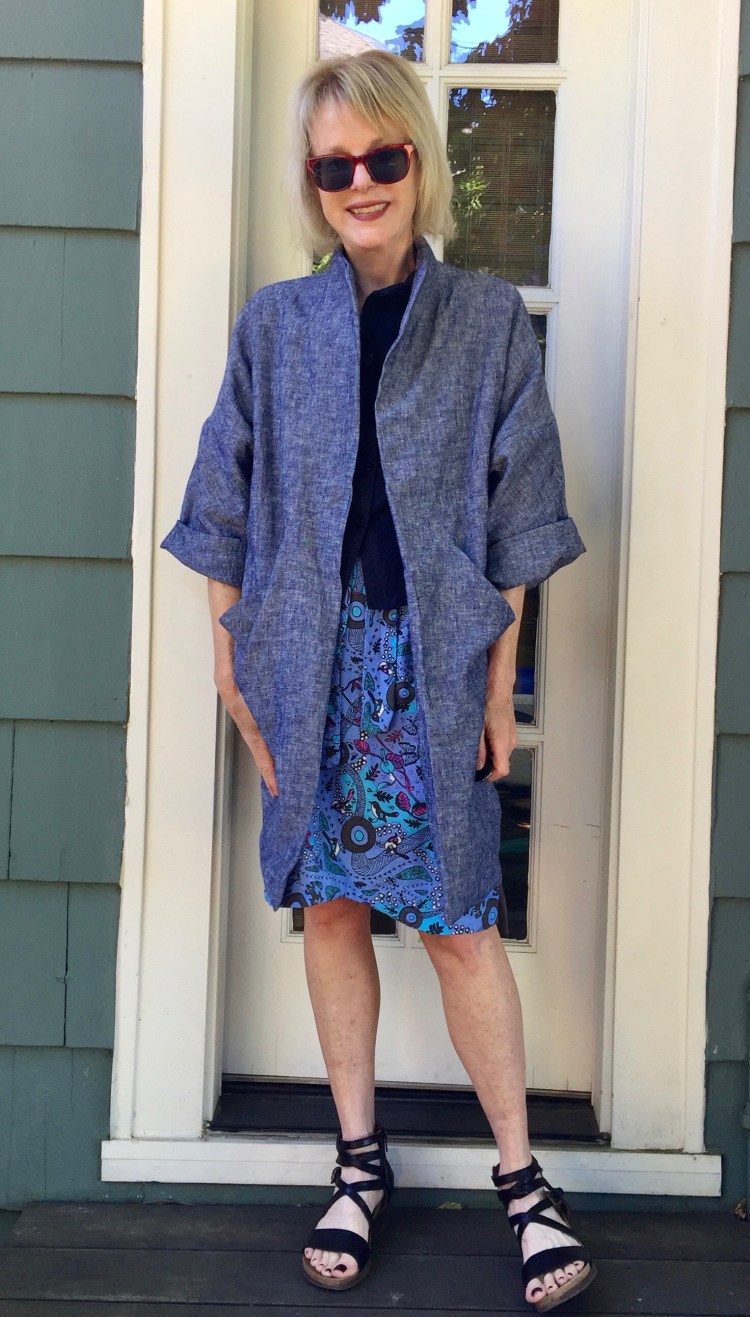
If you’d asked me, ‘are Caftan’s your thing? I probably would have said, no. But I’m such a fan of this pattern by Closet Case Patterns. I was inspired to try it by Indie Pattern Month over at the Monthly Stitch. After making a muslin version, I decided it was the perfect pattern to hack for this week’s IPM challenge.

IMG_9398

This pattern has several options that provide ample opportunity for you to do your own thing. You can make a loose gathered caftan, either short or long, or a more fitted version without gathers. For my hack, I used Version A, the non-gathered version.il_fullxfull.1223032594_ih2b

I loved the shape of A so I decided to convert the Caftan look into a more fitted cocoon dress. I modified as follows:

  • I raised the inset opening by 1 1/2 because, as drafted, it was too close to the waist for the look I wanted.

IMG_9448

  • The Inset Insertion: From my muslin, I discovered I was not wild about how the front inset is assembled.  You’re supposed to insert the inset into a 1/4’ opening and make it smooth and neat. I practiced and practiced, but well, needless to say, that didn’t happen for me. So, rather than an inset, I merely slit the opening, made the pleats as instructed, then topstitched the inset over the slit. It’s easier and looks a bit smoother to me.

IMG_9415 3

  • The pleats add a cool shape to the dress so I stitched them down for a more sculpted look.
  • I added large patch pockets to the front with button down flaps. I added self-faced cuffs to the sleeves that can be rolled up and kept in place with button tabs.
  • I added a small raised collar to the back of the neck, to make the neckline look more like a shirt.
  • IMG_9379

I love my cocoon shaped shift dress. It’s so comfortable and cool, and I think the polka dots add a vintage vibe. My fabric is cotton lawn, but I could imagine this dress in linen, cotton double gauze or rayon.  It’s so versatile, I’m thinking I’ll try the gathered version, both short and long. What about you? Are you a fan of the Caftan look?

I’m loving Indie Pattern Month over at the Monthly Stitch! It’s so inspiring to see everyone’s favorite Indie patterns and how they interpret them. I’ve found some new patterns I want to try as a result, and found some new blog friends too.

Happy sewing and thanks for stopping by!

New to Me: a Colette Moneta

IMG_9110 2

It’s Indie Pattern Month over at the Monthly Stitch, a fun month of challenges designed to acquaint us with the wonderful world of Indie pattern designers. Last week’s challenge was to make a pattern from a company that was ‘New To Me’. I picked Colette patterns, a company based in my home town, Portland, and made their popular pattern, the Moneta dress.  And lucky me, my ‘make’ qualifed me as a finalist in this week’s competition! Voting is now on the Monthly Stitch and I’d love to have your vote!

IMG_9123

This is a fabulous pattern, and I can see why it’s been so popular in the sewing community. I’m not sure why I never made it before….I’ll be making it again and again. I used a cotton jersey knit and added a contrast collar, sleeve bindings and pockets. It came together easily, and my full review can be found on the Monthly Stitch website. The good news about this pattern is that Colette includes lots of collar options on their website so that you can make many fun versions.  It’s really a keeper.

If you’re new to the Monthly Stitch, it’s worth checking out. It’s a great community and every month brings a new challenge. It’s a fun way to get inspired to do something new and to make sewing friends.

Happy sewing and thanks for stopping by!

McCall’s 7542 times two: Bubble and Tulip Sleeves

Hi all! I meant to post this earlier this week, but a horrid stomach virus took me out of action. According to my doc, it’s extremely contagious, but the good news? You can’t catch it by reading my blog :).

Spring hasn’t exactly sprung here, but I continue to sew as if it has! These two versions of McCalls 7542 are my attempt to lighten the mood in my closet by adding some more statement sleeves. It is one of the hottest trends around, probably because they are pretty fun to wear! You just have to believe warm weather is on it’s way when you’re wearing something this fun.

Bubble sleeves are how version one is described.IMG_5297Okay, I’d never heard this term, so I googled it, and was amazed at the varied interpretations of the word, ‘bubble’. The bubble look is made by simple gathering. After you’ve gathered the sleeve, it’s turned up to the outside to make the little ruffle where it attaches to the elbow of the main sleeve. It isn’t hard at all, and it’s a great way to take an ordinary sleeve to something special.


IMG_5324For fabric, I used a cotton shirting from Fabric Depot, and a remnant of rayon that I found on the sale rack there. Of course I love them both because they’re blue :), but they are also dreamy to sew with. The cotton shirting is crisp, but not too heavy, and feels as good as silk to wear! I wish I’d bought more of this!

My second version is with tulip sleeves.IMG_5386I made this version out of cotton double gauze from Fabric Depot and I love the way it drapes. The tulip sleeves are created by two pieces that overlap before you insert the sleeves into the bodice. It isn’t tricky or hard. These sleeves need to hang softly, so a cotton that was stiff or heavy probably wouldn’t work. I could imagine these sleeves would be fabulous out of rayon or silk or crepe. In fact, I just might have to try this again out of one of those yummy fabrics!

McCalls 7542 was easy and fun to sew.

The instructions are great, and I was happy that it fit without any modifications. I just made the size that I usually do in McCalls patterns. I made the longer version both times. I’m short waisted, but the cropped version was even a bit too short for me, and I wanted to be able to tuck them into my ruffled wrap skirt.  This pattern is a pretty quick sew because it doesn’t have a back zipper. The back opening is just finished with a hook/eye. I made it in a Saturday afternoon!

Both versions are part of my capsule wardrobe.


M7542 is going to be a TNT pattern for me, and I love how many options you get with this one purchase. I’m definitely a fan of the statement sleeve trend, so I wouldn’t be surprised if I don’t end up making all of these options!

My only ‘issue’ with these ‘makes’ is that on my second version, the tulip sleeves fall open all the time.  Even though the pattern instructions don’t tell you to stitch the two overlapping pieces of the sleeve together, I’m tempted. But then, the drape-y look might be ruined…What to do? Opinions welcome…

McCalls Pattern Company is having a #M7542 Contest to see who can make the best version of this pattern! How fun is that? There are even prizes. I just might have to enter:).

Happy sewing and thanks for stopping by!


Wardrobe Part 2: Safari and Long Cardi

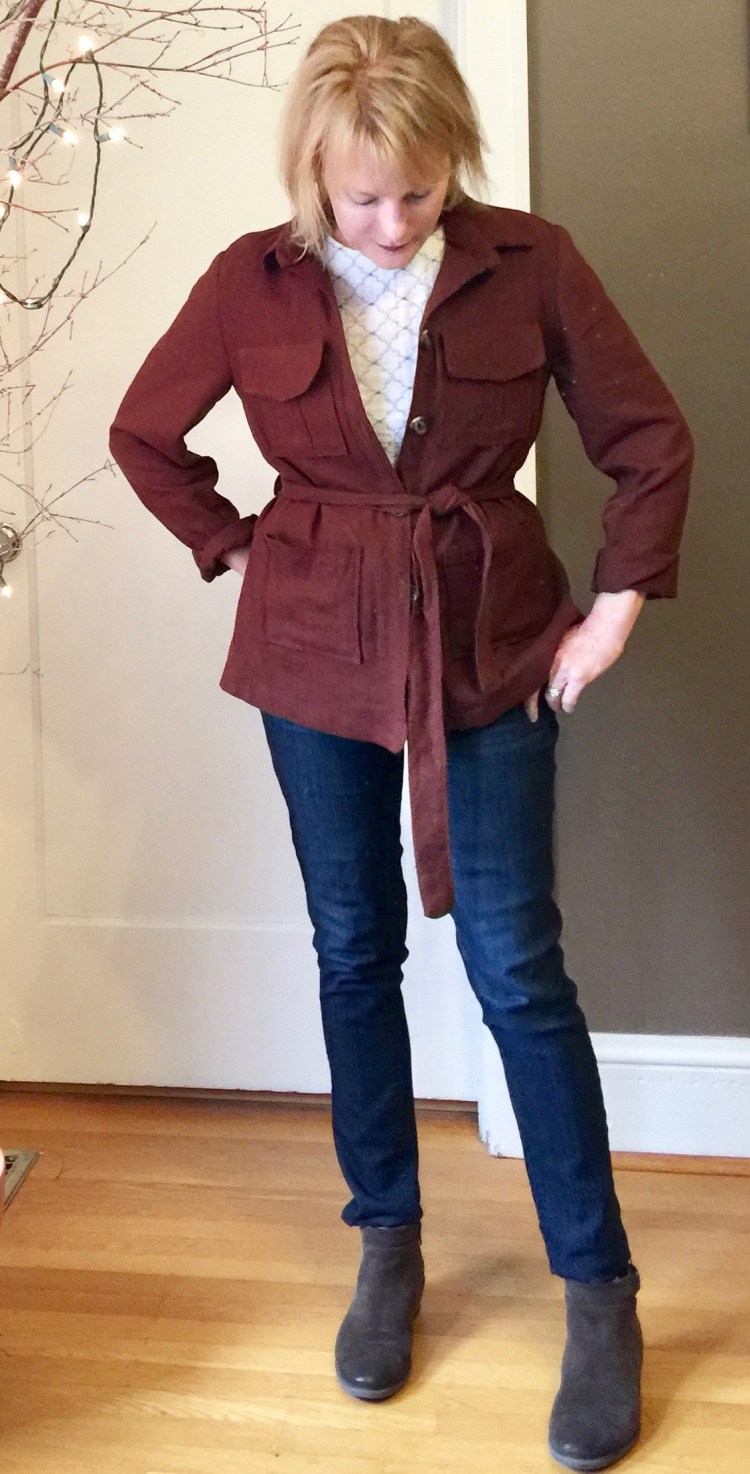
Hi All! I’m back with part 2 of my Sudoku Wardrobe adventure for Pattern Review’s Contest. These makes are two of my ‘accessories’, a linen safari jacket and a long knit cardigan. I think the fact that I interpreted the accessory category as a chance to add jackets or toppers to my wardrobe is a big clue that I live in Oregon! Honestly, one doesn’t venture out of the house, even in summer, without a wrap of some sort in hand. You just never know when the weather is going to shift and catch you by surprise.

This safari jacket was one of my favorite makes of this contest.

IMG_4313 2

Why? Because it’s detailed with double rows of topstitching everywhere!

Of course, I used my trusty #57 edge stitch presser foot to help guide me as I did on my denim dress last year. There’s something so satisfying about seeing those stitches lined up in perfect rows!

I’ve wanted to make a jacket like this for a while with a belt and pockets and buttons. I imagined a version with buttons on the upper pockets, but when I tried them on my jacket, well, it just was too much for me. So I left them off. McCalls 7365 is a loose-fitting, unlined vest and jacket with a self lined yoke, two piece sleeves, french seams and lots of pockets with tucks. It also has a cool back pleat, and a tie belt. There are lots of pieces of course, which makes this long project but it’s so satisfying and well worth the time. I love the two piece sleeves and the pleated pockets. One note though: the fit of the jacket is loose. Adjusting it would be a bit tricky if you usually adjust fit at the side seams because there are none. There’s a side panel instead.

The pattern instructions were great, the fit was good, and nothing was too tricky or confusing, definitely, a new favorite! The linen was from my stash, (YAY) purchased so long ago, I forgot where!  For the contest, the Sudoku grid forced me to pair this jacket with a skirt, but I’ll likely wear it more often with jeans and shorts. I want another version out of twill
 My other topper in the accessory category was a long knit cardigan.IMG_4826
I am such a fan of this shape. Earlier this year, I made this pattern and loved my wool knit version so much , I had to add a Spring version to my wardrobe.IMG_3967
It’s made from a denim colored cotton knit that I bought at Fabric Depot last summer. The fabric has just the right amount of stretch to make it wearable, but it’s not so stretch that it loses its shape. McCalls 7476 is one of my new favorites, and I have fabric for another version in linen knit. I cut this version a bit larger than my last because I wanted to take advantage of the light flow-y nature of this fabric. It floats a bit as I walk, which will make it a perfect summer layer.
M7476

I also made an Obagi belt from leather, and used that as one of my accessories too.

IMG_3875

This belt is basically just two pieces of leather sewn together with leather ties. I crafted the tassels by cutting strips of leather and sewing them to the ends :). Not sure I love how they turned out, but I do use this belt all the time!

That’s it for my accessories; The Moto jacket from last post, the Safari jacket, the cardigan and the belt…four pieces I’m glad to have in my wardrobe! Next post will be the tops I made.

I wandered around my sewing room a bit yesterday and noticed how airy and light I feel with a smaller stash :). That’s one of the best parts about entering a contest/challenge for me. I’m motivated to complete projects I’ve dreamed about for a long time, and I burn through my stash! I have to admit though. It is hard to part with some fabric, like the brown linen piece I used for the Safari jacket. I love the color and know I will never find a piece like that again. What? Do I have regrets? Not really, but I do get sentimental about fabric!  Am I the only one?

Happy sewing and thanks for stopping by!