Happy New Year! This is my first make of 2020 and I am happy to say it was a success. It’s always good to start a new year with a project that you love.
I’ve made the Coccon Coat before (see it here), based on a version Sew Over It released as part of Lisa Comfort’s magazine. Now they’ve released it as a PDF pattern, available on their website (I received a free copy as a Pattern Insider). I loved the pattern so much the first time, I had to give it another go!
There are many things to love about this pattern. The cocoon shape of the coat is modern but classic. There are two piece sleeves and two pocket options. I chose the welt pockets, which can be challenging, but with their in-depth instructions made it seem easy.
Pattern Construction and Modifications: The Cocoon Coat is meant to be worn open, but that just isn’t an option that works very well in Oregon. So, I extended the front lapels by an inch and added hidden snaps to secure the opening. It changes the look of the lapel and collar a bit from the intended design, but I still like the look, and it makes it much more wearable for me. My coat is made of a good medium weight wool (Millendstore) and lined with silk from my stash.
Construction of this coat is a breeze. The lines are simple so there aren’t any tricky fit issues to resolve. I think the Cocoon coat would be a good option for someone who has never made a coat before.
2019 was a pretty successful sewing year for me with 39 blog posts:). It seems as though the number of sewing blogs has thinned out a bit in response to the growing presence of Instagram and the option to post quickly and often. I understand that, but I quite like the longer format of a blog post and the chance for a more detailed discussion. So, in 2020, I’ll continue to post here too. Thanks for reading and for keeping me company here.
Well, it’s official. I am now a big fan of the Wiksten Haori jacket.
I might be the last blogger to make this lovely jacket. I avoided this pattern at first, as I prefer fitted jackets to loose-fitting styles. But on a recent visit to a local fabric store (Bolt, such a great store!! ), I tried on their sample version of the Haori, and it was love at first wear. Yes, the style is a bit boxy and unstructured, but that’s the beauty of it!
My first version (yes there will be others) was inspired by a change of weather here in Oregon. We had a few ‘teaser’ days last week that felt like Spring, but now, temperatures are cold again and it’s damp. I still need to wear a cozy layer, so my Haori is made from a wool blend, lined with linen. The woolfights the damp fearlessly, while the linen makes it wearable. Because the design is a loose fit, a fabric with some body (like linen, wool, cotton canvas) is a good thing…it really gives the stylish details some support.
The design of the Haori jacket is simple in concept. It’s two jackets bound together by a common front facing/lapel; brilliant really and quite easy to sew. I am a fan of this construction method, as the inside of the jacket has such a clean finish, and it makes the jacket reversible too.
Even though my measurements put me at a small, I cut the extra small and still had room to spare. You might want to consider sizing down. This version is the ‘short’ version. I worried a bit about the length as it was described as ‘cropped’, but in reality, on my 5′ 4″ frame, the length is perfectly fine – – it hits just above the hips. You can see the longer version on Instagram (#wikstenhaori). So many lovely versions to enjoy!
Construction is pretty straightforward. The sleeves are inserted before you sew the side seams so you don’t have to set them in…a big win if you ask me! The pockets are patch pockets that are top-stitched…also very simple. It took me about 2 and a half hours to put together.
Choosing fabric – – one thing to remember is that the front facing/lapel is cut from the lining fabric, so you need to choose a lining fabric that compliments the fabric of the body of the jacket. Also, the sleeves are rolled up, so that’s another chance for your lining fabric to be a cool design element. A fabric with some body is key to help the jacket hold its shape. My wool is pretty soft, but my linen has some crispness to it, so the combo worked well. The lapels are interfaced too, which helps give the style some structure.
I love the weight of this jacket. It’s perfect for this time of the year. But I’m already planning a linen version (or two) for warmer weather, maybe a quilted version for Fall. Really, with this style, the options are endless! If everything in my closet was this lovely to wear, life would seem easy indeed.
I’m really enjoying everyone’s #sewhappycolor posts on Instagram – I’m inspired to add more color to my wardrobe this Spring! Happy sewing and thanks for stopping by.
I finished sewing this wool coat a few weeks ago, and wanted to share it, but the weather hasn’t been great for taking photos outside. The fact is, the sky probably won’t be clear for another month or so, and by then, it will be too warm to wear wool (fingers crossed). So today, I gave up and took photos indoors!
This coat is Butterick 6292, a pattern that caught my eye when I saw the versatile collar!
I love coats with a military vibe (i.e.Burberry), and the button placement on this design definitely gives it that look.
The wool is, well…green, a color I don’t usually gravitate towards, but this wool from Mill End Store was too cozy to resist. It has a very soft hand though, so I decided to underline the front of the jacket to give it a bit of body to hold the shape of the front lapels. I think this was a good move, because even underlined, the wool still retains its character, yet holds its shape. I lined the coat with rayon and used very thin shoulder pads to give the shoulders some definition.
Challenges:
This wool is thick – so making buttonholes on a double layer of fabric was a absolute night mare. I thought I’d lose my mind. My machine couldn’t seem to manage moving across the thick nubby wool so I put a thin layer of interfacing over each buttonhole before stitchng it. It worked! Then, when the buttonhole was finished, I trimmed the interfacing away.
Lining – – Even though I cut it according to the pattern instructions, it was an inch too long. Not sure if others had this problem, but it added a step because I had to trim it.
Back pleat – I eliminated this as I thought my soft wool wouldn’t hold a pleat. The coat still has enough room to accomodate a wide stride without it.
Button placement was a bit tedious – -there are alot of them 🙂 But I love the look so the end result made the effort worth it!
I love my new coat, and, well…(don’t hate me)…I hope the weather doesn’t improve too quickly so that I can wear it!!! The pattern is definitely a keeper, one that I should probably make again, but will I? Hmmm, there are so many coat patterns in my stash that I want to try, so I’m not sure this one will make it into the queue again. Although I can imagine a version from twill or tweed….
Have you put your stash of wool away until next winter, or are you a die-hard like me?
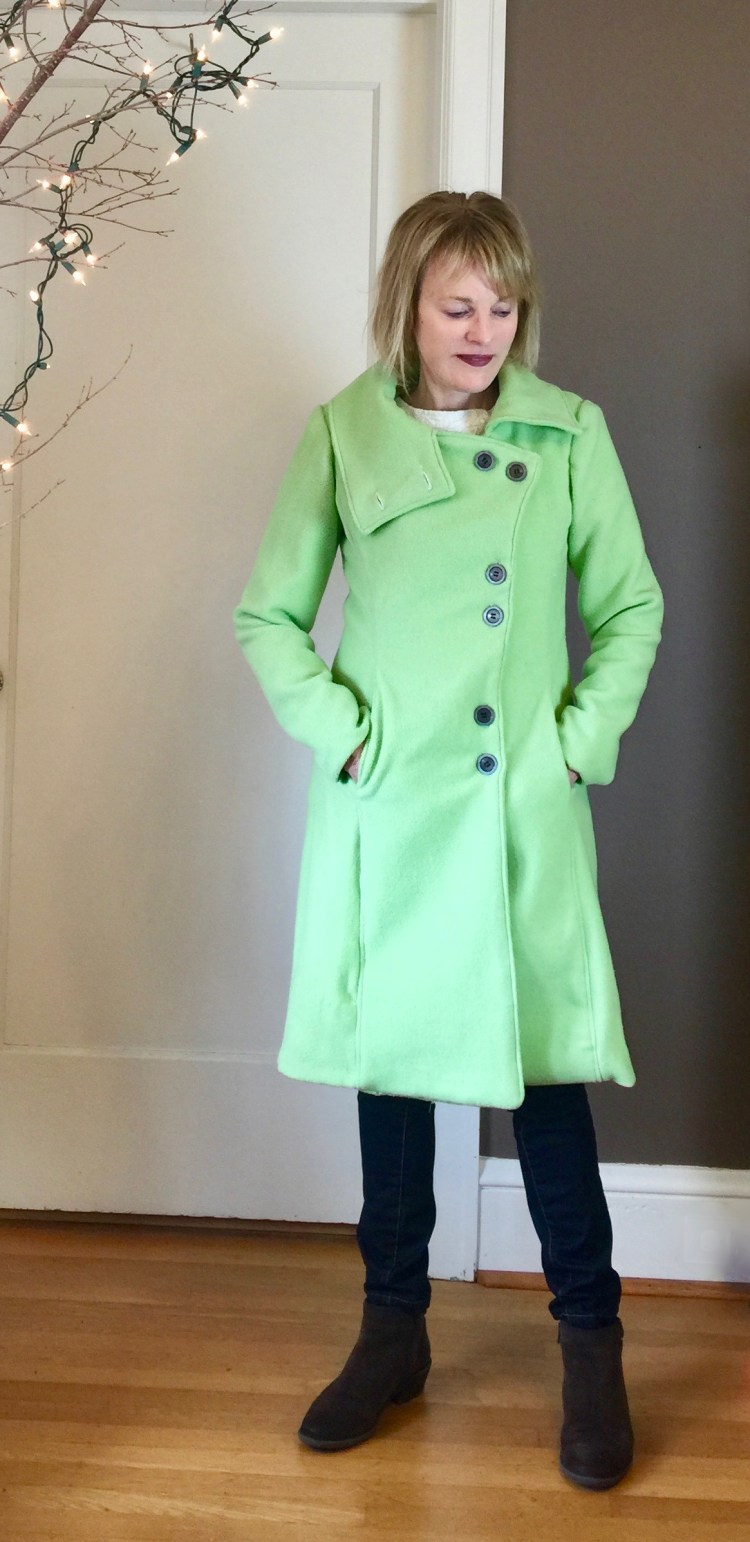
Hi All – – My husband is usually quite generous with compliments when I finish a make. But this coat got a strong, very negative reaction out of him! It caught me so off guard, I had to run to my girlfriends for reassurance. Yes, this coat isn’t the classic style I usually gravitate to, but I can’t always wear or sew the same old thing, am I right? That’s why I was drawn to this coat’s interesting hemline, and of course, that’s the detail, that makes my husband squirm. It reminds me a bit of this Burberry wrap coat I saw on line.
Of course, the challenge of this make was the plaid matching, made even more so by the fact that I have not changed my ways when it comes to buying fabric. I tend to buy on the short side….and that’s really crazy when the fabric is a plaid. When will I learn? Because I was short on fabric, I had some panicky moments as I tried to get the sleeve plaid to match the bodice plaid, but eventually, it worked. And let me tell you, after all that work, there’s no way I’m going to let one man’s opinion keep me from wearing this coat! Ha!
The pattern is Vogue, 9037, a double breasted style. The lovely wool is from the Mill End Store here in Portland. They have a fabulous wool selection…I feel so lucky to live close to them! The wool is a loose weave so I decided to line it with silk. This makes the coat so yummy to slip into. The pattern is easy to fit and sew. It doesn’t have darts or a complicated collar, and the shape is created by long tucks in the front and back bodice.
The pattern is out of print now…which is a shame if you ask me. This pattern has three easy collar choices and it’s a dramatic style so why not keep it around forever? I’m not sure how they decide when a pattern goes out of print, but some of the decisions completely baffle me. In this case, I’m not sure the envelope illustration did it justice, so maybe folks didn’t buy it? Who knows…
Okay, so the style isn’t a classic, but it is fun, don’t you think? Maybe the shaped hem and interesting collar make this coat qualify as a…. statement piece?
Hi all! The weather outside is frightful but wearing a poncho is so delightful! With this cozy new make, I’m well prepared for the possiblity (fingers crossed…) of a white Christmas.
Will it happen? I doubt it, but I’m glad I made this easy poncho. I loved laying out the pattern pieces so that the fabric’s cool weave would shine. What I didn’t like about this project? The Blanket Fringe. Yes, it looks easy, but OMG! The process went on forever. It took so many hours, I blew through my usual ‘sewing’ diet of old movies and binge worthy television series. So what did I watch? Old episodes of the Gilmore Girls. Remember that show? Such a blast from the past, a show full of the optimism that comes from a fictional but perfect small town world. In spite of that cheery back drop, I was pretty cranky by the time this fringe was done. Still, I do love the look!
The inspiration for my poncho was a Missoni original that I’ve worshipped from afar. That makes my poncho worthy of Designin’ December, don’t you think?
Besides the cool fringe, I love the Missoni version’s hood and contrast trim. In rainy Oregon, hoods are not optional, so I was quite pleased to add one.
I trimmed my hood with fleece binding, and used wool yarn for the blanket fringe. Blanket fringe is pretty easy to do. There are lots of U-tube tutorials, but here’s a quick summary. You poke a hole in your fabric then you pull doubled strands of yarn through the hole with a crochet hook. It’s a breeze, really, but I truly underestimated how much time and yarn it would take to fringe this poncho (Slow death by fringe).
The pattern I used is Butterick 5715, View D. The pattern is out of print, but available on Etsy.
I used a wool blend from my stash. I thought the front yoke detail might make this pattern complicated, but it went together quickly. I trimmed the front opening with contrasting fleece, but left off the buttons, opting for a looser, less structured look to mimic the Missoni version.
I love my new poncho so much, we’re destined to be inseparable! This is the way I like to dress- – in warm layers that are comfortable, easy, but that have ‘a look’. And I have to confess. I think the fringe makes it. So maybe it was worth the crazy hours I spent on it? Hmmm….but there must be an easier way. Have you fringed anything? Did you do it the way I did? Was it torture?
I love looking to the designer runways for inpiration, which is why I love Designin’ December. For more about it, visit Linda’s fabulous blog – –Nice Dress, Thanks I made it. And join in!
I hope your holidays are joyful! Happy sewing and thanks for stopping by!
Hi All – – I’m back with another cardigan, this time in a nubby sweater knit. This fabulous wool came from the remnant section of Fabric Depot, a fabric I had longed for from afar, but didn’t purchase since it was really expensive. Then, one day, Lady Luck looked my way. When I was there to buy a zipper, I perused the remnant rack and found two small pieces of this wool for 50% off! How could I resist?
Okay, there was a small problem though. My two pieces were a scant yard and a half. This is where being a small person comes in handy. No, I cannot see the dirt on the top of the refrigerator, but I can make something out of two little remnants.
Well, it took me an about an hour and a half to figure out how to cut this sleeveless cardigan out of my little pieces of fabric (LOL). It’s a good thing I was determined because it was not easy! This cardigan is my second version of my new favorite pattern, McCalls 7476.
I made another version here. The only change I made this time was to leave off the sleeves and to raise the front opening by two inches. I also used three buttons to fasten it instead of one as the pattern suggests. I LOVE this pattern. It’s easy but stylish and you can cut and sew it in only a couple of hours, (two episodes of my new binge watching obsession, The Crown). My nubby knit is a very loose weave though so I did use my serger to finish the seams since the fabric wanted to fray with very little encouragement. Still I love this fabric. It’s warm and the texture makes it so unusual.
I was able to find a moment when it wasn’t raining to take a quick outdoor shot. This was a true test of this wool, and it held up to the brisk temperature.
I’d say the only thing I’m a bit worried about with this sweater knit is snagging it. Not sure what to do if that happens? I know some of you would find fixing a snag an easy challenge, so please sure any tips you have, as I’m sure it will happen.
My winter sewing plans are in full swing. I’m finishing a velvet and lace swing dress which I will post soon, and have plans for a cape and a coat. Yes, that’s a lot to take on when I also want to bake holiday cookies and shop for presents and sing in a few holiday concerts. I’ll be fine IF I stick to easy, simple projects with tried and true patterns that don’t add unneeded stress to life. Then sewing is fast and fun without alot of unpicking to do.
I hope your holiday sewing is progressing nicely, and that you’re enjoying the season. Happy sewing and thanks for stopping by.
Hi All! Fall means cardigans because they are the perfect layer to throw over shirts and tee shirts when the weather begins to shift, so I’m always searching for new patterns. I was so pleased to find this new McCall’s option; a cardigan destined for ‘tried and true’ status. It’s easy and versatile with just the right amount of tapering for fit.
I like that it works with a collared shirt like this tie blouse, or over a collarless tee as well.
Because this sweater knit is pretty heavy with a bit of wool in the mix, I will likely wear it instead of a light-weight coat, so I made it really long. But I plan on making a shorter version with a shawl collar as soon as I can find another perfect knit!
The Details: My sweater knit is from Fabric Depot, a furry knit with lycra and wool in it, perfect for a cardigan jacket. The pattern is McCalls 7476, a cardigan with dropped shoulders, length options and collar variations.
I love the fact that there are so many great options with this pattern. I cut my usual size small and didn’t have any fit issues. I wanted a snug fit when buttoned, but if you want a looser fit, you might want to jump up a size.
This pattern is super easy and fast to sew. I think from cut to finish it took me about three hours. I used a serger to finish my seams, but a zigzag would likely work.
It’s been a long while since I added a cardigan pattern to my pattern stash and this one has reminded me that I love them. If only I had a few more options to choose from. Do you have a favorite cardigan pattern? Let me know!
I hope your fall sewing is going splendidly. Thanks for stopping by!
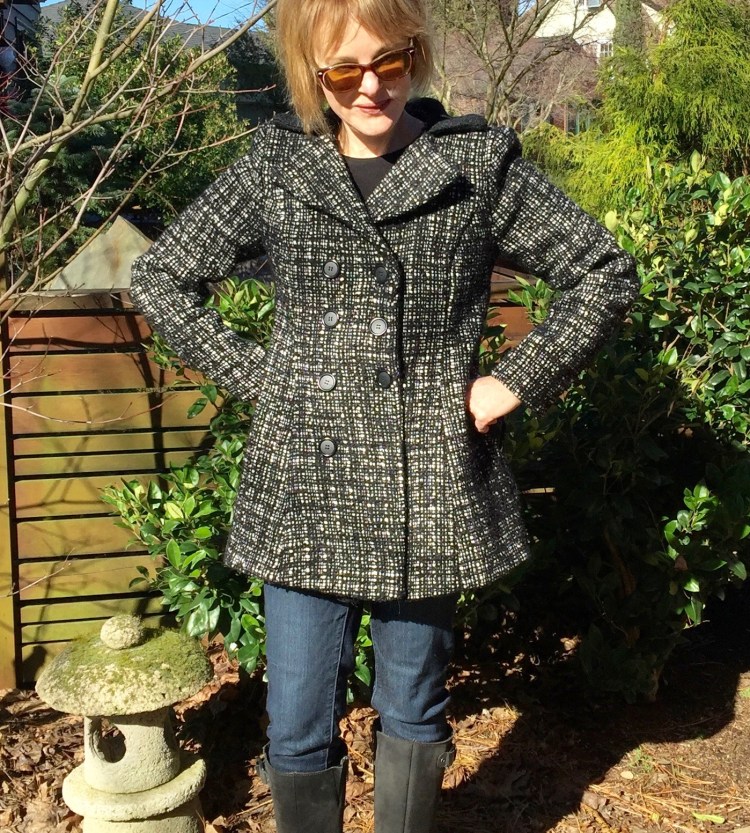
It’s sunny and warm in Portland today. Yet, I’m posting about a heavy winter coat! Yes, timing is everything, and mine isn’t impeccable, but here goes. I started this coat before Christmas, and just finished it because I worked on it in sporadically. So, here I am, wearing a wool coat when it’s sixty degrees outside. Of course, the weather here is a fickle friend, so it might be ‘bundle up’ weather tomorrow (is it evil to wish it would get cold again?). In any event, after all this work, this coat will be worn, no matter how hot it makes me!
This wool was purchased last year, and I loved it so much (and spent so much on it, LOL) I dithered a bit (actually a lot) before getting the nerve to cut it. I got all angsty over the choice of pattern, how to line it, whether I really needed to underline..(blah, blah, blah). Basically I was procrastinating. I do this whenever I contemplate a big project. Honestly, I drive myself crazy. Anyway, the weave of this wool was so beautiful, I couldn’t resist buying it from the Mill End Store when wool was on sale. I felt a little guilty as I splurged so I scrimped a bit on yardage, and wouldn’t you know? Now I wish I’d bought more. Once I started sewing it, I knew just how special it was. The weight, the weave, even the smell of this wool is heavenly (yes, I am weird). A long coat from it would have been so nice. Do overs, please?
The pattern I used for this coat is Vogue 8346, a classic style, with a bit of a flare.
Because my height almost qualifies me for petite status (only 5′ 4″ on a good day), I avoid styles with a lot of volume. Still, I loved the style of this coat but worried I’d look as though I was drowning in fabric.
So, I made a test coat from corduroy. This was a good move, as I realized after sewing only a few seams that the amount of flare on the design was too much for me. So I ripped it apart, recut the bodice pieces, tapering the flare a bit more, then tried again. That did the trick. Here’s my modified flare:
I learned a valuable lesson from this process. The corduroy test version of my coat was great, but when I started working with the wool, I realized the drape of the two fabrics was very different. The thick wool made that little bit of flare seem quite exaggerated compared to the corduroy. So, I had to modify a bit more. All in all though, making the test coat was worth doing, as I learned a lot about the fit of the coat. The shoulders were in the right place and not too narrow, (no adjustment needed, yay), the waist was too long for me (raised it a half inch), and the sleeves were too full for me. Nothing too traumatic, but good to know.
The details: I underlined each piece to give the coat’s structure the support it needed to look crisp. This is not hard, but is time consuming, but well worth the effort. (For tips on underlining, take a look at House of Pinhero’s Peacoat Sew Along. In fact, just have fun looking around at all of her posts!) I used a polka dot silk for the lining, which feels like a dream. I highly recommend finding something luscious for the lining…you deserve it after working so hard on a coat, am I right?
I added very thin shoulder pads to support the sleeve cap and an extra row of buttons because I love the ‘military’ look they add.
And, that’s about it!
The truth is, sewing a coat isn’t that hard, so who knows why I dithered around so much about this one? The challenge was the fit, I guess. Also, a coat with lining and underlining is a serious commitment of time and energy. But why not just jump in? Next time, I will. Sewing a coat is time well spent. I know I’ll wear this one again and again.
Do you dither around before starting a coat like I do? And what have you experienced when making a toile, (test garment) out of a fabric with a different drape? Thumbs up or down?