Waiting for Spring in my Wiksten Haori Jacket

IMG_4450
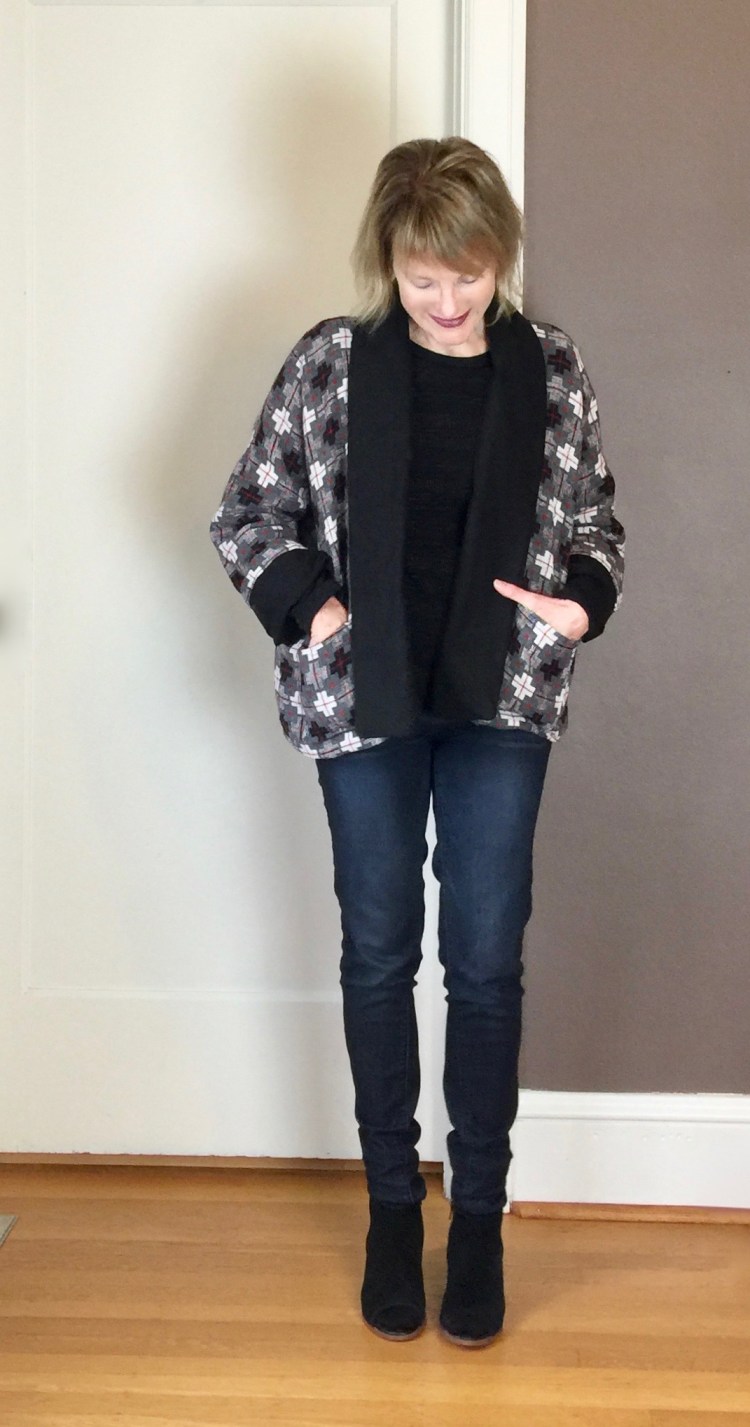
Well, it’s official. I am now a big fan of the Wiksten Haori jacket.


I might be the last blogger to make this lovely jacket. I avoided this pattern at first, as I prefer fitted jackets to loose-fitting styles. But on a recent visit to a local fabric store (Bolt, such a great store!! ), I tried on their sample version of the Haori, and it was love at first wear. Yes, the style is a bit boxy and unstructured, but that’s the beauty of it!

IMG_4613My first version (yes there will be others) was inspired by a change of weather here in Oregon. We had a few ‘teaser’ days last week that felt like Spring, but now, temperatures are cold again and it’s damp. I still need to wear a cozy layer, so my Haori is made from a wool blend, lined with linen. The wool fights the damp fearlessly, while the linen makes it wearable. Because the design is a loose fit, a fabric with some body (like linen, wool, cotton canvas) is a good thing…it really gives the stylish details some support.


Kimono_Flat_Sketches

The design of the Haori jacket is simple in concept. It’s two jackets bound together by a common front facing/lapel; brilliant really and quite easy to sew. I am a fan of this construction method, as the inside of the jacket has such a clean finish, and it makes the jacket reversible too.

IMG_4514Even though my measurements put me at a small, I cut the extra small and still had room to spare. You might want to consider sizing down. This version is the ‘short’ version. I worried a bit about the length as it was described as ‘cropped’, but in reality, on my 5′ 4″ frame, the length is perfectly fine – – it hits just above the hips. You can see the longer version on Instagram (#wikstenhaori).  So many lovely versions to enjoy!

IMG_4487 2Construction is pretty straightforward. The sleeves are inserted before you sew the side seams so you don’t have to set them in…a big win if you ask me! The pockets are patch pockets that are top-stitched…also very simple. It took me about 2 and a half hours to put together.


Choosing fabric – – one thing to remember is that the front facing/lapel is cut from the lining fabric, so you need to choose a lining fabric that compliments the fabric of the body of the jacket. Also, the sleeves are rolled up, so that’s another chance for your lining fabric to be a cool design element. A fabric with some body is key to help the jacket hold its shape. My wool is pretty soft, but my linen has some crispness to it, so the combo worked well. The lapels are interfaced too, which helps give the style some structure.

IMG_4634I love the weight of this jacket. It’s perfect for this time of the year. But I’m already planning a linen version (or two) for warmer weather, maybe a quilted version for Fall. Really, with this style, the options are endless! If everything in my closet was this lovely to wear, life would seem easy indeed.

I’m really enjoying everyone’s #sewhappycolor posts on Instagram – I’m inspired to add more color to my wardrobe this Spring! Happy sewing and thanks for stopping by.


An Anthro Inspired Peplum Top X 4

PicMonkey Collage-7
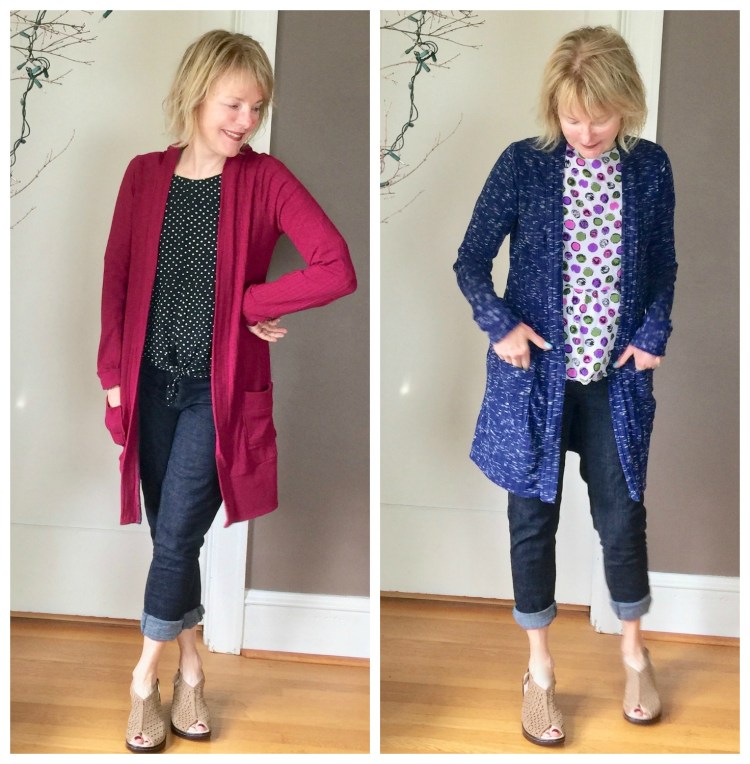
Yes, I’ve gone a little off the deep end over this pattern! What can I say? When I find a favorite pattern, I tend to go a little berzerk, imagining all of the variations…and then, before you know it, I have four versions in my closet! No, I did not sew all of these tops since my last post. They were sewn over the last couple of months, using fabric from my stash (YAY!).

And regarding the style — well, yes, this top has a peplum. I was pleased on a recent trip through Anthropologie to discover that peplum tops are still hanging on their racks.


Whew…so good to know, since I have four of them.!

I’m always amazed at how fabric choice changes the look of a pattern. So I really love doing posts where I show multiple versions. This top is Butterick 6486. I also used the angled peplum on McCall’s 7052 on a couple of versions (OOP, but you don’t really need it to pull off this style). B6486 pattern was really easy to sew – perfect for a beginner. The only modification I needed was to lengthen the bodice by a inch so that the peplum would be just above my waist.

il_570xN.1321868872_dk9p


IMG_3339

This top (version A) is really casual and easy to wear in large part because of the fabric. It’s rayon from Cotton and Steel. This fabric was released last year, a result of their collaboration with the  Rifle paper company. This is top notch fabric, my friends. It wears and sews like a dream. To make this version, I shortened the peplum by 2 inches. I’m not usually drawn to fabrics witl small prints, but I do love this one. The color palate is definitely in my wheelhouse.

This version is in cotton gauze (FabricDepot).

IMG_3541

I made this version for one reason…to wear it with the necklace I have on! It was designed by a local artist using crocheted linen and linen tassles and I needed a top that would allow it to be the center of attention. For this version I used the angled peplum from M7052. This double gauze has extraordinary drape and is comfortable even on a muggy day.

This version is a stiffer quilting cotton.

IMG_3504

It also has a assymetrical peplum, but because the cotton has more body, it looks like a different top!  The stiffer fabric gives the peplum more structure. This fabric has a coarser weave too, so the vibe of this top is casual.

Last but not least, a dressier version from a poly blend fabric with cut outs.

IMG_3448

Of course, I couldn’t resist trying a version out of something lacy! I had this fabric in my stash, purchased last summer, and only had a yard and a third, not enough for sleeves. To let the cutout design of this fabric shine, I lined the bodice with peach colored lining. This version is fun to wear with jeans/pants, but also with a skirt.

Phew – – My minor obsession with this pattern might be over now….we’ll see! Next up, I’ll be working on some pants and skirts to go with these. I’m heading to France in September so am thinking travel wardrobe as I sew right now.

In another sewing news..This week on Crafting a Rainbow, (great blog, check it out!!) Gillian drafted a great post calling for a blogging renaissance. Her thoughts really resonated with me, so I thought I’d share some of my own thoughts on the topic.  In spite of the way Instagram has grabbed the sewing world’s attention, I remain committed to this blog and to following lots of others (see the side bar for my favorites).  Instagram is a fun place to get a quick fix, but I’m constantly frustrated by the fact that there seems to be absolutely no way for me to control what shows up in my feed. I follow alot of people, yet I only see a very curated collection of posts based on some strange algorithm defined by the folks at Instagram. (Is anyone else frustrated by this?!?)  Since I like to control my personal feed,  and since I like the personal story behind the makes…(the details, the inspiration), I head to sewing blogs for that conversation. I do visit Instagram too, but only a couple of times a week. More just stresses me out. I’d love to know your thoughts….

I really appreciate you, and hope we can continue to share and chat for a long time to come.  Happy sewing and thanks for stopping by!


More Kimono Love – Simplicity 8553

IMG_3268

Hi All! I’m sure none of you will be surprised when you see my make this week, another long flow-y kimono! Yes, admittedly, I do have a ‘thing’ for long toppers of any kind (see others here, here and here). So, I couldn’t resist this Simplicity pattern for a long kimono.

IMG_3166


In my defense, this pattern is a bit different from my other tried and true pattern (Simplicity 1318, shown here and here), in that it doesn’t have front bands (although view D includes them), the two piece sleeves are longer, and the bodice style is empire with a tie.

Truly, the pattern is a keeper as the options offered are endless; You can modify the length of course but also the bodice style as well as the sleeve options. I love the bell sleeves and the gathered sleeve option, which gives it a bit of a boho vibe. The empire wasit is a nice change as is the front tie closure, an option I really appreciate after wearing lots of free-minded, open fronted kimonos in the past.

My fabric is very special to me, because I bought it last year in a wonderful fabric store in Barcelona.

IMG_3283


It’s a rayon border print and it was love at first sight. I bought just enough to make a long version of this kimono – – which in the XS takes 2/1/4 yards. The fit is very loose – – my measurements showed a size small, but I went down a size and I’m glad I did. Rayon is a dream to sew with – even though it doesn’t fray much, I finished the seams with my serger so it would look nice inside when the wind blows it open.

IMG_3172


I love the way this fabric moves – so important when you’re trying to pull off this long kimono look.  If you used a stiff fabric, it would likely be a bit of a disaster.The pattern is quite easy to assemble; a beginner could do it. The hardest part for me was making my slippery rayon stay in place as I sewed (lots of pins and some wonder tape helped). The sleeve length is just right on me. If you had longer arms, you might want to lengthen them a bit.

IMG_3162


I love this pattern – – it was easy and fast to sew, (a must for me during the summer) and I feel so stylish in my kimono.  I can imagine another version in silk velvet for fall.

Apparently, my ‘thing’ for long flowing toppers will be around for some time to come! I know there are other kimono patterns out there… would love to know if you have a favorite.

Happy sewing and thanks for stopping by!


Blackwood Cardigan – the Star of my ‘Me Made May’


For me, Me-Made May is all about figuring out what works in my daily wardrobe and and what doesn’t. As a rule, I tend to wear me-made separates that I mix and match. The questions I ask myself are – – which me-made pieces do I reach for because they make me feel great, and which ones drive me crazy as I wear them? I take notes about my daily choices for myself, only keeping photos of outfits that are revealing in some way to me. The pieces that don’t work are thrown into the revision or donate pile. I don’t post my outfits on social media – – yes, I love seeing other people’s posts but can’t bear thirty-one days of photographs of myself, LOL!!

I’ve had a couple of revelations this month – the big one, which is the subject of this post is my absolute daily dependence on cardigans! Seriously, I wear them almost every day Unpredictable May weather is the culprit – – in Oregon it can be cold enough for a coat in the morning, but shirt-sleeve weather in the afternoon. Enter the Blackwood cardigan!

IMG_2171

Last year, my favorite cardigan pattern was  McCall’s 7476 made here and here. This year, my obvious favorite is the blackwood cardigan by Helen’s Closet patterns.

blackwood-cardigan-illustration

I’m probably the last blogger to be smitten with this pattern, but what can I say? Better late than never…

IMG_2127

Why do I love it? For one thing, the design is perfect for throwing over tops or dresses. Helen suggests that it be used as a layering piece and this blue version I made works with everything in my closet in part, because it’s blue, but also because the length and the cut are superb over everything!

I usually gravitate toward knits that have cotton as the primary ingredient, but I really love how this rayon knit feel against my skin. And it slides over sleeves so nicely!

IMG_2092

Design notes: The Blackwood rests perfectly on the shoulders which makes it great for wearing with a variety of tops and dresses. The bottom band is wide and it shapes the hemline of the sweater in a very flattering way. I love the longer length (perfect for me at 5”4”) and the wide cuff on the sleeve. The pocket size is perfection too!!

Construction notes;

  • For this pattern – the stretch and drape of the knit is everything. You want to make sure your knit has enough stretch on the cross grain for this pattern. Because it isn’t designed to close in the front, if you don’t have enough stretch, this sweater will likely gape open and probably won’t look or feel that great.
  • The front band needs to be stretched slightly to fit.
  • I stabilized the top of the pockets with a strip of fusible interfacing to keep them from sagging too much.

IMG_2159

I’m wearing it here with the Simplicity top I posted a few weeks ago (here).

I give this cardigan a big thumbs up. It’s a quick, fun sew that does the heavy lifting in my wardrobe, and as a result of my Me-Made-May discovery, I will likely make this pattern again and again! My other cardigan patterns will remain favorites, but it’s nice to expand my cardigan universe.  Thanks so much to those of you who recommended this pattern when I asked for ideas in a post last month!

Are you as hooked on cardigans as I am? Happy sewing and thanks for stopping by!


Tops That Pop – Kimono Wrap Top

IMG_1168
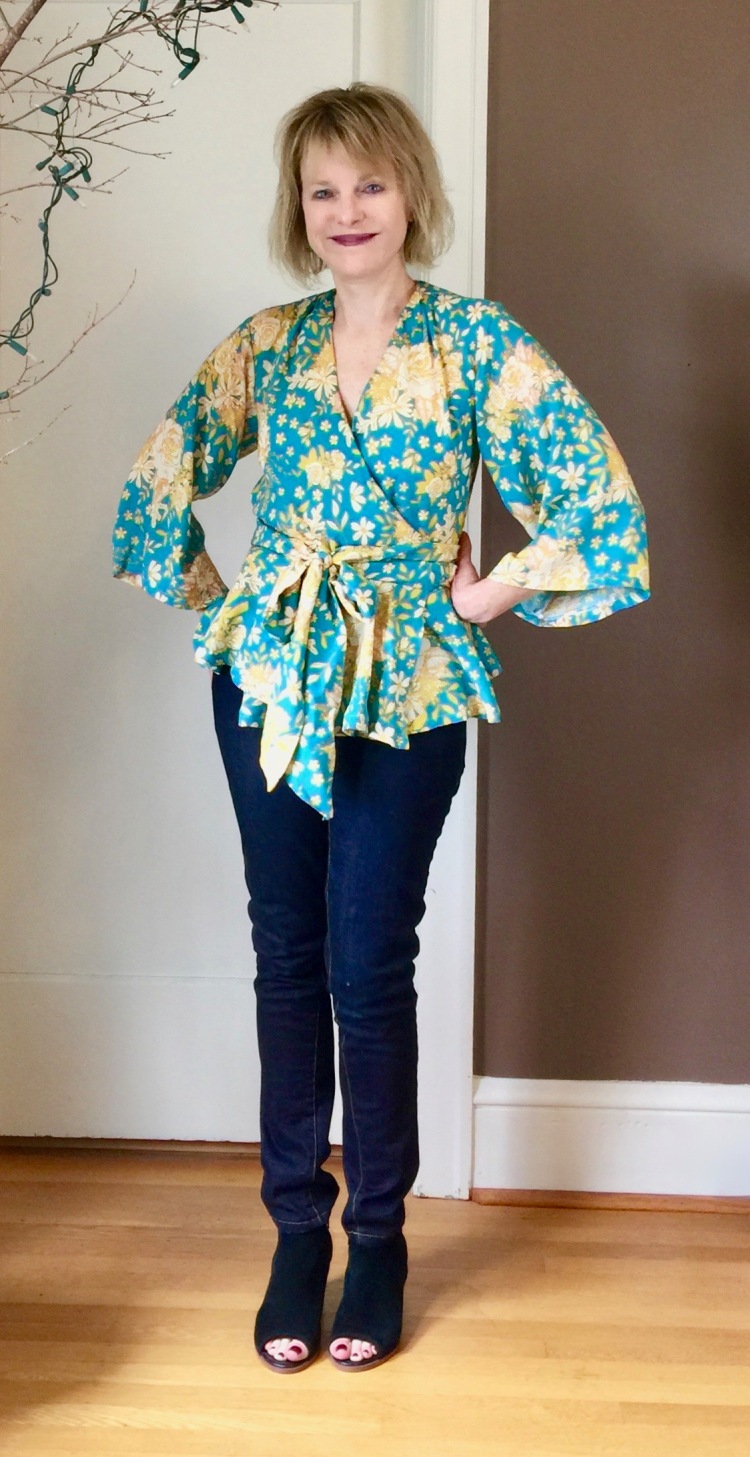
Hi all – I love a good challenge and so I couldn’t resist the #Tops that Pop challenge, created by the talented Faye of Faye’s Sewing Adventures. What a brilliant theme! Who doesn’t want to sew a top?

IMG_1204

I’ve been wanting a kimono sleeved wrap top for the longest time, so I was thrilled to find McCall’s 7627 on sale at Joann’s.


When I first looked at it, I didn’t think it was the pattern of my dreams, primarily because I was focussed on the statement sleeves that went with view B. Yes, those sleeves are interesting and very fashion forward, but I can tell you, they are just too much for me :).  So I combined the sleeve in view D with the short wrap bodice of version of View B.

Fitting Challenges: Because I’m short-waisted, fitting a wrap dress/top is a bit tricky. On this dress, after a paper fitting, I could see the waist was way too long, so I shortened the bodice by a full inch. My other fitting dilemma on wrap dresses is that I usually get a front gap at the neck because I have narrow shoulders. To prevent this, I took out a 5/8″ in the back shoulders. This helped tremendously.

IMG_1195

Fabric: McCall’s suggests crisp fabrics for this top. I chose a softer rayon (Fabric Depot) because I wanted it to look drape-y.  I love this rayon – it’s so soft and comfortable and was a dream to sew.

The pattern was pretty well designed and the instructions were clear. I’m not wild about the darts at the shoulder though….not sure why they’re necessary since they aren’t very flattering.


IMG_1212 All in all, I do think this pattern is a keeper. I may make the dress version at some point, and may take out the shoulder pleats. But there are so many patterns and so little time, so who knows if I’ll make it back to this one again.

Thanks to Faye for creating this fun challenge. She’s posting all of the #Tops that Pop on her blog, and there’s lots of inspiration there.

Happy sewing, and thanks for stopping by!

McCall’s 7430: A Knit Dress for Spring

IMG_9618I made this knit dress for a trip we just took to Santa Fe, but there was snow on the ground when we arrived so this dress never made it out of the suitcase, LOL! Still, I love wearing knit dresses, so I know this dress will have its day.

The trickiest part of this dress was positioning the stripes across the bodice and the sleeves.

Let me tell you….It took alot of pins and patience to get the stripes in the right place as I inserted the sleeves, but in the end, the effort was worth it.

I’ve made this knit dress pattern before and it’s now one of my favorites. McCalls 7430 offers a few variations that makes it easy to modify to give each version a fresh look. You can use contrast fabric for the yokes and the sleeve crowns as I did, or you can cut the entire sleeve from the same fabric as the bodice, or even make it sleeveless. There are collar variations too – a raised collar or a simple neck-band (my choice).

m7430

I love a pattern that gives you alot of options!

Challenges: There aren’t any side seams on this pattern.

IMG_9625

This makes fit a little harder to modify. Because I’d made this pattern before (here), I wasn’t concerned, as I’d already done a trial run. The good news is, the pattern is well drafted and for me,  the size dictated by my measurements was perfect.
IMG_9612

The success of this dress depends in large part on the knit, I think. The fabric must have some weight and body so that it will give the dress some shape. A thin lightweight knit wouldn’t work because it would be cling too much and would show every bump. I was lucky to find this medium weight knit at Fabric Depot. It has just the right amount of weight and crosswise stretch. It’s a rayon/cotton blend which will make it easy to wear as the temperatures rise.  Now, if the weather would just improve around here.

New Mexico stole my heart last week, and the brief sprinkling of snow only made the high desert seem more exotic. Here’s one of the sights we enjoyed as we hiked.IMG_9384

It was a great trip, but it’s good to be back at my sewing machine:).

Happy sewing and thanks for stopping by!

A Moto Jacket, part of a..capsule wardrobe?!?

IMG_5087

When Pattern Review announced their Wardrobe Sudoku Contest, I said, Never!  10 garments in two months that all have to coordinate with each other and shoes and accessories? Too mind-boggling for me. So I told myself I’d play along and use only fabric from my stash.

Well, the phrase, ‘never say never’ now clearly applies to me. I suppose my reluctance to join the fun had to do with the fact that I throw a hissy-fit whenever someone suggests I might sew with a plan (SWAP). I prefer to sew on a whim! But I’ve also secretly envied those who have used their sewing skills to achieve their dream capsule wardrobe too, which is basically what the Sudoku Challenge is all about.

sudoku_big

Here’s my completed Sudoku wardrobe.

PicMonkey Image

The grid shows ten combinations that work together, but the truth is, there are many, many more. The Mimi G jacket is one of the key pieces because it goes with everything, so it’s an accessory on the grid. I’ve wanted to sew this jacket for a long time. It’s a cool girl thing, you know? And this one is designed by Mimi G, no less! Definitely on my sewing bucket list, but it took this contest to get me to push through.

IMG_5109 2


I’ll wear it open, closed, over jeans, skirts and dresses. Here it is with other pieces in my Sudoku wardrobe.

The pattern; Simplicity 8174 is cute, but it’s not an easy make, to say the least. It’s a well designed pattern, but very complicated. It has a side zipper, back shoulder insets, epaulets, a waistband with carrier and belt detail, and inset zippered pockets, and it’s lined. There are lots of pattern pieces to manage, but once I got them labeled clearly, things started to work better. Here’s a shot of the back waistband, and the back shoulder panels. Cool details, eh?IMG_5094 2

I used brushed twill from my stash and cut my usual size, comparing my measurements to those on the envelope. It turned out to be perfect! Challenges….Construction took awhile, and required my full concentration. For me, the shoulder panels were the most frustrating part. They’re faced with another piece of fabric which gives them stiffness and makes them look cool when they’re top stitched. But, I found the instructions confusing. Mimi G’s video on U tube saved the day. In fact, I used it constantly through the process. It really helped, although I did find a few challenges even with that. She constantly says, do the same thing to the other side. That works for everything but the front bodice which has a right and left side.  In error, I applied the facings to both sides, but in reality, you have to wait on the left side until later in the process so that you can insert the front angled zipper correctly. So, I had a few stitches to rip out.

I did cheat on the belt carriers on the top epaulets and on the waist band. I could not get my thick fabric to turn, so I just winged it, making carriers without turning them.  My fingers were grateful.

This complex pattern had so many twists and turns, I had to turn off my new binge-watching obsession, Bloodline, so that I could concentrate. It was worth it though. I know this jacket will get worn alot, a key piece in my spring wardrobe.

Check out the contest over on Pattern Review.com for some great inspiration. I just love seeing how everyone puts together a wardrobe, and many are only using their stash like me. One of my favorite wardrobes is Elizabeth’s of Elizabeth Made This, so inspiring! Check out her fabulous makes on her blog.

My wardrobe is done and posted now,(my denim ruffled skirt is one item) and it feels good to have it behind me. Over the next few days, I’ll do some posts on my other makes, including two statement sleeve tops, a safari jacket, an alder shirt dress and a long blue cardigan. I stayed with blues and neutrals, which seems to be all I have in my stash these days!

Will I always sew with a plan? I doubt it….no new leaf being turned over here. How about you? Happy sewing and thanks for stopping by!!

A Ruffle Skirt and Cold Shoulder Top

IMG_3737 2
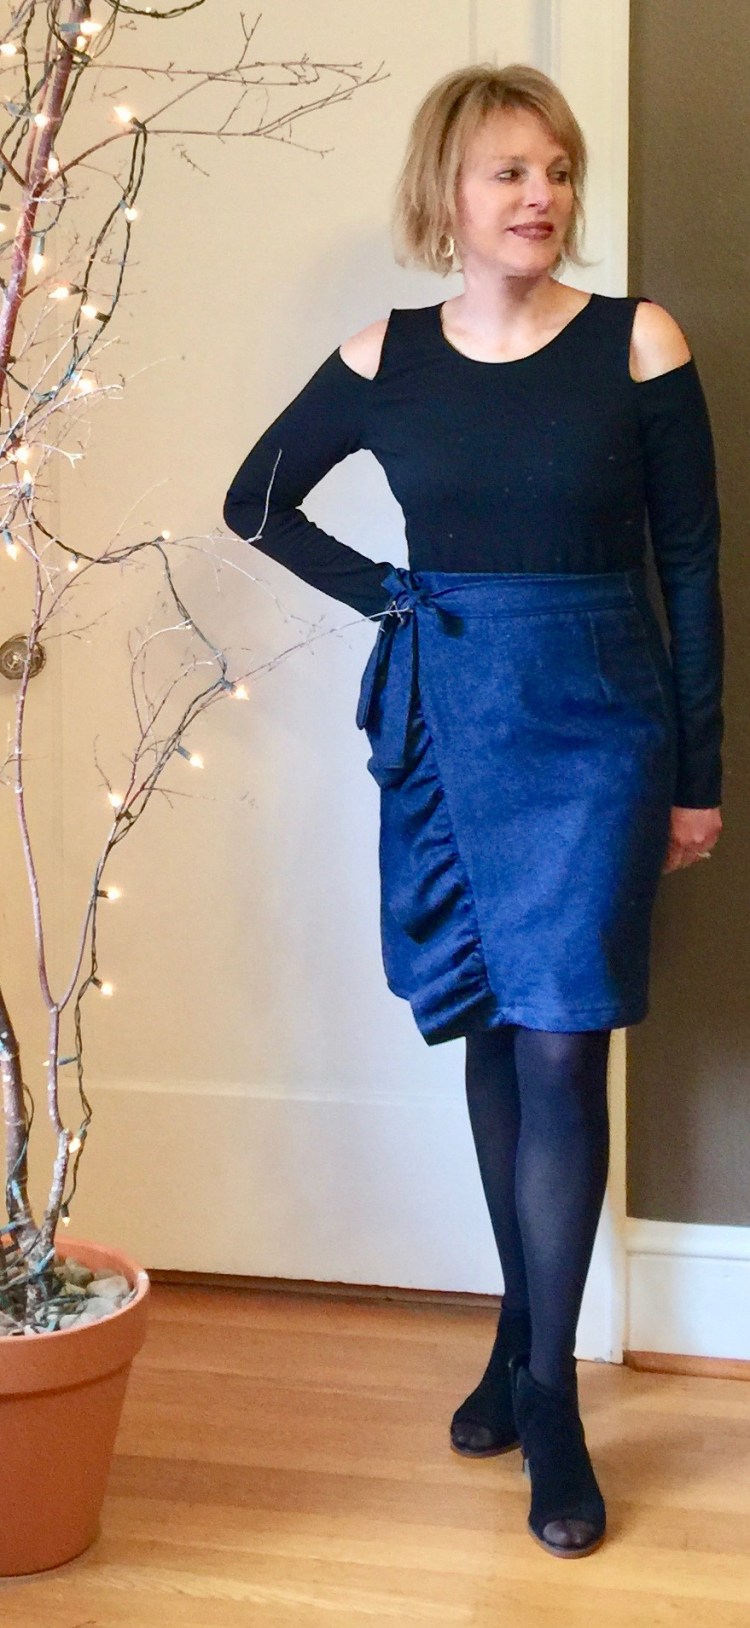
If you told me a year ago that I would be sewing a ruffle wrap skirt in denim for Spring, I would have laughed out loud. Ruffles have never been my thing. But if you show me enough of a trend, I am usually happy to hop on board!

Such is the case with this skirt.  I couldn’t resist modifying a simple skirt pattern to mimic some of the ready to wear ruffled gems I’ve been seeing around town.

IMG_3751In this photo, I am noticing that my bootie is unzipped. So ridiculous (!), but I had to include this shot because the ruffles on the front of the skirt are so easy to see. Honestly, this modification was easy. I measured the front edge of the right front of the skirt. I made my ruffle 1 and a half times that length (to allow for gathering), and 6″wide. I love how a simple modification can completely change the look of a pattern.

This skirt is Simplicity 1322. It’s meant to be a mock wrap with a front and back yoke and back zipper. But I made it into a real wrap skirt be eliminating the yokes and cutting a waistband and tie instead. I used  a lightweight denim; a cotton/linen blend. It’s been in my stash for so long, I have no idea where I bought it.

IMG_3771I’m happy with this skirt, but I’m not sure about the length. I might need to shorten it a couple of inches? Opinions? I won’t wear this with tights when it warms up around here and it might look more Springy if it’s a bit shorter?

This cold shoulder top (another trend I have happily embraced) is my first Style Arc Pattern. I wanted a basic top I could wear with anything, so I chose black ponte knit with moderate stretch and lots of body. This fabric was perfect to support the shape of the cut out shoulders.

IMG_3747I’d heard that Style Arc patterns are challenging because there are very few instructions. In the case of this pattern, the instructions were sparse (less than one page), but the instructions were enough to get the job done. There aren’t any facings to deal with on this top. The neck is finished with a turned edge as are the shoulder cut outs, so there just isn’t that much to say! It fit perfectly without modification, a rarity for me, so I’m fairly impressed with this pattern!


I’m more comfortable wearing ruffles when they’re paired with something that is simple and not so fussy, like this top. So, I imagine I’ll wear this skirt with simple knit tops most of the time.

IMG_3741I’m pretty happy with this make, and it was a stash buster too. What do you think of the ruffle trend? Thumbs up or down? And do you have any Style Arc Tried and True’s that I should try?

I hope it’s warm and sunny where you are, because it definitely isn’t here, which is not great for my Spring Sew-Jo. Nevertheless, there is a silver lining to the weather. Rain is a perfect excuse to ignore my yard and sew…. Happy sewing and thanks for stopping by!


A lace top inspired by Dolce & Gabbana

IMG_1544

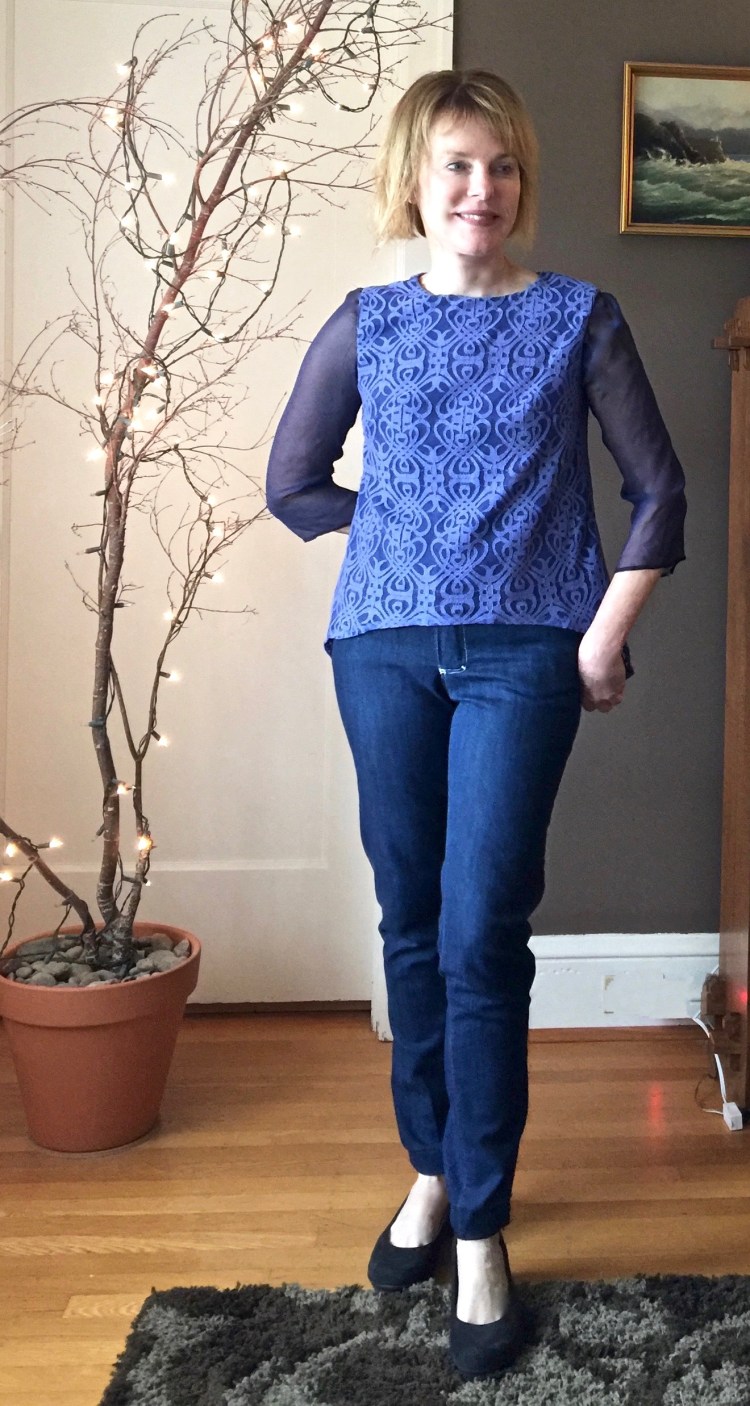
I used to think lace was reserved for prom dresses, frilly wedding dresses and other  hyper-girlie looks. But I think I’ve given that up. I can’t resist the combination of feminine lace with the edge of denim it seems. And if the lace is blue, I’m all in!

My inspiration for this top was this tunic length top/dress from Dolce and Gabbana.

37862084XH_13_F

I fully intended to go the whole way with lace on the sleeves and the longer length of the top/dress, but as luck would have it, when I ordered this lace (Fabric.com), I thought I’d ordered two yards, but ended up with one. Not sure if I pushed the wrong button or if the order was messed up at their end, but when I tried to order another yard, the lace was already gone!

I grumbled about it for awhile, then found a great sheer silk to use for the sleeves and lining. It’s so perfectly wonderful to touch and wear, I decided the mistake was a good thing after all. It forced me to use a contrast silk sleeve which is more comfortable than lace by a long shot.

IMG_1549

The pattern is one I’ve used before McCall’s 7285.

I made view D, and used the silk for the sleeves.

Other modifications:

  • I raised the neckline by an inch.
  • I made 3/4 length sleeves with a rolled hem.
  • The hem is cut ‘high-low’. Because my lace didn’t have a scalloped edge, I merely finished the bottom with a rolled hem.

It’s an easy pattern that’s well designed, a good template for your own creativity. The only challenge here was lining up the lace so that it was perfectly centered.

IMG_1505

I’m wearing this top with my recently completed Jalie Jeans and love the look! It’s comfortable but sufficiently dressy. I wore it to a party just last week.

IMG_1547I only wish I’d bought more of that lace! Honestly, I have got to get in the habit of buying more not less!  I think this top might travel with me this summer. The good thing about this lace? It doesn’t wrinkle, nor does the silk. I’m guessing this top would look dressy if I wore the right jewelry and skinny black pants?

I hope you’re enjoying all of the sewing events in the blog world right now.  I love what’s going on over at the Monthly Stitch. The McCall’s blog has been great too, with a shirt dress sew along. And Pattern Review is hosting a skirt contest. There are so many ways to find inspiration, I feel a bit spoiled. Are you participating in any of these events?

Happy sewing and thanks for stopping by!

Simplicity 1280: Crossover Top Times Two

I will admit. When it comes to sewing a top, I am a bit of a speed demon. I’m happiest when I’m sewing fast, and I will not stop until I’m done. Yes, I can leave a coat, jacket or dress on the sewing table to be completed another day, but a top? No way! Tops take ONE DAY, don’t you know?

IMG_0821

Enter Simplicity 1280: a cross-over top with a keyhole neckline. The top has a bit of a ‘ANTHRO’ vibe and it can be made in a day!

1280

I made two versions of this pattern, using a not-so-special rayon, and a fabric that I’d saved for just the right project (both from Fabric Depot). Wouldn’t you know it? The not-so-special fabric turned out to be the one with the best drape for the project. (Can you guess which one it is?)

I made view C with long sleeves and skipped the elastic on the sleeves as I wanted a bit more of a boho look.

IMG_0836

The top went together pretty well, and it was done in ONE DAY!!

IMG_0817


The pattern instructions are great. Here are some construction tips that I can offer after making two versions!

  • The neck is roomy. If you have narrow shoulders like me, you might want to do a muslin, or, at a minimum, baste the neck band on to make sure it doesn’t droop. I found the extra small to be a bit roomy and had to make it even smaller so that I wouldn’t have an ‘off-the-shoulder’look without intending to. Yes, it is trendy, but….
  • The construction of the front crossover pieces is interesting. The pattern instructions tell you to topstitch the two panels together before you have the back bodice attached to the front bodice. If you use a lightweight fabric like I did, you don’t really know if the drape is nice until the top is sewn together, so when you topstitch the two fronts, you can get some gathers and puckers that have to be corrected when the top is finally put together. Personally, I hate to unpick. So,  I’d take a pass on that topstitching step until after you’ve tried the top on and checked fit and drape. On my first version of this pattern, I had to unpick the topstitching and redo it after the back was sewn to the front because the drape was so different once the bodice was completed and there were so many strange puckers to fix!  Blah!!! Second version, I just basted the two front pieces together with a short stitch. Then, after I’d confirmed I had a good fit, I topstitched like I meant it.

The good news….Once you have these crossover pieces topstitched together, they will not gap or move as you wear the top! Yay!

  • The top really needs ‘drape’, so stiff fabrics will give a much different result. I used lightweight woven rayon, and could imagine it would have turned out even better if I had used silk. Next time….

Both fabrics were chosen in hopes that I could mix things up a bit by  wearing the  prints with my striped Morris Blazer. It’s a wardrobe challenge as only solid tee shirts seem to work with it. Alas, I’m not sure either of these prints works either..opinions welcome!

I keep hoping that I’m on the road to having a true capsule wardrobe, but, well, Hmmmmm. Maybe not today?

I hope your Spring sewing is going well. Me-Made-May, are you in or out? I might pledge one Me-Made a day, as Linda at Nice dress Thanks I made it, very wisely suggested. We’ll see.

Happy sewing and thanks for stopping by!!