Summer Making Journal 2: a Patchwork top, Inari hacks and Free Range Slacks

IMG_1094Hi all! July was a busy month in the sewing room. Recently, I cleaned my closet and donated several ragged tops (made so long ago!). I’ve been on a mission to replace them, while honoring a pledge I made to myself to use up my remnants. That pledge led me here…to my first pieced top.

IMG_1116I have never been able to throw away even the smallest scrap of linen. It’s too wonderful to toss! So, when the #JoinupJuly challenge started on Instagram, I was challenged to join up some of my linen scraps into a top.

The process of making a patchwork top isn’t difficult at all. Basically, with a quarter inch seam, you piece blocks and bits of fabric together, varying the colors. Then, when your pieced creation is large enough, you lay your pattern pieces on it and cut! My top is made using the Inari pattern from Named clothing(also made here). The lines are simple so it showcases piece work nicely.  It was so fun to figure out how to combine the linens into a pleasing pattern.

IMG_1185Here, I’m wearing my new pieced Inari with my first ever Free Range Slacks,a lovely pattern from Sew House Seven. I’ve been wanting to make these pants for ages. I used linen from my stash for this version.  I love the boxy shape of the pants, the cool seams and the deep pockets. But I found the fit to be more generous than I expected. Because the pants are high waisted and I’m short waisted, the fit of the rise was challenging. I’m pleased with the result, but my advice is to remember the loose fit when you’re choosing the size to cut. A toile would be a good idea too!

IMG_1153As you can see, the fit isn’t perfect yet. There are creases in the crouch. I’ll adjust the rise a bit more next time.

IMG_1339Here’s another Inari, this one with sleeves. I made this from rayon scraps left over from my Sew Over It Wrap skirt (see it here).I do love this rayon! It’s from art Gallery and it is so sumptious to wear. It flows so nicely too! This pattern, the Inari, is a keeper too, simple but stylish and so easy to modify to make it your own! The shorts I’m wearing are Simplicity 8841. This is a easy pattern with great fit! It has a elastic waist so you can make it quickly.IMG_1238I’m wearing my Inari here with the paper bag Burda shorts I made last summer (Here)…Love these! The linen just gets better with time. I wear them constantly!

My last Inari was also made from linen scraps, left overs from this summer dress.IMG_1274Again I used the Inari. Because I had oddly shaped pieces of fabric, I had only enough for a cropped version of the front and back bodice. So, I added a short peplum also pieced from scraps. Luckily the gathering of the peplum hides the many seams:). The sleeve bands are cut from a contrast linen.

That’s it for me for now. I’m in the process of cleaning and reorganizing my sewing room using Ikea modular shelves. And even though I recently reorganized my stash, I’m revisiting the scheme. Isn’t that the way it is with this hobby? It seems like there’s always a better way to organize your fabric, notions and patterns.

Stay safe and healthy. Happy sewing! Thanks for stopping by.


Sewing a Patchwork Shirt from Remnants

If you’ve been sewing for as long as I have, you’ve likely accumulated a large stash of fabric remnants. I find it hard/impossible to part with the lovely leftover bits when I’ve finished a project, so my remnant stash is HUGE, and overwhelming. Recently, I decided to sort and catalog the pieces. That’s when I made a lovely discovery… the colors and textures all work together.

So I decided to use the pieces to make this shirt.

Pattern: For my project, I used a tried and true shirt pattern so that fit would not be an issue. McCalls 6124 has a back yoke, two piece sleeves, a collar band and princess seams…so many opportunities to explore!

Process: Because I patchworked both the front and back, I was able to use three types of shirting and three colors of linen, about a quarter of a yard of each. Sewing was easy as I’ve made this shirt a time or two.

The best part of this project was figuring out fabric coordination and placement. In fact, I enjoyed it so much, I had a ‘moment’ when I imagined myself as a quilter. (Just what I need…a new reason to accumulate fabric, LOL!!)

I’m pleased with my shirt and am so glad my remnant stash has shrunk a bit. The good news is my shirt works well with the denim skirt I made a couple of years ago, so I know it will be worn again and again.

Of course, I’ll still be on the look out for new ways to use my lovely leftovers, so if you have ideas…please share!

Although I’ve had a bit of a challenge easing back into sewing ‘post vacation’, I’m definitely inspired by the Fall colors here in Oregon. Our cool weather has me thinking about sweaters and jackets and coats…ideas are brewing! How about you?

Happy sewing, and thanks for stopping by.

A off-the-shoulder look inspired by Theory

PicMonkey Collage-7

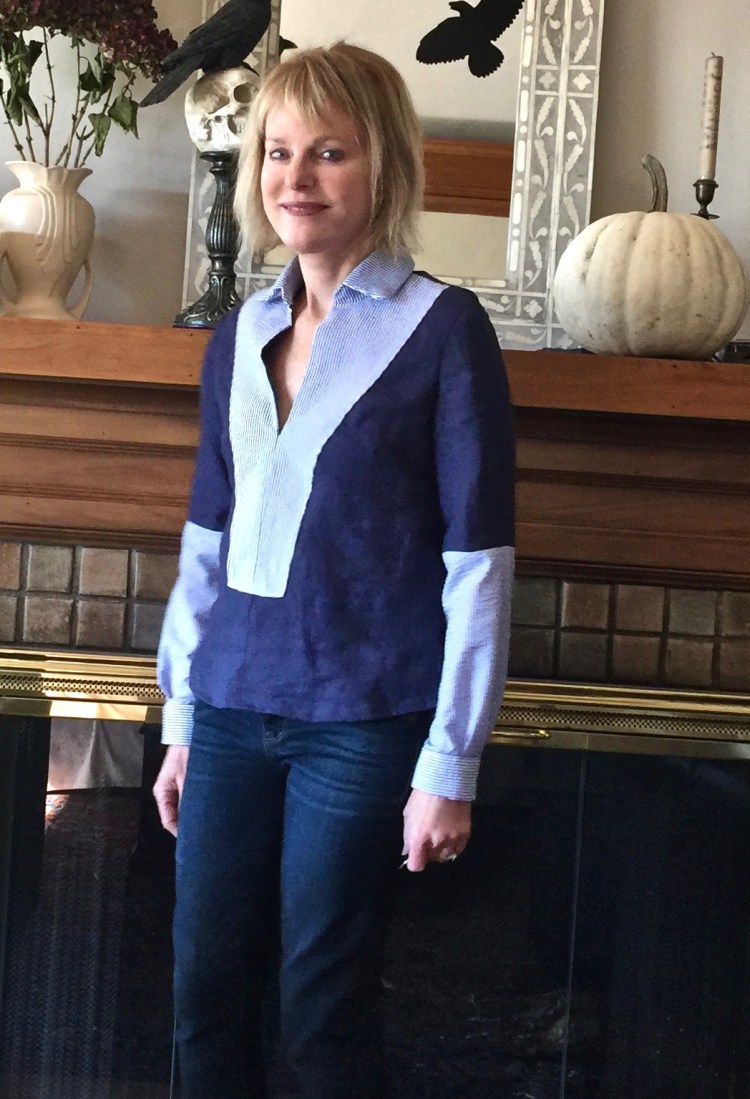
As you all know, I love a good designer knock-off, and Theory is one of my favorite designer lines. Last fall, a friend of mine wore the Theory shirt (on the left) to a dinner at my house, and I was smitten. She wore the shirt a bit off the shoulder and I loved the way the the gathered neckline was created by a drawstring.

IMG_2792

To create my knock off version, I used Simplicity 8550 as a template.

simplicity-off-shoulder-shirt-pattern-8550-envelope-front

The best news about this pattern is that I found it for a $1.99 at Joann’s!!  I have so many sewing patterns, I can only justify an addition if it’s a bargain. Yes, Indie patterns are great options, but you can’t beat the price when the Big Four go on sale.

simplicity-off-shoulder-shirt-pattern-8550-front-back-view

The neckline of the Simplicity top is similar to the Theory shirt in design, but it’s a bit wider. Also, it doesn’t have a drawstring closure.PicMonkey Collage-6To add a drawstring at the neckline: First, I adjusted the neck opening to make it a bit smaller. To do this, I took a half an inch out of the front and back bodice pattern at the center front and center back. Because the cut of this shirt is so loose in the shoulders and bodice, that adjustment did nothing to the comfort or fit of the top. To make the channel for the drawstring (a simple black ribbon), I replaced the neck facing with a strip of bias tape, and inserted the ribbon through that. Pretty simple modification…

Other adjustments: I tapered the bodice a bit by adding two eyelash darts in the back from the shoulders to the waist. Even though the Theory shirt is collarless, I couldn’t resist adding some drama with a big collar.

I was tempted to use Chambray for the top for my knock off, but decided I have too much blue in my wardrobe. It’s time for a new color…red! This cotton is from Fabric Depot and it has just the right amount of body for the collar – yet isn’t too stiff for the drawstring/gathered neck.


IMG_2789

This top was definitely a fly-by-the-seat-of-my-pants project, and I feel lucky that it turned out so well:) I love the fact that, with a tug on the drawstring, I can adjust the neckline of this shirt as the mood strikes. The color is nice for a change too. This top won’t be a wardrobe orphan because it works so well with my favorite Ginger jeans and with my denim skirt too.

Well, I think this officially begins my summer sewing. Fingers crossed that I get to wear it soon! Happy sewing and thanks for stopping by!

A Fall Top with Linen and Stripes

IMG_4458We’re in full-on Halloween mode over here (skulls, ravens, you know….the usual). In a typical year, this would mean the season for linen tops would be long past. But in Oregon, our Fall has been extraordinarily warm, a fact that has kept me from moving my summer fabrics into storage.  This top is another remnant make – linen and striped cotton from my stash.   IMG_4489


This top is a modified version of Simplicity 8295, a dress or tunic that has alot of options for creating different looks. It has a front panel insert, and you can even add grommets and ties if you’d like.

simplicity-top-tunic-pattern-8295-envelope-front (1)

I love the shirt details of this top/dress pattern. The long sleeves have cuffs.

IMG_4516

I also like the yoke and back pleat.IMG_4485

Since I used the striped fabric for the insert, I decided to make the sleeves a combination of striped and solid fabric to carry through my theme, and also to make my fabric go further. I also modified the front neck opening. As designed it was cut even lower than my version…I actually raised it by a couple of inches to make it work. I also shortened the tunic length by 3″ .

It’s a really comfortable shirt that makes me feel put together because of the crisp shirt details. Now, I want to try this pattern in the dress length with contrast pockets I think.

IMG_4460

I love wearing this top…maybe linen isn’t just for summer? Medium weight linen has a nice softness that makes it feel almost…cozy. Do you sew with linen all year around?

Happy sewing and thanks for stopping by!


DIY Street Fair Kimono and a Cold Shoulder Tee

IMG_1202

Summer is winding down, but there are still plenty of opportunities to attend street fairs, farmer’s markets and wine festivals. Since Street Fairs are great places to get your inner bo-ho on, I’ve taken to wearing kimonos over my standard jeans and tees on my excursions.

IMG_1204

A kimono is such a great wardrobe soldier. When you toss one on, you immediately add style to any outfit!  But the best part about kimonos is that they are so fun to sew. You can use just about any fabric with a good drape to make a show stopping topper. And, because kimonos have front bands and sleeve bands, you can play around with contrasting fabrics to make the look your own.

For my kimono, I used a tried and true pattern, Simplicity 1318, view C with a great high low hem. Lightweight fabrics work best for this look, so I used a sheer cotton lawn I purchased last year in that fabulous fabric store I found in Budapest (see this post). It has a fun geometic print that I took some care in placing on the pattern.

IMG_1215

I love this kimono pattern so much, this is my third make (I’ve made it twice before, here and here). The only modification I made this time was to lengthen it by three inches so it would be long and flowy.


Because I am committed to reducing the number of wardrobe orphans in my closet, I also made Simplicty 8337, a cold shoulder knit top to go with it.

IMG_1234

This pattern is fabulous! It has several different views, all with a look of their own. I love the cut of the bodice. It’s slightly loose but not too blousy. The v-neck is a winner too.

IMG_1228


Some notes on this pattern:

  • I used a lovely rayon knit with two way stretch that I found at Fabric Depot. You need a good amount of stretch for the cold shoulder sleeve to hug your arm and not sag.
  • The pattern is generously sized. I was able to cut a XS and had room to spare.
  • Also, please note, there is a seam down the front, which is a bit unexpected in a tee. It’s was likely added to the pattern to accomodate the ruffle version and the v-neck version. It doesn’t bother me on my solid color tee, but you could elimnate that front seam pretty easily if you wanted to.

Both patterns are keepers, if you ask me!

IMG_1208

Now that I’ve made this kimono pattern three times, I think it should enter a special category in my pattern stash;  the pattern Hall of Fame, don’t you think? Hmmm, I might have to put together a special post to honor that category :).

Do you have any three-time winners in your pattern stash? I’d love to check them out!

Happy sewing and thanks for stopping by.


Easy, breezy – – the Kalle Shirt Dress

I didn’t set out to become a fan girl of Closet Case Patterns, but that’s what seems to have happened!

IMG_0907

After making Closet Case’s Charlie Caftan twice (here and here) and loving it, I decided I had to give Heather’s other patterns a try. I chose the Kalle, although at first glance, it didn’t seem to be the pattern for me.  The pattern envelope drawing wasn’t that appealing to me to be honest.

Kalle_Shirt_Shirtdress_Pattern_Envelope_cover-01_c93b1b82-07e4-4b1c-985d-e5fc30ac905b_1280x1280Then there was the description of the shirt/dress as loose fitting… always bad news for a smallish person like me. But then, I saw a Kalle shirt on a sales person at one of my local fabric stores that was so, so cute, I had to have it.

IMG_0929

I do admire Heather’s design. The pattern is a great contemporary update of the traditional shirtdress. There’s so much to like about this pattern. The sleeves are cut as part of the bodice, which makes construction a breeze. You can make choices to modify the pattern to fit your mood; a hidden placket versus a regular placket? A band collar or standard collar? It’s all up to you.

Kalle_shirt_dress_Technical_flat-02_ca619977-8709-4422-8faa-a3c801b98fe9_1280x1280

As luck would have it though, my concerns about the style were realistic. The fit is very loose and boxy, which meant that even the smallest size was a bit much for me. Here’s my first version. I thought I’d figured out how to make it work, when my husband said, ‘hey, great fabric, BUT isn’t that dress WAY TOO BIG?” (Gutsy guy, don’t you think?)

IMG_0629 2After snarling a bit, and explaining to him that ‘this is the way it’s supposed to look’, I took a snap shot of myself. Darn, if he wasn’t right!! It looked big, but not in that, ‘oh, i just picked up my boyfriend’s shirt from off the floor’ way. So, I went back to the drawing board, adjusted the side seams, and smiled about the whole thing.

IMG_0908

My fabric is Cotton and Steel from last season (Fabric Depot), and the cotton is really nice…not too stiff or heavy, but it isn’t as flowy as rayon or silk would be. I mention this because I believe my fabric choice contributed to the boxy look I experienced before my modifications. I think the Kalle would be great in a soft linen, or maybe a rayon or silk.

Besides taking in the side seams, I also modified the length of my Kalle. I didn’t think I would love the look of what seemed to be a exaggerated high-low hem. So I added 3 inches to the front. It is still pretty short on me, and I am 5’4″. Not sure what it would have looked like if I hadn’t lengthened it, LOL!

IMG_0911

With those modifications, this dress is now in the category of ‘love’. It will likely move quickly into my shirt dress hall of fame. It’s fun to wear, and fun to sew….there’s something so satisfying about sewing a shirt – the placket, the collar, even the button holes are so gratifying. It’s almost as good as the smell of a new book when you first open it, don’t you think?

Happy sewing and thanks for stopping by!


A New Top and A New Rule

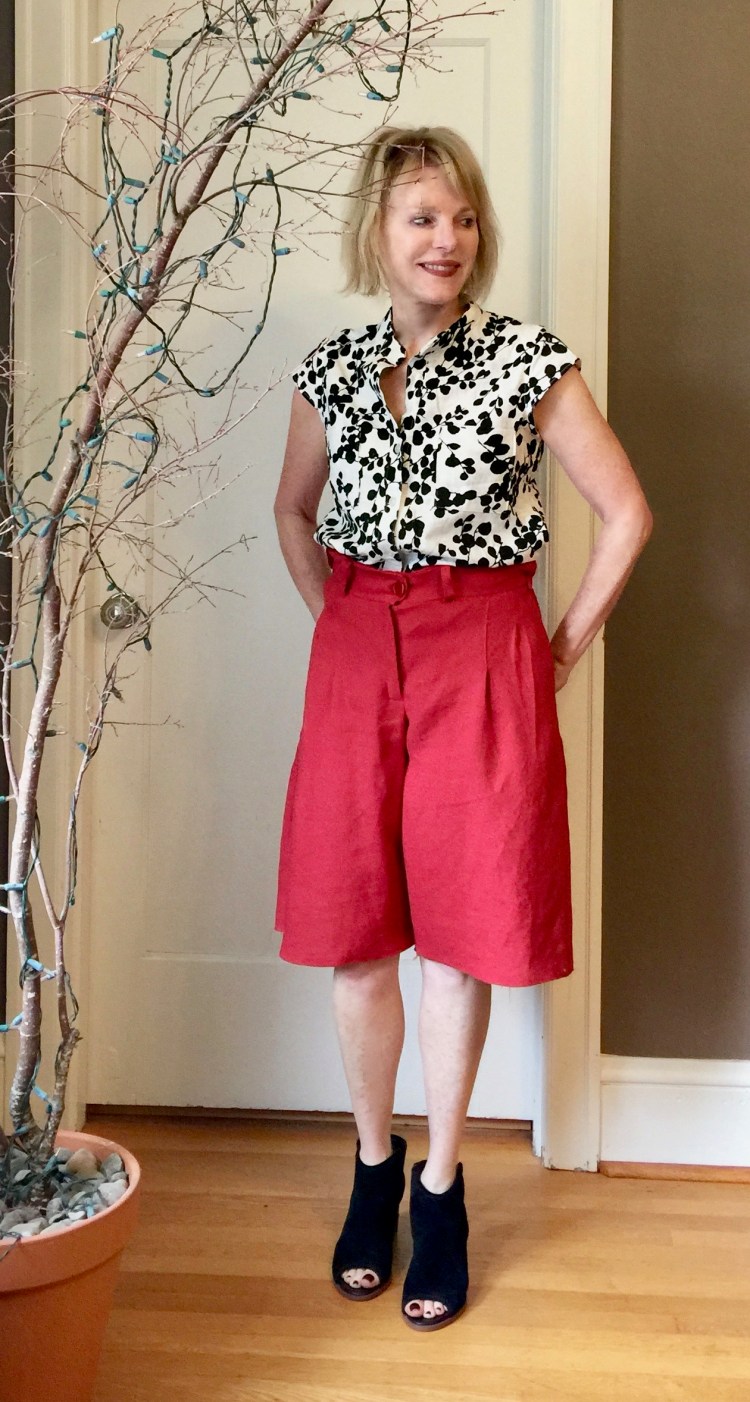
I have a new rule for separates. When I add a new make to my wardrobe, it must coordinate with two or more of my other me-mades.

IMG_0073

IMG_9626


Ha! Take that, all you orphans in my closet! I have too many tops and bottoms in my closet that have no friends. When you live in an older home with very few closets, this is a crisis. And friends, I’m counting on you all to keep me honest 🙂 Either that, or I’m going to have to move, LOL!! Anyway, the inspiration for this make is that I need more tops to go with my poppy culottes and my ruffled denim skirt.


Enter NewLook 6212.6212

I am always surprised at how much I enjoy sewing with New Look patterns. For some reason, I only reach for the New Look book after perusing the other pattern companies offerings first. I think it’s because their illustrations are pretty simple, maybe a bit boring? But more and more, I’m finding interesting designs when I look carefully.

IMG_9716

This shirt is no exception. New Look 6212 includes some interesting details that give you lots of opportunity to embellish.  I love the collar variations, the length variations and the pockets, the option to cut out the back. It even has a fun version with tucks across the front. Although I was really interested in the tuck detail, I realized the pattern of my linen would hide those lovely tucks. So I chose view C, a simple straight hem version with a standup collar, cap sleeves and two pockets.

IMG_0061

The instructions were great, and I love how the inside of the sleeves are finished with binding. It looks so neat and tidy!

IMG_0154 I find New Look patterns to be generously sized but on this one, I didn’t have any issues and I cut my usual size. I put the two pockets on, although they’re almost lost in the print of the linen. Linen (purchased at Joann’s) is the perfect fabric for this shirt because it has a bit of body. I can also imagine it from Rayon or silk, or cotton shirting. It’s a great shirt for summer, that I’ll wear a lot with shorts, my ruffled skirt and jeans.IMG_0073What do you think of my new rule? Yes, it’s a bit hilarious given my interest in sewing without a plan. Time will tell if I can stick with it!!

Happy sewing and thanks for stopping by!

Shirt Dress Love: McCall’s 7351

IMG_6748 2
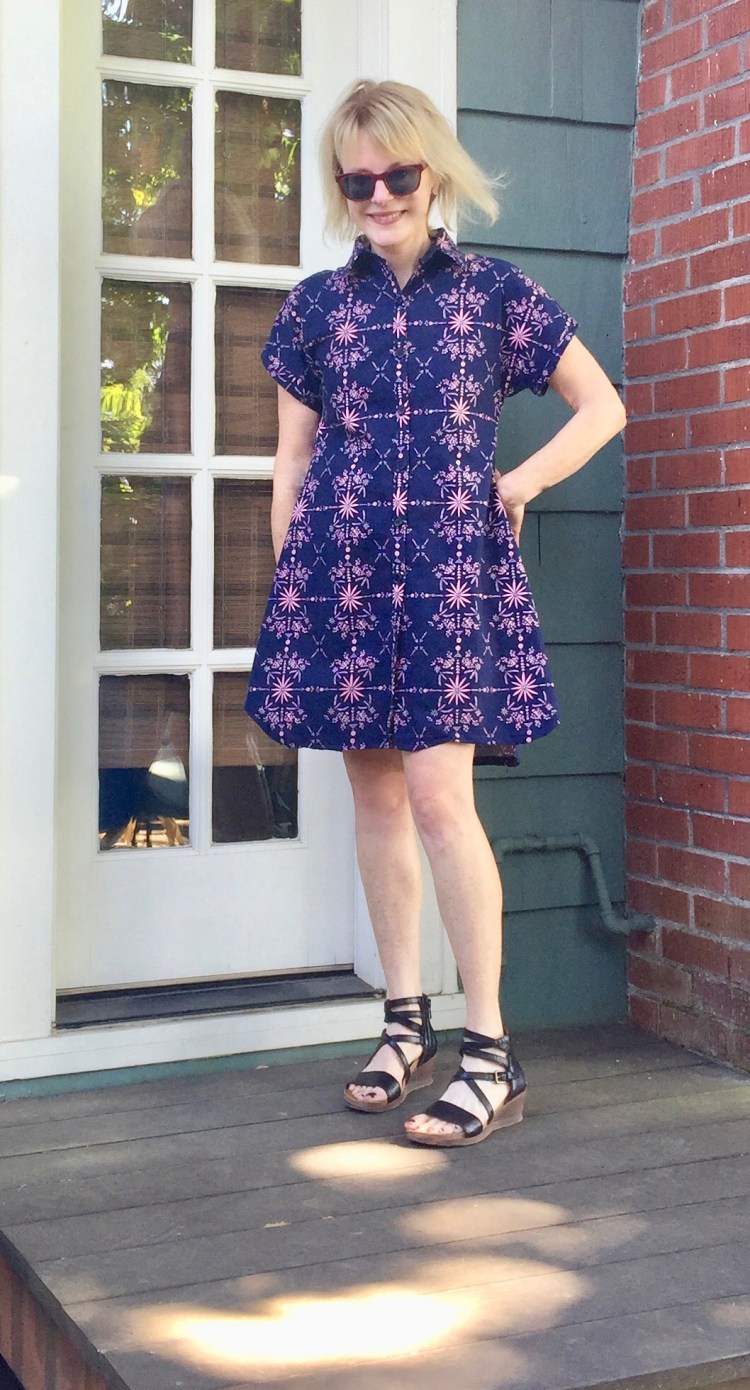
If I had to choose only one garment to take with me to a desert island it would probably be a shirt dress, because they just make me happy. This one gets bonus points for being a rayon shirt dress, which is pure bliss to wear in any weather. What’s different about this dress for me, is the raspberry print. Raspberry, not blue? I know – – I’m living on the edge here!

IMG_6864

You see, a few weeks ago, I found an old ‘personal color palate’ from a color analysis I paid for several years ago. I’d completely forgotten about it, and the raspberry pink that was identifed as one of my ‘top five’ colors. It’s supposed to make me glow, LOL, yet I rarely wear it. I guess it’s never too late….

I get weak knees over high low hems and I love the one on McCalls’ 7351. In fact, it might be the reason this pattern made it into my shopping cart. You might have seen this pattern on other blogs because it’s so popular.

As patterns go, this fit me pretty well as designed, even though I’m petite. I did modifiy it a bit: I shortened the bodice by 5/8″. I also shorted the skirt by 5/8′ as well, being careful to preserve the cool curved hem. I also ditched the collar, using only the collar band just because I wanted a simple neckline given the print of my fabric. I also raised the sleeve tab placement a bit so that I could roll the sleeves up more when it’s hot, but I think I over did that a bit. I love the yoke and back pleat detail.

IMG_6753

This rayon came from Fabric Depot and it did not disappoint! It wears like a dream and has just the right drape for this dress.

IMG_6801

I think a fabric belt would look good with this dress, but I ran out, so I skipped it. The raspberry color is growing on me… I think I’ll enjoy wearing it.  In fact, now that I’ve found my long lost color analysis swatches, I could start taking them with me when I shop. However, I must admit, my fabric love is color blind. If I see a fabric I love that doesn’t match my palate, it will likely still find its way into my shopping cart.

Are you a color analysis believer, or do you buy what you like and call it good?

Yes, I do love shirt dresses and will likely make this dress again, soon. I’m imagining a linen version, maybe cotton poplin… Happy sewing and thanks for stopping by.

Tencel Love

IMG_5861

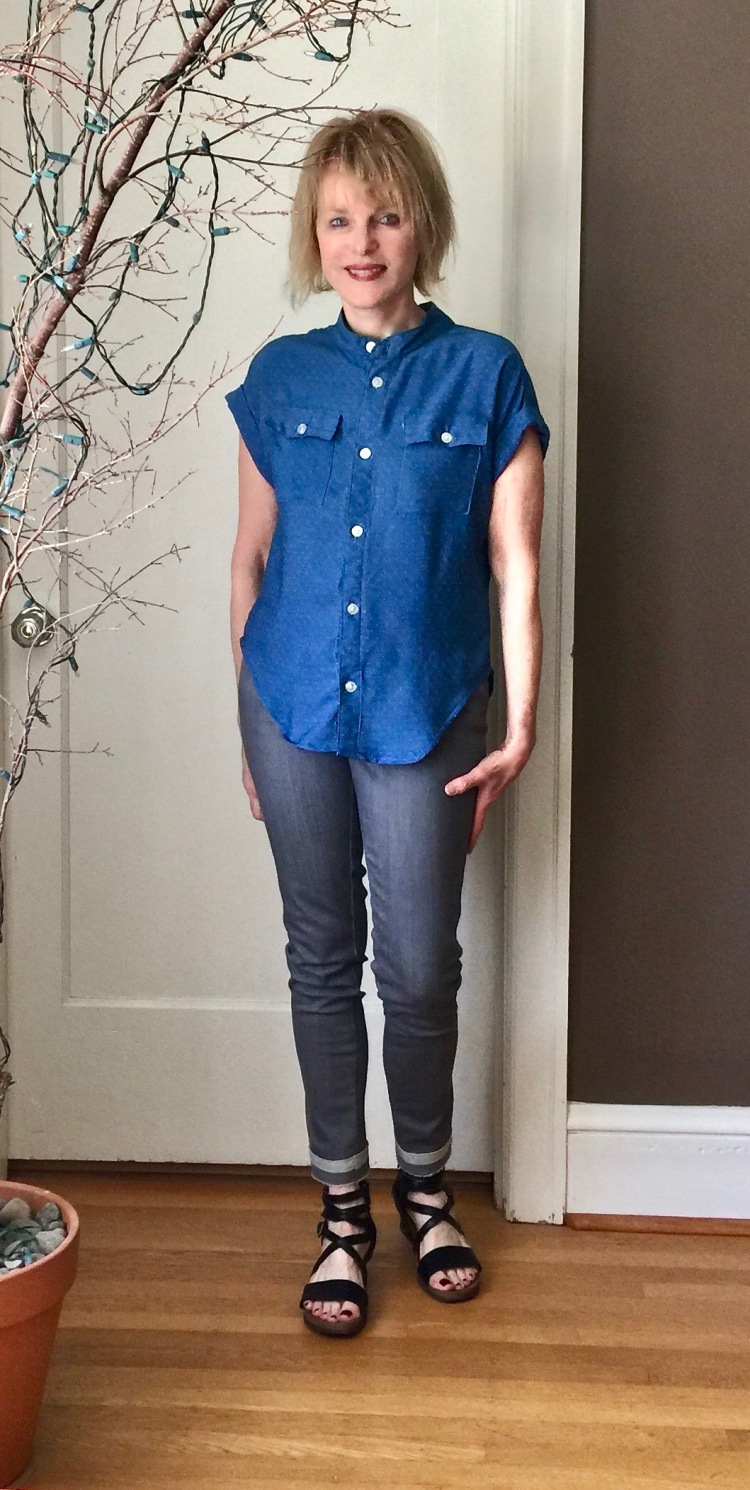
Since completing this pair of gray Jalie Jeans, I’ve been in a frenzy, sewing fun summer-y tops to go with them, hence – – this shirt!  I can tell it’s going to be a favorite because it’s made from Tencel, better known as lyocell, a fabric I grew to love when I bought a Tencel shirt at Anthropologie a few years ago. Not only is Tencel comfortable, it’s a sustainable fabric, regenerated from wood cellulose. It feels similar in hand to rayon and bamboo, both regenerated fabrics. I think I love this fabric because it has weight, yet it feels comfortable, even when it’s hot and humid. That’s because Tencel boasts the ability to absorb perspiration and quickly release it into the atmosphere, so it’s resistant to developing odors.

It sounds like the perfect ‘travel’ fabric to me! That’s why I chose it for my latest make; a button up shirt that will travel with me to Spain and Portugal this summer. It will be hot there, so I know this top will be in my suitcase!

IMG_5822

My pattern for this shirt is McCalls’ 7387, a pattern I had to have because of the cool back pleat.

IMG_5846

It’s those sort of little details that take a make from ho-hum to fabulous. This pleat is so cool. It’s a double pleat In other words you make one pleat then, fold another one over the top of it, creating this criss-cross look.

McCall’s 7387 took me about four hours to make from cut-out to hem. It probably would have taken less time if I’d resisted the urge to binge watch, “How to Get Away with Murder. “(I confess… I had to concentrate to follow the plot. The bonus for perservering though is the eye candy of Viola Davis’ wardrobe… she looks ‘chic’ but invincible. ) If you aren’t binge-watching, you could probably make this shirt in three hours.IMG_5804

Pattern Modifications: I left the flap off the front fly that covers the buttons because I wanted them to show. I visualized white buttons down the front of this shirt when I decided on this fabric, so I had to drop the flap. I added buttons to the pocket flaps too.

I also changed out the collar and replaced it with a collar band. I did this because I plan to wear this in warm weather and sometimes collars make me feel hot. To do this, I drafted a collar band by copying one from a tried and true button up shirt pattern.

IMG_5817

I’m smiling because I’m wearing blue Tencel!  This fabric was in the category of ‘special’, so I was a nervous when I decided to try a new pattern. I was so lucky that the pattern fit without modifications….phew!

My sewing energy is focussed on travel clothes right now. I’m trying to use the skills I gained from the Pattern Review Sudoku challenge to help me coordinate my travel wardrobe so that I can pack efficiently. Nevertheless, my efforts are a bit scattered. What will my neutral colors be? Do I pack skirts, shorts and tops, or do I just take a couple of dresses and call it good? What I do know for certain is that this shirt is going with me!

I’ve never traveled with Tencel, and one questions looms in my mind. Will it wrinkle? Have you sewn with Tencel? Thumbs up or down?

Happy sewing and thanks for stopping by!

A White Shirt and Jeans: Classics Recharged

IMG_5707
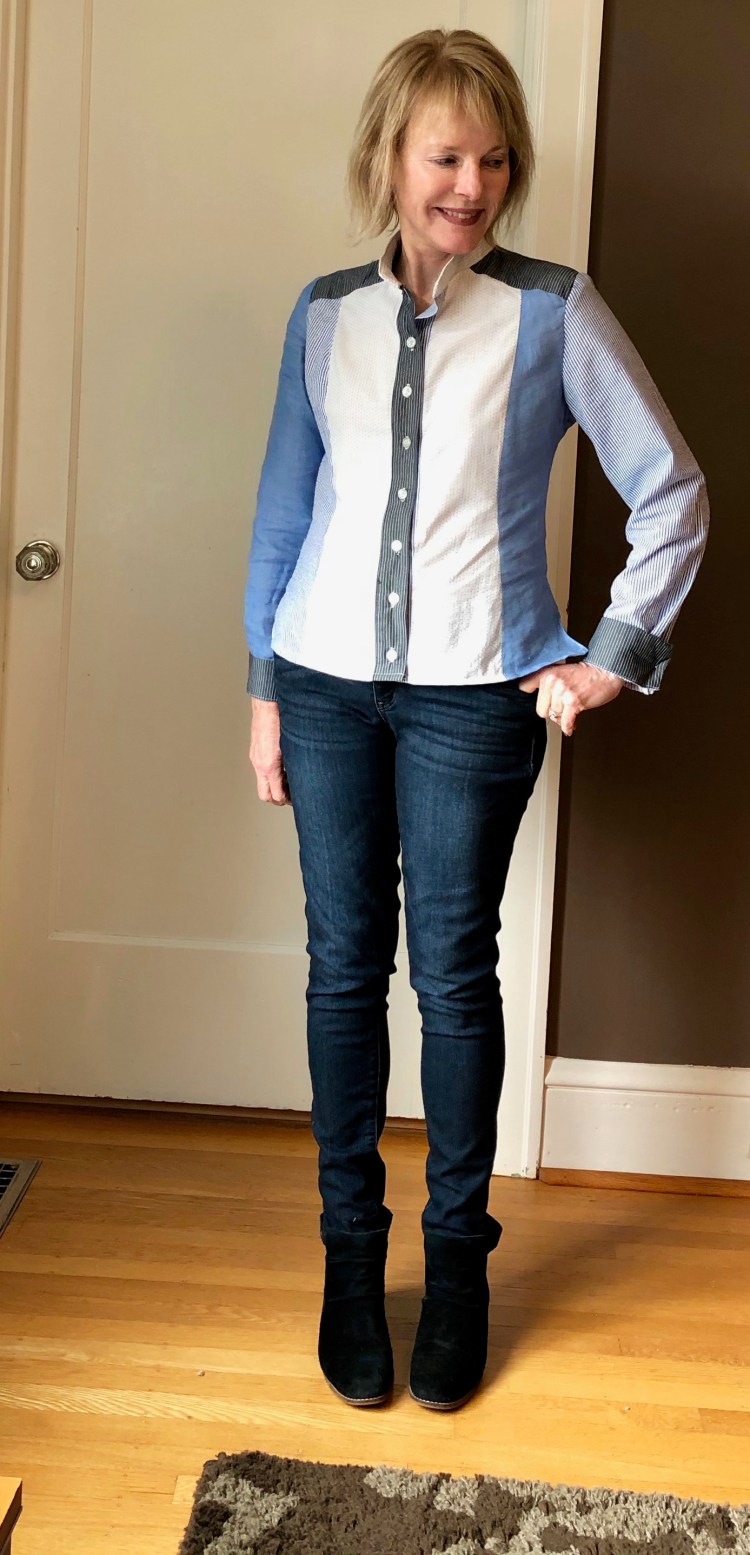
I’m such a fan of wearing classics – jeans, button-down shirts, tee shirts to name a few, so it’s always fun when you see an updated classic that brings something new to the game.

_100282034

When I saw this white Vince Camuto shirt in the Nordstrom catalog, I just had to make a DIY version. It’s a classic redefined with bell sleeves. I love this version except for one thing. The Vince sleeves are a bit too long for me. They’d end up in my soup. So my DIY sleeves are a little shorter.IMG_5635

For the shirt, I used a tried and true pattern, Butterick 5526 (made here) and modified the sleeves. This shirt is one of my favorites because it has princess seams and fits well. 5526

I used a linen/cotton blend from Fabric Depot. It has just the right amount of body to support my bell sleeves. To make the bell, I used the bell off of another pattern, Butterick 6456 (made here). It was just my luck that the top of the bell sleeve on that pattern fit the shirt sleeve of B5526 perfectly! If it hadn’t, I would have tapered it slightly to make it fit.

IMG_5691 My jeans were inspired by the Nordstrom catalog too. I used the  Jalie Jeans pattern for my DIY version, and used stretch denim from Modern Domestic, one of the awesome fabric stores here in Portland. This is my second pair of Jalie’s so they went together without too much struggle. I did forget how to do the front pockets though. So I referred to a great tutorial on this blog, Jillie Be Joyful. It was so helpful! I kept the design on back pocket pretty simple this time.

IMG_5722 2To make the jeans straight legged, I tapered the pattern’s legs by using a ready to wear pair that I love to guide me. For a little variety, I added some of the raw jeans salvage to the hem as a border. It’s a popular look in ready to wear so I couldn’t resist giving it a try.

I like the fit of these jeans, but I’m a bit frustrated with the knees. As I took these photos, wrinkles started to appear. Grrr. I might make a pair of legging jeans next (maybe Mimi G’s version?) to see if that works better in the knees.

IMG_5674

DIY jeans are fun when you’re a top stitching maniac like me. I’m determined to get a pair with perfect fit though, so I’m considering ‘rubbing’ a favorite RTW pair to copy them. Have any of you ever tried that? Does it work? How about legging jeans? Do you have a favorite pattern?

Happy Spring sewing and thanks for stopping by!