A Sierra Jacket in Forest Green

Whoa….It’s been awhile since I’ve posted!  My mother-in-law died recently and it’s been a sad, low energy time for me. I drifted into a space where I had very little time or mental space to create. The experience of being away from sewing deepened my appreciation of it though. I’m so happy to be back with a new make, the Sierra Jacket from Closet Case Patterns. 

The design of this unlined jacket has such a cool ‘french’ vibe to me. From what I understand, Heather of Closet Case Patterns was inspired by a old canvas maker’s jacket she owned. The pattern includes two views, a long version that’s cinched at the waist and a shorter, boxier version with buttons down the front. 

Of course, an unlined jacket is the perfect opportunity to practice some nice seam finishings. I flat-felled most of the seams to keep the inside looking neat, then added some bias binding in a contrasting stripe to the front facing. It makes me so happy to look at the inside of this jacket!

The fabric I chose is a medium weight twill in deep forest green. It’s the perfect weight for days when you need a light layer. It’s pretty cold here now, so I’ve been wearing my Sierra like a blazer under my coat, but will use it as outwear in the Spring and Fall. 

Details I love…There’s a cool side tie and an extra pocket inside the front for carrying your cell phone or what ever. You can even put a pocket on the sleeve. I didn’t have enough fabric for that this time around, but will definitely add that next time. I love the two piece sleeves too, and the cinched waist. The shorter version has buttons and sleeve pockets. Trust me…I’ll make that one soon, maybe out of corduroy .

The fit of this jacket is oversized and a bit boxy so be forewarned. I like it that way, but will cut one size smaller next time. Construction steps are well explained as is the usual with this company.


I’m in love with this jacket in part because of the color… forest green. For some reason, it seems hard to find these days! The jacket is so fun to make and wear..I know I’ll make the shorter version soon!

Happy sewing and thanks for stopping by.

A Spring Jacket with Triangle Bound Buttonholes

IMG_6299
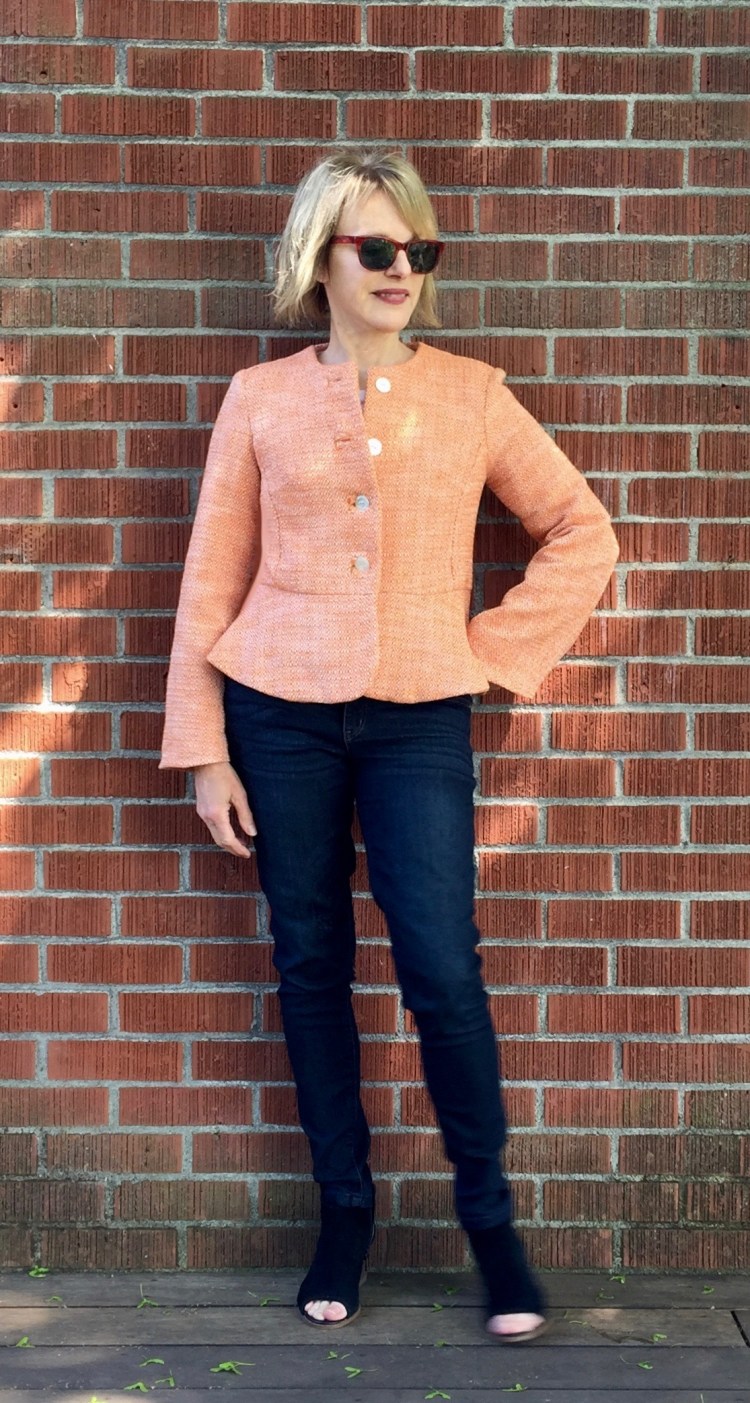
For years, my sewing bucket list has included “Jacket with Bound Buttonholes.” Well, this jacket has triangle shaped bound buttonholes and I’m saying, close enough! Yes, they were a bit fussy to sew, but I’m glad I took the leap to do them on this project. I will admit that the first two were ‘nail biters’ for sure, made possible only by the able hand-holding of my jacket class instructor, the Marvelous Marla! I was so fortunate last week to attend a three-day jacket making class lead by her. She makes everything so easy. If you ever have a chance to attend one of her classes, I highly recommend them.

I’m always attracted to peplum style jackets and shirts (here and here), so when this Simplicity pattern was released last Spring, it was an immediate add to the ‘must-have’ list. The front of the jacket is simple, so I decided it was the perfect opportunity to try a new buttonhole. IMG_6228

Triangle shaped buttonholes are very much like bound buttonholes. Marla taught me the method that’s in the Palmer Plestch Couture handbook.  Also, there’s a good explanation on-line at the Seamworks website, as well as a few U-tube videos on the subject. cfc8da3ec10d207d781d2a9d04676495e052556dThe good news…Creating a triangle bound buttonhole isn’t that hard! The bad news…There is a bit of unavoidable risk when you have to actually cut into your fabric to create the hole:) I recommend that you try out the process using scraps of fabric to start. It is a bit tricky, but very worth it, if you ask me.

IMG_6351I love this fabric, a lovely cotton boucle’ from Bolt Fabric,  but it was not ideal for this project. The weave was so loose, it unraveled at a mere glance. However, I knew it would be perfect for this pattern so I was highly motivated to push through the challenge! I used my serger to finish the edges but had to be careful not to cut off any seam allowances as I did so. I also had to be careful not to stretch the fabric as I pressed the jacket seams. The front of the jacket is completely interfaced and I lined the jacket with a simple rayon lining.

IMG_6292


The fit of this pattern is a bit tricky as there is a side seam panel, rather than straight side seams.

simplicity-peplum-jacket-pattern-8604-front-back-view

That being said, the jacket fit great without alot of adjustments.  I chose my size based on my measurements and it was really close! I shortened the waist a bit (I’m short waisted) and made a slight shoulder adjustment, but that was it. I had planned to add a mandarin collar, but when I basted it in, I didn’t like the look so left it off.

IMG_6302

The construction of the jacket wasn’t hard at all. In fact, if you’re looking for an easy, first jacket pattern to try, this would be a good candidate. The pattern instructions are edited by Threads magazine so they include finishing tips that are quite helpful.

I love my new jacket, but to be honest. I’m not really sure about this color. Melon/orange is a new color for me, but I decided it’s high time I stretched my wings a bit. I’m wearing this jacket with jeans because I couldn’t figure out what other colors would work with it. Ideas?

IMG_6338

Next on my sewing ‘to do’ list is a trench and a new Sew Over It Pattern Insider project that I’m anxious to share. Stay tuned.

Happy sewing and thanks for stopping by!


Sew Bibs with Simplicity 8610

IMG_5150There’s nothing like a community sewing challenge to motivate me to complete a project that’s lingered too long on my to do list. This pinafore pattern has been on my wish list since I made the jumpsuit version last Spring (here). It took the #sewbibs challenge to push me to get it done! (more about the challenge here)

My pattern is Simplicity 8610.

I love the big pockets, topstitched front band, buttoned straps. But if this doesn’t grab you, there are many other pinafore patterns to explore. Here are a few that are on my wish list right now.

The York Pinafore from Helen’s closet

york_pinafore_10

The Dani from Seamwork

sw3093-dani-01-large-1d45fe69fcb7935303658eef9020e3c945df0ae16c0f1ec38a6c182a7fe42449

Simplicity 8641

I chose Simplicity 8610 for the big pockets, front gathers and the cool bodice band detail. Also, I love the size of the straps, a detail that can make or break this design for me. If they’re too narrow, they’re uncomfortable, but these are just right.

IMG_5250

Construction – I cut the size indicated by my measurements and there were no surprises or adjustment’s needed. (Size options are from 6-24).  The construction of the bodice is pretty easy and fast to put together. Although I made my jumpsuit version from a rayon crepe, I decided to make my pinafore from a cotton, and I’m glad I did. I think the cotton gives the pinafore a bit more structure which works well to support the gathered details and the fabulous pockets (a must on a pinafore, don’t you think?).

IMG_5176

One of the nice things about this style is that you can wear it with a long or short-sleeved top under it which makes it a great layering piece. It’s still cold and rainy here, so I chose a long sleeve, but come Spring, I’ll happily wear this with a short sleeve top, or maybe even alone.

IMG_5192I’m such a fan of the pinafore style. I think it’s perfect for casual wear about town, or as a travel wardrobe item that you use as a layering piece. I know there will be other pinafores in my future, and since the challenge is on until April 12…would love to finish another before then:)

There are so many inspiring bibs and pinafores on #sewbibs on Instagram right now. Do you have a favorite bib sewing pattern to recommend?

Happy sewing and thanks for stopping by!

Finding Violet and Vogue 9363

IMG_4895
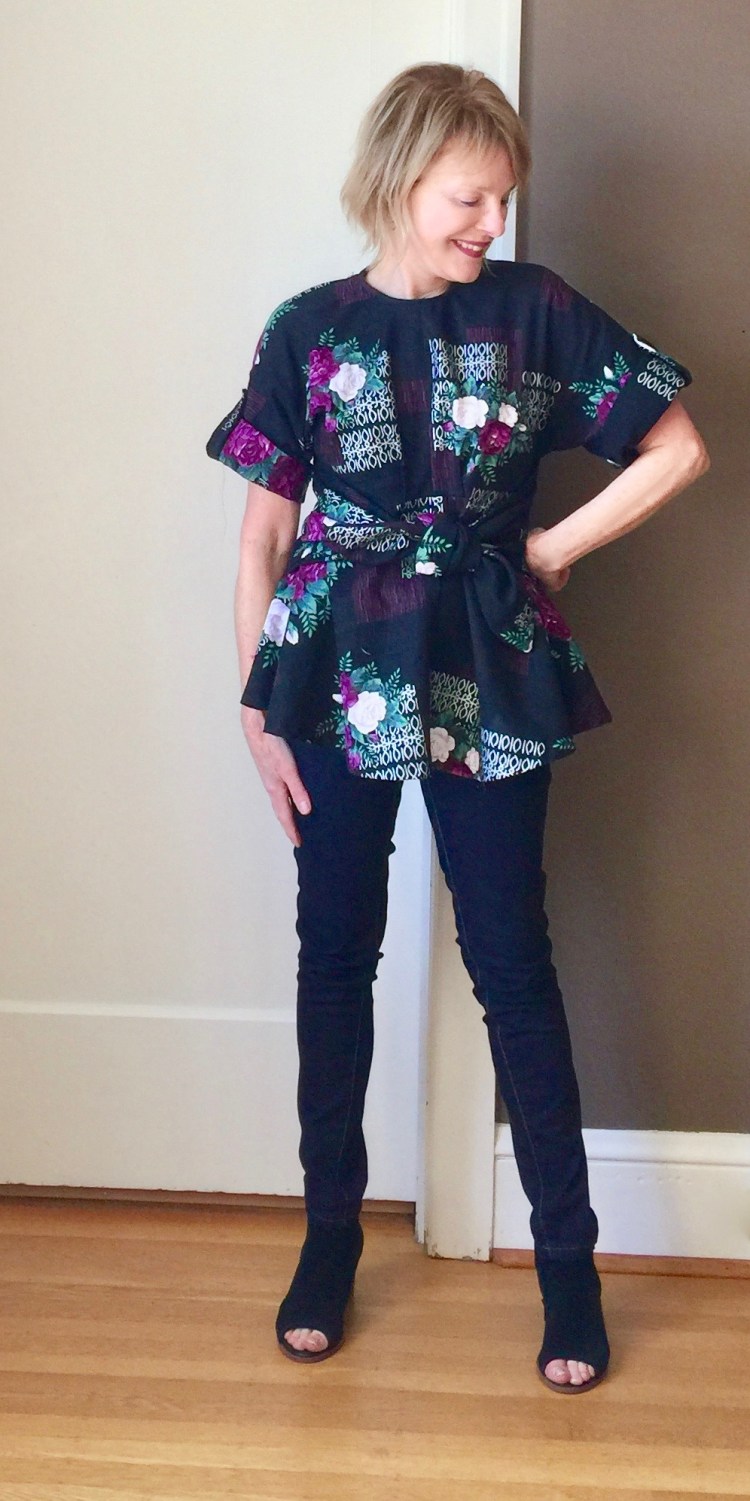
I’ve really enjoyed the #sew happy color challenge on Instagram. It’s inspired so many lovely posts by members of our sewing community! The premise of the challenge (created by @katiekortmanart) has been to explore combining complimentary colors in new ways. For me, it’s been an opportunity to look at the colors I love and to think about ways I can have more of them in my wardrobe and life.

This last week of #sewhappycolor features violet and blue. Blue…well, you all know how much I love that color (LOL). My wardrobe includes so many blue options, I could wear the color every day if I wanted. I love violet too, but my stash of fabric and wardrobe doesn’t really reflect that at all.

IMG_4849

So I took a trip to the fabric store, intending to buy a beautiful piece of violet fabric. Instead, I ended up with a print. It’s the scale of this one that caught my eye. The areas of solid black provide negative space that really allows the large violet flowers to pop. I really love this print….Hmmm, need/want more like this…

IMG_4980

Vogue 9363 is my pattern, new this Spring. I can’t resist a pattern with a front tie!  (see my other tie makes here, here and here)

Construction: Although the fabric recommendations include rayon and crepe (lots of drape), I chose Japanese cotton because I wanted the top to look more structured. It was such a such a dream to work with. It shapes beautifully and is a joy to press. The pattern is well drafted too. I cut my usual size and have absolutely no complaints about the fit. The curve of the front bodice seam gives it a unique drape, and the sleeves are easy as they are cut as part of the front and back bodice. There’s a zipper in the back and the loose fit is shaped by front and back bodice darts as well as the wide belt. It’s an easy top to fit and wear.

Changes modifications: I made the short sleeve version of the top/tunic. The pattern suggests the sleeves be finished with a machine hem, but since the print has a bit of a vintage vibe to it, I decided to add a rolled cuff to the sleeve with a buttoned sleeve tab. I really like the finished look of the rolled cuff on this generous sleeve.

IMG_4981

This lovely print has reinforced my love for violet. I’m hoping there will be more of this happy color in my future. For more inspiration and information about complimentary colors, check out Katie’s blog…it’s a wealth of information very enthusiastically presented. #Sewhappycolor was such brilliant idea – – Thanks Katie! Have you all enjoyed #sewhappycolor too? Any new revelations?

Happy sewing and thanks for stopping by!

My #Sewing Top Five of 2018

PicMonkey Collage_1
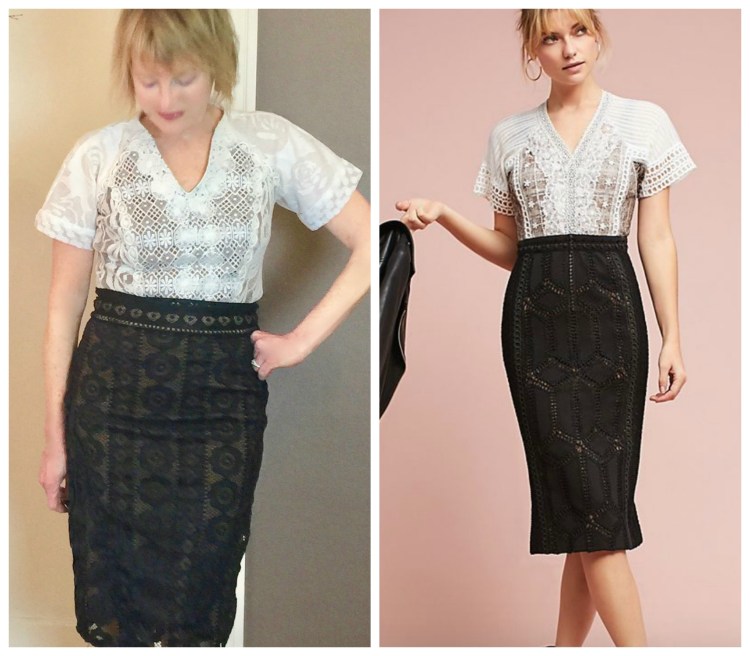
Even though I prefer to look forward, I love doing this retrospective post at the end of every year. Thanks to Gillian of Crafting a Rainbow for inspiring the #SewingTopFive. So here we go…my top five makes for 2018.

  1. The layered lace Anthropologie knock off (full post here).


I chose this Anthropologie knock off as one of my best, not because I wore it alot, but because I had such a great time making it.  Even the first step of the process was fun. I visited all the local fabric shops, searching for bits of lovely lace, then layered them to create this textured bodice. It took alot of time, but I loved what I was doing so much, I didn’t really notice.

2. This New Look dress took me by surprise! The two versions are here and here, but I’m counting them as ‘one’ for the purposes of my ‘best of’ list.

IMG_8946


IMG_9692

I didn’t really expect this drop waist loose-fit dress to become a favorite. It was a such a simple project…but sometimes it’s the ‘easy sews’ that yield the best results.

3. Pastel Green Coat (full post here)

IMG_9641

This was the only ‘serious’ coat I made in 2018 and it has become a strong favorite. The wool was a great find; gorgeous and soft. I’m so glad I decided to line the coat in silk. Pastels aren’t on my list of favorite colors as a rule, but I always feel like a ‘cool girl’ when I wear this coat.

4. Another Anthropologie knock-off made it into my top five list, the cordoroy shirt dress.

IMG_8454After multiple washings, the cordoroy has softened. I enjoy wearing this so much.

5.The floral kimono wrap top: IMG_1212

I always feel great in a wrap top/dress. This one is so fun to wear!

Here are a few Honorable Mentions: 

I would feel disloyal if I didn’t give a shout out to these me-made garments that have served me so well this year.

This Kobe Top from Papercut patterns:

I love this pattern, and will be using it again. This was a fun project because I used a old linen tablecloth with embroidery.

The floral wrap dress;

IMG_8124

I was reluctant to cut into this fabric because I loved it so. Fortunately, the dress turned out well. It’s now a favorite of mine…

3. Blackwood cardigan

IMG_9225 3

I made several Blackwoods in 2018 and I love them all! This particular version was special because I was able to use the selvege to create a unique border along the front and sleeve bands.

The Inari Tee dress and top:

PicMonkey Collage-8

I’m not sure why I waited to try this cool pattern! I wear the linen dress all summer and the tops (modified with a low peplum) are favorites too.

How was your 2018? It was a productive year for me. I managed to sew and blog three or more garments each month. Motivation to sew was easy to find, as I joined the Ready to Wear Fast sponsored by Goodbye Valentino. If there was a ‘hole’ in wardrobe, I had to sew or go without!

The RTW fast has been an interesting experience. It’s shifted my sewing significantly from spontaneous, muse-driven sewing to ‘sewing with a purpose’. Intentional sewing meant I was able to fill some holes in my wardrobe that I’d ignored or filled with frantically purchased ready-to-wear garments. I’m glad I replaced those pieces with nicer me-made essentials. I also reduced my fabric stash significantly…a big win! I discovered that there are some things I just don’t like to sew, exercise wear, for example. I just don’t find the satisfaction quotient to be high enough to justify committing any of my cherished sewing time to it. It was good for me, so I will likely do the fast again!

In my sewing room, 2018 was a very good year. But alas, there were a few missteps along the way so I’ll post the Top Five Misses next.

I hope those of you who blog/instagram will post your top five too, as I love reading those posts. Happy sewing and thanks for stopping by!


A Gift to Sew: How To Make a Fringed Circle Vest

PicMonkey Collage-8Sometimes the simplest make gives you the most pleasure. Every time I wear one of these vests, I feel stylish, cozy and comfortable. It’s a simple design that brings compliments and the question….where can I buy that?

My love affair with circle vests started several years ago when I was gifted a pattern for one. I soon realized I didn’t really need one at all since it’s just a circle. But the trick is in the proportions.  The patterned vest was a bit too voluminous for me, and it wouldn’t fit under my coat. So, I played around with the concept using fabric scraps and muslin and came up with an updated variation that works better for me.


These vests are a great wardrobe addition because they can be worn open or closed. This particular version is reversible, made from two fabrics sewn together, a solid and a plaid. You can finish the edge with bias binding, but fringe is great too. To fringe a vest, sew around it at 5/8″ then use a seam ripper to pull threads from the edge to make the fringe.

IMG_9880

The short vest takes a yard of each of two fabrics. For me, the long vest can be made from a yard and 3/8.

The basic concept of a circle vest is introduced in this Thread magazine blog post. In a nutshell…

  • Circumference of the circle: your bust measurement
  • Distance between armhole: the width of your back from arm to arm
  • Depth of the armhole: Top of the shoulder to 3” below your armpit for the depth of the armhole.

I liked this method, but found the vest to be a bit short. So, I modified it by adding 3”to the width of the circle. I  did this to give the front of the vest more drape.

Here’s a double-sided flannel vest with bound edges. I used two heavy weight flannels so it’s cozy but a bit stiff. The edges are bound with fleece binding.

IMG_9956

Here’s the long version in boiled wool.

IMG_9918

To make the long version I added a few extra inches to the length of the oval. I eliminated the bias binding, fringing the edges instead. Here’s a visual of the pattern I drafted for mine.

IMG_0104

I only used a yard and a half of fabric by folding the fabric selvage to selvage and cutting my oval from that.

IMG_0107

I’m not sure which version I like the best….I’m such fan of plaids and this project is a perfect way to use them all!

IMG_9845

IMG_9926 2

IMG_9934

It’s always so satisfying to find make a stylish and unique gift for a friend. A unique fabric choice can really make this a stand out piece in any wardrobe. It’s also a great addition to your wardrobe too. As they say, One for you…One For ME!!! 

Happy sewing and thanks for stopping by!


A Vogue Vintage Jacket in Plaid

IMG_9618 2 
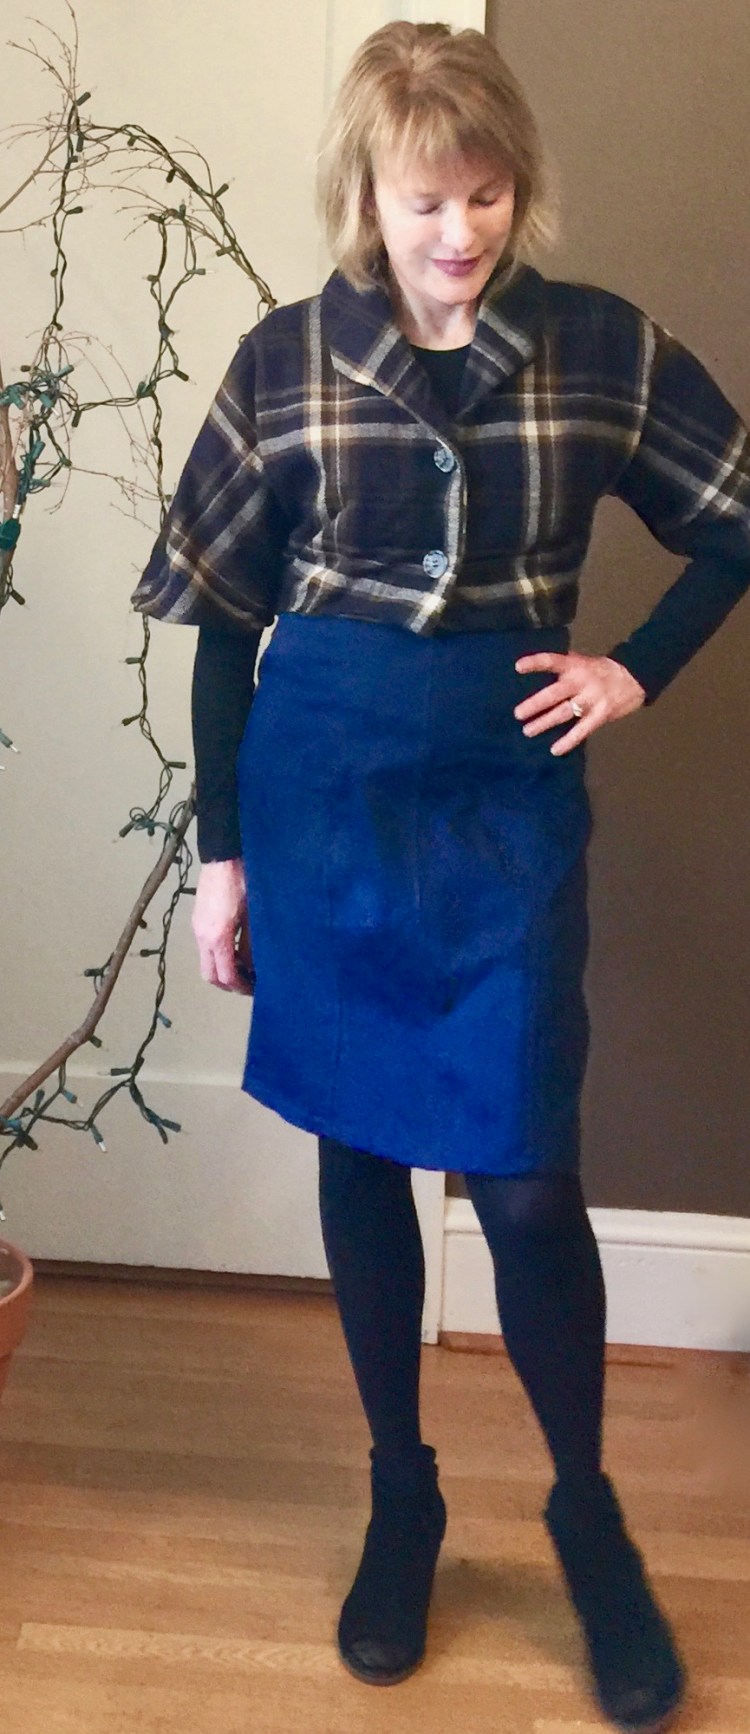
Hi all! I’m back from a bit of a holiday break with a plaid jacket, inspired by one I saw in Vogue pattern Magazine. If you’re like me, you look forward to each issue of the Vogue Pattern magazine because there is always something there that will spark an idea for a project. This issue was one of my favorites as it was all about PLAID.

vpm_product_0

Love the plaid coat on the cover!! Inside, a vintage Vogue jacket caught my eye, and I knew I’d have to make my own version.

IMG_9631


It’s hard not to love a good Vintage Vogue design! Vogue 9082 is especially appealing because it has a cute cropped jacket.


I made my jacket from a plaid I found at the Mill End Store here in Portland on my usual Fall visit there. I’m always on the lookout for classic but fun plaids, and, as usual, they did not disappoint. This fabric is really lovely in person; photos don’t do it justice. It has a bit of olive green and gold in it, and it’s so soft, a blend of wool and acrylic. I was lucky enough to get the last two yards on the bolt.

IMG_9598 2


Challenges: The pattern is pretty straightforward and pretty easy, but hey, I had to complicate things by making mine from plaid. It was a bit of a challenge to lay the pattern out because the sleeves are cut as part of the bodice. This means you must be sure that you place the plaid on the bodice carefully because that line follows down the sleeve. The good news is…because you don’t set in the sleeve, it means you get to avoid the whole sleeve to bodice matching ordeal, The bad news…the wrong placement could mean you’d have plaid sitting awkwardly on your shoulder. My plaid was large so a mistake would be glaring but I think it worked out well. By the way, my success rate with matching plaid has increased considerably since I started using Wonder Clips to hold things in place while cutting and sewing. s-l640

I love these things so much! Just posting a photo of them makes me want to buy a zillion more. You can find them at Joann’s, at craft stores, on Amazon. They are so useful and all the colors….I could go on and on!!

More about the challenges – – those collar points!!  From the line diagram, it appears that the collar is designed to look a bit more angular and pointed than in my version. Not sure why, but mine aren’t quite as dramatic as I expected. I think the error happened when I cut the bodice. When I inspected the pattern pieces later, to my surprise, I’d cut the collar points as I expected them to be, rather than how they were. Perhaps it was because I was binge watching Outlander. Blame it on Clare and Jamie.

IMG_9602 2


I think the cropped style works best with my highwaisted denim skirt (made here). It would probably work with jeans too!

Future posts and plans….

The holiday season is in full swing around here. It’s my favorite time of year because I get to sing in several Christmas concerts with my choir, which is such a privilege and joy. It also means I’ll be sewing a few fun EASY gifts for friends…Curious if you are too?  My next post will probably be about that. In other news, the year is coming to an end, as is the 2018 RTW fast and I’ve been thinking alot about that experience and what it’s meant to my sewing journey so I’ll share those thoughts too. Then, of course there will be a hits and misses post for 2018. So much to talk about!

I hope you had a nice holiday with family and friends. Happy sewing and thanks for stopping by!


Blackwood Cardigan vs. McCalls 6844

You can never have too many cardigans. I feel quite certain about that. That’s why, each Fall, I find myself yearning for a new one…or two.  I’ve made several in the past (here and here) but today I want to talk about the two cardigan patterns I reach for time and again – –  the Blackwood cardigan by Helen’s closet and McCall’s 6844 (OOP but available on-line). Both patterns are easy to sew and friendly to a variety of knit fabric options. It’s the neckline that is usually the deciding factor in why I choose to make one over the other.

IMG_9104 3This version of McCalls 6844 is a coatigan of sorts. I found this thick sweater knit at Joann’s. The weight is perfect for this time of year, and the stretch recovery is great for this pattern.

6844line

I made view B but lengthened it by six inches. I love long cardigans these days (my Pinterest page is proof of that). The wide shawl collar makes it so warm, and by cutting the front bodice pieces a bit wider than I normally need, I was able to make the closure have a bit of an overlap, which makes it appropriate for windy weather.

IMG_9093 2Next up is (no surprise) the Blackwood cardigan by Helen’s Closet. Who doesn’t love this pattern?

IMG_9242I’ve made this before, but this time, I really wanted a stripe along a solid front band for contrast, as I’ve seen that detail on RTW cardigans.

IMG_9225 3With this striped fabric, I got lucky! The selvege edge of my fabric was solid navy with a thin purple stripe, and I had enough fabric to manage to cut the entire neck band from it!! Such a perfect opportunity to add a fun easy detail to this cardigan.  Again, I made this version very, very long. The advantage is that the longer look makes a shrimp like me feel tall. The bad news? It’s so long, none of my coats cover it. Such problems….

My new cardigans are so wardrobe friendly since they go with everything in my closet. I know they’ll get alot of mileage! What’s your favorite cardigan pattern these days?

The holidays are coming and I cannot let the season go by without a new velvet make so that’s on my sewing to do list. Oh, I guess I’ll have to go on Pinterest and start a new ‘velvet inspiration’ page, don’t you think?

Happy sewing and thanks for stopping by!


Jumpsuit Love and Two New Buddies

IMG_5286

I knew when I decided to participate in the RTW Fast this year, that I’d have my work cut out for me in a key wardrobe category – – Pants. I’ve always preferred RTW over me-made pants in past years. But in the jumpsuit category, RTW has always let me down; the fit, the fabric… not to mention the comfort factor. Ugh. So, creating a jumpsuit that fit was a challenge I accepted willingly.

Of course, as soon as I finished this, my husband informed me he isn’t a ‘fan’ of jumpsuits. Ha, isn’t that such a guy thing? If he would just wear a jump suit, I’m sure he would change his mind.

IMG_5549

The pattern I chose is Simplicity 8610, a jumpsuit with a slightly raised waist, deep pockets and slight gathers at the waist.

simplicity-kimono-jumpsuit-pattern-8610-front-back-view

I was attracted to the details on this one – the raised, gathered waist, the top-stitched bodice band, and the buttons on the straps.


This is my first jumpsuit and I was a bit nervous about fit, so I’m glad this pattern was pretty forgiving. The look/fit is so unstructured, there was little I could do to screw it up! I cut the size my measurements indicated and it fit perfectly – a rarity in patterns that must be celebrated! I also found the placement of the back pockets to be spot on too! That’s got to be a first for me. The one modification I made was to shift the gathers so that the center front of the waist is and smooth. I did this because I thought there was a bit of a pooch at the stomach when the gathers were evenly distributed.

IMG_5328

Simplicity recommends soft fabrics like cotton and linen, but I really wanted ‘drape’ so I chose a soft medium weight crepe, and I’m glad I did as it’s so comfortable and easy to wear. It was great to work with – not too slippery and it doesn’t fray. As fabrics go, crepe is pretty versatile – – easy to dress up or down. I might be able to get away with wearing my new jumpsuit in the fall with a shirt underneath. What do you think?

IMG_5128

Are you a jumpsuit fan, or are you in my husband’s camp? I’d love to know pattern recommendations for the future, as I’m loving this one right now!

It’s been a year since our nutty tabby, Dustin, passed, and we decided we’re ready for a new friend. We went to adopt one, and ended up with two babies :). They’re a boy and a girl from the same litter who look like twins; Maggie and Mitchell, only three months old!

They were a bit nervous at first, but are now feeling enough at home to show us their stuff. There’s lots of running, jumping and climbing at our house right now. I’m sure they’ll be leaping into a blog photo or two before too long!

Happy sewing and thanks for stopping by.


An Anthro Lace Dress Knock-Off

PicMonkey Collage-5

Which one is from Anthropologie? Ha, just kidding. As you all know, I have a thing for lace and when I saw the above dress from Anthropologie, I wanted it in the worst way. The lace is gorgeous, but the style is a bit edgy, a must have if you ask me! But the price tag stopped me in my tracks. $728.00. Okay, it might be worth it with all of those gorgeous layers of lace, carefully sewn in place. But, hey, we can do that; am I right? Enter the Pattern Review Bargainista contest, just the motivation I needed to get it done! IMG_8867

I used Simplicity 1699 as my basic template for this dress.

1699

It’s a simple design, a peplum top or dress with raglan sleeves and a simple rounded neck line. Since, I’d made it before I knew it would fit me, freeing me to focus on the design elements I wanted instead.

First, even though the Anthropologie dress is one piece I saw it more as a skirt and top. So I split the dress at the bodice and added a waistband to make it a skirt.

Then, I started in on the bodice/top. I cut the lining pattern pieces first then cut corresponding pieces from the lace (contrasting pieces of white lace, purchased at Joanns.) and sewed them together. I wanted a v-neck, so I cut that too.

IMG_7326 Once I had the basic bodice constructed, I took little bits of lace and layered them over the first layers of lace, focussing on placing eye popping elements on the princess seams and neckline. Then, I finished the seams, added a zipper and hemmed the bodice so that it would be a top that could be tucked in or worn out.

IMG_1973By the time all that detail work was completed, I was ready for simple tasks. I was glad the process for the skirt was much easier. I just cut it from the lace, added a waistband, and lined it – phew!

IMG_8884

The process of layering the lace on the bodice/top took some time, but it was so satisfying. Deciding where the bits of lace should go was fun, and hand stitching them into place was a calming process. I often forget just how therapeutic hand stitching is!

The good news? My new dress/ensemble is close enough to the original that my credit card is no longer in danger of being used.

IMG_8863

  • Here’s how the costs broke down using the Pattern Review contest formula – – Column dress designed by Byron Lars for Anthropologie – – $728.00
  • 2.5 Yard Fabric for lining (top and skirt) – Joanns – $12.99 per yard on sale for $9.00 x 2.5= $22.50
  • white lace fabric; (3) 1/2 yard pieces for contrast on bodice front and back (1.5 yds total)  $6.99 X 1.5 = $10.48
  • Black Lace for skirt overlay 1.5 yards x 12.99 yard on sale for 9.00 = 13.5
  • 18” zipper for top – $2.99
  • Bits of lace for top embellishment purchased at a thrift store – $5.00
  • 7” zipper for skirt (invisible) $3.99
  • Total: 58.46
  • $728.00 – $58.46 = 669.54
  • $669.54 / $728.00 = .91969 =91.9 % savings

IMG_8861

There’s nothing like a Pattern Review Contest to get the creative juices flowing. Be sure to follow the link  to check out all of the entries – there are some amazing creations and some incredible Bargainista’s out there!

Happy sewing and thanks for stopping by!