A Gift to Sew: How To Make a Fringed Circle Vest

PicMonkey Collage-8Sometimes the simplest make gives you the most pleasure. Every time I wear one of these vests, I feel stylish, cozy and comfortable. It’s a simple design that brings compliments and the question….where can I buy that?

My love affair with circle vests started several years ago when I was gifted a pattern for one. I soon realized I didn’t really need one at all since it’s just a circle. But the trick is in the proportions.  The patterned vest was a bit too voluminous for me, and it wouldn’t fit under my coat. So, I played around with the concept using fabric scraps and muslin and came up with an updated variation that works better for me.


These vests are a great wardrobe addition because they can be worn open or closed. This particular version is reversible, made from two fabrics sewn together, a solid and a plaid. You can finish the edge with bias binding, but fringe is great too. To fringe a vest, sew around it at 5/8″ then use a seam ripper to pull threads from the edge to make the fringe.

IMG_9880

The short vest takes a yard of each of two fabrics. For me, the long vest can be made from a yard and 3/8.

The basic concept of a circle vest is introduced in this Thread magazine blog post. In a nutshell…

  • Circumference of the circle: your bust measurement
  • Distance between armhole: the width of your back from arm to arm
  • Depth of the armhole: Top of the shoulder to 3” below your armpit for the depth of the armhole.

I liked this method, but found the vest to be a bit short. So, I modified it by adding 3”to the width of the circle. I  did this to give the front of the vest more drape.

Here’s a double-sided flannel vest with bound edges. I used two heavy weight flannels so it’s cozy but a bit stiff. The edges are bound with fleece binding.

IMG_9956

Here’s the long version in boiled wool.

IMG_9918

To make the long version I added a few extra inches to the length of the oval. I eliminated the bias binding, fringing the edges instead. Here’s a visual of the pattern I drafted for mine.

IMG_0104

I only used a yard and a half of fabric by folding the fabric selvage to selvage and cutting my oval from that.

IMG_0107

I’m not sure which version I like the best….I’m such fan of plaids and this project is a perfect way to use them all!

IMG_9845

IMG_9926 2

IMG_9934

It’s always so satisfying to find make a stylish and unique gift for a friend. A unique fabric choice can really make this a stand out piece in any wardrobe. It’s also a great addition to your wardrobe too. As they say, One for you…One For ME!!! 

Happy sewing and thanks for stopping by!


A Vogue Vintage Jacket in Plaid

IMG_9618 2 
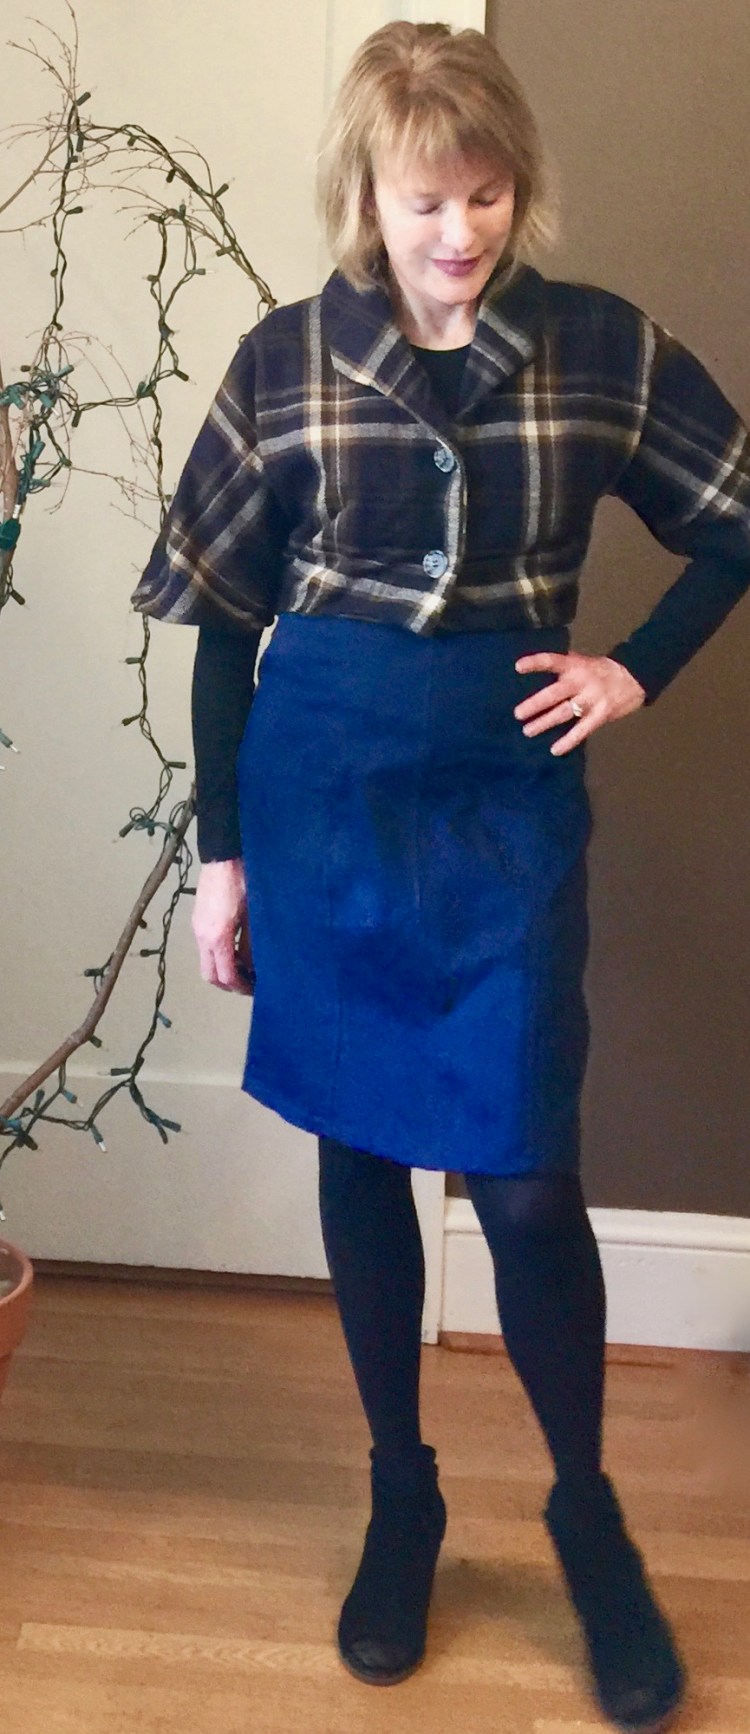
Hi all! I’m back from a bit of a holiday break with a plaid jacket, inspired by one I saw in Vogue pattern Magazine. If you’re like me, you look forward to each issue of the Vogue Pattern magazine because there is always something there that will spark an idea for a project. This issue was one of my favorites as it was all about PLAID.

vpm_product_0

Love the plaid coat on the cover!! Inside, a vintage Vogue jacket caught my eye, and I knew I’d have to make my own version.

IMG_9631


It’s hard not to love a good Vintage Vogue design! Vogue 9082 is especially appealing because it has a cute cropped jacket.


I made my jacket from a plaid I found at the Mill End Store here in Portland on my usual Fall visit there. I’m always on the lookout for classic but fun plaids, and, as usual, they did not disappoint. This fabric is really lovely in person; photos don’t do it justice. It has a bit of olive green and gold in it, and it’s so soft, a blend of wool and acrylic. I was lucky enough to get the last two yards on the bolt.

IMG_9598 2


Challenges: The pattern is pretty straightforward and pretty easy, but hey, I had to complicate things by making mine from plaid. It was a bit of a challenge to lay the pattern out because the sleeves are cut as part of the bodice. This means you must be sure that you place the plaid on the bodice carefully because that line follows down the sleeve. The good news is…because you don’t set in the sleeve, it means you get to avoid the whole sleeve to bodice matching ordeal, The bad news…the wrong placement could mean you’d have plaid sitting awkwardly on your shoulder. My plaid was large so a mistake would be glaring but I think it worked out well. By the way, my success rate with matching plaid has increased considerably since I started using Wonder Clips to hold things in place while cutting and sewing. s-l640

I love these things so much! Just posting a photo of them makes me want to buy a zillion more. You can find them at Joann’s, at craft stores, on Amazon. They are so useful and all the colors….I could go on and on!!

More about the challenges – – those collar points!!  From the line diagram, it appears that the collar is designed to look a bit more angular and pointed than in my version. Not sure why, but mine aren’t quite as dramatic as I expected. I think the error happened when I cut the bodice. When I inspected the pattern pieces later, to my surprise, I’d cut the collar points as I expected them to be, rather than how they were. Perhaps it was because I was binge watching Outlander. Blame it on Clare and Jamie.

IMG_9602 2


I think the cropped style works best with my highwaisted denim skirt (made here). It would probably work with jeans too!

Future posts and plans….

The holiday season is in full swing around here. It’s my favorite time of year because I get to sing in several Christmas concerts with my choir, which is such a privilege and joy. It also means I’ll be sewing a few fun EASY gifts for friends…Curious if you are too?  My next post will probably be about that. In other news, the year is coming to an end, as is the 2018 RTW fast and I’ve been thinking alot about that experience and what it’s meant to my sewing journey so I’ll share those thoughts too. Then, of course there will be a hits and misses post for 2018. So much to talk about!

I hope you had a nice holiday with family and friends. Happy sewing and thanks for stopping by!


Three Versions: Darling Ranges Dress

PicMonkey Collage-7

I’m back from my wonderful trip to France (more about that later) and am trying to ease back into the real world. So far, between jet lag and the growing awareness that daily life is not *quite* as stimulating as vacation life, it’s been a bit of a struggle. Lethargy and lack of motivation has been the mood. However, I do have a plan. This weekend I’m going to take a quick trip to a fabric store to peruse the new Fall patterns and see where that takes me.

In the meantime, I want to share with you a pattern I’m quite in love with!

f2a298a2c48e8f4d9920e6d7b46d1f6e--shirt-patterns-dress-sewing-patterns

Megan Nielsen’s Darling Ranges dress pattern has been around for a while so it’s easy to find inspiring makes on social media to cheer you on. It’s pretty versatile, with two options for the dress (with or without gathered waist) and a top. Before I left for my trip,  I made three of the dresses in quick succession. I hoped to blog it before I left, but alas…that didn’t happen! I love them all, but have a special place in my heart for the two linen versions, because, well, LINEN!

IMG_7798

My first version is made from a striped linen/rayon blend that I found at Joann’s early this Spring. I didn’t have quite enough to make the sleeves, so I had to modify, but I’m happy with the result. It’s easy to wear as is, or, with a tee under it, it will work well for Fall. The in seam pockets are great…very convenient without a lot of bulk. This dress went to France with me, and it did its job well. The tie is meant to go in the back, but I can’t stand the feeling of a tie when I lean back, so I extended the length so that it can be worn in front.

IMG_7847

This green version is made from plaid cotton shirting (ModernDomestic) so it required a bit of pattern matching. I eliminated the waist tie on this version to keep the fit loose. The sleeves are lengthened so that they’re easy to roll or push up. The pockets are self drafted and are cut on the bias.

IMG_7701

Version three is made from a lovely embroidered striped linen I found at Mill End store here in Portland. Here’s a close up of the fabric.

IMG_8029

The only changes I made to this version was to hem it about a inch longer. I also made the waist tie an inch wider so that it would look more substantial when I tied it in the front.

Fit and challenges: 

  • Shoulders – – Usually I have to do a narrow shoulder adjustment – – not here! So if you have wide shoulders, the fit on this dress may need some adjusting.
  • Fabric required – – Yes, this takes a lot of fabric! I tried to skimp a bit because I’m short, and ended up with a sleeveless version when I didn’t plan on one. Yes, the dress turned out fine, but (as usual), I should have respected the stated fabric requirements to avoid that situation.
  • Button placement – – The way they were positioned on the pattern would have left gaps where I didn’t want them, so I had to do some significant repositioning.


IMG_7812

IMG_7788

IMG_7747

All three versions are really wearable. My favorite is probably the last one, the embroidered linen, although I’m fond of the green version too. My husband has a strong dislike to that one – – his reason? “Some dresses aren’t meant to be made in green!” Hmmm…interesting and, well, thought-provoking. I hope he’s wrong, because I predict that version will be in heavy rotation this Fall. Will I make this dress again, or is three enough? Not sure…I’m tempted to make the waist less version, although I wonder if it will be too boxy. Thoughts? Please share.

Happy sewing and thanks for stopping by!!


One for you, one for me…A reversible fringed scarf to give or keep

Well, it’s almost too late to pull off a DIY gift for a friend, but here’s a last minute gift you can sew in an hour – – A fringed scarf that’s so versatile! It’s cozy and lovely as a scarf, but also wide enough to wear as a shawl. When I saw a version of this scarf on a mannequin at Fabric Depot, I just had to sew one for me and a few for friends. They’re popular gifts as the scarves are reversible and can be worn a variety of ways.

IMG_6653


IMG_6631

IMG_6471


Here’s how to make a quick reversible scarf of your own.

The best part of this project is selecting the coordinating fabric. To make one scarf you need 1 1/3 yards each of two coordinating flannels, 44/45″ wide.

IMG_6091

From each piece of coordinating flannel, cut two (2) 20″ high pieces.

IMG_6096

You now have the four panels that will make up the scarf. For each coordinating flannel, place the two 20″ high panels right sides together and sew a 5/8” seam down the center.IMG_6662

You now have two long pieces of two coordinating fabrics.  Place wrong sides together, aligning the center seams and the edges, smoothing out wrinkles. I use clips to hold the edges in place.

IMG_6103 2


Sew these two pieces together around the entire circumference of your scarf placing your stitching line 1 and 1/2 inches from the edge. ( I used a piece of tape on my machine placed at 1 1/2 inches as my stitching guide.) This stitching line is important as it will be your guide to cut the fringe. You can double stitch it if you want for extra security.


From each corner, cut a 1/1/2’ square, then begin to cut your fringe, using a small scissors at 1/4” intervals, being careful not to cut through your seams.

IMG_6104 3

You can see my edges don’t meet all that perfectly. That’s okay because the fringe will be fluttering about when you’re done, so precision is not essential. It looks so great after it’s been ruffled by your hand or the washing machine.

IMG_6477

That’s all there is to it! I’m not sure which scarf is my favorite….

Another fringe option that’s more time consuming is to take a darning needle and carefully pull out fibers at the scarf’s edge to fringe it. This requires alot of patience. IMG_6625

These scarves are quick to sew and cost effective as gifts go. They’ve been quite popular with friends who enjoy throwing something stylish around their shoulders on damp wintery days.

I’ve experimented with various combinations with regard to fringe. On this scarf, I only fringed one side and serged the other. It’s a tidier look if that appeals to you. I also made this scarf a bit longer, using  1 1/2 yards of fabric. The longer length makes it very easy to wrap . I chose to keep this scarf for myself, because, well, it’s blue!!


IMG_6568

Here, in Oregon, the weather is damp, and I love wearing my scarf as I enjoy dinners around the fire with friends.

It’s a great time of the year to reflect on the past and plan for the future. I’ve loved reading everyone’s top five hits posts and I’ll be posting my own list here before the year ends. Happy sewing and thanks for stopping by!

A Bomber Jacket Inspired by Philip Lim


IMG_6389I thought I was over bomber jackets until I saw this plaid version by Philip Lim.screenshot

When I found McCall’s 7636  by Beaute’ J’Adore, I knew it was the perfect match for my designer inspiration. There’s alot about this pattern that sets it apart from the bomber jacket patterns that are available.

M7636

My favorite detail is the statement sleeves. As you can see from the line drawing, the shape is created by pleats that are gathered into a ribbed cuff. Then, to make the sleeves pop, there’s piping added before you insert the sleeve into the bodice. I think that really makes this jacket unique.

IMG_6353

IMG_6352


The jacket is fully lined, a plus at this time of year! To make cozy and warm,  I used red checked flannel from Fabric Depot.

IMG_6392

Some tips about the fit of this jacket… It is cut very generously, so be prepared to adjust.

  • The sleeves are pretty long. I don’t usually need to shorten sleeves, but it was a must here and I’m glad I took the time to figure that out because the sleeves are quite poufy. If they were too long, they would be pretty annoying to wear.
  • Also, I took my usual narrow shoulder adjustment but increased it by 5/8″ and I think I could have even done more! My guess is that this broad shoulder look is what the designer is going for, but it’s a bit overdone if you have a small frame.
  • The jacket bodice is cut pretty long. I’m 5’4″ and I shortened it by a full inch.

Even with those adjustments though, I’m in love with this pattern. The sleeves look tricky to sew, but they really aren’t – -they are simple pleats that easily fit into the ribbed cuff. The instructions are thoughtful and there’s alot of attention to detail that makes sewing this jacket a breeze. In fact, I enjoyed it so much, I might make another version this Spring from denim.

IMG_6387

Because this was a designer original inspired make, I’m going to tag it for Designin’ December, a fun competition created by Linda of Nice Dress, Thanks I Made It. Visit her website for more inspiration!  There’s alot to enjoy there!

December is a busy month and it’s hard to find a spare minute to sew, but I’m completing a couple of gifts and decorating projects that are using up my huge stash of remnants. I’ll be posting about those this week.

I love that this make has red as the dominant color. It makes this jacket feel, well… festive! Happy sewing and thanks for stopping by.

About the Jacket my Husband Hates


IMG_5308Hi All – – My husband is usually quite generous with compliments when I finish a make. But this coat got a strong, very negative reaction out of him! It caught me so off guard, I had to run to my girlfriends for reassurance. Yes, this coat isn’t the classic style I usually gravitate to, but I can’t always wear or sew the same old thing, am I right? That’s why I was drawn to this coat’s interesting hemline, and of course, that’s the detail, that makes my husband squirm.  IMG_5481It reminds me a bit of this Burberry wrap coat I saw on line.


3f6f53dc9543ab57b9f395117c3a8a2ef7b45d0cOf course, the challenge of this make was the plaid matching, made even more so by the fact that I have not changed my ways when it comes to buying fabric. I tend to buy on the short side….and that’s really crazy when the fabric is a plaid. When will I learn? Because I was short on fabric, I had some panicky moments as I tried to get the sleeve plaid to match the bodice plaid, but eventually, it worked. And let me tell you, after all that work, there’s no way I’m going to let one man’s opinion keep me from wearing this coat! Ha!

IMG_5470

The pattern is Vogue, 9037, a double breasted style. The lovely wool is from the Mill End Store here in Portland. They have a fabulous wool selection…I feel so lucky to live close to them! The wool is a loose weave so I decided to line it with silk. This makes the coat so yummy to slip into. The pattern is easy to fit and sew. It doesn’t have darts or a complicated collar, and the shape is created by long tucks in the front and back bodice.

The pattern is out of print now…which is a shame if you ask me. This pattern has three easy collar choices and it’s a dramatic style so why not keep it around forever? I’m not sure how they decide when a pattern goes out of print, but some of the decisions completely baffle me. In this case, I’m not sure the envelope illustration did it justice, so maybe folks didn’t buy it? Who knows…

IMG_5484 2


Okay, so the style isn’t a classic, but it is fun, don’t you think? Maybe the shaped hem and interesting collar make this coat qualify as a…. statement piece?

Happy sewing and thanks for stopping by!

‘Tis the Season for Flannel

IMG_5243

Hi All! I’ve been traveling on the East Coast this week, where the below freezing temperatures have encouraged me to think about the benefits of a wardrobe dominated by flannel.  It’s certainly not a bad thing as there’s nothing more comfortable to wear! This plaid flannel has been hiding in my stash for a couple of years. I found it when I was putting away my lightweight warm weather fabrics in favor of heavier fall and winter options. I had exactly a yard and a half and it was only 45″ wide. What to do….

IMG_5224

Even though it’s flannel, the turquoise plaid made me think of a top with feminine details like bell sleeves so I went to my pattern stash to find a tried and true pattern, McCall’s 7542 (two other versions made here ). It has a number of sleeve options, none of them quite right for a cozy fall/winter top.


So, I went for View D, but decided I needed long sleeves. To do that, I lengthened the sleeve by 4″ before attaching the bell. To make the bell a bit more dramatic, I increased the width to ten inches.

IMG_5262

I do love this McCall’s pattern, but have never been wild about the boxy shape with my waistless figure. So, I cut the longer length option on the bodice, then widened it by four inches at the waist. That allowed me some room to insert two six-inch long pinch pleats on either side of the waist. I like this look because it pulls that boxy bodice in a bit, giving the illusion of a waist. To further accentuate it, I inserted a tie at the side seam right at the waist. I’m such a fan of adding in ties at the side seam…they never get lost!

IMG_5267

This was a fun, easy sew, because there isn’t a zipper or buttons. The simple neck opening is fastened with a hook and eye.

IMG_5257 2

I love my new flannel top, and know it will just get softer and cozier as I wash and wear it. Flannel is such a great fabric and it’s nice to find another other way to have it in my wardrobe besides the classic button down shirt. I have a few more pieces of plaid flannel in my stash and I’d love some ideas of what to do with them.What are you sewing with flannel these days?

Happy sewing and thanks for stopping by!

DIY: Philip Lim Inspired Top


img_2016
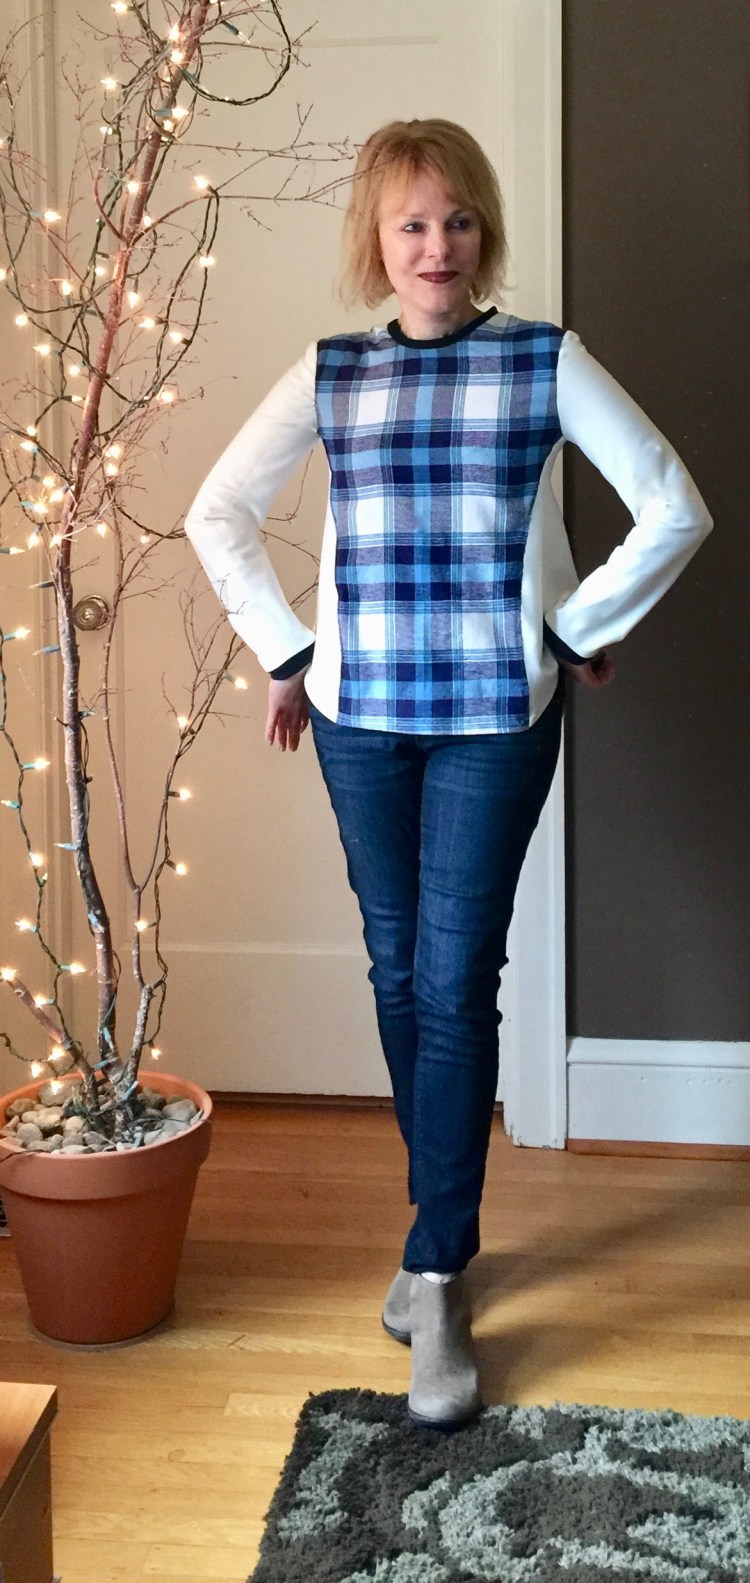
Hi all! The inspiration for this stash-busting top was a Philip Lim creation I saw at the San Francisco Saks a couple of weeks ago. It’s so fun to wander around in that amazing store, a real treat for me since we don’t have a Saks here anymore (wah!). But when I saw this top it was instant ‘love’. The bold plaid, the color blocked side panels, the contrast trim and stitching, I wanted it all. But alas, the price tag….

0400092850625_247x329

So, I set about making my own version. The good news? I used left over remnants from my recent Day Dress, and another plaid from a top I made years ago. So no new money was spent in the making of this top.

img_2040The pattern I used for this make is a tried and true: Vogue 9054.

It’s out-of-print but still available on their website and on Etsy. The design detail that makes this pattern the perfect choice for my Philip Lim top is that it has a front panel. So, that’s where I placed my cotton plaid. I used a contrasting off white knit for the side panels. Even though this pattern is designed for knits, my inspiration top combined knits and wovens, so I went out on a limb and did the same thing. I think the loose design of this top made that combination less risky than it otherwise would have been. The fit really didn’t change. I also added a contrast band to the collar and cuffs.

img_2020A detail I love on the inspiration top was the stitching on the front and back panel seams. To get that look, I top stitched those seams with a decorative stitch. I wanted to use the flat lock stitch on my serger, but alas, it just wouldn’t behave. My substitute stitch isn’t quite as stunning, but I still like it.

img_2070

I especially like the way Vogue designed the hemline of this top. There’s a bit of a high-low thing going on there that’s fun.

img_2002Well, I think my top will work as a reasonable substitute for the Philip Lim top, and wearing my DIY  version will save me from spending hundreds of dollars I don’t have. I rarely think that sewing saves money, but when it comes to designer fashions, it has a very strong edge. Thanks to Philip for the inspiration! The colors of this top make it a seasonal transition item, I think, and I feel almost Springy as we persevere through another ice storm with freezing rain. Ugh!

I’m glad I used some fabric from my stash here, because my goal this year is to reduce the size of  my stash (yes, I used bold font so I won’t forget, LOL). Lately, I’ve been feeling like I have to ‘sew to my stash’, if you know what I mean. I often buy fabric with a project in mind, but by the time I get to it, my enthusiasm for it has waned or the inspiration is gone. That means my stash is huge, and it means my sewing is often motivated by the guilt that comes with excess. It overwhelms and confuses my creative urges (yes, I’m a junkie). So, my goal is to sew some of it ASAP and give some to friends or charity so that it doesn’t weigh me down. What do you think, fellow fabric junkies? Will this strategy work? 

Happy sewing and thanks for stopping by!