Fall Sewing: Carolyn Pajamas, the 1960’s coat, and the Stacker Jacket

lindas collage copyHi All – With temperatures dropping, I’ve been inspired to sew ‘cozy’ clothes this Fall.  During November, I made a wool coat, a corduroy jacket and a pair of pajamas, and all are in heavy use. The truth is, my wardrobe needs have shifted during the pandemic. My daily uniform is a pair of jeans and a top, perfect for my usual outing, a walk in my neighborhood. Since there aren’t any social events to dress up for, I’ve enjoyed having a new coat or jacket to wear on my walks. Honestly, can you ever have too many?

The Sew Over It 1960’s Coat.

This coat pattern is a real winner from Sew Over It. The style is so classic.

IMG_4898

As a pattern insider, I received a free pattern before the general release and I was so excited to make it! From the photos, I expected the coat to be hard to sew, but it really wasn’t.

I cut my usual size based on my measurements and did a toile from a old sheet just to be sure. The bodice has some tapering, but the fit is relatively loose so I found fitting it to be easy.

IMG_4913 I splurged on fabric, a red boiled wool from the Mill End Store, here in Portland. I lined with red silk. I’m so glad I did because this coat is in heavy rotation in my wardrobe and it’s so lovely to slip your arms into silk. If you can sew a collar, set in sleeves and insert a lining, you will be good to go on this pattern. My only tip is not to use too heavy a wool as the lapels and collar might be hard to turn.

Stacker Jacket.

IMG_5601

The Stacker Jacket is from one of my favorite pattern companies, Papercut patterns. Not only is their packaging superb, their designs are so fresh. This jacket is no exception. It’s a ‘utility’  jacket, with a yoke for some interest, and great pockets. Honestly, I just can’t leave the house in anything without pockets!

IMG_5450

I used a lovely rust cordoroy for this jacket and plaid flannel for the liningm both from my stash. It’s such a cozy combination.  The buttons are vintage, found at an estate sale here in town.

IMG_5441.jpeg

Altough this jacket is lined, it was a easy sew. The fit is loose so there isn’t anything tricky there. You can easily complete this project in a weekend!

Carolyn Pajamas

IMG_5164

My Minerva Make for Minerva Crafts.com this fall is a pair of Carolyn Pajamas, from Closet Core Patterns. Honestly, these pajamas are such a mood brightener!  I spend so much time in pajamas now, as I allow myself the luxury of lounging a bit more during the pandemic. This lovely Lady McElroy cotton lawn was given to me by Minerva Crafts, and you can find my post about this pattern on their blog (here)This pattern is so fun, and I will make it again and again.

IMG_5219Even though social events are discouraged in Oregon right now, I hope to sew something festive for the holidays in December. After all, even a Zoom cocktail party is worthy of a bit of dress up, don’t you think?

Happy sewing, stay healthy and thanks for stopping by.

Summer Making Journal 2: a Patchwork top, Inari hacks and Free Range Slacks

IMG_1094Hi all! July was a busy month in the sewing room. Recently, I cleaned my closet and donated several ragged tops (made so long ago!). I’ve been on a mission to replace them, while honoring a pledge I made to myself to use up my remnants. That pledge led me here…to my first pieced top.

IMG_1116I have never been able to throw away even the smallest scrap of linen. It’s too wonderful to toss! So, when the #JoinupJuly challenge started on Instagram, I was challenged to join up some of my linen scraps into a top.

The process of making a patchwork top isn’t difficult at all. Basically, with a quarter inch seam, you piece blocks and bits of fabric together, varying the colors. Then, when your pieced creation is large enough, you lay your pattern pieces on it and cut! My top is made using the Inari pattern from Named clothing(also made here). The lines are simple so it showcases piece work nicely.  It was so fun to figure out how to combine the linens into a pleasing pattern.

IMG_1185Here, I’m wearing my new pieced Inari with my first ever Free Range Slacks,a lovely pattern from Sew House Seven. I’ve been wanting to make these pants for ages. I used linen from my stash for this version.  I love the boxy shape of the pants, the cool seams and the deep pockets. But I found the fit to be more generous than I expected. Because the pants are high waisted and I’m short waisted, the fit of the rise was challenging. I’m pleased with the result, but my advice is to remember the loose fit when you’re choosing the size to cut. A toile would be a good idea too!

IMG_1153As you can see, the fit isn’t perfect yet. There are creases in the crouch. I’ll adjust the rise a bit more next time.

IMG_1339Here’s another Inari, this one with sleeves. I made this from rayon scraps left over from my Sew Over It Wrap skirt (see it here).I do love this rayon! It’s from art Gallery and it is so sumptious to wear. It flows so nicely too! This pattern, the Inari, is a keeper too, simple but stylish and so easy to modify to make it your own! The shorts I’m wearing are Simplicity 8841. This is a easy pattern with great fit! It has a elastic waist so you can make it quickly.IMG_1238I’m wearing my Inari here with the paper bag Burda shorts I made last summer (Here)…Love these! The linen just gets better with time. I wear them constantly!

My last Inari was also made from linen scraps, left overs from this summer dress.IMG_1274Again I used the Inari. Because I had oddly shaped pieces of fabric, I had only enough for a cropped version of the front and back bodice. So, I added a short peplum also pieced from scraps. Luckily the gathering of the peplum hides the many seams:). The sleeve bands are cut from a contrast linen.

That’s it for me for now. I’m in the process of cleaning and reorganizing my sewing room using Ikea modular shelves. And even though I recently reorganized my stash, I’m revisiting the scheme. Isn’t that the way it is with this hobby? It seems like there’s always a better way to organize your fabric, notions and patterns.

Stay safe and healthy. Happy sewing! Thanks for stopping by.


July Making Journal: A Wiksten Haori, A Libby Shirt, a Peplum Top

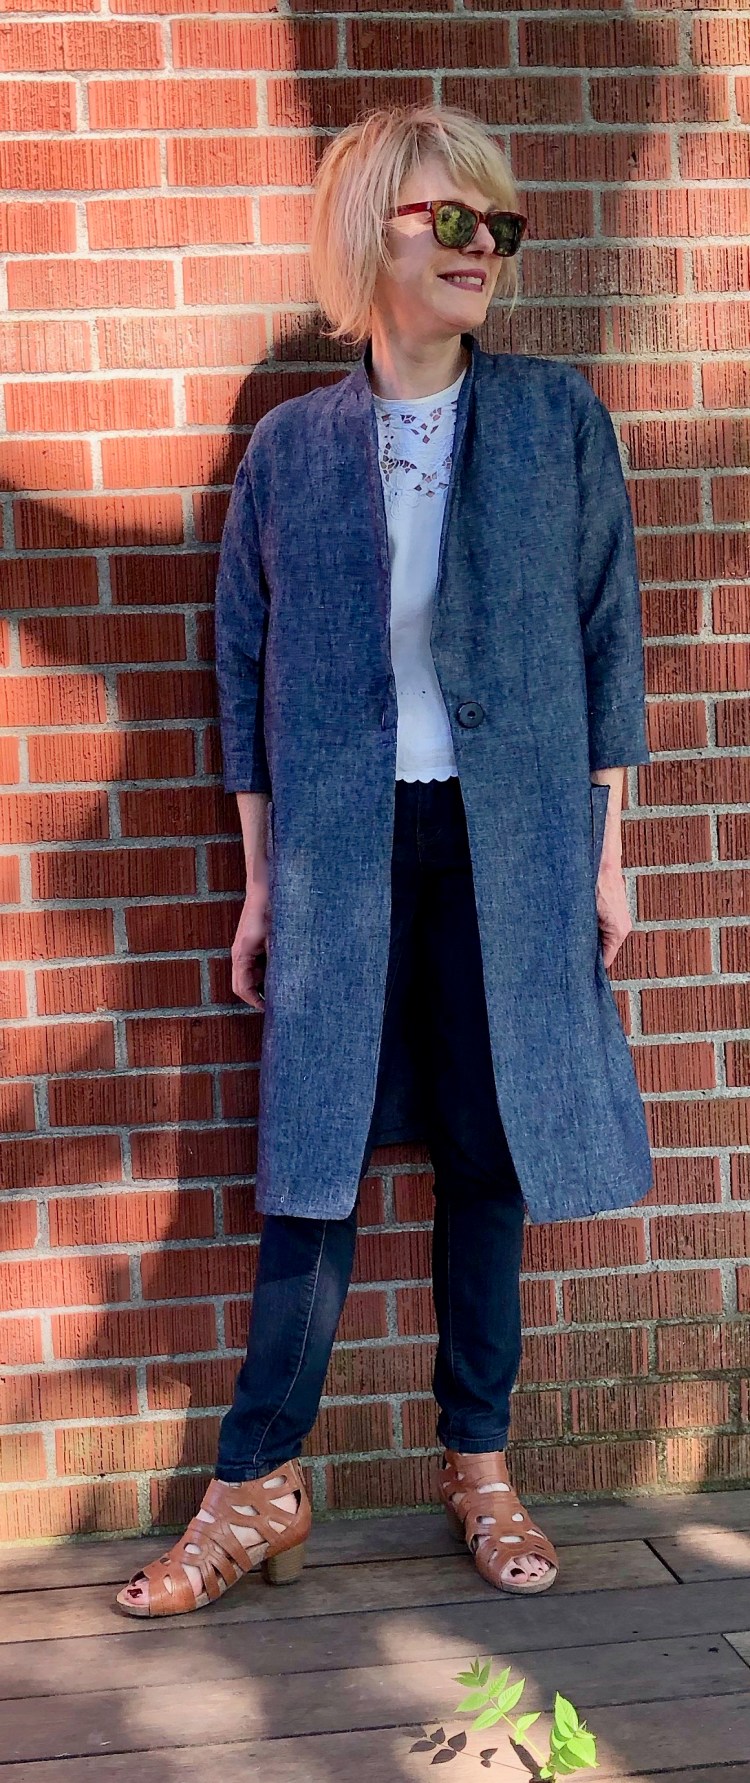
Although we’ve all felt the strain of the unknown over the past months, for me, there have been some positive things about the quarantine. I’ve truly appreciated the gift of time. It’s been lovely to slow down and savor making things. As Oregon gradually reopens, I hope I can resist the urge to rush!

Denim Wiksten Haori

When considering what to do with several old pairs of jeans, it’s probably no surprise that I reached for my well-used Wiksten Haori pattern. I do  love creating from scraps.

IMG_0870

 My last two versions are soft now and well worn (hereand here).

For this Haori, I mixed and matched the legs of several pairs of jeans, all from different colors of denim.

IMG_0894

To get enough denim for the front and back bodice, I cut pieces from the legs. I also ripped off pockets and added them to the front and inside of the jacket.

To tie it all together, I used white topstitching thread and double stitched where ever possible. For lining, scraps of soft chambray came in handy.  I hardly noticed the time as I ripped and cut and sewed. It’s a lovely weight, perfect for our cooler summer evenings. This will be one of my entries for #joinupjuly on instagram.

IMG_0819

Libby Shirt

This month, I enjoyed revisiting one of the older Sew Over It patterns, the Libby shirt. This easy button-up top is cropped and loose fitting for a modern look. I made both versions from rayon. Even though it’s easy to sew, the pattern has lovely details. I love the vintage collar and cute cuffs.  Rayon is a great fabric for this one. Since the fit of this top is loose, I cut the smallest size.

IMG_0734

IMG_0917

McCalls 7052

My last make is a tried and true top that I’ve made so, so many times. It’s a easy-fitting top with a swing-y peplum, McCalls 7052 (also made here). I love this top because you can throw it on and feel put together, even though the style is relaxed and easy. This is project you can finish in an afternoon – -instant gratification! I’ve used different fabrics for other versions, but love the feel of it in rayon.

IMG_0844

The journal/diary format I’m using here on the blog today is new for me.  It seems to make sense when I’m reviewing makes I’ve sewn before. What do you think?

I hope you’re enjoying your sewing projects as much as I am these days.  Happy sewing and thanks for stopping by!

My First Tamarack Jacket

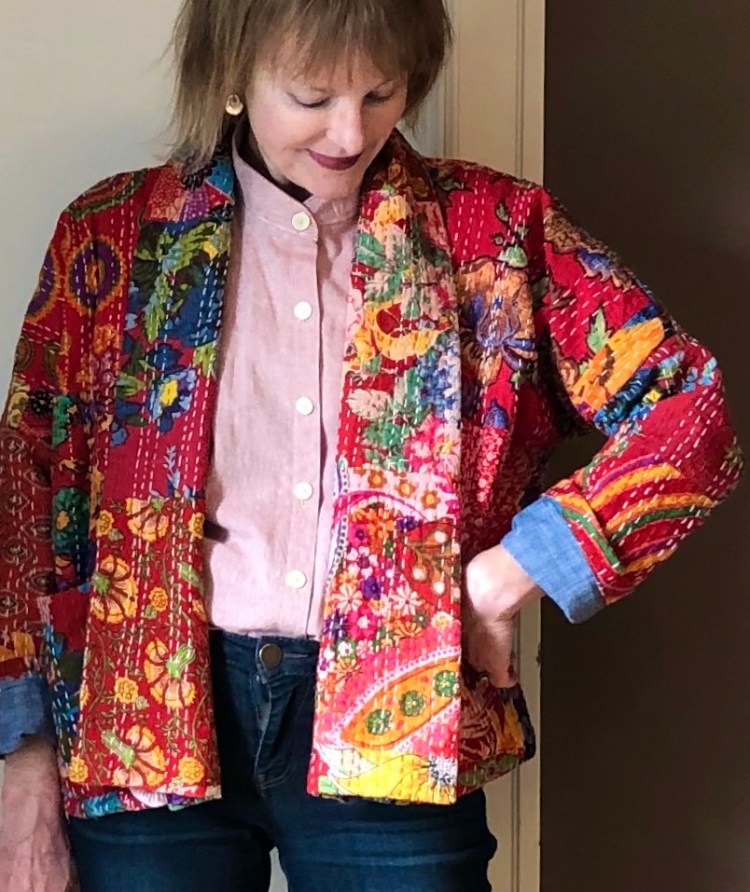
This jacket has been on my sewing to-do list for such a long time. I kept shuffling it to the bottom of the queue as I waited for a block of time to tackle it. Well, as you all know, I’ve got that time now!

The tamarack is quilted, making it perfect for those cooler evenings in spring and fall. For my first Tamarack (yes there will be others), I decided to use Merchant and Mills pre-quilted cotton. It’s such a lovely weight and texture, well worth the price. With this fabric, it isn’t really necessary to line the jacket, but I did anyway. I used an Nano Iro linen ( Bolt Fabric.) that’s so soft. I chose a contrasting lining so that it would would really show when the sleeves are rolled up. I finished the edges with self-made bias binding in linen (Josephine’s fabric). 

Even though I didn’t have to, I wanted the lining to be quilted, so I followed the lines already provided in my outer fabric. This was a fun, stress free way to go, and I highly recommend it!  I love how the extra quilting adds more texture to the bodice of the jacket. 

In order to get the fit I wanted, I shortened the jacket by 1 1/2 inches (I’m 5′ 4”). I love this modified length. The fit of the bodice seemed a little boxy for me so I tapered it a bit at the waist. 

The biggest construction challenge was the welt pockets. The quilted fabric is thick, making it tricky to get everything to lie flat. I decided to practice making a pocket with some thick fabric I had leftover from another project. I’m really glad I did. I felt pretty secure when I had to cut into my lovely quilted fabric. I do like the look of the welt pockets, but will likely use patch pockets next time so that the jacket will be reversible. If I had to do it over, I’d make this one reversible too, as I love the lining almost as much as the outside fabric! 

The other challenge with my thick quilt sandwich was sewing the binding around the edges. I used fabric clips I bought at Joann’s to hold the layers together as I sewed. 

Overall, this was a fun, satisfying project, and I highly recommend it. The construction of the jacket isn’t as challenging as it appears. There isn’t a collar to mess with for one thing. Also, the slow process of quilting the jacket was lovely and calming. In fact, it made me more curious about quilting in general. I may try to do a bit of improvisational quilting with my fabric scraps. What better time to play with new sewing experiences than now!

I hope you all are well and happy. Thanks for stopping by! 

A Wiksten Haori in Kantha Cloth

I don’t know about you, but I’m craving a bit of ‘normal’ right now. So let’s just dive into the details of this new make, a Wiksten Haori jacket. 

If you haven’t tried this pattern, you’re missing out on some fun! It’s a chance to use your favorite fabrics in a way that makes them so wearable. This is my third Haori (others posted here and here), and I’m sure there will be more. 

This is an unstructured, loose-fitting jacket with three length variations, short, medium and long. I prefer the short, cropped version on me as I really like the proportions, but I’m in love with some of the longer versions I’ve seen in wool, so I might try one of those too. 

This jacket looks more complicated than it is. If you can sew a straight seam, you can make this jacket. Yes, it is lined but that’s nothing to worry about because creating the lining is simple. You just sew another jacket from your lining material and attach the two at the bottom seam.  The only modification I made to the pattern was to leave the interfacing out of the collar band as my fabric was stiff enough.

The beauty of the Haori is that it really allows the fabric to shine. My fabric is a Kantha cloth. I found a piece at Modern Domestic then found a bit more  at Cool Cottons, here in Portland. It’s amazing fabric with beautiful colors and the layers of cloth are stitched together with a long quilting stitch. It makes me happy just looking at it!  I’m wearing it with the linen shirt I made from a japanese pattern book (posted here.) I think they work well together.

Sewing is such a stress reliever for me. In these challenging times, I’m grateful that I have a pastime that comforts me, and a community to share it with. Hang in there all, and thanks for stopping by! 

Vogue 9311: Playing Dress-up

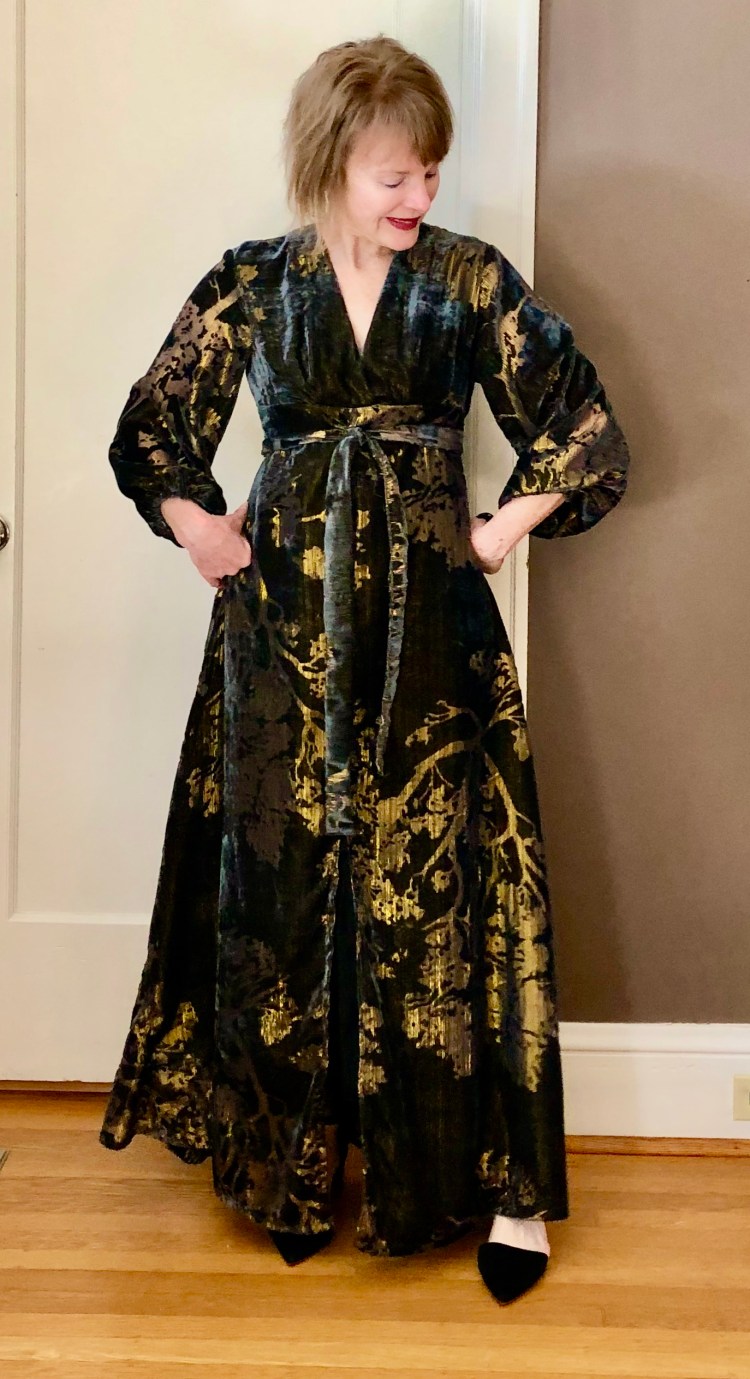
My every-day wardrobe consists of easy-to-wear layers. But once I year, I have the opportunity to really dress-up. The choir that I sing with, Oregon Repertory Singers has an annual fundraiser where formal attire is required. I always look forward to the opportunity to sew and wear something special.

In past years, I’ve sewn cocktail length dresses, but this year, I wanted something different, so I decided to go ‘long’. Honestly, in all my years of sewing, I’ve only sewn a couple of long dresses. What?? I know!! If it isn’t time now, when will it be?  

For the pattern, I chose Vogue 9311, a long dress with optional sleeves and ruffle. I love the v-neck line and think that it gives the dress a look of elegance. I made the long sleeve version, but shortened them to 3/4 length. Instead of cuffs, I used elastic to gather the base of the sleeves. I wanted to be able to push them up and away from my dinner:). 

The biggest challenge with this make was the fabric. I love the look of this burnout velvet, but it really was tough to work with. The shimmer comes from shiny gold fibres that are woven into the spaces between the sections of velvet ‘burnout’ and they tended to snag. Also, the fabric frayed like crazy so I finished all the edges with my serger before sewing the seams. I purchased microtex needles which really worked nicely! 

Even though the pattern doesn’t call for a lining, I chose to line the bodice and skirt with solid black silk. This really helped give the skirt more body and structure. The lining was easy to create and gave the entire dress a nice finished feel. It’s so lovely to wear! The ties are meant to be worn in the back, but they were so long, I was able to play around with the look, and decided I liked them better in front. 

I’m pretty pleased with my new frock and absolutely love this Vogue pattern. It’s been in my stash for awhile, and I’m so glad I finally decided to make it. I can imagine a version for Spring, maybe in linen. I really enjoyed wearing this dress last weekend. It felt so elegant. The good news is that I’ll have another chance to wear it when we sing with the Oregon Symphony in April.

This project really marks the end of winter sewing for me. I’m really ready to sew up some of my lovely woven fabrics for Spring and Summer. How about you?

Happy sewing and thanks for stopping by!

A Kalle Shirtdress Becomes a Coat

This week, I marked the beginning of Fall by completing my first cold-weather sewing project. My new denim walking coat was just the kind of project I needed to cope with ‘post vacation blues’. It’s a topstitching extravaganza, just the therapy I needed. Some sewists find topstitching to be stressful, but for me, the focus required is actually a relief that my brain craves when I’m down. 

My inspiration for this coat was a denim coat, designed by Madewell. I saw Cobie Smulders wear it on the already cancelled show, “Friends from College.” It’s a loose-fitting coat, made of mid-weight denim with a hidden placket and a tie belt. 

Although Colbie wore it as a dress on the show, I saw it as a long coat for Fall. Many of my knit dresses (here and here) are below my knees, so this coat will accomodate that length easily.

Pattern: To make the coat, I modified a tried and true pattern, the Kalle Shirt Dress. This pattern has so many options, I recommend it highly.

I chose this pattern because the fit is great, but loose and classic. To make it coat length, I added six inches to the bodice. To create the back vent, I eliminated the back pleat and added a seam instead, open at the bottom. Otherwise, I left the pattern pretty much as is.

 The orginal pattern has short sleeves, but I purchased the long sleeve extension from the Closet Case website. Instead of the classic french cuffs suggested by them, I eliminated the closure on the cuffs, and just folded them back.

Fabric: I used a medium weight denim from my stash for the with a darker denim for the collar, cuffs and pockets. The Kalle has one pocket, but I drafted three more. I used double topstitching on the pockets to make them pop.

I always love using a tried and true pattern in an unexpected way. As a coat, the Kalle does not disappoint! With this make, I’m officially accepting that Fall is here. It’s time to pull out the knits and wools from my stash and sew cozy

Happy sewing and thanks for stopping by!

Italy: My Favorite Linen Travel Dress

Hi All! I had a wonderful trip to Italy and am now easing back into real life. I’m still battling the effects of the 9 hour time difference, but last night I slept through the night so things are looking up!

Although the weather here in Portland is a bit on the cool side, I wanted to share the dress I wore the most in Italy – – a linen dress that I finished the day we left, LOL!!! As usual, I decided at the last minute to add a dress to my travel wardrobe.

These photos were taken in the Villa Cimbrone Garden in Ravello Italy, a breath taking town perched on a cliff high above the Amalfi coast.

This linen dress was my go-to garment on the trip because the weather was warmer than expected. I thought I’d wear this dress with a tee shirt under it to protect my upper arms from the sun, but it was hot so the tee shirt stayed in the suitcase. I chose to stand in the shade often and managed to avoid a sunburn.

Dress Construction – To sew this dress, I modified my favorite loose fitting top pattern, the Grainline Hadley. The cut of this top is so flattering on everyone I think, with two neck options to choose from.

For the dress bodice, I used the sleeveless Hadley without the back pleat and lengthened the Hadley bodice by 6 inches. This became the A-line shaped bodice of the dress, complete with high – low hem.

The back button placket is a non-functional add on, just for looks. To make it, I sewed together two long strips of fabric then added buttons. After the placket was in place, I focussed on drafting the skirt. I cut two huge rectangles, that were 1 and a half times the bottom width of the Hadley. These I sewed together, then gathered and attached them to the bottom of the bodice. That’s all there was to it.

Fabric – Linen was the perfect fabric for Italy. It made me comfortable no matter what the weather. Personally, I could care less about the wrinkles. For this dress, I used a solid blue linen from my stash, purchased last season at the Mill End Store. The striped linen is from Joann’s.

This dress is so fun to wear!

Swinging wasn’t in my vacation plans, but when you’re on the Amalfi coast, why not? I enjoyed wearing linen so much on my trip, I’m determined to find ways to sew with it year round! Any thoughts on this idea?

Sewing plans – As the travel fog lifts and I put away my summer clothes, I know I’ll be inspired to sew a few fall things. I hope there will be a new trench coat, maybe a short wool coat too so watch for those posts.

Happy sewing and thanks for stopping by!

#sewjapaneseinjuly meets #tableclothrefashion

July was a big month for sewing challenges. There were so many on Instagram, I coudn’t keep track of them all. For me, two challenges stood out above the rest: #sewjapaneseinjuly and #scarfrefashion, which also includes tablecloths. Yes, my last post was about a tablecloth refashion, but as you all know, one thing always leads to another for me, and that project was so fun. I guess it isn’t too surprising that I had to do another revashion before July was done.

But first, my #japeneseinjuly make…

IMG_2306 This is the Summer Jacket from the Nano Iro sewing studio book.


Nano Iro is a watercolor artist who creates beautiful textiles. Her designs are transferred to cotton and linen, which are perfect for clothing. Not only does she create beautiful textiles but she is an author. On a recent shopping trip to Bolt fabric here in Portland, I discovered that her recent book has been translated to English! Of course, I couldn’t resist….this is the summer jacket from that book.

images

To me, Japanese sewing books are great because the styles are simpler and cleaner which allows the fabric to take center stage. That’s why, for this jacket, I reached deep into my stash for one of my favorite pieces of linen.


IMG_2318My linen has the tiniest bit of sheen which makes the denim color really pop.

IMG_2241I love the classic lines and the shawl collar of this summer jacket. The construction is basic but clever…the shawl collar is supported by a back neck facing that keeps the neck from rolling.  The pockets are patched onto the jacket, which gives it a utility jacket feel, so on-trend! It’s unlined so construction is a breeze. If you can set in a sleeve and attach a basic collar, you’re good to go! Use a medium weight fabric for this project with a bit of drape.  IMG_2305This style works with everything in my closet – – I suspect this jacket will be in my suitcase when I go to Italy this September!

On to the  tablecloth refashion…

IMG_2284This is the Basic Blouse, cut from a circular vintage table cloth purchased at an estate sale. I wish you could see from these photos that the cut detailing is embroidered with blue thread – – Love!!


Construction of this top was simple..The sleeves are cut into the bodice so there’s nothing much to it. The trick was in the layout….I had to place the cut detailing appropriately. I used the scalloped edge of the tablecloth as the hem and the center of the tablecloth as the yoke of the bodice. The sleeves are highlighted with more cut detailing, and after some tricky maneuvering I managed to get the sleeves to mirror each other. IMG_2287I added a back slit at the neckline and finished it with bias binding.

IMG_2246 2

I love my new outfit…and to think both pieces were inspired by sewing challenges! What challenges are you inspired by?

IMG_2190 Happy sewing and thanks for stopping by!


Linen Tablecoth Top for #scarfrefashion and #so50vintage

IMG_2015

I have a love/hate relationship with Instagram, I must admit. I love seeing everyone’s makes but I find the limitations imposed by the IG algorithm to be so frustrating. Sometimes, my feed is so edited by Instagram, I don’t see the content I choose. Nevertheless, as you all know, I do love a good sewing challenge and Instagram is full of them! So, I will stop complaining and get on with it….:)

IMG_2046

This linen top (a bit wrinkled having just been worn) was inspired by two sewing challenges on Instagram: the #scarfrefashion challenge (includes tablecloths too) sponsored by @sewstoney and @sewdalaridada, and the #so50vintagechallenge. I happened upon a vintage linen tablecoth with beautiful cut work and mitred corners at a estate sale. I’ve made tops from tablecloths before (here and here) so I knew this one was perfect for a top. I couldn’t resist giving the challenge a whirl.

With a little over a yard of fabric to work with, my style options were a bit limited. After perusing my extensive (!!) pattern stash, I came upon Simplicity 8090, a pattern from 2016 that has all sorts of possibilities.

I chose view C because it doesn’t take alot of fabric and it’s cropped, which allowed me to use the finished edges of the tablecloth as the hem for the top.

The pattern was so easy to sew. The sleeves went in perfectly. The front placket was really easy because I used the finished edge of the tablecloth for that. I only made one modification – I added a collar stand.

I do love the french darts on this top. They look so crisp in linen.

IMG_2008

This top has a seam down the back so I positioned the bodice pieces so that the tablecloth’s cut detailing would be on either side of the seam. I cut the sleeves to use the tablecloth detailing and hem too.

IMG_2045

The inside of the shirt looks fabulous because the hem of the tablecloth finished all the seams for me, LOL!!

All in all, it was a fun project, and I’m pleased with how it turned out. The biggest challenge was the laying out the pattern properly, of course, but the extra time involved was worth it.  I do love the boxy cut of this top and know I’ll use this pattern again. Vintage linen is so lovely to work with, I’ll never be able to resist an old tablecoth again!

IMG_1977

Are you taking on any sewing challenges this summer? Let me know so I don’t miss it! I love seeing everyone’s makes….

Happy sewing and thanks for stopping by!