New Pattern Release: Sew Over It Bonnie Top/Dress

IMG_1008 3Hi All – – When I saw the sketches of the new Bonnie Top from Sew over It London I was thrilled. If you’re like me, you have a closet full of high waisted pants/skirts, but no tops to go with. I knew that this lovely ‘cropped’ top would fill a hole in my wardrobe. Not only that, but the Bonnie top has pleats! IMG_1005 2The Bonnie has a 1940s vibe with its defined waist, button up front and vertical pleats. It has a cute flat collar and short sleeves with little turn-up cuffs, a design detail that is subtle but effective. I like that the button placket is concealed – – it makes it a bit more polisihed – – a top that can go to a dress up event. There’s a dress version as well that has a knee length gathered skirt and a comfortable elastic waist.  I do love the pleats, but if you want a faster make, there’s a version of the Bonnie without pleats too. I know there will be a version of that view in my future.

I used a lightweight rayon for my version of the Bonnie, and it worked perfectly. Sew Over It recommends rayon/viscose, lightweight crepes, georgette, chiffon or very fine cotton voiles, in other words anything soft and drapey. I’d warn against anything heavier like a stiff cotton. The pleats wouldn’t have a chance to shine. If you are making the pleated version, the wider the fabric the better, as you need lots of room to lay out the front bodice as the pleats make it fairly wide.

IMG_1003.jpeg

Fit and sizing – – I made my size according to my measurements and it fit nicely, without adjustment. I spent a bit of time fussing about the fit of the waistband, but I shouldn’t have bothered. The buttons don’t extend there so the waistband falls open ever so slightly…the fit isn’t tricky at all.

Construction– -When it comes to the pleats, I found the trick was to carefully mark them on my fabric. From there, construction was simple…. All I had to do is fold, press and sew!  Thankfully, the Bonnie  has very clear markings. I transferred them using a chaco marker. Once I’d accomplished that, pleat constructions was easy and fast. The concealed front placket was pretty simple too  once I had the markings transferred.

IMG_0998.jpegI love my new Bonnie top and plan to wear it with my high waisted skirts (the skirt I’m wearing is blogged here), pants, perhaps even with jeans. I can imagine an even dressier version out of silk or chiffon, and the dress version is on my ‘must-make’ list. Really, the Bonnie is one of my favorite Sew Over It patterns! Thanks to the Sew Over It London team for giving me the opportunity to make this lovely pattern!

Happy sewing and thanks for stopping by!

As a Sew Over It Pattern Insider, I received a download of this pattern for free, but the opinions expressed here are my own. 

The Last Sewing Blogger to Make the Burnside Bibs

IMG_0889.jpegI’m very late to the party here.

I bought the Burnside Bibs pattern by Sew House Seven when it first came out. I had big plans to make them ASAP.  Well, that was three years ago and, YIKES, I’m just now getting around to trying them. I hesitated to be honest. I really loved the style, but had so many issues floating around in my head. As a member of the #SewOver50 community, was I too old for the style? Would they look okay on my short waisted figure? Would I be comfortable wearing them?

IMG_0887 2.jpegWell, all of the angsty thoughts and questions completely disappeared when I began the construction process. Honestly, it was so fun! This project ticked all the boxes for me – – topstitching galore, interesting construction details like belt loops, pockets, and a self faced bib. Then there was the fabric…I used a lovely blue linen from the Mill End store, that is absolute heaven. So, I threw caution to the wind and went for it.


Burnside_Bibs_front_cover_website_1024x1024@2x.jpgConstructing these bibs was a bit time consuming.  I cut them one evening and then sewed them the next day in a marathon session. I love pushing through a project like this…you can get completely absorbed in it! The instruction booklet from Sew House Seven was really wonderful – – lots of illustrations that made it fairly easy to understand.


IMG_0746 2.jpegChallenges – – well, the biggest one was figuring out what size to cut. I perused Pattern Review, several blogs and Instagram to see what my fellow sewists had to say about this topic. On their advice, I made view 1 which is the more fitted version with the invisible zipper on the side. I used my measurements to select a size and it turned out to fit well in the crouch and waist, but was a bit baggy in the hips so I tapered down a size there. This is a common adjustment for me in patterns, and I’m happy with the result.


The construction of these bibs is a bit out of the ordinary, so I didn’t/couldn’t binge watch TV while I made these, LOL. Small price to pay though. They are so fun to wear. I love how the tie ends criss cross in the back and slip through the belt loops. As you pull them to tie them, the waist area cinchs a bit more, which makes the fit really nice. I chose to tie them at the side but you can tie them at the front or back as you prefer.

IMG_0757.jpegI cropped them a bit more than the pattern suggested as I really want to be able to enjoy these in steamy Italy when I travel there later this summer. When I wear them, I’m really comfortable!!  I don’t think twice about the age appropriate issue anymore because, well, I love them and we all deserve to dress as we wish, don’t you think?

IMG_0765 3.jpegIf you’ve hesitated to make the Burnside Bibs as I did, my advice is…go for it. It’s such a pleasurable journey.

Happy sewing and thanks for stopping by!

The Saraste Shirt, my Me-Made-May Hero

IMG_6940

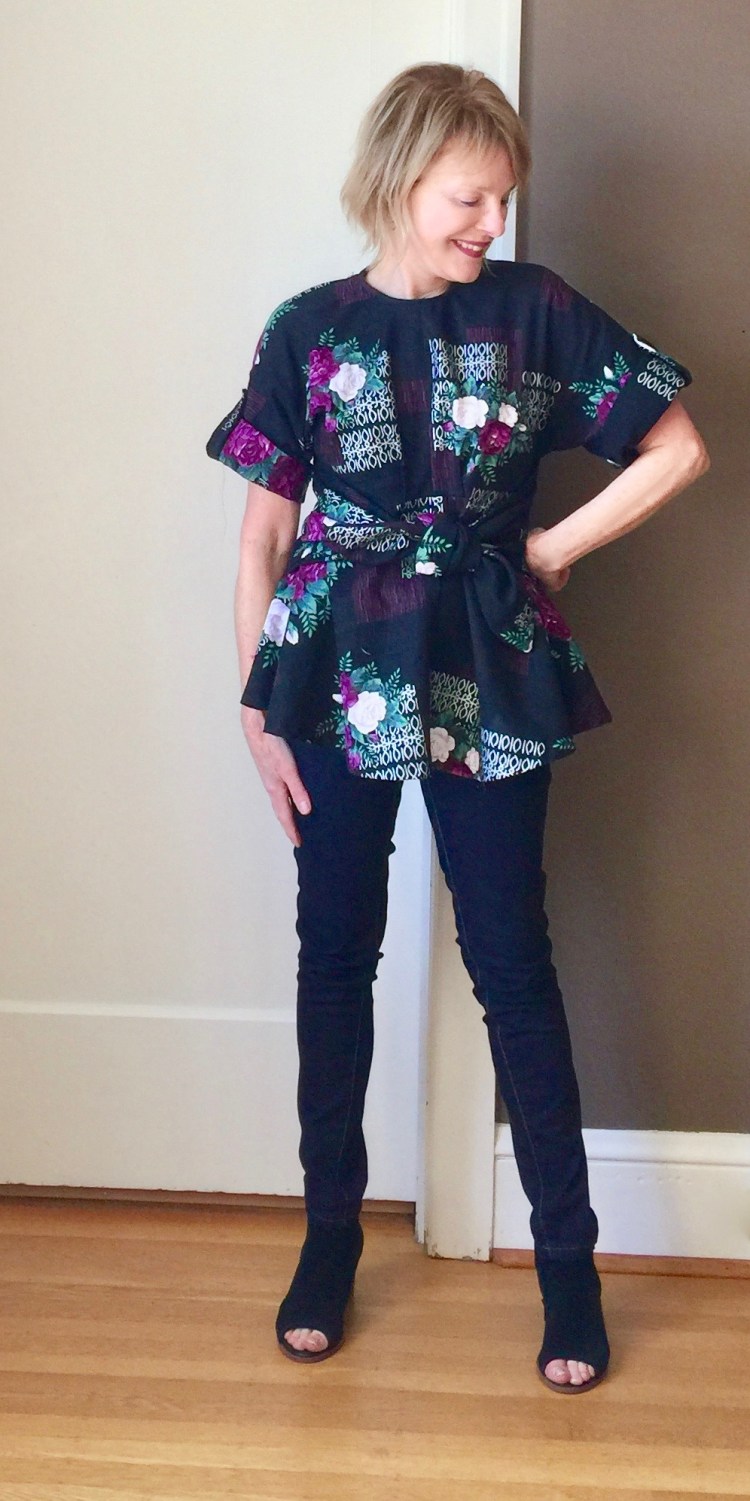
When I completed the Saraste shirt, I wasn’t totally ‘in-love’ with it. In fact, I immediately pushed it to the far right side of my closet, the place where the ‘never to be worn’s’ go. It’s a sad corner and it makes me feel a bit guilty. It’s all the me-mades that were fun to sew, yet, when all was said and done, I couldn’t imagine actually wearing it.

That was the sad story of this recent reject, but everything changed when Me-Made May rolled around. This year, my pledge was a bit different. Since I already wear me-mades every day, I pledged to wear the ones that I abandoned, and try to analyze why. This is one of those makes.

IMG_6970

It might be the fabric that put me off. It’s a floral print and, when I purchased it, I thought it was a random print. When I laid it out on my cutting table, I discovered that there’s a strong repeat….pattern matching would be involved! Ugh. That discovery made me a bit cranky as I wasn’t sure I’d purchased enough fabric to make this work, but I managed to pull it off, carrying the pattern through on the sleeves and the back.

IMG_6946

I do love the fit of this shirt! The Saraste shirt is a pattern from Named Clothing’s book,  ‘Breaking the Pattern’.

COVER

I’ve made several of the patterns in this book now (here), and they’ve all been fabulous. The Saraste shirt is one of my favorites with many elements I love: princess seams down the front, a back yoke, optional sleeves and a small collar that fits my short neck. The surprise detail is small cut- outs at the shoulder, which I love.

IMG_6950

They were a bit of a challenge though. My tip is to be sure to trace the pattern carefully, noting all of the markings accurately. I hadn’t done that and had to go back and add them in. Once I had that accomplished, it wasn’t too hard to make everything work. However, I’m a bit disappointed that the cut-outs don’t show that well in my print. I’m going to have to give this lovely pattern another try in a solid colored linen, so that those slits can shine!

My Me-made analysis – – I do love the print now, but at first glance, I wasn’t too excited about it in this shirt. However, I have worn it many times this month and have discovered that it goes with everything in my closet. The fit is perfect and the shirt is easy to wear. In fact, people compliment me when I wear it:)

Lesson learned…my first take on a make shouldn’t be my last.   IMG_6959

How are you doing with Me-Made May? Any new revelations?

Happy sewing and thanks for stopping by!

A Spring Jacket with Triangle Bound Buttonholes

IMG_6299
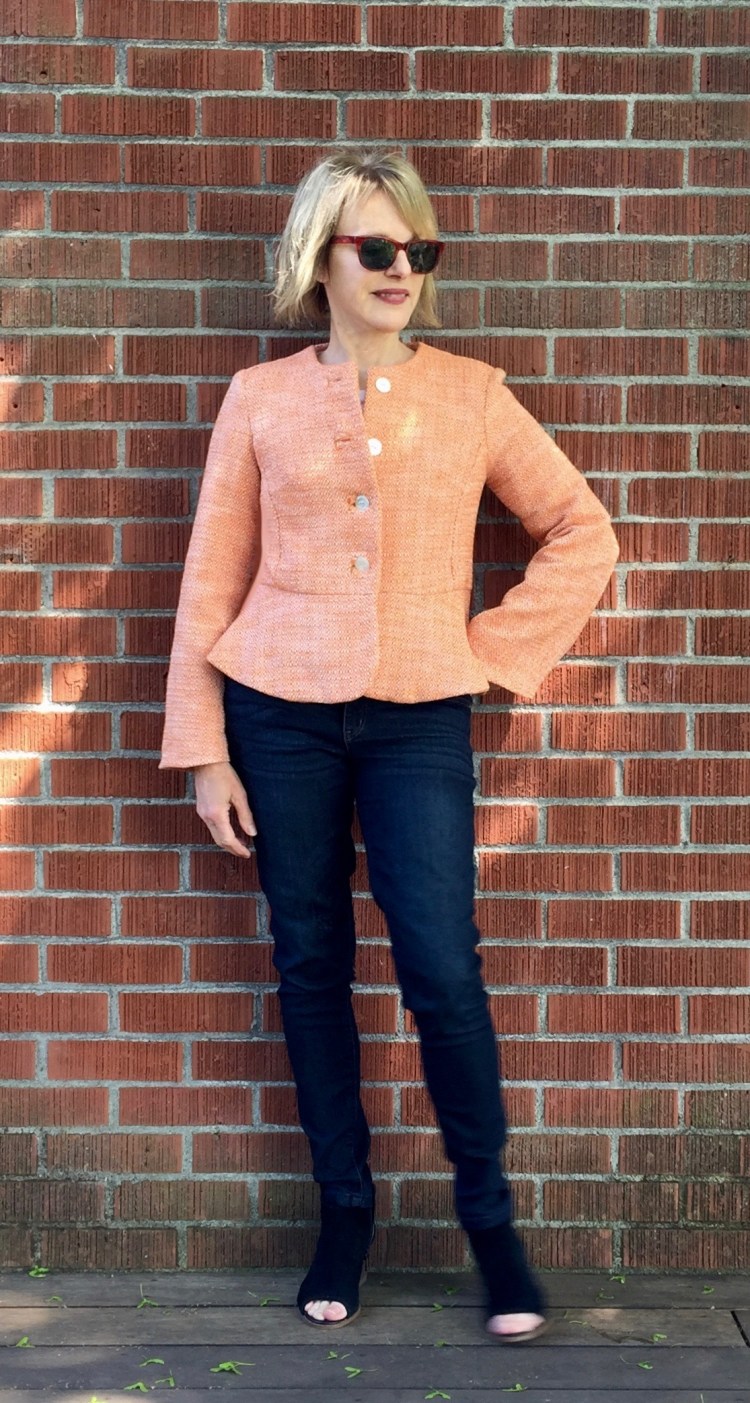
For years, my sewing bucket list has included “Jacket with Bound Buttonholes.” Well, this jacket has triangle shaped bound buttonholes and I’m saying, close enough! Yes, they were a bit fussy to sew, but I’m glad I took the leap to do them on this project. I will admit that the first two were ‘nail biters’ for sure, made possible only by the able hand-holding of my jacket class instructor, the Marvelous Marla! I was so fortunate last week to attend a three-day jacket making class lead by her. She makes everything so easy. If you ever have a chance to attend one of her classes, I highly recommend them.

I’m always attracted to peplum style jackets and shirts (here and here), so when this Simplicity pattern was released last Spring, it was an immediate add to the ‘must-have’ list. The front of the jacket is simple, so I decided it was the perfect opportunity to try a new buttonhole. IMG_6228

Triangle shaped buttonholes are very much like bound buttonholes. Marla taught me the method that’s in the Palmer Plestch Couture handbook.  Also, there’s a good explanation on-line at the Seamworks website, as well as a few U-tube videos on the subject. cfc8da3ec10d207d781d2a9d04676495e052556dThe good news…Creating a triangle bound buttonhole isn’t that hard! The bad news…There is a bit of unavoidable risk when you have to actually cut into your fabric to create the hole:) I recommend that you try out the process using scraps of fabric to start. It is a bit tricky, but very worth it, if you ask me.

IMG_6351I love this fabric, a lovely cotton boucle’ from Bolt Fabric,  but it was not ideal for this project. The weave was so loose, it unraveled at a mere glance. However, I knew it would be perfect for this pattern so I was highly motivated to push through the challenge! I used my serger to finish the edges but had to be careful not to cut off any seam allowances as I did so. I also had to be careful not to stretch the fabric as I pressed the jacket seams. The front of the jacket is completely interfaced and I lined the jacket with a simple rayon lining.

IMG_6292


The fit of this pattern is a bit tricky as there is a side seam panel, rather than straight side seams.

simplicity-peplum-jacket-pattern-8604-front-back-view

That being said, the jacket fit great without alot of adjustments.  I chose my size based on my measurements and it was really close! I shortened the waist a bit (I’m short waisted) and made a slight shoulder adjustment, but that was it. I had planned to add a mandarin collar, but when I basted it in, I didn’t like the look so left it off.

IMG_6302

The construction of the jacket wasn’t hard at all. In fact, if you’re looking for an easy, first jacket pattern to try, this would be a good candidate. The pattern instructions are edited by Threads magazine so they include finishing tips that are quite helpful.

I love my new jacket, but to be honest. I’m not really sure about this color. Melon/orange is a new color for me, but I decided it’s high time I stretched my wings a bit. I’m wearing this jacket with jeans because I couldn’t figure out what other colors would work with it. Ideas?

IMG_6338

Next on my sewing ‘to do’ list is a trench and a new Sew Over It Pattern Insider project that I’m anxious to share. Stay tuned.

Happy sewing and thanks for stopping by!


#sewbibs: Seamwork Dani Pinafore

IMG_5472Believe it or not….this Dani Pinafore is my first make of a Seamwork pattern. What took me so long?

IMG_5553I’ve never really investigated Seamwork patterns because I assumed (wrongly)  that because Seamwork patterns were part of a online magazine/club, they were simple designs, really meant for beginners. I suppose that’s true in some instances, but certainly not in this pattern.

sw3093-dani-01-large-1d45fe69fcb7935303658eef9020e3c945df0ae16c0f1ec38a6c182a7fe42449 The design of this pinafore includes so many things I like – – interesting seam details, pockets, a deep v-neck. The pinafore is fully lined, complete with armhole and neck facings as well.

IMG_5439Fabric: I used a medium weight dark wash denim and topstitched with medium gray thread. For a bit of fun, I lined it in polka dot rayon.

IMG_5465

Construction Notes – – 

Size: I chose the size indicated by measurements, then did a quick muslin, and quickly reaized it was going to be a bit too big. So I sized down and think the fit is pretty good at this point. If you’re thinking about making this….you might want to do the same.

Modifications – – As designed, the skirt is pretty short. I lengthened the bodice by 1 and 1/2” . Even with that change, I was left with a very narrow hem. The neckline is lovely, but pretty low, so I raised it by an inch.

I eliminated the inseam pockets and added patch pockets. All seams are flat-felled and topstitched with a twin needle.The front bodice and front skirt darts are topstitched too.

Rather than cutting the front and back bodice on the fold, I added a flat-felled seam at the center front and back, and topstitched.

IMG_5458Denim and topstitching are two of my sewing ‘loves’ so this project ticks off all of the boxes for me. I’m so glad I found this lovely pattern, and lucky me…it was free ( I won from a the Day/Night Dress Challenge drawing)!  I know there will be other Dani’s in my future…I’m already eyeing a piece of linen in my stash for a summer version that will be perfect for hot sticky days.

IMG_5442I hope you’re enjoying the #sewbibs challenge on instagram as much as I am- – Thanks to cookin’ and craftin for organzing a challenge that inspired me to add two new pinafores to my wardrobe (here’s the other one if you missed the post). Happy sewing and thanks for stopping by.


Sew Bibs with Simplicity 8610

IMG_5150There’s nothing like a community sewing challenge to motivate me to complete a project that’s lingered too long on my to do list. This pinafore pattern has been on my wish list since I made the jumpsuit version last Spring (here). It took the #sewbibs challenge to push me to get it done! (more about the challenge here)

My pattern is Simplicity 8610.

I love the big pockets, topstitched front band, buttoned straps. But if this doesn’t grab you, there are many other pinafore patterns to explore. Here are a few that are on my wish list right now.

The York Pinafore from Helen’s closet

york_pinafore_10

The Dani from Seamwork

sw3093-dani-01-large-1d45fe69fcb7935303658eef9020e3c945df0ae16c0f1ec38a6c182a7fe42449

Simplicity 8641

I chose Simplicity 8610 for the big pockets, front gathers and the cool bodice band detail. Also, I love the size of the straps, a detail that can make or break this design for me. If they’re too narrow, they’re uncomfortable, but these are just right.

IMG_5250

Construction – I cut the size indicated by my measurements and there were no surprises or adjustment’s needed. (Size options are from 6-24).  The construction of the bodice is pretty easy and fast to put together. Although I made my jumpsuit version from a rayon crepe, I decided to make my pinafore from a cotton, and I’m glad I did. I think the cotton gives the pinafore a bit more structure which works well to support the gathered details and the fabulous pockets (a must on a pinafore, don’t you think?).

IMG_5176

One of the nice things about this style is that you can wear it with a long or short-sleeved top under it which makes it a great layering piece. It’s still cold and rainy here, so I chose a long sleeve, but come Spring, I’ll happily wear this with a short sleeve top, or maybe even alone.

IMG_5192I’m such a fan of the pinafore style. I think it’s perfect for casual wear about town, or as a travel wardrobe item that you use as a layering piece. I know there will be other pinafores in my future, and since the challenge is on until April 12…would love to finish another before then:)

There are so many inspiring bibs and pinafores on #sewbibs on Instagram right now. Do you have a favorite bib sewing pattern to recommend?

Happy sewing and thanks for stopping by!

Finding Violet and Vogue 9363

IMG_4895I’ve really enjoyed the #sew happy color challenge on Instagram. It’s inspired so many lovely posts by members of our sewing community! The premise of the challenge (created by @katiekortmanart) has been to explore combining complimentary colors in new ways. For me, it’s been an opportunity to look at the colors I love and to think about ways I can have more of them in my wardrobe and life.

This last week of #sewhappycolor features violet and blue. Blue…well, you all know how much I love that color (LOL). My wardrobe includes so many blue options, I could wear the color every day if I wanted. I love violet too, but my stash of fabric and wardrobe doesn’t really reflect that at all.

IMG_4849

So I took a trip to the fabric store, intending to buy a beautiful piece of violet fabric. Instead, I ended up with a print. It’s the scale of this one that caught my eye. The areas of solid black provide negative space that really allows the large violet flowers to pop. I really love this print….Hmmm, need/want more like this…

IMG_4980

Vogue 9363 is my pattern, new this Spring. I can’t resist a pattern with a front tie!  (see my other tie makes here, here and here)

Construction: Although the fabric recommendations include rayon and crepe (lots of drape), I chose Japanese cotton because I wanted the top to look more structured. It was such a such a dream to work with. It shapes beautifully and is a joy to press. The pattern is well drafted too. I cut my usual size and have absolutely no complaints about the fit. The curve of the front bodice seam gives it a unique drape, and the sleeves are easy as they are cut as part of the front and back bodice. There’s a zipper in the back and the loose fit is shaped by front and back bodice darts as well as the wide belt. It’s an easy top to fit and wear.

Changes modifications: I made the short sleeve version of the top/tunic. The pattern suggests the sleeves be finished with a machine hem, but since the print has a bit of a vintage vibe to it, I decided to add a rolled cuff to the sleeve with a buttoned sleeve tab. I really like the finished look of the rolled cuff on this generous sleeve.

IMG_4981

This lovely print has reinforced my love for violet. I’m hoping there will be more of this happy color in my future. For more inspiration and information about complimentary colors, check out Katie’s blog…it’s a wealth of information very enthusiastically presented. #Sewhappycolor was such brilliant idea – – Thanks Katie! Have you all enjoyed #sewhappycolor too? Any new revelations?

Happy sewing and thanks for stopping by!

Waiting for Spring in my Wiksten Haori Jacket

IMG_4450
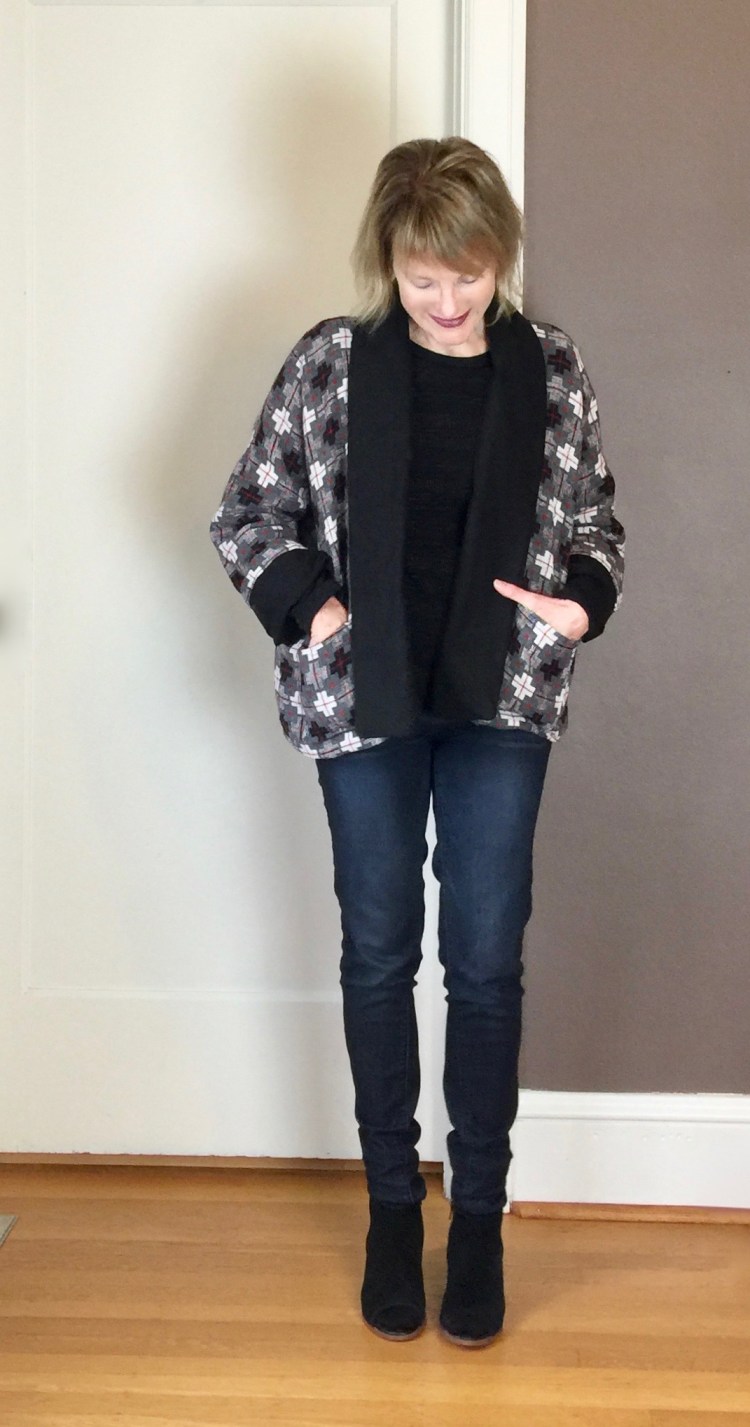
Well, it’s official. I am now a big fan of the Wiksten Haori jacket.


I might be the last blogger to make this lovely jacket. I avoided this pattern at first, as I prefer fitted jackets to loose-fitting styles. But on a recent visit to a local fabric store (Bolt, such a great store!! ), I tried on their sample version of the Haori, and it was love at first wear. Yes, the style is a bit boxy and unstructured, but that’s the beauty of it!

IMG_4613My first version (yes there will be others) was inspired by a change of weather here in Oregon. We had a few ‘teaser’ days last week that felt like Spring, but now, temperatures are cold again and it’s damp. I still need to wear a cozy layer, so my Haori is made from a wool blend, lined with linen. The wool fights the damp fearlessly, while the linen makes it wearable. Because the design is a loose fit, a fabric with some body (like linen, wool, cotton canvas) is a good thing…it really gives the stylish details some support.


Kimono_Flat_Sketches

The design of the Haori jacket is simple in concept. It’s two jackets bound together by a common front facing/lapel; brilliant really and quite easy to sew. I am a fan of this construction method, as the inside of the jacket has such a clean finish, and it makes the jacket reversible too.

IMG_4514Even though my measurements put me at a small, I cut the extra small and still had room to spare. You might want to consider sizing down. This version is the ‘short’ version. I worried a bit about the length as it was described as ‘cropped’, but in reality, on my 5′ 4″ frame, the length is perfectly fine – – it hits just above the hips. You can see the longer version on Instagram (#wikstenhaori).  So many lovely versions to enjoy!

IMG_4487 2Construction is pretty straightforward. The sleeves are inserted before you sew the side seams so you don’t have to set them in…a big win if you ask me! The pockets are patch pockets that are top-stitched…also very simple. It took me about 2 and a half hours to put together.


Choosing fabric – – one thing to remember is that the front facing/lapel is cut from the lining fabric, so you need to choose a lining fabric that compliments the fabric of the body of the jacket. Also, the sleeves are rolled up, so that’s another chance for your lining fabric to be a cool design element. A fabric with some body is key to help the jacket hold its shape. My wool is pretty soft, but my linen has some crispness to it, so the combo worked well. The lapels are interfaced too, which helps give the style some structure.

IMG_4634I love the weight of this jacket. It’s perfect for this time of the year. But I’m already planning a linen version (or two) for warmer weather, maybe a quilted version for Fall. Really, with this style, the options are endless! If everything in my closet was this lovely to wear, life would seem easy indeed.

I’m really enjoying everyone’s #sewhappycolor posts on Instagram – I’m inspired to add more color to my wardrobe this Spring! Happy sewing and thanks for stopping by.


Perth dress: #So50Visible

IMG_4344 2
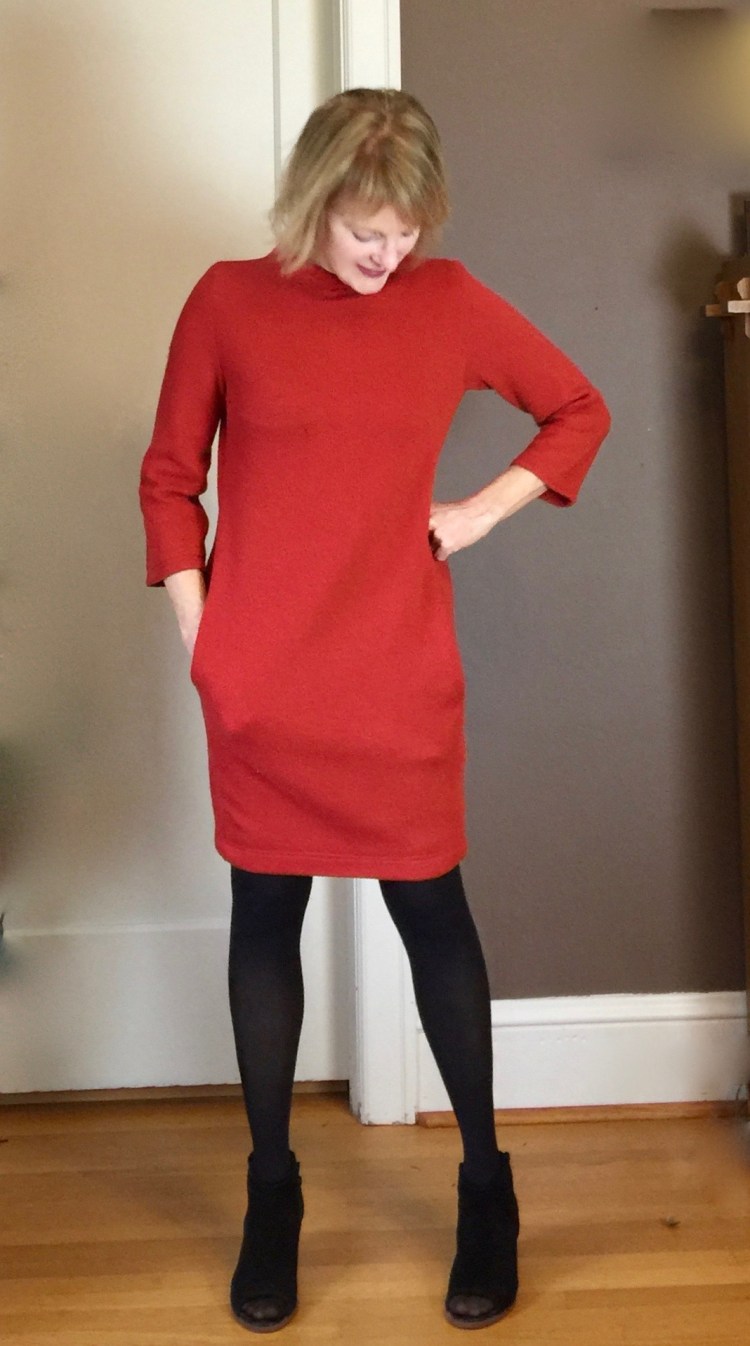
This new linen dress was inspired by the challenge on Instagram, the #So50Visible, created by the #SewOver50 gang.  The idea of the challenge is to find a pattern where the photo features a model who is over 50. Sounds easy, Right? If only…. In my search for a pattern, I couldn’t find any over 50 models in McCalls, Butterick, Vogue or Burda. Simplicity had only two. I was shocked.

When I turned to the Indie patterns, I found a few more, and I’m so pleased that my search led me to this fabulous pattern, the Perth Dress and Top by Carolyn and Cassie (Carolyn is from the blog Handmade by Carolyn). The photos of the pattern include Carolyn herself as a model…fabulous!!  I haven’t made a pattern by Carolyn and Cassie before (Cassie is her daughter), so this qualifies this make for the #BGchallenge (Breaking Ground Challenge) too!

IMG_4325

The Perth dress is a shirtdress that includes some classic menswear details like a traditional collar stand and generously shaped collar. It has all the trimmings of a shirt dress, but without all of the buttons (yay) so if you’ve postponed making a shirt dress because of the buttons, this option is clearly for you!

il_1588xN.1488116329_p9eq

Details: My favorite detail on this dress is the button and the front pleat. It’s so cleverly designed because, by buttoning the collar, you create the lovely pleated front of the dress.  There’s also a back yoke, a black pleat and lovely in seam pockets. The style looks structured but it has the ease and flow of a flouncy, fun dress. Because the dress is loose fitting, you choose the size by your bust measurement.

IMG_4337

The pattern is expertly crafted with some great constructions details that are carefully explained by Carolyn. The back yoke is constructed burrito style. If you haven’t tried it, it’s a fabulous way to get a clean finish on the inside. The front pleat and collar and stand look much harder than they are. There’s one button, but two buttonholes, and it was fun to see how, by buttoning the dress, you suddenly have this wonderful pleat in the front. The only modification I made was to the dress was to shorten the collar points by about a half of an inch, just because I like a smaller collar.

IMG_4326

The success of this dress depends in large part on the fabric. In order for the dress to have some lovely movement, you need a fabric with the right amount of drape, but also with enough body to support the precise construction required for a collar and stand. Linen is perfect for all of these tasks, so I chose a lovely mustard linen from the Mill End Store here in Portland as well as a contrasting white linen for the collar. This fabric was amazing to work with – – it has a slight texture to it, a rare find that I wish I had more of.

IMG_4311

I love my new poufy dress and am so happy that this challenge led me to a new, fun pattern. Thanks to Carolyn and Cassie for bringIMG_4344ing this pattern to life with a real life model who is over 50. And I’m so grateful to everyone involved in the #So50Visible challenge. It’s fun, and informative and it made me much more aware. Let’s hope pattern companies take notice…

Happy Sewing and thanks for stopping by.

Burda Style Cocoon Dress

I have to admit it…There was very little forethought behind these two new ‘makes’. I made these cocoon dresses on a whim….merely because I thought they would look pretty good with my new Cocoon coat (here)! Shallow…but true. Now that the 2018 RTW fast is over, I’m feeling quite free. I can sew anything I want without a single thought about whether I ‘need’ it to fill a hole in my wardrobe or not.  Frivilous sewing is the life for me!!

I’m such a sucker for a good knit dress in the winter, so if anyone waves a pattern in front of my face that gives me an excuse to make yet another one, I’m all in. And this one has pockets, which makes it perfect!

img_0891

I absolutely love a dress with side seams that wrap around to the front. I’m a big fan of stand up collars too….so Audrey Hepburn!

img_0872

Burda Style patterns have never been on the top of my list because they come in a magazine insert, so they all have to be traced onto pattern paper before they’re cut and sewn, and, well, I hate tracing patterns. I’d much rather buy a paper pattern, thank you very much. But the design of this dress was too good to pass up. So, I put on a binge worthy show just did it. This Burda Style pattern (1/2019/111) was worth the effort.


I loved the pattern so much I made two versions – – one from a soft, ‘poppy’ colored sweater knit I bought at the Mill End Store, and one from a textured sweat shirt jersey that I found at Joann’s (on sale!).

img_0905

img_0867

It’s always interesting to see how different a dress/pattern looks with a two different knits. The gray textured jersey is a heavier moderate stretch knit so the dress and collar look more structured in that fabric. The poppy knit is so soft with a bit more stretch so the fit is loose and easy.

The dress went together easily. The collar is cut as part of the bodice so that makes things simple. The shape of the dress is created by the forward placement of the side seams. The hardest detail is the zipper at the back. Fitting is pretty straightforward…you can modify at the side or center back seam. I used a double needle for the sleeve hem and dress hem.

I love the neckline and the cocoon shape of this pattern – obviously, I’ll likely make it again. And the best part? Both dresses work under my new coat:)

img_0949 2

It’s always fun to follow an intense project like a coat with a less involved project, a palate cleanser! To be honest, the tracing of the pattern wasn’t as bad as I expected…really went pretty quickly and I’m getting better at figuring out all of those crazy lines on the magazine insert. So, there will definitely be more Burda Style makes in my future.

I  hope your New Year has had a strong start. I’m excited about all of the sewing happenings this month – – the Pattern Review Sewing Bee started this week. I’m not participating this year, but I love watching the fun. There should be lots of inspiration there. I’m hoping to make something for Sew Japanese In January, and there’s the Day/Night Dress Challenge coming up next month, hosted by Elizabeth Made This! Lots to look forward to…

Happy sewing and thanks for stopping by!