Making a Wiksten Haori from a Mid-Century Modern Curtain

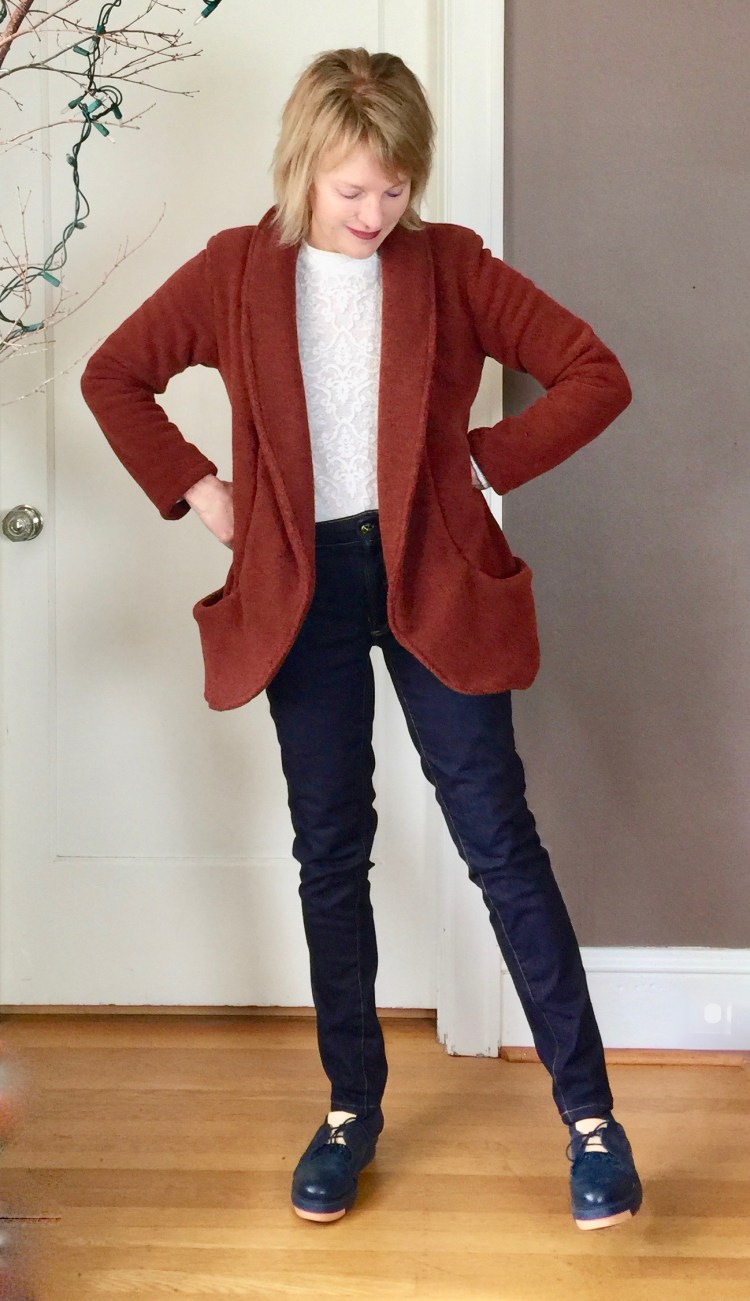
This Wiksten Haori was once a curtain in someone’s house.

IMG_1847.jpegThe leaf design on this fabric is typical of the mid-century modern style. It was all about the exotic, so tropical themes were big. Vintage drapes can cost as much as $200 per panel on Ebay. One Saturday afternoon, I got lucky.  I found mine at a estate sale for $10.

Estate sales can be such a great place to find vintage fabric and notions. My interest in them grew after I participated in the  #tableclothrefashion challenge on Instagram. I made a couple of tops from vintage tablecloths (here and Here) and had so much fun, I started exploring other vintage fabrics as well. I do love taking something old and making it new. Now, I can’t pass by an estate sale without taking a look.

IMG_1743.jpegThere was only one drapery panel at the sale so I didn’t have alot of this fabric to work with. This drape wasn’t lined, which meant it was ready for my project right away. The trickiest part of the make was figuring out how to best place my pattern pieces to let the leaf design take center stage.

This is the second Wiksten Haori I’ve made (first is here) so this make was pretty easy for me. I do love how the pattern is drafted so that the jacket is reversible.

Kimono_Flat_Sketches

IMG_1719.jpegThis is the short verion of the Haori, lined with soft Chambray, the perfect fabric mate for my drapery barkcloth. Although I could reverse my Haori and wear it blue side out, I doubt I will – – I love the barkcloth side too much!

IMG_1820.jpegAs in my other version, this Haori has a lovely feel, in part because the barkcloth is soft but heavy.  That’s one of the reasons I love to wear this one so much. It feels substantial, but not too stiff. In my opinion, a medium weight fabric lined with a sleek lightweight fabric makes the perfect Haori.IMG_1847.jpeg I love the boxy shape of this jacket and the casual feel of the fabric. I know I’ll wear it again and again. Honestly, there’s a reason this is one of the most popular patterns around. It’s so fun to sew and wear. I can’t wait to make another!!  Now, if I could only find more vintage fabric….Sources anyone?

Happy sewing and thanks for stopping by!

The Saraste Shirt, my Me-Made-May Hero

IMG_6940

When I completed the Saraste shirt, I wasn’t totally ‘in-love’ with it. In fact, I immediately pushed it to the far right side of my closet, the place where the ‘never to be worn’s’ go. It’s a sad corner and it makes me feel a bit guilty. It’s all the me-mades that were fun to sew, yet, when all was said and done, I couldn’t imagine actually wearing it.

That was the sad story of this recent reject, but everything changed when Me-Made May rolled around. This year, my pledge was a bit different. Since I already wear me-mades every day, I pledged to wear the ones that I abandoned, and try to analyze why. This is one of those makes.

IMG_6970

It might be the fabric that put me off. It’s a floral print and, when I purchased it, I thought it was a random print. When I laid it out on my cutting table, I discovered that there’s a strong repeat….pattern matching would be involved! Ugh. That discovery made me a bit cranky as I wasn’t sure I’d purchased enough fabric to make this work, but I managed to pull it off, carrying the pattern through on the sleeves and the back.

IMG_6946

I do love the fit of this shirt! The Saraste shirt is a pattern from Named Clothing’s book,  ‘Breaking the Pattern’.

COVER

I’ve made several of the patterns in this book now (here), and they’ve all been fabulous. The Saraste shirt is one of my favorites with many elements I love: princess seams down the front, a back yoke, optional sleeves and a small collar that fits my short neck. The surprise detail is small cut- outs at the shoulder, which I love.

IMG_6950

They were a bit of a challenge though. My tip is to be sure to trace the pattern carefully, noting all of the markings accurately. I hadn’t done that and had to go back and add them in. Once I had that accomplished, it wasn’t too hard to make everything work. However, I’m a bit disappointed that the cut-outs don’t show that well in my print. I’m going to have to give this lovely pattern another try in a solid colored linen, so that those slits can shine!

My Me-made analysis – – I do love the print now, but at first glance, I wasn’t too excited about it in this shirt. However, I have worn it many times this month and have discovered that it goes with everything in my closet. The fit is perfect and the shirt is easy to wear. In fact, people compliment me when I wear it:)

Lesson learned…my first take on a make shouldn’t be my last.   IMG_6959

How are you doing with Me-Made May? Any new revelations?

Happy sewing and thanks for stopping by!

A Travel Dress for France

IMG_4487
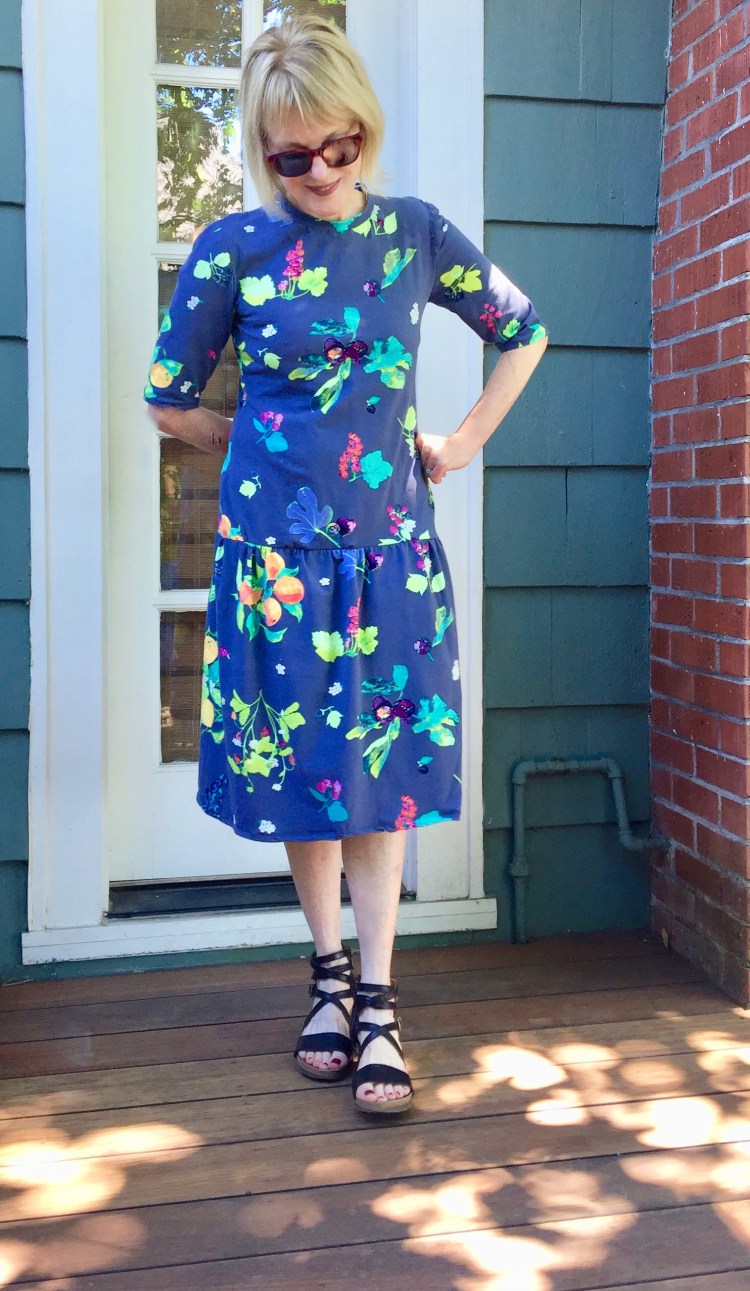
Did I tell you all that I’m headed to France in September? I’m beyond excited. We’re headed to the Dordogne region followed by a visit to Paris which will definitely include some fabric shopping. I’ve started a packing list and this dress is versatile enough to earn a place in my suitcase.

There’s something about dressing in a bright colors that makes things feel…fun! Not sure if there’s a scientific reason for that, but this dress will be a favorite just because the fabric makes me feel light and happy! This knit from Art Gallery is 95% cotton, 5% spandex. I love the name of the print… Frutteria Bleu. I found it in a shop in Alexandria Virginia that I found on a recent trip to DC.. the Stitch Sew Shop. Their natural fabric collection is nicely curated. I wish I’d had room in my suitcase for more.

IMG_4468

This was an easy dress to make. I used the same method I used for my Day/Night Challenge cocktail dress (here). I took a favorite knit dress pattern, shortened it a bit, then added a skirt.


For the bodice, I used McCalls 6886, a TNT pattern that everyone loves because it never fails…it’s an easy sew, the fit is great and it’s always a dress you want to wear!! Since this fabric is so special I could not risk a failure.

This pattern is perfect to embellish, modify, lengthen, shorten…whatever. It’s one of those patterns that really transforms with your fabric choice.

I modified by adding a skirt. To do this, I cut version A of the dress, but shortened it by 8″. That still left the dress bodice quite long, a choice I made so that the skirt would feel more like a ruffle…less like a traditional drop waist dress. To make the skirt/ruffle, I cut a wide (20″) swath of fabric whose width was 1.5 times the circumference of the hem of the shortened dress. I simply gathered that long piece of fabric with a long stitch, then sewed it to the bodice of the dress.

IMG_4519

Because of the long bodice and deep ruffle, I wanted this dress to be long…midi length. In the summer,  I love how a long dress moves in the breeze. It makes me feel…light!


Happy sewing and thanks for stopping by!


Blackwood Cardigan – the Star of my ‘Me Made May’


For me, Me-Made May is all about figuring out what works in my daily wardrobe and and what doesn’t. As a rule, I tend to wear me-made separates that I mix and match. The questions I ask myself are – – which me-made pieces do I reach for because they make me feel great, and which ones drive me crazy as I wear them? I take notes about my daily choices for myself, only keeping photos of outfits that are revealing in some way to me. The pieces that don’t work are thrown into the revision or donate pile. I don’t post my outfits on social media – – yes, I love seeing other people’s posts but can’t bear thirty-one days of photographs of myself, LOL!!

I’ve had a couple of revelations this month – the big one, which is the subject of this post is my absolute daily dependence on cardigans! Seriously, I wear them almost every day Unpredictable May weather is the culprit – – in Oregon it can be cold enough for a coat in the morning, but shirt-sleeve weather in the afternoon. Enter the Blackwood cardigan!

IMG_2171

Last year, my favorite cardigan pattern was  McCall’s 7476 made here and here. This year, my obvious favorite is the blackwood cardigan by Helen’s Closet patterns.

blackwood-cardigan-illustration

I’m probably the last blogger to be smitten with this pattern, but what can I say? Better late than never…

IMG_2127

Why do I love it? For one thing, the design is perfect for throwing over tops or dresses. Helen suggests that it be used as a layering piece and this blue version I made works with everything in my closet in part, because it’s blue, but also because the length and the cut are superb over everything!

I usually gravitate toward knits that have cotton as the primary ingredient, but I really love how this rayon knit feel against my skin. And it slides over sleeves so nicely!

IMG_2092

Design notes: The Blackwood rests perfectly on the shoulders which makes it great for wearing with a variety of tops and dresses. The bottom band is wide and it shapes the hemline of the sweater in a very flattering way. I love the longer length (perfect for me at 5”4”) and the wide cuff on the sleeve. The pocket size is perfection too!!

Construction notes;

  • For this pattern – the stretch and drape of the knit is everything. You want to make sure your knit has enough stretch on the cross grain for this pattern. Because it isn’t designed to close in the front, if you don’t have enough stretch, this sweater will likely gape open and probably won’t look or feel that great.
  • The front band needs to be stretched slightly to fit.
  • I stabilized the top of the pockets with a strip of fusible interfacing to keep them from sagging too much.

IMG_2159

I’m wearing it here with the Simplicity top I posted a few weeks ago (here).

I give this cardigan a big thumbs up. It’s a quick, fun sew that does the heavy lifting in my wardrobe, and as a result of my Me-Made-May discovery, I will likely make this pattern again and again! My other cardigan patterns will remain favorites, but it’s nice to expand my cardigan universe.  Thanks so much to those of you who recommended this pattern when I asked for ideas in a post last month!

Are you as hooked on cardigans as I am? Happy sewing and thanks for stopping by!


Three Versions – Simplicity Waist-Tie Top

PicMonkey Collage-5

Packing for a trip always points out the flaws in your wardrobe, don’t you think? A planned visit to the already muggy east coast made me realize – I have very few easy-to- wear, easy-to-pack tops that are humidity friendly.

Enter Simplicity 8601 – – An ‘easy-to-sew’ top with lots of variations.

simplicity-tie-front-top-pattern-8601-envelope-front

Version 1; Rayon

IMG_1234 2

This lovely batik rayon was purchased last Spring (Millendstore). I used some of it for this dress last spring. This rayon has a lovely, soft drape, so even though I was short a quarter of a yard, I worked hard to squeeze this 3/4 sleeve top from it. I was really lucky it worked because the drape of rayon is so perfect for this style!

One thing to note about this pattern – – It has a seam down the front, a necessity because of the tie at the waist. Stripes, plaids etc need to be positioned strategically. Even though this rayon has a polka dot print, it’s a batik with a noticeable pattern to it so I had to do some strategic matching around that front seam.

I loved this top right away! Encouraged by the immediate gratification this pattern offered, I pressed on and sewed a few more…..

Version two: Medium weight cotton

IMG_1279

This is View A with bell sleeves, the perfect shape for layering under sweaters.  I was a bit concerned that the stiffness of this Cotton and Steel print would be a bit much for the waist tie…but it worked! Not only is this medium weight cotton great  in humid weather, it supports the shape of these sleeves.

Version 3; Cotton Double GauzeIMG_1337

When the weather is a bit sticky, double gauze always makes me feel great, so I just had to use a cotton gauze remnant in my stash for version B. I am so glad I did! There’s a reason people use double gauze for baby blankets – it’s so soft.  Wearing this top is like wearing pajamas, which makes me wonder…..Why don’t I make everything out of double gauze?

I’m pleased with all three versions so Simplicity 8601 so it gets a big thumbs up from me. I have plans to make View D as well (flutter sleeves) and who knows what else I might whip up.  From start to finish each version of this top took only two hours to sew – – a perfect saturday or evening project. The instructions are great and the fabric options that work with this pattern are endless. I have some linen I will use for a flutter sleeve version. I will likely make a flannel version in the fall.

IMG_1332

IMG_1291


IMG_1234 2

I was pleased to see several similar RTW tops at Anthropologie last week with a waist tie, so give this look a try. What version do you like best? Have you ever made a top from double gauze?

Happy sewing and thanks for stopping by!

A Quick Cozy Jacket and Ginger Jeans

After completing my two dresses for the Day/Night Dress Challenge, I needed something to cleanse my sewing palate. Usually, when I’m in that mood, I choose a simple pattern to complete. But this time, I decided to make a fun outfit including a new pair of Ginger Jeans. So in this post I’ll talk about the jacket first followed by the jeans.IMG_9097 3The jacket – – Yes, it’s March but it’s still cold and damp here. That’s why I decided to make my jacket from fleece, a first for me!

IMG_9073I  love slouchy jackets with big pockets so I couldn’t resist Simplicity 8468, a jacket with curved seams, deep pockets and cozy lapels.

8468

I made it from double sided fleece that I found at Mill End Store. Fleece is easy to sew too, if you know a few tricks.

  1. You don’t have to finish your seams because fleece doesn’t unravel. I did choose to serge my seams though, but only because I like the finished look it gives to the inside of the jacket, but it isn’t a crime if you don’t.
  2. To keep bulk down, trim your seams and clip your curves.
  3. Topstitching can be tricky because the fabric is so thick. Walking foots are nice for this, although I managed without.

The fit of this jacket is loose so I cut the smallest size but still had room to spare. It was a quick fun sew (less than four hours with cutting time). The jacket is unlined and the fit comes from the curved seams so it’s a breeze to sew. I’m so happy with this make. It’s the sort of jacket I love to wear, casual but polished. I’m sure I’ll make this pattern again!

IMG_9143

My first Ginger Jeans: Even though I’ve made several pairs of jeans before, I still feel some trepidation when I consider sewing another pair, especially when it means trying a new pattern.  There’s the time committment involved for one thing (this pair took 6 hours), and even if you put the time in, there’s the very real possibility the darn things will not fit or feel or look the way you want. It’s the risk factor that kept me from realizing my dream of Ginger jeans for so long. But, Wow! It was worth the risk because I love this pattern. I’m so glad I took the leap!

IMG_9157

Things I learned:

  • I find that a block of dedicated time is necessary to make a pair of jeans so I dedicated an entire Saturday to this project. If I take a break, I lose momentum and it’s hard to get my head back in the game at a later time.
  • I made View B (high rise version) and used a dark very stretchy denim (Modern Domestic) that isn’t too heavy.
  • If you can, use two sewing machines, one threaded for topstitching.
  • I use wonder tape (I should invest in the stuff) to hold things in place at tricky moments (pocket facings, waistband, zipper). Pins can fall out of denim at critical moments.
  • Baste side seams so that you can rip them out if the fit isn’t just right.
  • Interfacing is optional on the waist band. I left it out and I’m glad I did for comfort.
  • Heather (Closet Case pattern’s designer) suggests that you cut the legs out one at a time, rather than cut them on doubled fabric. That way you’re assured each leg is on the straight of the grain which prevents twisting once they’re sewn.
  • Pocket facings – – okay, I really struggled with this step (it was hell, honestly). It could be just me, but the instructions made no sense. I ripped the pocket facings out twice before I resorted to referring to my favorite pair of RTW jeans and mimicking their construction.  I also referred to the on-line tutorial on the Closet Case Files website, which really helps.
  • Back pocket placement – -The marked placement seemed low to me, so I raised them as high as they could go.

IMG_9185


IMG_9183 2

Okay, maybe they aren’t perfect but they’re close enough and so comfortable! The legs bag a little which is likely because I left them a bit long as I’m always nervous they will shrink again down the road (Ha, yes, this is probably impossible, but I freak out over these sorts of things). There might be a bit of a twist on the left leg, or maybe I’m standing in an odd way :), but it’s not too bad. Otherwise, I love these jeans!  I’m really pleased with the fit. I think I may like this pattern even better than the Jalie’s I made here. I think I’ll cut out another pair soon. I need to make another pair before I forget how I did the pocket facings, LOL!!

IMG_9122


A new outfit that will be transitional for Spring, yay! What’s your go to jeans pattern? Have you ever made a jacket from fleece?

Happy sewing and thanks for stopping by!


An easy DIY Date Night Top and a Challenge

IMG_7161

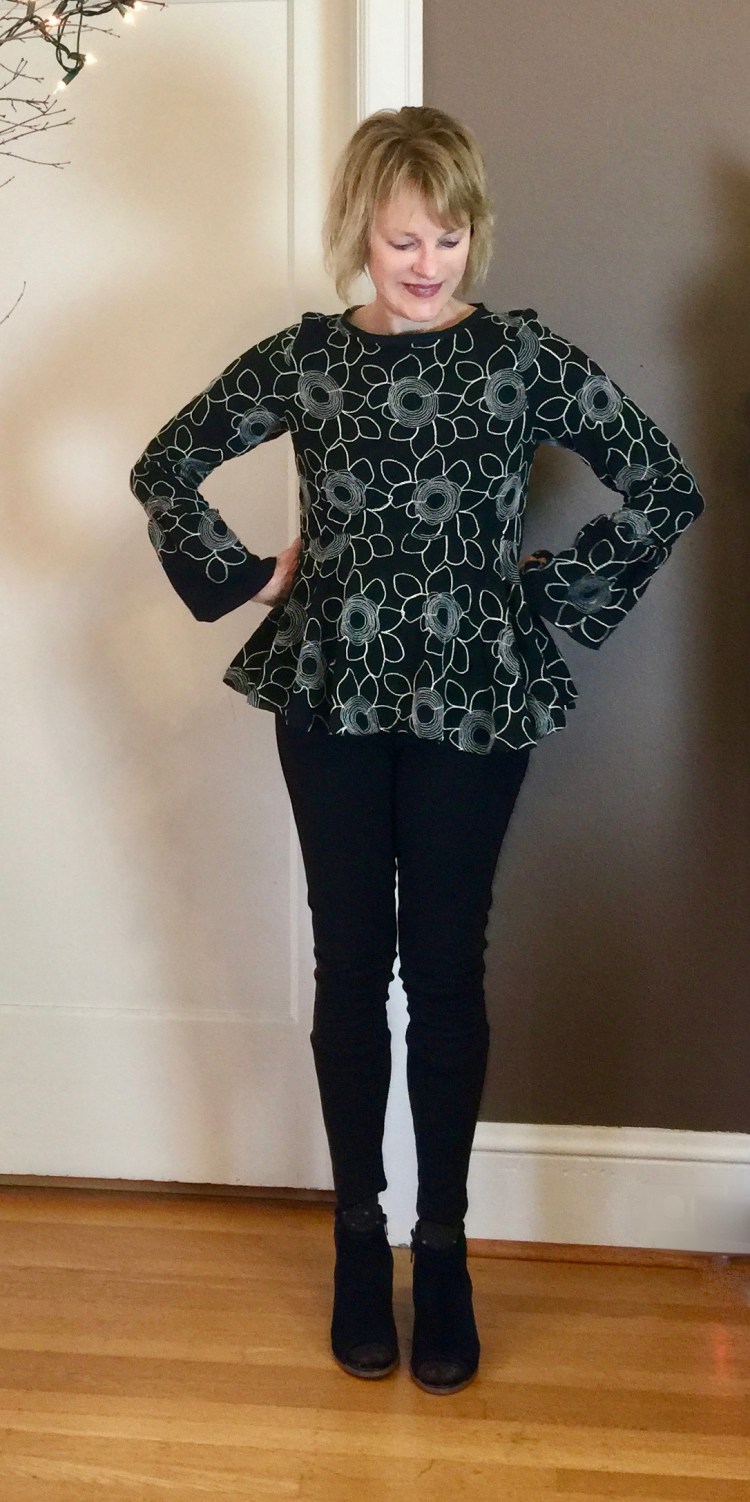
Next week I’m celebrating my wedding anniversary, and will be going out for a date with my husband. As usual, the January weather isn’t really great for wearing a dress (gray, dark and rainy, blah!), so I decided to sew a date night top from a springy floral to perk myself up!

For a special night out, I always want to wear something with a bit of drama, so it was the perfect excuse to sew another fun peplum top.

IMG_7144

You all know, I’m a big fan of peplums (sewn here, here and here). Every time I think I’m over them, I discover a new version to try. This top is Vogue 9084, a very easy pattern that has some really dramatic peplums, if you’re in the mood! I was attracted to the curved seam where the peplum meets the bodice – I just had to have it!


I love this fabric (fabricdepot.com). It’s embroidered rayon and it hangs like a dream.  Unfortunately, I didn’t have enough fabric to do view C with the dramatic high low peplum. Not sure my husband would have loved that look anyway, since he wasn’t a fan of my coat with the interesting hem (here), LOL. Maybe next time. Although this pattern is marked ‘easy’ I did have a few challenges with fit. The neck doesn’t look big, but on me it was huge, even though I cut the smallest size and took a narrow back adjustment. I ended up taking a couple of short darts at the neckline in the back before finishing the neckline with seam binding. This did make it fit much better, but it was frustrating as I had already taken some ease out of the back with my narrow shoulder adjustment.

IMG_7099

Unfortunately, my print doesn’t really show the cool curved seam in the front, so next time, I’ll likely make it in a solid fabric. For fun, I modified the sleeves a bit and added a 6 inch wide bell cuff so that it would look more dressy for ‘date-night’. To do this, I cut off 6 inches of the sleeve length. Then, for the bell cuff, I cut a 8 inch wide piece of fabric. The length was 1 and a half times the circumference of the sleeve opening. Once the cuff was gathered, I just inserted it into the sleeve bottom.

At this time of year, going out in the evening means wearing a heavy coat and pants so I’m glad I’ll have this fun top to make me feel dressed up when I reach my destination.

IMG_7094

In other news, Elizabeth at Elizabeth Made This is hosting the Day/Night dress Challenge again this year. Last year, I loved participating in the challenge because it inspired me to make two dresses that I wear all the time and I met some really fun bloggers. So I was so pleased when she asked me to participate again this year. daynightchallenge18logohashtag

The theme is coffee and cocktails, a brillant way to capture the essence of the challenge, which is to sew a dress you’d wear if you were meeting a friend for coffee, and another to wear for cocktails! Any one can participate. The details are on Elizabeth’s blog, but it’s really simple. You can tag your entries on Instagram with #dayandnightdresshchallenge and tag Elizabeth at Elizabethmadethis too. There are prizes, heh, heh and great sponsers. I’ve started planning my dresses and can’t wait to see yours!

Happy sewing and thanks for stopping by!


A Sweater Knit Dress you can sew in a afternoon

IMG_6854At this time of year, I find it so easy to dress in cozy knit tops and dresses. So, I find myself reaching for sweater knits rather than wovens for my sewing projects.

Sweater knits used to be so hard to find! I’d spend hours in the fabric stores and shopping online looking for the perfect textures and colors. I’m pleased to say that isn’t the case anymore. I find great sweater knits at my local stores as well at Joann’s. In fact, it’s hard to resist the many options that are available when you’re sweater knit fanatic like me!

IMG_6907

This sweater knit was such a find at Joann’s. It’s stretchy with a fun texture that makes it look almost as interesting as a hand-knit piece. Sweater knits can have a tendency to unravel, but if you finish your seams with a serger or knit stitch on your machine, it’s usually pretty manageable. I also love Dritz Fray Check as another option for double insurance when the going gets tough.

IMG_6906

This pattern is an old favorite (made here), McCalls 7243 that has a dramatic collar that makes it a cut above the usual knit dress pattern.

2017 was the year of the sleeve for me. 2018 might turn out to be the year of the collar as I’m so crazy about patterns with dramatic collars and necklines right now. Before cutting my fabric, I was careful to check the stretch of the fabric against the stretch gauge on the pattern envelop. This knit fabric had a very forgiving crosswise stretch so I was careful to lay out my pattern to take advantage of that in the bodice and sleeves. It’s a snug fitting pattern and if you choose a stable knit, it might be a tight fit.

This pattern is pretty easy going, in spite of the unusual collar. The collar is large though, so even the short tunic top version takes 1 and 5/8 yards of fabric! That being said, I think the look it gives is worth it.  I was able to make this in only a couple of hours, using a combination of my regular sewing machine and my serger. It’s so comfortable to wear, and I’m inspired now to make the sleeveless version for spring!

IMG_6851 2


Here, I’m wearing it with leggings because it’s pretty yucky outside. But I’ll switch to tights as the weather warms.

I’m off to do some fabric shopping this week in San Francisco with a friend that’s as crazy about fabric as I am (trouble!!) and I’ll be posting my finds on Instagram :). I’m happy to say that it’s been months since I shopped so my stash rule (two pieces must be sewn from my stash for every one piece I buy) will be easy to honor as I’m way ahead at this point!!! Because of my RTW fast, other shopping will be limited to shoes, but that’s okay because I have a couple of new knit makes to help me resist. I think I’ll be able to resist even more if I sew a bit more with a plan, maybe even take on the wardrobe challenge/contest Pattern Review is sponsering this spring. Curious what challenges/contests you all are planning on this year?

Happy sewing and thanks for stopping by!


‘Tis the Season for Flannel

IMG_5243

Hi All! I’ve been traveling on the East Coast this week, where the below freezing temperatures have encouraged me to think about the benefits of a wardrobe dominated by flannel.  It’s certainly not a bad thing as there’s nothing more comfortable to wear! This plaid flannel has been hiding in my stash for a couple of years. I found it when I was putting away my lightweight warm weather fabrics in favor of heavier fall and winter options. I had exactly a yard and a half and it was only 45″ wide. What to do….

IMG_5224

Even though it’s flannel, the turquoise plaid made me think of a top with feminine details like bell sleeves so I went to my pattern stash to find a tried and true pattern, McCall’s 7542 (two other versions made here ). It has a number of sleeve options, none of them quite right for a cozy fall/winter top.


So, I went for View D, but decided I needed long sleeves. To do that, I lengthened the sleeve by 4″ before attaching the bell. To make the bell a bit more dramatic, I increased the width to ten inches.

IMG_5262

I do love this McCall’s pattern, but have never been wild about the boxy shape with my waistless figure. So, I cut the longer length option on the bodice, then widened it by four inches at the waist. That allowed me some room to insert two six-inch long pinch pleats on either side of the waist. I like this look because it pulls that boxy bodice in a bit, giving the illusion of a waist. To further accentuate it, I inserted a tie at the side seam right at the waist. I’m such a fan of adding in ties at the side seam…they never get lost!

IMG_5267

This was a fun, easy sew, because there isn’t a zipper or buttons. The simple neck opening is fastened with a hook and eye.

IMG_5257 2

I love my new flannel top, and know it will just get softer and cozier as I wash and wear it. Flannel is such a great fabric and it’s nice to find another other way to have it in my wardrobe besides the classic button down shirt. I have a few more pieces of plaid flannel in my stash and I’d love some ideas of what to do with them.What are you sewing with flannel these days?

Happy sewing and thanks for stopping by!

DIY Street Fair Kimono and a Cold Shoulder Tee

IMG_1202

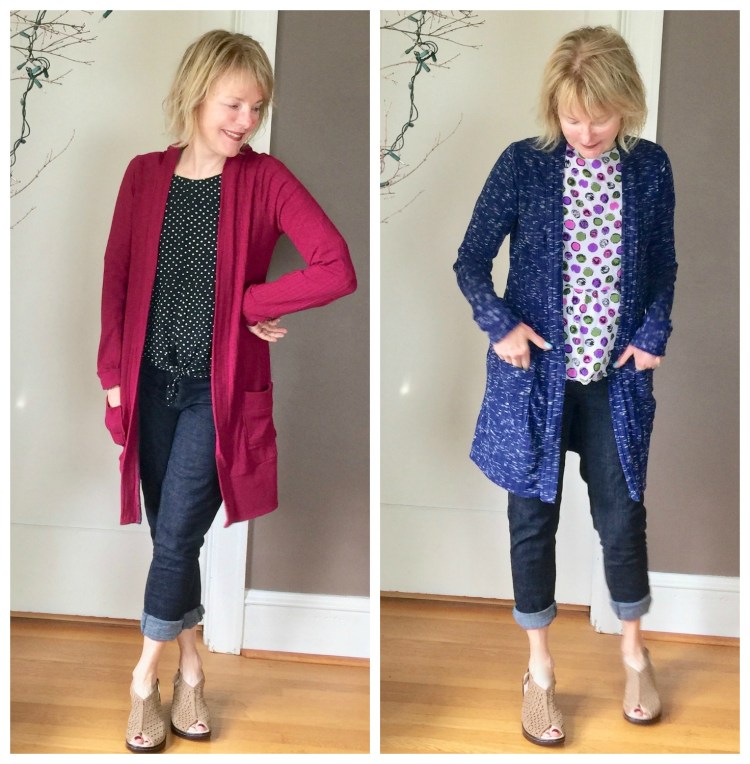
Summer is winding down, but there are still plenty of opportunities to attend street fairs, farmer’s markets and wine festivals. Since Street Fairs are great places to get your inner bo-ho on, I’ve taken to wearing kimonos over my standard jeans and tees on my excursions.

IMG_1204

A kimono is such a great wardrobe soldier. When you toss one on, you immediately add style to any outfit!  But the best part about kimonos is that they are so fun to sew. You can use just about any fabric with a good drape to make a show stopping topper. And, because kimonos have front bands and sleeve bands, you can play around with contrasting fabrics to make the look your own.

For my kimono, I used a tried and true pattern, Simplicity 1318, view C with a great high low hem. Lightweight fabrics work best for this look, so I used a sheer cotton lawn I purchased last year in that fabulous fabric store I found in Budapest (see this post). It has a fun geometic print that I took some care in placing on the pattern.

IMG_1215

I love this kimono pattern so much, this is my third make (I’ve made it twice before, here and here). The only modification I made this time was to lengthen it by three inches so it would be long and flowy.


Because I am committed to reducing the number of wardrobe orphans in my closet, I also made Simplicty 8337, a cold shoulder knit top to go with it.

IMG_1234

This pattern is fabulous! It has several different views, all with a look of their own. I love the cut of the bodice. It’s slightly loose but not too blousy. The v-neck is a winner too.

IMG_1228


Some notes on this pattern:

  • I used a lovely rayon knit with two way stretch that I found at Fabric Depot. You need a good amount of stretch for the cold shoulder sleeve to hug your arm and not sag.
  • The pattern is generously sized. I was able to cut a XS and had room to spare.
  • Also, please note, there is a seam down the front, which is a bit unexpected in a tee. It’s was likely added to the pattern to accomodate the ruffle version and the v-neck version. It doesn’t bother me on my solid color tee, but you could elimnate that front seam pretty easily if you wanted to.

Both patterns are keepers, if you ask me!

IMG_1208

Now that I’ve made this kimono pattern three times, I think it should enter a special category in my pattern stash;  the pattern Hall of Fame, don’t you think? Hmmm, I might have to put together a special post to honor that category :).

Do you have any three-time winners in your pattern stash? I’d love to check them out!

Happy sewing and thanks for stopping by.