Waiting for Spring in my Wiksten Haori Jacket

IMG_4450
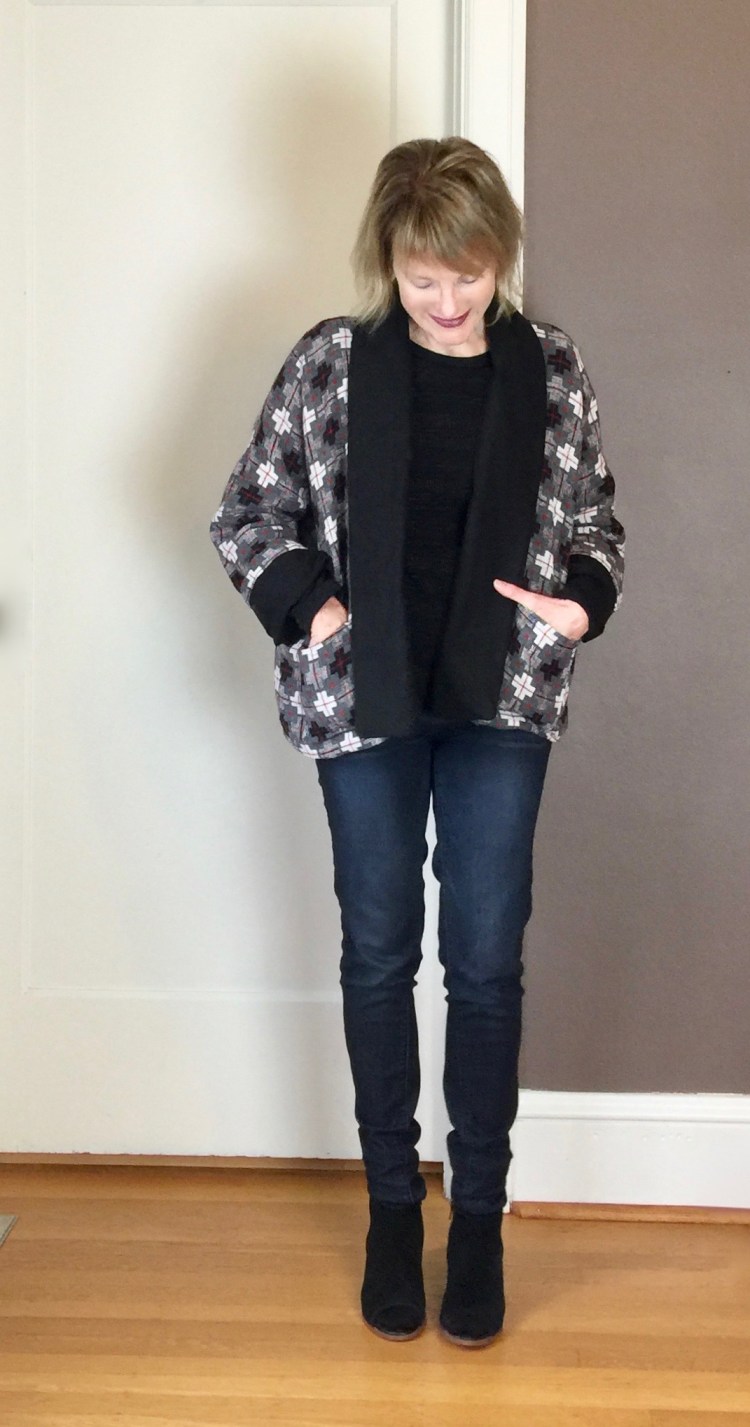
Well, it’s official. I am now a big fan of the Wiksten Haori jacket.


I might be the last blogger to make this lovely jacket. I avoided this pattern at first, as I prefer fitted jackets to loose-fitting styles. But on a recent visit to a local fabric store (Bolt, such a great store!! ), I tried on their sample version of the Haori, and it was love at first wear. Yes, the style is a bit boxy and unstructured, but that’s the beauty of it!

IMG_4613My first version (yes there will be others) was inspired by a change of weather here in Oregon. We had a few ‘teaser’ days last week that felt like Spring, but now, temperatures are cold again and it’s damp. I still need to wear a cozy layer, so my Haori is made from a wool blend, lined with linen. The wool fights the damp fearlessly, while the linen makes it wearable. Because the design is a loose fit, a fabric with some body (like linen, wool, cotton canvas) is a good thing…it really gives the stylish details some support.


Kimono_Flat_Sketches

The design of the Haori jacket is simple in concept. It’s two jackets bound together by a common front facing/lapel; brilliant really and quite easy to sew. I am a fan of this construction method, as the inside of the jacket has such a clean finish, and it makes the jacket reversible too.

IMG_4514Even though my measurements put me at a small, I cut the extra small and still had room to spare. You might want to consider sizing down. This version is the ‘short’ version. I worried a bit about the length as it was described as ‘cropped’, but in reality, on my 5′ 4″ frame, the length is perfectly fine – – it hits just above the hips. You can see the longer version on Instagram (#wikstenhaori).  So many lovely versions to enjoy!

IMG_4487 2Construction is pretty straightforward. The sleeves are inserted before you sew the side seams so you don’t have to set them in…a big win if you ask me! The pockets are patch pockets that are top-stitched…also very simple. It took me about 2 and a half hours to put together.


Choosing fabric – – one thing to remember is that the front facing/lapel is cut from the lining fabric, so you need to choose a lining fabric that compliments the fabric of the body of the jacket. Also, the sleeves are rolled up, so that’s another chance for your lining fabric to be a cool design element. A fabric with some body is key to help the jacket hold its shape. My wool is pretty soft, but my linen has some crispness to it, so the combo worked well. The lapels are interfaced too, which helps give the style some structure.

IMG_4634I love the weight of this jacket. It’s perfect for this time of the year. But I’m already planning a linen version (or two) for warmer weather, maybe a quilted version for Fall. Really, with this style, the options are endless! If everything in my closet was this lovely to wear, life would seem easy indeed.

I’m really enjoying everyone’s #sewhappycolor posts on Instagram – I’m inspired to add more color to my wardrobe this Spring! Happy sewing and thanks for stopping by.


Perth dress: #So50Visible

IMG_4344 2This new linen dress was inspired by the challenge on Instagram, the #So50Visible, created by the #SewOver50 gang.  The idea of the challenge is to find a pattern where the photo features a model who is over 50. Sounds easy, Right? If only…. In my search for a pattern, I couldn’t find any over 50 models in McCalls, Butterick, Vogue or Burda. Simplicity had only two. I was shocked.

When I turned to the Indie patterns, I found a few more, and I’m so pleased that my search led me to this fabulous pattern, the Perth Dress and Top by Carolyn and Cassie (Carolyn is from the blog Handmade by Carolyn). The photos of the pattern include Carolyn herself as a model…fabulous!!  I haven’t made a pattern by Carolyn and Cassie before (Cassie is her daughter), so this qualifies this make for the #BGchallenge (Breaking Ground Challenge) too!

IMG_4325

The Perth dress is a shirtdress that includes some classic menswear details like a traditional collar stand and generously shaped collar. It has all the trimmings of a shirt dress, but without all of the buttons (yay) so if you’ve postponed making a shirt dress because of the buttons, this option is clearly for you!

il_1588xN.1488116329_p9eq

Details: My favorite detail on this dress is the button and the front pleat. It’s so cleverly designed because, by buttoning the collar, you create the lovely pleated front of the dress.  There’s also a back yoke, a black pleat and lovely in seam pockets. The style looks structured but it has the ease and flow of a flouncy, fun dress. Because the dress is loose fitting, you choose the size by your bust measurement.

IMG_4337

The pattern is expertly crafted with some great constructions details that are carefully explained by Carolyn. The back yoke is constructed burrito style. If you haven’t tried it, it’s a fabulous way to get a clean finish on the inside. The front pleat and collar and stand look much harder than they are. There’s one button, but two buttonholes, and it was fun to see how, by buttoning the dress, you suddenly have this wonderful pleat in the front. The only modification I made was to the dress was to shorten the collar points by about a half of an inch, just because I like a smaller collar.

IMG_4326

The success of this dress depends in large part on the fabric. In order for the dress to have some lovely movement, you need a fabric with the right amount of drape, but also with enough body to support the precise construction required for a collar and stand. Linen is perfect for all of these tasks, so I chose a lovely mustard linen from the Mill End Store here in Portland as well as a contrasting white linen for the collar. This fabric was amazing to work with – – it has a slight texture to it, a rare find that I wish I had more of.

IMG_4311

I love my new poufy dress and am so happy that this challenge led me to a new, fun pattern. Thanks to Carolyn and Cassie for bringIMG_4344ing this pattern to life with a real life model who is over 50. And I’m so grateful to everyone involved in the #So50Visible challenge. It’s fun, and informative and it made me much more aware. Let’s hope pattern companies take notice…

Happy Sewing and thanks for stopping by.

Day and Night Dress Challenge: Transforming a boring dress with Edge and Sparkle

dresschallenge

I’m so honored to be participating in Elizabeth’s Day/Night Dress Challenge for the third year in a row (here are years one and two.)

dandc2019I

The Challenge has a great twist this year. Rather than make two new dresses, the idea is to take a dress you’ve made but ignored, and make it more wearable by adding to the look. The challenge fit perfectly with my recent efforts to curate my wardrobe (inspired by the show, Tidying Up!). I’ve really been reviewing my me-mades in an attempt to figure out what works for me, and what doesn’t, a challenge I hope will illuminate my future me-made efforts.

My Basic Dress

IMG_1750Even though I used a lovely rayon knit to make this dress last year, I felt it was just too plain for me, and the color made me feel a bit like I belonged on the flight crew of a local airline, LOL! Yet, the rayon jersey is as comfortable to wear as silk, so I just couldn’t toss the dress. My first order of business for this challenge was to modify my original dress slightly, to give it more style by adding a ruffle to the sleeve, a design element I noticed in the Max Mara Spring line – – there are cool ruffles everywhere!

The pattern for this dress (McCalls 6886) is a simple one I’ve used many times before, so modifying it was really fun. To add the ruffle to the sleeve, I sewed a long, double-faced ruffle 1 and 1/2 times the length of the sleeve and three inches wide that I gathered with three rows of gathered stitching. To insert it on the sleeve, I first unpicked the sleeve from the bodice (since I’d already made the dress, LOL), and unpicked the sleeve seam itself so that I could lay the sleeve flat. From there, it was easy to sew on the ruffle, aligning it with the center of the shoulder, extending the ruffle to the wrist. Then, I re-sewed the sleeve seam, and inserted it into the bodice of the dress. The process was time-consuming, but the sewing was easy.

IMG_1753 2

Once modified, the dress had more appeal to me, but it still didn’t feel that versatile. To work in my life, a dress work at the grocery store, at a business meeting, then to dinner with friends. So, to make this dress more functional, I added my favorite go-to accessory, a ‘topper’.
DAY LOOK: Adding some edge
IMG_2098
For my day look, I used a Lisette pattern, Butterick 6169, a basic moto jacket pattern I know I’ll use again.
My fabric is a lightweight wool blend and I love the cozy feeling I get just looking at its fleece-like pile.
IMG_2078
Construction was straightforward and the pattern fit without modification. Adding the zipper looks harder than it is, I’m pleased to say! This cropped jacket will be a favorite, I can tell as I can imagine how it will look with my ginger jeans, with skirts…with everything I own!  I love how its funky animal print vibe gives a bit of an edge to my fussy-looking dress.
 NIGHT LOOK: Adding BLING
To create my night look, I added another topper, a jacket with some sparkle (There are little sequins imbeded in the boucle. They’re hard to see in the photos.)
IMG_1930
I used a long-favorite pattern of mine, Butterick 5569, a coat with a vintage vibe and a big wide collar (OOP but available on Etsy.)
I fell in love with this glitzy fabric without thinking much about how it would be to work with.
IMG_1964
Wow – – It was a challenge and a half. This fabric unravels if you just look at it wrong and it doesn’t move easily under the presser foot. So, I had to layer tissue paper over each seam before sewing to keep the fabric from bunching. It was a time-consuming effort, but I love the result. Not only that, but I learned how to sew with a special fabric, something that normally intimidates me. I’m so glad I decided to line this coat with silk. It will always feel special to wear it. I know this jacket is going to be in heavy rotation…It will work with dresses, skirts, even with my Ginger jeans!
IMG_1999
I loved the Day/Night Dress Challenge this year, and I learned a lot from taking it on. From a wardrobe perspective,  I’m definitely a girl who loves to wear a good ‘topper’! For me, a jacket/sweater/wrap can take a basic dress from Ho-hum to a keeper. I also learned how to sew with a challenging fabric (sequins!). I know I’ll never be intimidated by glitzy fabric again:).
Thank-you Elizabeth, for the invitation to join and for hosting the challenge. It’s an honor to be featured here with these talented sewing friends.
To see the fabulous makes of the bloggers, visit ElizabethMadeThis. 

HOW CAN YOU GET INVOLVED IN THE DAY AND NIGHT DRESS CHALLENGE 2019?

  1. Find your lonely dress in your closet! Sew up 2 extra pieces to coordinate with your dress for a day look and a night look.
  2. Let other people know about it.  Use #dayandnightdresschallenge on Twitter and Instagram and follow the Day and Night Dress Challenge Facebook group.
  3. Keep reading here to find out the latest.  Follow Elizabeth Made This on Instagram andFacebook.
  4. Post a picture of your newly styled dress and extra pieces in your day look and your night look to Instagram to enter yourself.  Don’t forget to tag  @elizabethmadethis and use the #dayandnightdresschallenge.
  5. Grab the graphic below and post it on your site and/or repost on Instagram:  dandc2019I

A Burda top you can make in an afternoon and Dior Exhibit

A Burda top and Dior….a lovely combination, eh?

First, the Burda top…..My box of precious fabric bits and lacy remnants is overflowing these days, so I’ve adopted a new ‘tidying up’ rule. If I can’t find a use for a remnant within six months of adding it to the box, it must go. So, I was thrilled to find this lovely pattern that seems designed to use up my bits and pieces.

Burda Style 12/2018/103 ticks a lot of boxes for me. Since my daily uniform of choice is a knit top with jeans, this one has the potential to stretch my every day wardrobe significantly.  I also have a thing for peplums (here and here), so I couldn’t resist this assymetrical version. Then there’s the opportunity here to mix fabrics…a big plus when you’re working with remnants.

103_large

Because I could see lots of potential here, I decided it would be worth the extra step of tracing the pattern from the magazine insert (usually a hard sell for me!!). Luckily, this  pattern only has four pieces to trace (a front and back bodice, and a front and back peplum) so it took me less than a half hour – – Score!! Also, since Burda patterns don’t include seam allowances, I’ve taken to tracing a size up to avoid the process of adding seam allowances to each piece. So far, this method has worked well for me.

Recommended fabrics are knits for the bodice, and softly draping blouse fabrics for the peplum. I used a rayon knit for the bodice of both my versions. On the white version, I used a remnant of eyelet lace for the peplum and a remnant of silk for the blue peplum.


The blue silk was a bit tricky to work with. It’s sheer and my Bernina wanted to eat it:). I’ve found that to sew with silk, I have to use the right needle in my machine..the sharper the better!

IMG_0796

The sheer fabric really dresses up the top, so the torture was worth it. I used my rolled hem foot to put a narrow hem on this peplum.  I didn’t have enough of the bodice fabric for the sleeves so I cut them from a remnant of solid blue rayon jersey – – another piece from the pile!! I always feel so virtuous when I use a remnant, don’t you?

This top was an easy sew.  The neck is finished with a bias strip, and I used my twin needle to hem the sleeves and the lace. All of the seams are serged, but you could use a zig-zag stitch as well. Instructions on Burda Style patterns can be a bit brief, but in this case, there really wasn’t much of a need to elaborate. One other note…the fit on this top is loose and very forgiving, so I didn’t find I needed any adjustments.

IMG_0770

I was able to complete both of the tops in an afternoon. There’s nothing like a quick project on a Sunday afternoon, don’t you think?

In other news, I visited the Dior exhibit in Denver last week and was completely blown away by the exquisite designs and fabrics and finishings. Here are a few shots to enjoy…

(If only I was a better photographer…) The first dress here is embroidered with branches and leaves and flowers…so beautiful!  The green dress was worn by Nicole Kidman to the Oscars. It has netting, embroidery and fur trim! And let me tell you, this dress is….well, tiny.

The dress on the left is covered with equisitely made tassels. The red dress here is embroidered with flowers and studded with pearls and sequins. The white dress is tassled too. Touching these gowns was out of the question of course, but wouldn’t that be fabulous? We sewists are tactile creatures, aren’t we? After leaving the exhibit, I could hardly wait to get home to sew.

This week, I’ll be working on my look for the Day/Night Dress Challenge.  I’ll be posting my look on February 22. There’s a community challenget too and prizes…join us! dandc2019I

Happy sewing and thanks for stopping by!


Burda Style Cocoon Dress

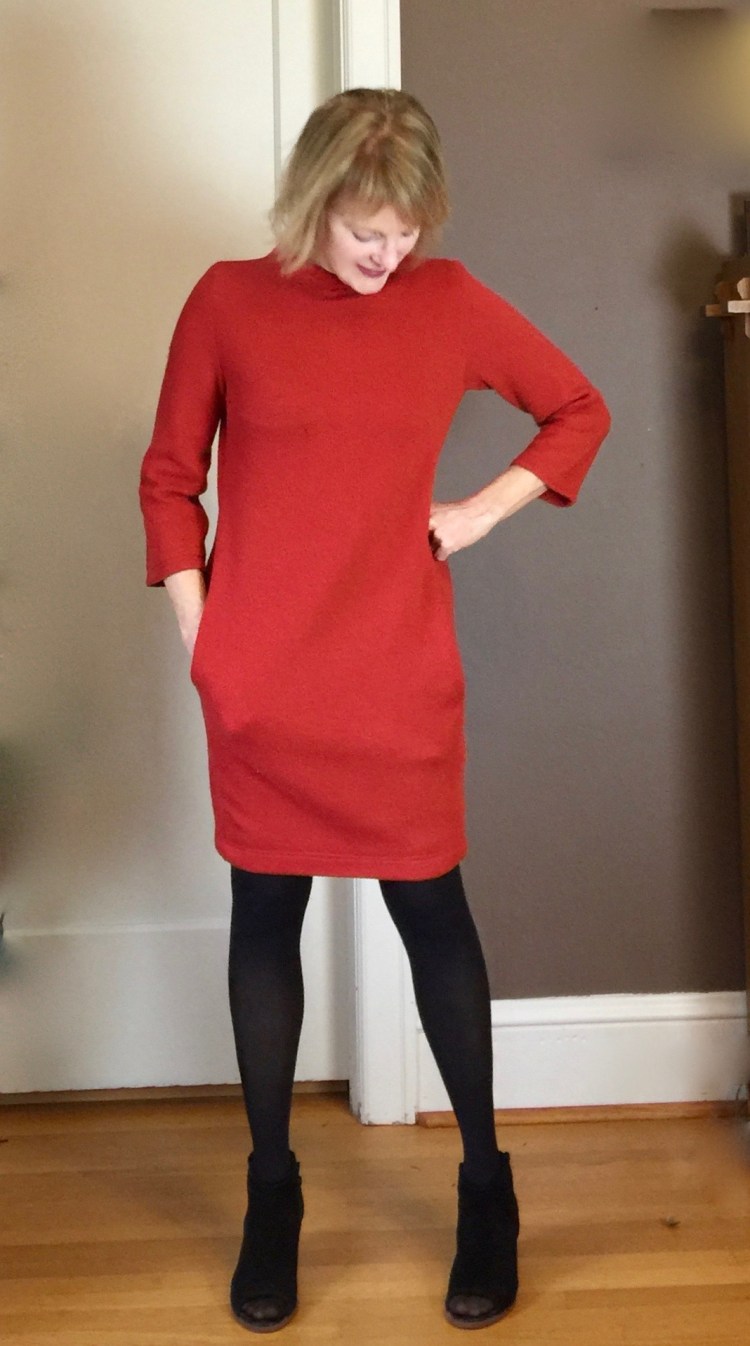
I have to admit it…There was very little forethought behind these two new ‘makes’. I made these cocoon dresses on a whim….merely because I thought they would look pretty good with my new Cocoon coat (here)! Shallow…but true. Now that the 2018 RTW fast is over, I’m feeling quite free. I can sew anything I want without a single thought about whether I ‘need’ it to fill a hole in my wardrobe or not.  Frivilous sewing is the life for me!!

I’m such a sucker for a good knit dress in the winter, so if anyone waves a pattern in front of my face that gives me an excuse to make yet another one, I’m all in. And this one has pockets, which makes it perfect!

img_0891

I absolutely love a dress with side seams that wrap around to the front. I’m a big fan of stand up collars too….so Audrey Hepburn!

img_0872

Burda Style patterns have never been on the top of my list because they come in a magazine insert, so they all have to be traced onto pattern paper before they’re cut and sewn, and, well, I hate tracing patterns. I’d much rather buy a paper pattern, thank you very much. But the design of this dress was too good to pass up. So, I put on a binge worthy show just did it. This Burda Style pattern (1/2019/111) was worth the effort.


I loved the pattern so much I made two versions – – one from a soft, ‘poppy’ colored sweater knit I bought at the Mill End Store, and one from a textured sweat shirt jersey that I found at Joann’s (on sale!).

img_0905

img_0867

It’s always interesting to see how different a dress/pattern looks with a two different knits. The gray textured jersey is a heavier moderate stretch knit so the dress and collar look more structured in that fabric. The poppy knit is so soft with a bit more stretch so the fit is loose and easy.

The dress went together easily. The collar is cut as part of the bodice so that makes things simple. The shape of the dress is created by the forward placement of the side seams. The hardest detail is the zipper at the back. Fitting is pretty straightforward…you can modify at the side or center back seam. I used a double needle for the sleeve hem and dress hem.

I love the neckline and the cocoon shape of this pattern – obviously, I’ll likely make it again. And the best part? Both dresses work under my new coat:)

img_0949 2

It’s always fun to follow an intense project like a coat with a less involved project, a palate cleanser! To be honest, the tracing of the pattern wasn’t as bad as I expected…really went pretty quickly and I’m getting better at figuring out all of those crazy lines on the magazine insert. So, there will definitely be more Burda Style makes in my future.

I  hope your New Year has had a strong start. I’m excited about all of the sewing happenings this month – – the Pattern Review Sewing Bee started this week. I’m not participating this year, but I love watching the fun. There should be lots of inspiration there. I’m hoping to make something for Sew Japanese In January, and there’s the Day/Night Dress Challenge coming up next month, hosted by Elizabeth Made This! Lots to look forward to…

Happy sewing and thanks for stopping by!

First Make of the New Year: Sew Over It Cocoon Coat

img_0492 2

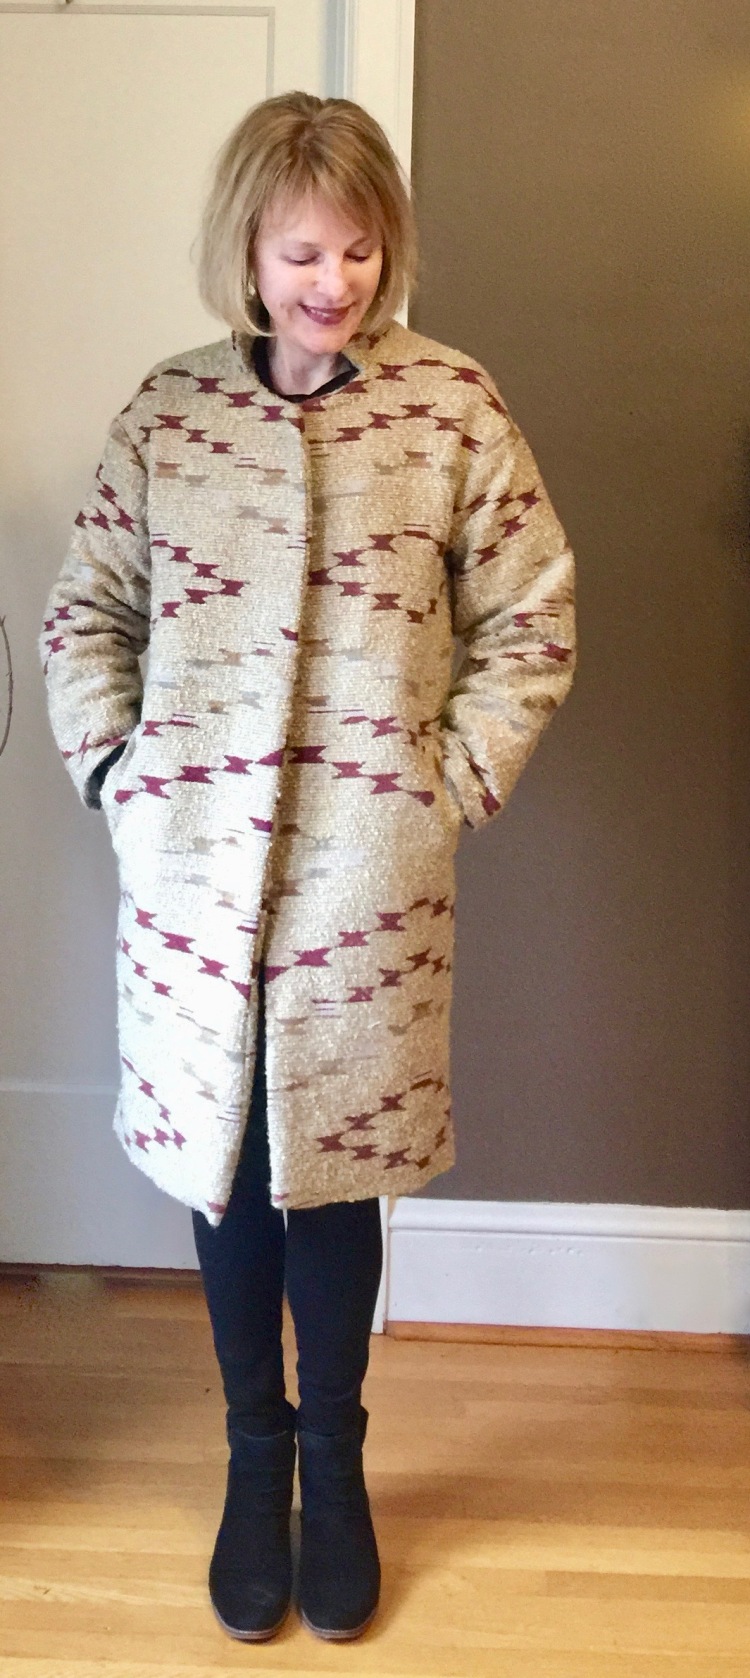
If you read my post on my sewing ‘Misses’ for 2018, you know that I’ve sworn off wearing or buying fabric with beige and brown tones.  Yet, I’m here today with a beige/tan coat, LOL! Well, I had to ignore my new rule, because I had this lovely wool in my stash, and couldn’t pass up the chance to use it!

I found this wool at the Mill End Store here in Portland. Honestly, that store is amazing. They have the best assortment of coat quality wools I have ever seen. If you plan to visit our city (PR Weekend 2019?!), you must make time to shop there. It’s a large store, so plan a good hour to explore.

The pattern: If a coat has a ‘cocoon’ shape, I’m a big fan (here’s the Sapporo coat I made last summer). I love this version from Lisa Comfort of Sew Over It.

460-2

Unfortunately, it isn’t available as a standard PDF pattern, but is offered as part of an issue of Lisa’s magazine, so you have to download the magazine to get the instructions and pattern. It’s easy to do ( the same as downloading a pattern), but it’s a bit unusual.


img_0403 2

Pressing is such a huge part of constructing a coat. This wool is really thick, so it was really hard to press, but the texture and yummy feel of the wool made it well worth the effort.  Thankfully, I have a gravity feed steam iron, so the task was made a bit easier. I can’t believe I struggled with the decision to buy one. It’s been such a great addition to my sewing room. This project would have been impossible without it.  If you’re considering purchasing one, I must recommend my Silver Star, but there are lots of other options on Amazon.0ff7fb1a-3683-4b25-9f9f-3ba2da8947dd_1.5f12e5f980943d7780f23b881a3d0b0c


The construction of the coat was pretty straightforward. The pattern instructions are adequate, but not overly detailed, but in terms of a good first pattern for a coat, this would be a great place to start.  The cocoon style makes fitting pretty easy. I think I’d call the style oversized (even though it doesn’t really look like that in the pattern photos.) I cut the smallest size and I had plenty of room to spare.

The trickiest part for me, was laying this coat out on my patterned fabric. I did pretty well with the matching of the pattern, but when the coat is closed (It’s meant to be worn open, but honestly in Oregon, that is so impractical), the front diamond looks a little bit off. This is because I overlapped the front to get some closure. I like the overlap and the snaps so much, I’ll live with the pattern being a little off to gain some comfort on blustery days.

All in all, I give a big thumbs up to this pattern! I’m really in love with the shape, and can imagine it in a solid wool, or maybe even in linen.


img_0481 3

Is there anything more satisfying than sewing a coat? In our climate, a coat gets alot of use, so I know this one will be reached for again and again. It took about 8 hours to make, but it was time well spent. And yes, I said ‘tans and brown tones’ were a no-no for me, but I feel pretty good in this coat…go figure. Maybe it’s because the tone has a bit of rust in it? Or maybe it’s because there’s a bit of contrast in the pattern that makes it work?

My first make of the new year!! I love this time of year as it’s a chance for a fresh start and a chance to plan the future. It’s so fun to see everyone’s posts on Instagram for the ‘make nine’ challenge. I’m working on my plans and pattern wish list for the year, and hope to share it soon.

Happy sewing and thanks for stopping by!

My #Sewing Top Five Misses 2018

Each year, I enjoy a review of my #Sewing Top Five Misses almost as much as my best top five. I always learn so much from my mistakes. So without further ado, here they are!top-5-of-2018.

IMG_0169

  1. Vogue top – Okay, when I made this,  I felt pretty clever because I constructed this top from odds and ends in my fabric stash. Ha! It’s such a mashup of colors and textures, I feel oddly distracted when I wear it. What was I thinking? New Motto – – keep it simple. To the donation pile!

IMG_3804

2. Aernite pants. I really loved these when I made them, but the color of the linen turned out to be problematic. It didn’t really work with anything in my wardrobe and it made me feel blah too. Lesson learned….I will avoid peachy beiges and tans in the future.

IMG_7747

3. The Darling Ranges dress by Megan Nielsen is a new favorite (I made three (3) versions!), but this version did not work for me. Again, the issue is the color of the stripes in the linen. It’s too peachy for me. Also, I think the dress is too long(?) so I feel rather frumpy in it. So many problems here. Ugh. The embroidered linen is so gorgeous though…too lovely to part with. I’m going try to modify the dress (shorten it to a top?) or reuse the fabric in some way.

IMG_5665

4. Simplicity Vintage top: What? you say. But this one is Blue! How can it be a miss?

This top is a clear miss because it’s so annoying to wear. I kid you not. Because it’s basically a wrap top with only a front and back panel, it depends on the tie to hold in the sides. That means when the tie loosens as you wear it, you enter the danger zone. If you don’t run off to a private place to re-tie, you will soon be showing all sorts of things best left covered.  Bummer as I made three of these. Thumbs down on this one….to the pile!

IMG_3283

5. Long Kimono top; I should love this one…the fabric, the kimono style…but I’ve never worn it. I cannot seem to find an appropriate venue/occasion. There’s something so awkward about it…maybe the length? A head scratcher for sure because I do love, LOVE this fabric so much and the style gets a big thumbs up from me.  Maybe I’ll shorten it next summer or recut it as something else. Hmmmm. I’ve got some thinking to do on this one.

Lessons learned – –

  1. Fabric in tan or beige-y tones is a no-no for me. (sigh).
  2. Avoid patterns where the design includes an element that might potentially be awkward or where you might be naked if it comes ‘undone’, LOL!
  3. Even though I love the look of a long cardigan or kimono, long isn’t always that easy to wear.
  4. Fabric that isn’t in my color palate is best left behind.
  5. Simple fabric, simple designs…they always work!

Well, that pretty much sums up the good and the not so good of 2018. I have no complaints. All in all, it was a very good year. That being said, I’d like 2019 to look a bit different. I’m hoping for some new creative adventures to sweeten my sewing experience and am thinking a lot about how to make that happen.

A fresh year, a fresh start. How was your 2018?

Happy sewing and thanks for stopping by!


An Anthropologie Inspired Burda Top


mL2l3J35Qjulp7CwY9UopA_thumb_11013If you ask me, the November and December issues of Burda Style magazine were so great, they more than justified the hefty price of U.S. subscription. This Anthropologie inspired make is from the November issue, and it’s just one of five patterns that I marke to trace. Yes, I always dread the task of tracing the patterns from the magazine…there are so many crazy lines to sort through! But the results were worth the effort!

Here’s the Velvet top from Anthropologie that inspired me to make this.  4110348695280_070_b

This Burda Style top is really close, minus the gathers at the shoulders.

rZMxr0WtSIumRgbFb3O9OA_thumb_110f3

Navy blue is such a hard color to photograph so I’m not sure how clearly you can see the waist-pleat detailing, but it adds a nice touch and it was easy to sew. This Burda Style pattern is 11/2018 Style 110.


The magazine version is made from stretch jersey so I made my version from stretch velvet. If you try it yourself, I highly recommend a stretchy jersey with lots of drape. I cut the smallest size and the fit is great. I did forget to add the seam allowances when I first traced the pattern pieces and had to retrace them. UGH. There are so many crazy lines going every which way on those pattern inserts. I guess you could avoid that frustrating step by paying for a download of the pattern from the website, but to me, that feels like paying for the pattern twice which I could not justify, since, in the US, a subscription is already a sizeable investment. Fortunately, there aren’t alot of pieces to this pattern so the tracing wasn’t too hard.

x2MmSKnwSw2mxLcTjL4YJg_thumb_110cb

The required sewing was quite easy! I’m always impressed at how well Burda Style patterns come together.  The instructions feel so abbreviated to me, yet the projects always seem to work out! The front bodice and neckline are finished with facings and they’re very simple to attach. The sleeves are set in and they went in easily. The tie is just inserted before attaching the facing. No big deal. Machine sewn hems finish both the bodice and sleeves.


I always worry about fit when I make a wrap top. There’s so much that can go wrong in terms of gaping in the front. Because of that, I celebrate when I find one that fits well. Since this one is a clear winner, I’ll likely try it again. I might even add a few inches for a dress. It’s a great addition to the wardrobe since it can be worn alone or with a white collared shirt. Probably a lacy tee would look great under it too.

It’s always great to add a new velvet piece to my wardrobe, since I am such a fan! I’m hoping to sew a few more things before I do my yearly wrap up, but it could be wishful thinking on my part:). Happy sewing and thanks for stopping by!


A Vogue Vintage Jacket in Plaid

IMG_9618 2 
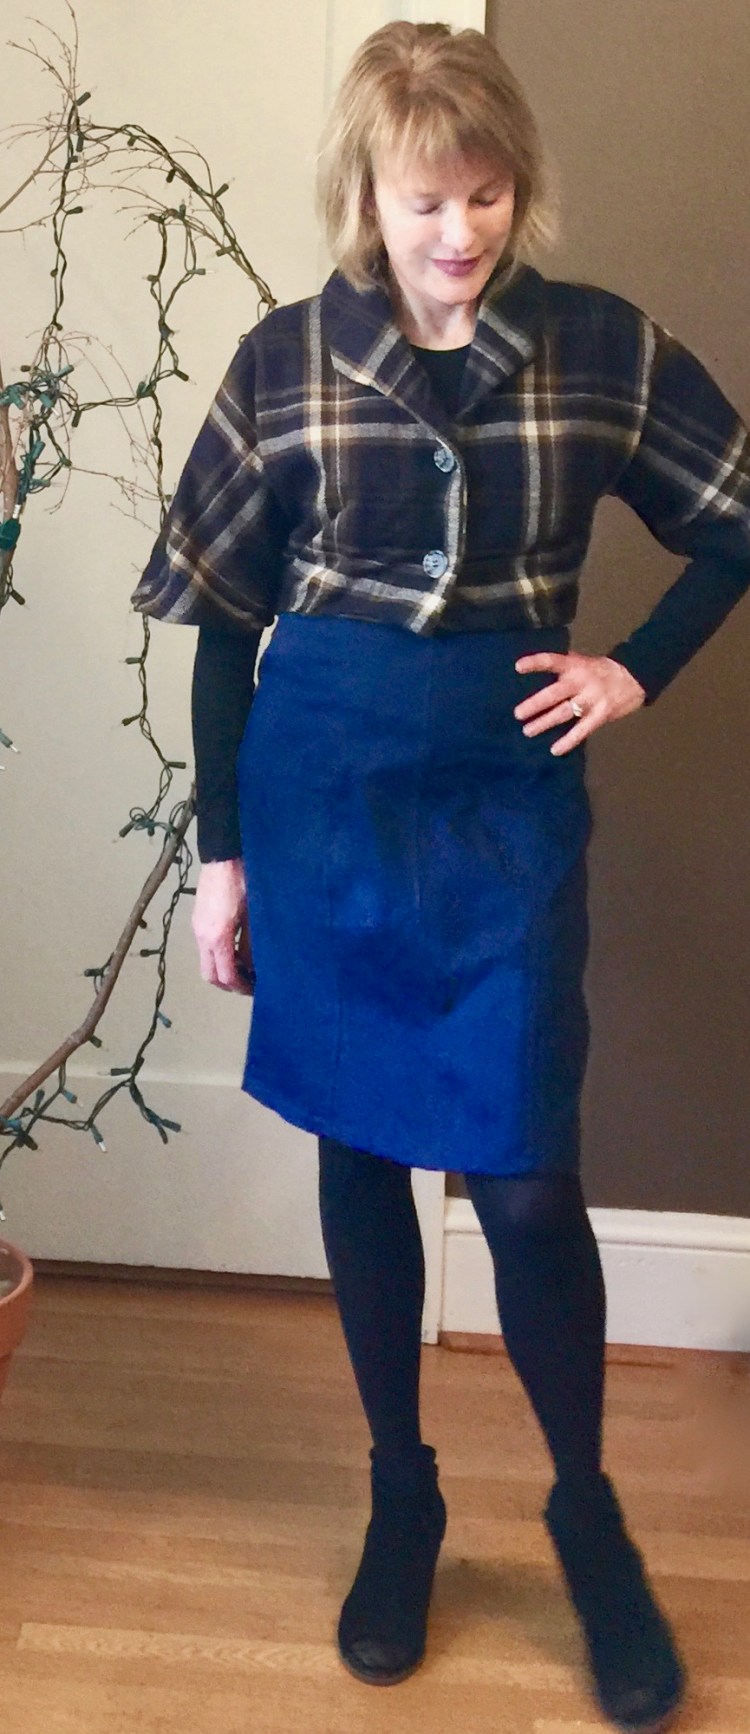
Hi all! I’m back from a bit of a holiday break with a plaid jacket, inspired by one I saw in Vogue pattern Magazine. If you’re like me, you look forward to each issue of the Vogue Pattern magazine because there is always something there that will spark an idea for a project. This issue was one of my favorites as it was all about PLAID.

vpm_product_0

Love the plaid coat on the cover!! Inside, a vintage Vogue jacket caught my eye, and I knew I’d have to make my own version.

IMG_9631


It’s hard not to love a good Vintage Vogue design! Vogue 9082 is especially appealing because it has a cute cropped jacket.


I made my jacket from a plaid I found at the Mill End Store here in Portland on my usual Fall visit there. I’m always on the lookout for classic but fun plaids, and, as usual, they did not disappoint. This fabric is really lovely in person; photos don’t do it justice. It has a bit of olive green and gold in it, and it’s so soft, a blend of wool and acrylic. I was lucky enough to get the last two yards on the bolt.

IMG_9598 2


Challenges: The pattern is pretty straightforward and pretty easy, but hey, I had to complicate things by making mine from plaid. It was a bit of a challenge to lay the pattern out because the sleeves are cut as part of the bodice. This means you must be sure that you place the plaid on the bodice carefully because that line follows down the sleeve. The good news is…because you don’t set in the sleeve, it means you get to avoid the whole sleeve to bodice matching ordeal, The bad news…the wrong placement could mean you’d have plaid sitting awkwardly on your shoulder. My plaid was large so a mistake would be glaring but I think it worked out well. By the way, my success rate with matching plaid has increased considerably since I started using Wonder Clips to hold things in place while cutting and sewing. s-l640

I love these things so much! Just posting a photo of them makes me want to buy a zillion more. You can find them at Joann’s, at craft stores, on Amazon. They are so useful and all the colors….I could go on and on!!

More about the challenges – – those collar points!!  From the line diagram, it appears that the collar is designed to look a bit more angular and pointed than in my version. Not sure why, but mine aren’t quite as dramatic as I expected. I think the error happened when I cut the bodice. When I inspected the pattern pieces later, to my surprise, I’d cut the collar points as I expected them to be, rather than how they were. Perhaps it was because I was binge watching Outlander. Blame it on Clare and Jamie.

IMG_9602 2


I think the cropped style works best with my highwaisted denim skirt (made here). It would probably work with jeans too!

Future posts and plans….

The holiday season is in full swing around here. It’s my favorite time of year because I get to sing in several Christmas concerts with my choir, which is such a privilege and joy. It also means I’ll be sewing a few fun EASY gifts for friends…Curious if you are too?  My next post will probably be about that. In other news, the year is coming to an end, as is the 2018 RTW fast and I’ve been thinking alot about that experience and what it’s meant to my sewing journey so I’ll share those thoughts too. Then, of course there will be a hits and misses post for 2018. So much to talk about!

I hope you had a nice holiday with family and friends. Happy sewing and thanks for stopping by!


Blackwood Cardigan vs. McCalls 6844

You can never have too many cardigans. I feel quite certain about that. That’s why, each Fall, I find myself yearning for a new one…or two.  I’ve made several in the past (here and here) but today I want to talk about the two cardigan patterns I reach for time and again – –  the Blackwood cardigan by Helen’s closet and McCall’s 6844 (OOP but available on-line). Both patterns are easy to sew and friendly to a variety of knit fabric options. It’s the neckline that is usually the deciding factor in why I choose to make one over the other.

IMG_9104 3This version of McCalls 6844 is a coatigan of sorts. I found this thick sweater knit at Joann’s. The weight is perfect for this time of year, and the stretch recovery is great for this pattern.

6844line

I made view B but lengthened it by six inches. I love long cardigans these days (my Pinterest page is proof of that). The wide shawl collar makes it so warm, and by cutting the front bodice pieces a bit wider than I normally need, I was able to make the closure have a bit of an overlap, which makes it appropriate for windy weather.

IMG_9093 2Next up is (no surprise) the Blackwood cardigan by Helen’s Closet. Who doesn’t love this pattern?

IMG_9242I’ve made this before, but this time, I really wanted a stripe along a solid front band for contrast, as I’ve seen that detail on RTW cardigans.

IMG_9225 3With this striped fabric, I got lucky! The selvege edge of my fabric was solid navy with a thin purple stripe, and I had enough fabric to manage to cut the entire neck band from it!! Such a perfect opportunity to add a fun easy detail to this cardigan.  Again, I made this version very, very long. The advantage is that the longer look makes a shrimp like me feel tall. The bad news? It’s so long, none of my coats cover it. Such problems….

My new cardigans are so wardrobe friendly since they go with everything in my closet. I know they’ll get alot of mileage! What’s your favorite cardigan pattern these days?

The holidays are coming and I cannot let the season go by without a new velvet make so that’s on my sewing to do list. Oh, I guess I’ll have to go on Pinterest and start a new ‘velvet inspiration’ page, don’t you think?

Happy sewing and thanks for stopping by!