Sewing and Print Mixing with Liberty Florals

Wow, it’s been awhile. My lack of posts over the last few months is puzzling even to me. I suppose it’s a consequence of the pandemic. During the lockdown, I found myself lacking motivation as I struggled to find a new routine for my days. I never intended to stop writing and blogging. It just sort of happened. But since being vaccinated, I’m feeling more energized and hopeful. Do you feel it too? I do hope we’ll all back to a pleasant routine soon. In any event, I do love talking about sewing and fabric and our lovely community of sewists. So, onward!

It’s no secret that I love to sew with Liberty Cotton Lawn. Over the years, I’ve purchased more than a few yards of their pretty prints. Because I love them so, I never toss out any of the lovely little bits at the end of a project. As you can imagine, over the years I’ve accumulated quite a stash of Liberty remnants! What to do…? Sew from my stash, of course.

At first, I was intimidating by my mountain of remnants. But when I tossed a few favorites onto my cutting table, I saw a trend….the color theme was dominated by blue and gray. Yes, my color choices tend to be somewhat boring at times, but the good news is the prints in my stash naturally work together.

My first attempt was an Grainline Archer using three liberty prints.

I played around with ideas for awhile, but ended up using one dark remnant for the cuffs, the front button placket and the collar, another for the front and back yoke. An added benefit of using a darker print for the button placket is that the white buttons really pop against the navy. The Liberty print I used for the bodice is called Thorpe, a classic print that comes in many different colors.

For my second attempt, I used a pattern that’s new this year, the Harriet Blouse, a pattern designed by Mijke of @sewitcurly. This pattern has so many details that make it perfect for pattern mixing! It has lovely curved yokes, deep cuffs and a rounded collar. I used two Liberty prints for this one.

I was impressed by how well drafted this pattern is! With regard to fit, I didn’t have to make any adjustments, but just cut my usual size. I modified the style a bit. Instead of long sleeves, I shortened them to three quarter and self drafted a small cuff. Because I plan on wearing this when the weather is warm, shorter sleeves were a better choice for me. I do love the puffy sleeves on this one!

It was such fun to play with these prints. I used to think that florals as a wardrobe choice was limiting, but I find these timeless classic prints look good with everything. I can’t wait to try a bit of mixing and matching on another project!

Happy sewing and thanks for stopping by.

A Sierra Jacket in Forest Green

Whoa….It’s been awhile since I’ve posted!  My mother-in-law died recently and it’s been a sad, low energy time for me. I drifted into a space where I had very little time or mental space to create. The experience of being away from sewing deepened my appreciation of it though. I’m so happy to be back with a new make, the Sierra Jacket from Closet Case Patterns. 

The design of this unlined jacket has such a cool ‘french’ vibe to me. From what I understand, Heather of Closet Case Patterns was inspired by a old canvas maker’s jacket she owned. The pattern includes two views, a long version that’s cinched at the waist and a shorter, boxier version with buttons down the front. 

Of course, an unlined jacket is the perfect opportunity to practice some nice seam finishings. I flat-felled most of the seams to keep the inside looking neat, then added some bias binding in a contrasting stripe to the front facing. It makes me so happy to look at the inside of this jacket!

The fabric I chose is a medium weight twill in deep forest green. It’s the perfect weight for days when you need a light layer. It’s pretty cold here now, so I’ve been wearing my Sierra like a blazer under my coat, but will use it as outwear in the Spring and Fall. 

Details I love…There’s a cool side tie and an extra pocket inside the front for carrying your cell phone or what ever. You can even put a pocket on the sleeve. I didn’t have enough fabric for that this time around, but will definitely add that next time. I love the two piece sleeves too, and the cinched waist. The shorter version has buttons and sleeve pockets. Trust me…I’ll make that one soon, maybe out of corduroy .

The fit of this jacket is oversized and a bit boxy so be forewarned. I like it that way, but will cut one size smaller next time. Construction steps are well explained as is the usual with this company.


I’m in love with this jacket in part because of the color… forest green. For some reason, it seems hard to find these days! The jacket is so fun to make and wear..I know I’ll make the shorter version soon!

Happy sewing and thanks for stopping by.

My ‘go-to’ outfit: wide leg pants and a safari style top

IMG_2448 2

Each season, there’s one me-made outfit that seems to rise above the rest. This one is it! A pair of cropped, wide-legged pants and a linen Fringe top – -nothing unusual or particularly earth shattering about these makes. Yet,  I find myself reaching for them over and over again.

Honestly, these pants are the best thing I’ve made in a long while!

IMG_2366

Like every other sewing blogger, I have fallen in love with wide legged pants.  They have the double appeal of being stylish and easy-to-wear.  The fact that these were an easy ‘sew’ is the icing on the cake!

8841.jpg

Simplicity 8841 is an easy-to-sew pattern with a elastic waist and huge pockets. There’s a straightlegged version and a wide legged version, cropped or full length. I went for the wide-legged cropped version, a look I’ve really grown to love.

IMG_2442.jpeg

I chose lightweight cotton chambray for this version. The fabric is so soft, these pants qualify as secret pajamas for sure! There are belt loops and a belt as well, so if I want to tuck something in, the elastic waist is well hidden.

This modified Fringe top is the perfect mate for these pants.

IMG_2441.jpeg

If you aren’t familiar with Chalk and Notch’s Fringe blouse/dress pattern, I can highly recommend it! It was the darling of Instagram for a while, and I fell in love with the many variations I saw there. Search the #fringedresspattern hastag on Instagram and you’ll see what I mean!

To make my top, I modified View A to give it a bit more of a Safari vibe. I left the upper bodice and neckline as designed (and they fit like a dream!).  Then, instead of gathering the bottom bodice panel,  I cut it to fit the measurement of the upper bodice lower seam, plus a seam allowance. I also drafted darts on the lower bodice to mimic those on the upper bodice. The pattern suggests you insert the ties in the side seams or in the back bodice darts. I chose to put them in the back darts, and I think that’s part of the reason the bodice fits so well. I love the sleeve cuffs and the button tabs.

IMG_2435

The appeal of this pattern for me is the lovely v-neck and spot on fit of the bodice. I’ve already cut a dress version, and am interested in another top, likely another modified version. Yes, I was late to the Fringe dress party, but better late than never. This pattern will be a tried and true that will take me into Fall as well.

Fall sewing is on my mind, as well as a few added wardrobe items for a trip to Italy in September. My sewing machine is fired up and ready for a marathon of projects this month, so watch for more blog posts. There will be a few….:) Happy sewing and thanks for stopping by!

New Pattern Release: Sew Over It Bonnie Top/Dress

IMG_1008 3Hi All – – When I saw the sketches of the new Bonnie Top from Sew over It London I was thrilled. If you’re like me, you have a closet full of high waisted pants/skirts, but no tops to go with. I knew that this lovely ‘cropped’ top would fill a hole in my wardrobe. Not only that, but the Bonnie top has pleats! IMG_1005 2The Bonnie has a 1940s vibe with its defined waist, button up front and vertical pleats. It has a cute flat collar and short sleeves with little turn-up cuffs, a design detail that is subtle but effective. I like that the button placket is concealed – – it makes it a bit more polisihed – – a top that can go to a dress up event. There’s a dress version as well that has a knee length gathered skirt and a comfortable elastic waist.  I do love the pleats, but if you want a faster make, there’s a version of the Bonnie without pleats too. I know there will be a version of that view in my future.

I used a lightweight rayon for my version of the Bonnie, and it worked perfectly. Sew Over It recommends rayon/viscose, lightweight crepes, georgette, chiffon or very fine cotton voiles, in other words anything soft and drapey. I’d warn against anything heavier like a stiff cotton. The pleats wouldn’t have a chance to shine. If you are making the pleated version, the wider the fabric the better, as you need lots of room to lay out the front bodice as the pleats make it fairly wide.

IMG_1003.jpeg

Fit and sizing – – I made my size according to my measurements and it fit nicely, without adjustment. I spent a bit of time fussing about the fit of the waistband, but I shouldn’t have bothered. The buttons don’t extend there so the waistband falls open ever so slightly…the fit isn’t tricky at all.

Construction– -When it comes to the pleats, I found the trick was to carefully mark them on my fabric. From there, construction was simple…. All I had to do is fold, press and sew!  Thankfully, the Bonnie  has very clear markings. I transferred them using a chaco marker. Once I’d accomplished that, pleat constructions was easy and fast. The concealed front placket was pretty simple too  once I had the markings transferred.

IMG_0998.jpegI love my new Bonnie top and plan to wear it with my high waisted skirts (the skirt I’m wearing is blogged here), pants, perhaps even with jeans. I can imagine an even dressier version out of silk or chiffon, and the dress version is on my ‘must-make’ list. Really, the Bonnie is one of my favorite Sew Over It patterns! Thanks to the Sew Over It London team for giving me the opportunity to make this lovely pattern!

Happy sewing and thanks for stopping by!

As a Sew Over It Pattern Insider, I received a download of this pattern for free, but the opinions expressed here are my own. 

Butterick 6592 Three Ways

Me Made May has been so revealing! My pledge this year was to wear the me-mades that were taking up valuable closet space, but weren’t getting much use. That lead to some ‘aha’ moments. 1. I prefer tops made of rayon, jersey knit, cotton lawn or linen (I hate stiff cottons!). 2. I love wearing skirts, pants but dresses…? Not so much (but I love to sew them!) 3. I do not enjoy wearing sleeveless tops or dresses not matter how hot it is. Yes, I have a few, but I never wear them! I’ve always had a thing about my arms, that less is more, LOL. 

That last conclusion led to one of this post’s projects. I pulled all of my sleeveless tops from my closet, determined to add sleeves. Easier said than done.  As you all know, that remedy relies on a stash of remnants that includes pieces of fabric from past projects. I used to have buckets of remnants, but that was before my commitment to ‘tidy up’. I was convinced those remnants weren’t giving me joy, so I discarded/donated most  of them a month ago! What I wouldn’t give to have them back again!!

The good news…I was able to locate enough fabric to add sleeves to this first version of my new favorite pattern, Butterick 6592. Yes, the sleeves are tiny, but I do love this top now.

I used Butterick 6592 for the three tops in this post, and it has alot to offer.  

The bodice can be made with or without a peplum, and there are three sleeve options, which makes the pattern a good value if you ask me. It’s a simple pattern to complete. The bodice is shaped by darts and the neck opening is finished with a zipper. Fit on this one is easy. I cut my usual size according to my measurements and it fits like a dream without tricky modifications.

This is view A, and for this version, I used a vintage linen table cloth that I picked up at a estate sale. The trick here was to place the cut out details in the right place on the bodice and sleeves. I used the scalloped edges of the table cloth as the finish for the sleeves. this is the second top I’ve made from a tablecloth, and it was so fun to sew!

The loose fit makes this top really comfortable and cool. Yes, it wrinkles easily, but that’s linen for you! I know this will be one of my favorite tops this summer.

This last version of B6592 is made from a remnant of silk I found last summer in the bin at the Mill End store here in Portland. It doesn’t photograph that well, but the blue is really lovely, with contrast bits of gray and off-white.

This is view B, the peplum bodice with a modified sleeve (no ruffle). Silk is so fabulous to wear – – I don’t know why I don’t treat myself to its luxury more often. I like this peplum because it isn’t too flouncy. For this version, I shortened the waist by 5/8 of an inch because the peplum is supposed to hit above the waist.

It’s always so fun to see how a single pattern can be used to create different looks. Any pattern that provides so many fun options, gets a big thumbs up from me! Besides that, it only takes a couple of hours to complete — Make it this weekend! I searched Instagram and Pattern Review for other versions of this pattern, but didn’t find much. I’m not sure why it isn’t popular, as I can see more versions of this in my future.

Happy sewing and thanks for stopping by!

New Pattern: Sew Over It Kitty Dress

IMG_6897

As a Sew Over It Pattern Insider, I had the opportunity to test Sew Over It’s latest pattern, the Kitty Dress. I love a good shirt dress (here and hereand this one is perfect with lots of design details and options that make it unique – a shawl collar, a gathered or paneled skirt, and your choice of sleeves or no sleeves at all.

IMG_6724

It’s the design of the Kitty dress that makes it tick all the boxes for me. It’s so versatile- – two bodice and skirt styles that you can mix and match!  You can choose a princess seam bodice or a two-dart bodice. Both choices can be paired with one of two skirts: either paneled or a gathered option.  Both skirts feature in-seam pockets, and all versions are cinched in at the waist with a waistband, which makes them look great on everyone.

If I had to rate the difficulty of this pattern, I’d say it’s a great option for an intermediate sewer, or for a beginner who wants to learn some new skills. The instructions are detailed and helpful, so it’s easy to dive right in!

IMG_6920

It’s no secret that I love sewing patterns that give you options so that you can play and modify as inspired. At first, since I’m a fan of a bodice with princess seams, I was drawn to option 1, but when I made my fabric choice, I changed to option two. My rayon print is colorful, and I felt the princess seam detail would be lost in the fabric’s design. So, instead, I paired the double-darted bodice option with the gathered skirt.

I love long flow-y dresses in the Spring and Summer, so I made my Kitty dress from a lovely rayon from Joanns’. This rayon has a bit of texture to it, giving it a casual crinkled look that I love. The drape of this rayon is perfect for my mid-length Kitty because it gives the skirt some swish! For added style, I chose the shawl collar, which has a bit of a vintage vibe.

IMG_6716

The double darted bodice was easy to sew – -just two pattern pieces, both shaped nicely by bust darts and waist darts. Because I have a large waist relative to my bust measurement, I made a test version to make sure the fit was accurate, and I’m glad I did.  I quickly realized the darts needed to be widened slightly to compensate for my non-standard waist.

Fitting the gathered skirt was easy. I used my hip measurements to choose the size to cut and it worked great without adjustments. Gathered skirts are so forgiving and so easy to sew!! I love the way this skirt looks and swishes in the mid-calf length. It’s all I was hoping it woud be.

IMG_6912

I love my Kitty dress, so much, version one is in my sewing queue( princess seams and sleeveless), maybe in a cotton lawn or linen for summer. The updated version of the Kitty is available at Sew Over It now.

The weather here in Portland is improving – I hope to take my Kitty outside for a test run soon!

Happy sewing and thanks for stopping by.

.

The Saraste Shirt, my Me-Made-May Hero

IMG_6940

When I completed the Saraste shirt, I wasn’t totally ‘in-love’ with it. In fact, I immediately pushed it to the far right side of my closet, the place where the ‘never to be worn’s’ go. It’s a sad corner and it makes me feel a bit guilty. It’s all the me-mades that were fun to sew, yet, when all was said and done, I couldn’t imagine actually wearing it.

That was the sad story of this recent reject, but everything changed when Me-Made May rolled around. This year, my pledge was a bit different. Since I already wear me-mades every day, I pledged to wear the ones that I abandoned, and try to analyze why. This is one of those makes.

IMG_6970

It might be the fabric that put me off. It’s a floral print and, when I purchased it, I thought it was a random print. When I laid it out on my cutting table, I discovered that there’s a strong repeat….pattern matching would be involved! Ugh. That discovery made me a bit cranky as I wasn’t sure I’d purchased enough fabric to make this work, but I managed to pull it off, carrying the pattern through on the sleeves and the back.

IMG_6946

I do love the fit of this shirt! The Saraste shirt is a pattern from Named Clothing’s book,  ‘Breaking the Pattern’.

COVER

I’ve made several of the patterns in this book now (here), and they’ve all been fabulous. The Saraste shirt is one of my favorites with many elements I love: princess seams down the front, a back yoke, optional sleeves and a small collar that fits my short neck. The surprise detail is small cut- outs at the shoulder, which I love.

IMG_6950

They were a bit of a challenge though. My tip is to be sure to trace the pattern carefully, noting all of the markings accurately. I hadn’t done that and had to go back and add them in. Once I had that accomplished, it wasn’t too hard to make everything work. However, I’m a bit disappointed that the cut-outs don’t show that well in my print. I’m going to have to give this lovely pattern another try in a solid colored linen, so that those slits can shine!

My Me-made analysis – – I do love the print now, but at first glance, I wasn’t too excited about it in this shirt. However, I have worn it many times this month and have discovered that it goes with everything in my closet. The fit is perfect and the shirt is easy to wear. In fact, people compliment me when I wear it:)

Lesson learned…my first take on a make shouldn’t be my last.   IMG_6959

How are you doing with Me-Made May? Any new revelations?

Happy sewing and thanks for stopping by!

Sew Over It Meredith Wrap Dress

IMG_6124

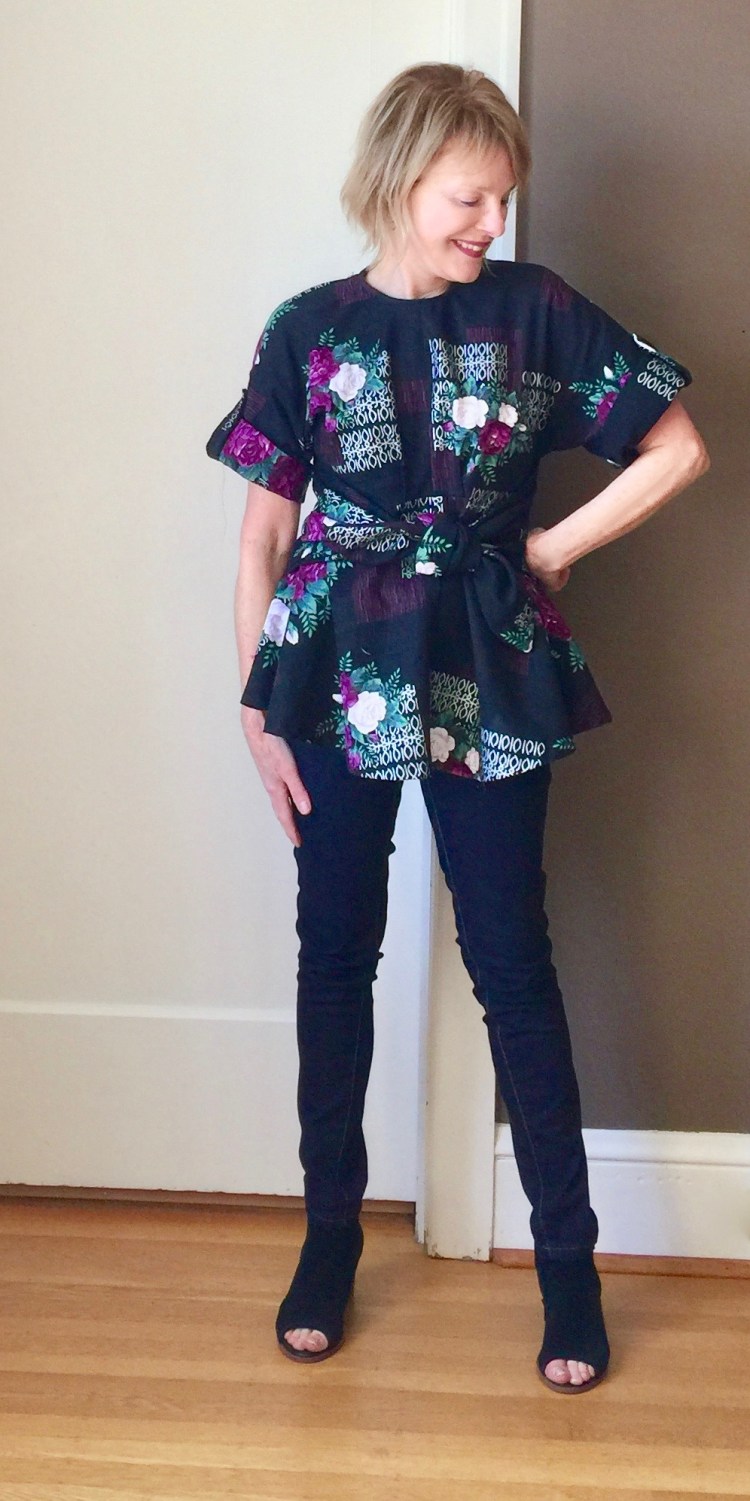
I was so pleased to be invited to be a Pattern Insider for Sew Over It patterns. I’ve been in love with their designs (especially the awesome Cocoon Coat here) so I’m excited to have the opportunity to show your their new release patterns here.

IMG_6102


The Meredith Wrap Dress was love at first sight for me. I do love a good wrap dress and this one did not disappoint. It comes in a short and love version with sleeve length variations.

I made the longer version, probably because the weather has been so cool here lately. As summer heat rolls in though, I might be inclined to shorten this hem a bit.

IMG_6130I’m so impressed with the fit of this dress! There isn’t a gap at the front and the neckline is just right, not too low like some patterns. I cut the size my measurements indicated and it fit perfectly, without any adjustments, always a win if you ask me:). Assembling the dress is pretty straightforward. Unlike some other wrap dresses I’ve tried, this pattern has one long front facing which makes it easy to stitch this dress together quickly. The two front bodices are mirror images of each other (rather than one bodice cut wide and one narrow to make the wrap), so the wrap closure is secure and comfortable to wear. The sleeves set in beautifully.  The tie is attached to the front facings before they’re stitched together.


IMG_6085I made my dress out of a soft jersey that I found at Modern Domestic here in Portland (also on-line). It’s the loveliest fabric to wear and sew with – – if only I could wear this dress all the time. It has just the right amount of two way stretch for the Meredith Dress. Really, any stretchy knit will do! I could imagine this in a silky rayon knit, or in a scuba knit too.

IMG_6098

The Meredith gets a big thumbs up from me, and there will likely be more of these in my future. I love my print jersey version, but could see this working well in a solid color. It would make a very elegant little black dress don’t you think?  Hmmm… The Meredith was just released, and it should be up on the Sew Over It website now.

Happy sewing and thanks for stopping by.

Disclaimer: As a Sew Over It Pattern Insider, I receive a free pdf copy of the pattern in return for my review, but the opinion expressed here is mine:)

A wrap shirt from my first Japanese pattern book

IMG_5784

A wrap shirt…Looks tricky, doesn’t it? Actually, it’s all in how the shirt is buttoned up!  If you want to, you button it up the traditional way.

IMG_5814

But why would you want to, when you can do this?

A simple modification makes the wrap possible. You add a loop to one side seam, a button to the other, and viola! You have a wrap shirt.

IMG_5782

I admit it. I bought my first japanese sewing book because this cute shirt was on the front cover. I just had to give it a try.

41J7FSmIQ1L._SX365_BO1,204,203,200_

I can’t tell you why it’s taken me so long to experience the world of japanese pattern books. Perhaps, it’s because I assumed the patterns would be hard. This book, Simply Sewn, written by Michiyo Ito, shows how wrong I was. It has a variety of patterns in them, none of them especially tricky, but all of them stylish and interesting. collage


I’m so intrigued by both the hooded jacket and the cropped polka dot jacket. Now that I’ve tried one pattern and loved it, those are next on the list.

To be sure, when sewing with a pattern book, there are challenges to be faced. You have to trace the patterns (ugh, but I am getting better at it), and you have to select your size, in this instance, either S, M, L, or XL. The sizing is a bit different than what you’d find in a Big 4 pattern, but there’s a chart and a thoughtful explanation of how to choose your size. You also must add a seam allowance, a easy detail to deal with. The good news…unlike some others, this book includes full size pattern pieces and the pattern markings used are straightforward.

IMG_5778Based on my measurements, I chose a size small, and found it to be perfect. There isn’t alot of ‘fuss’ to the instructions, which I often find confuses me more than helps. They were complete and easy to understand. With each style, there’s a pattern layout chart, and construction steps with a few diagrams. Everything was pretty straightforward on this pattern so I didn’t find any challenges. The sleeve is finished with a cuff, the button tab is folded fabric, and the collar is simply drafted and sewn in place.

I really love this book and the styles there, so there will likely be another japanese pattern book in my future. Here are a few I’m considering….

51YvNlMf-BL._SX398_BO1,204,203,200_

41aTbFPnahL._SX399_BO1,204,203,200_

41e38YJ1mcL._SX396_BO1,204,203,200_

There are so many to choose from, a huge new world of possibilities.  I’m so glad I took the leap and gave this pattern a try! I know I’ll wear this shirt constantly this summer, both wrapped and buttoned up.

Have you tried Japanese pattern books? Do you have a favorite?

Happy sewing and thanks for stopping by!


Finding Violet and Vogue 9363

IMG_4895I’ve really enjoyed the #sew happy color challenge on Instagram. It’s inspired so many lovely posts by members of our sewing community! The premise of the challenge (created by @katiekortmanart) has been to explore combining complimentary colors in new ways. For me, it’s been an opportunity to look at the colors I love and to think about ways I can have more of them in my wardrobe and life.

This last week of #sewhappycolor features violet and blue. Blue…well, you all know how much I love that color (LOL). My wardrobe includes so many blue options, I could wear the color every day if I wanted. I love violet too, but my stash of fabric and wardrobe doesn’t really reflect that at all.

IMG_4849

So I took a trip to the fabric store, intending to buy a beautiful piece of violet fabric. Instead, I ended up with a print. It’s the scale of this one that caught my eye. The areas of solid black provide negative space that really allows the large violet flowers to pop. I really love this print….Hmmm, need/want more like this…

IMG_4980

Vogue 9363 is my pattern, new this Spring. I can’t resist a pattern with a front tie!  (see my other tie makes here, here and here)

Construction: Although the fabric recommendations include rayon and crepe (lots of drape), I chose Japanese cotton because I wanted the top to look more structured. It was such a such a dream to work with. It shapes beautifully and is a joy to press. The pattern is well drafted too. I cut my usual size and have absolutely no complaints about the fit. The curve of the front bodice seam gives it a unique drape, and the sleeves are easy as they are cut as part of the front and back bodice. There’s a zipper in the back and the loose fit is shaped by front and back bodice darts as well as the wide belt. It’s an easy top to fit and wear.

Changes modifications: I made the short sleeve version of the top/tunic. The pattern suggests the sleeves be finished with a machine hem, but since the print has a bit of a vintage vibe to it, I decided to add a rolled cuff to the sleeve with a buttoned sleeve tab. I really like the finished look of the rolled cuff on this generous sleeve.

IMG_4981

This lovely print has reinforced my love for violet. I’m hoping there will be more of this happy color in my future. For more inspiration and information about complimentary colors, check out Katie’s blog…it’s a wealth of information very enthusiastically presented. #Sewhappycolor was such brilliant idea – – Thanks Katie! Have you all enjoyed #sewhappycolor too? Any new revelations?

Happy sewing and thanks for stopping by!