A Gift to Sew: How To Make a Fringed Circle Vest

PicMonkey Collage-8Sometimes the simplest make gives you the most pleasure. Every time I wear one of these vests, I feel stylish, cozy and comfortable. It’s a simple design that brings compliments and the question….where can I buy that?

My love affair with circle vests started several years ago when I was gifted a pattern for one. I soon realized I didn’t really need one at all since it’s just a circle. But the trick is in the proportions.  The patterned vest was a bit too voluminous for me, and it wouldn’t fit under my coat. So, I played around with the concept using fabric scraps and muslin and came up with an updated variation that works better for me.


These vests are a great wardrobe addition because they can be worn open or closed. This particular version is reversible, made from two fabrics sewn together, a solid and a plaid. You can finish the edge with bias binding, but fringe is great too. To fringe a vest, sew around it at 5/8″ then use a seam ripper to pull threads from the edge to make the fringe.

IMG_9880

The short vest takes a yard of each of two fabrics. For me, the long vest can be made from a yard and 3/8.

The basic concept of a circle vest is introduced in this Thread magazine blog post. In a nutshell…

  • Circumference of the circle: your bust measurement
  • Distance between armhole: the width of your back from arm to arm
  • Depth of the armhole: Top of the shoulder to 3” below your armpit for the depth of the armhole.

I liked this method, but found the vest to be a bit short. So, I modified it by adding 3”to the width of the circle. I  did this to give the front of the vest more drape.

Here’s a double-sided flannel vest with bound edges. I used two heavy weight flannels so it’s cozy but a bit stiff. The edges are bound with fleece binding.

IMG_9956

Here’s the long version in boiled wool.

IMG_9918

To make the long version I added a few extra inches to the length of the oval. I eliminated the bias binding, fringing the edges instead. Here’s a visual of the pattern I drafted for mine.

IMG_0104

I only used a yard and a half of fabric by folding the fabric selvage to selvage and cutting my oval from that.

IMG_0107

I’m not sure which version I like the best….I’m such fan of plaids and this project is a perfect way to use them all!

IMG_9845

IMG_9926 2

IMG_9934

It’s always so satisfying to find make a stylish and unique gift for a friend. A unique fabric choice can really make this a stand out piece in any wardrobe. It’s also a great addition to your wardrobe too. As they say, One for you…One For ME!!! 

Happy sewing and thanks for stopping by!


A Vogue Vintage Jacket in Plaid

IMG_9618 2 
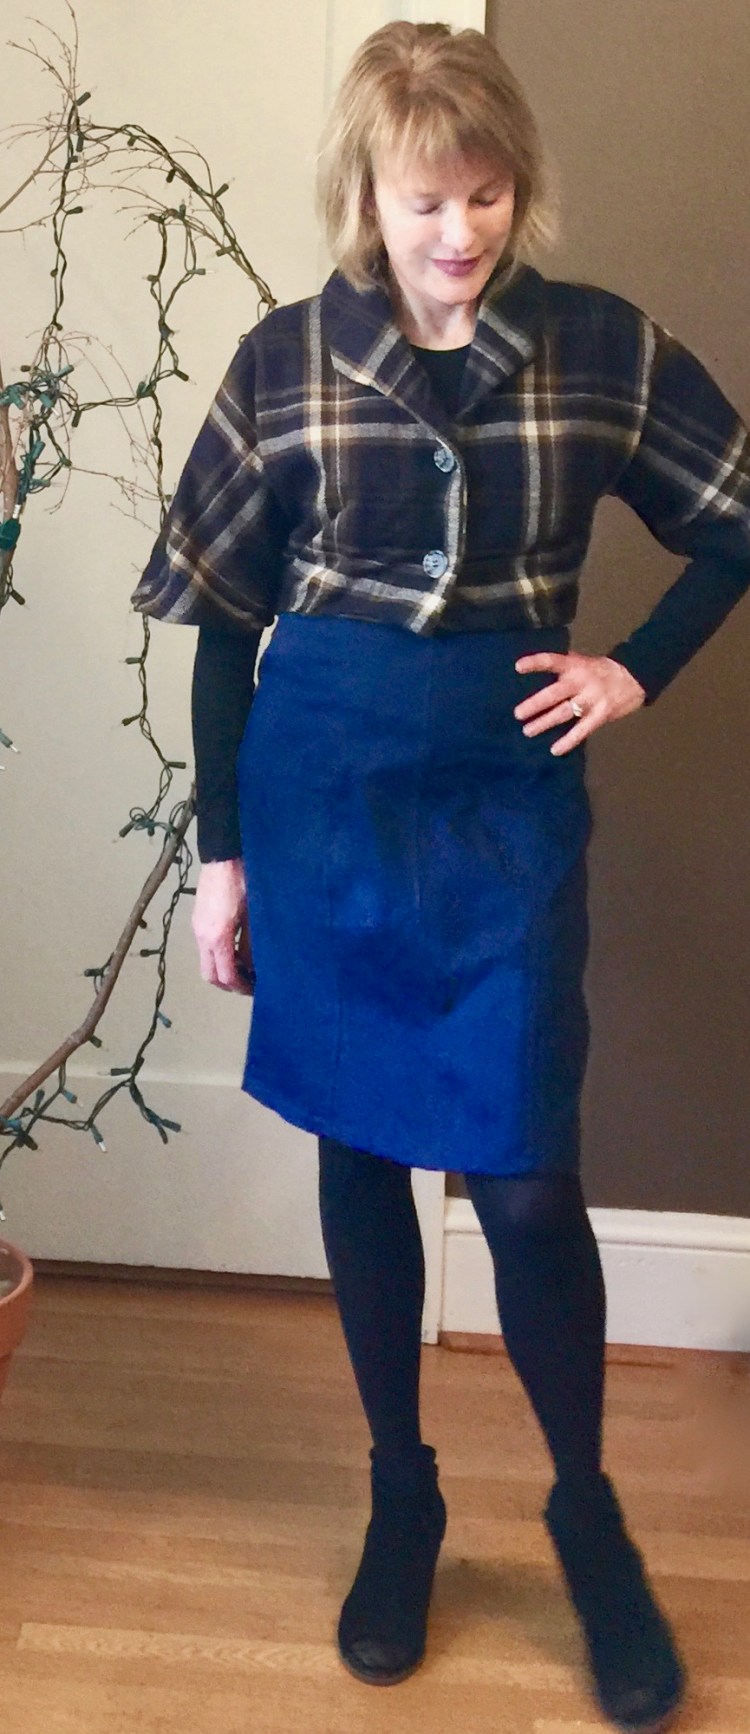
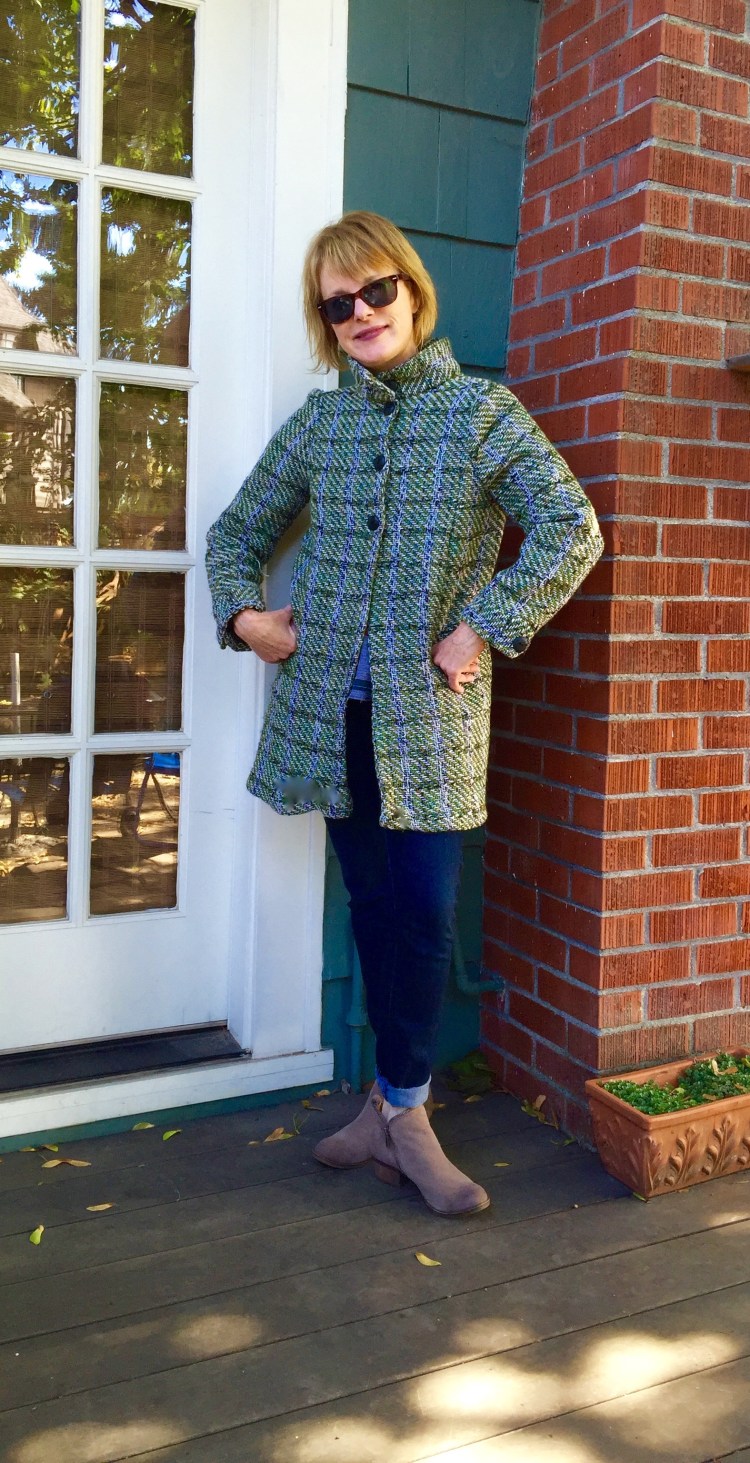
Hi all! I’m back from a bit of a holiday break with a plaid jacket, inspired by one I saw in Vogue pattern Magazine. If you’re like me, you look forward to each issue of the Vogue Pattern magazine because there is always something there that will spark an idea for a project. This issue was one of my favorites as it was all about PLAID.

vpm_product_0

Love the plaid coat on the cover!! Inside, a vintage Vogue jacket caught my eye, and I knew I’d have to make my own version.

IMG_9631


It’s hard not to love a good Vintage Vogue design! Vogue 9082 is especially appealing because it has a cute cropped jacket.


I made my jacket from a plaid I found at the Mill End Store here in Portland on my usual Fall visit there. I’m always on the lookout for classic but fun plaids, and, as usual, they did not disappoint. This fabric is really lovely in person; photos don’t do it justice. It has a bit of olive green and gold in it, and it’s so soft, a blend of wool and acrylic. I was lucky enough to get the last two yards on the bolt.

IMG_9598 2


Challenges: The pattern is pretty straightforward and pretty easy, but hey, I had to complicate things by making mine from plaid. It was a bit of a challenge to lay the pattern out because the sleeves are cut as part of the bodice. This means you must be sure that you place the plaid on the bodice carefully because that line follows down the sleeve. The good news is…because you don’t set in the sleeve, it means you get to avoid the whole sleeve to bodice matching ordeal, The bad news…the wrong placement could mean you’d have plaid sitting awkwardly on your shoulder. My plaid was large so a mistake would be glaring but I think it worked out well. By the way, my success rate with matching plaid has increased considerably since I started using Wonder Clips to hold things in place while cutting and sewing. s-l640

I love these things so much! Just posting a photo of them makes me want to buy a zillion more. You can find them at Joann’s, at craft stores, on Amazon. They are so useful and all the colors….I could go on and on!!

More about the challenges – – those collar points!!  From the line diagram, it appears that the collar is designed to look a bit more angular and pointed than in my version. Not sure why, but mine aren’t quite as dramatic as I expected. I think the error happened when I cut the bodice. When I inspected the pattern pieces later, to my surprise, I’d cut the collar points as I expected them to be, rather than how they were. Perhaps it was because I was binge watching Outlander. Blame it on Clare and Jamie.

IMG_9602 2


I think the cropped style works best with my highwaisted denim skirt (made here). It would probably work with jeans too!

Future posts and plans….

The holiday season is in full swing around here. It’s my favorite time of year because I get to sing in several Christmas concerts with my choir, which is such a privilege and joy. It also means I’ll be sewing a few fun EASY gifts for friends…Curious if you are too?  My next post will probably be about that. In other news, the year is coming to an end, as is the 2018 RTW fast and I’ve been thinking alot about that experience and what it’s meant to my sewing journey so I’ll share those thoughts too. Then, of course there will be a hits and misses post for 2018. So much to talk about!

I hope you had a nice holiday with family and friends. Happy sewing and thanks for stopping by!


DIY: Philip Lim Inspired Top


img_2016
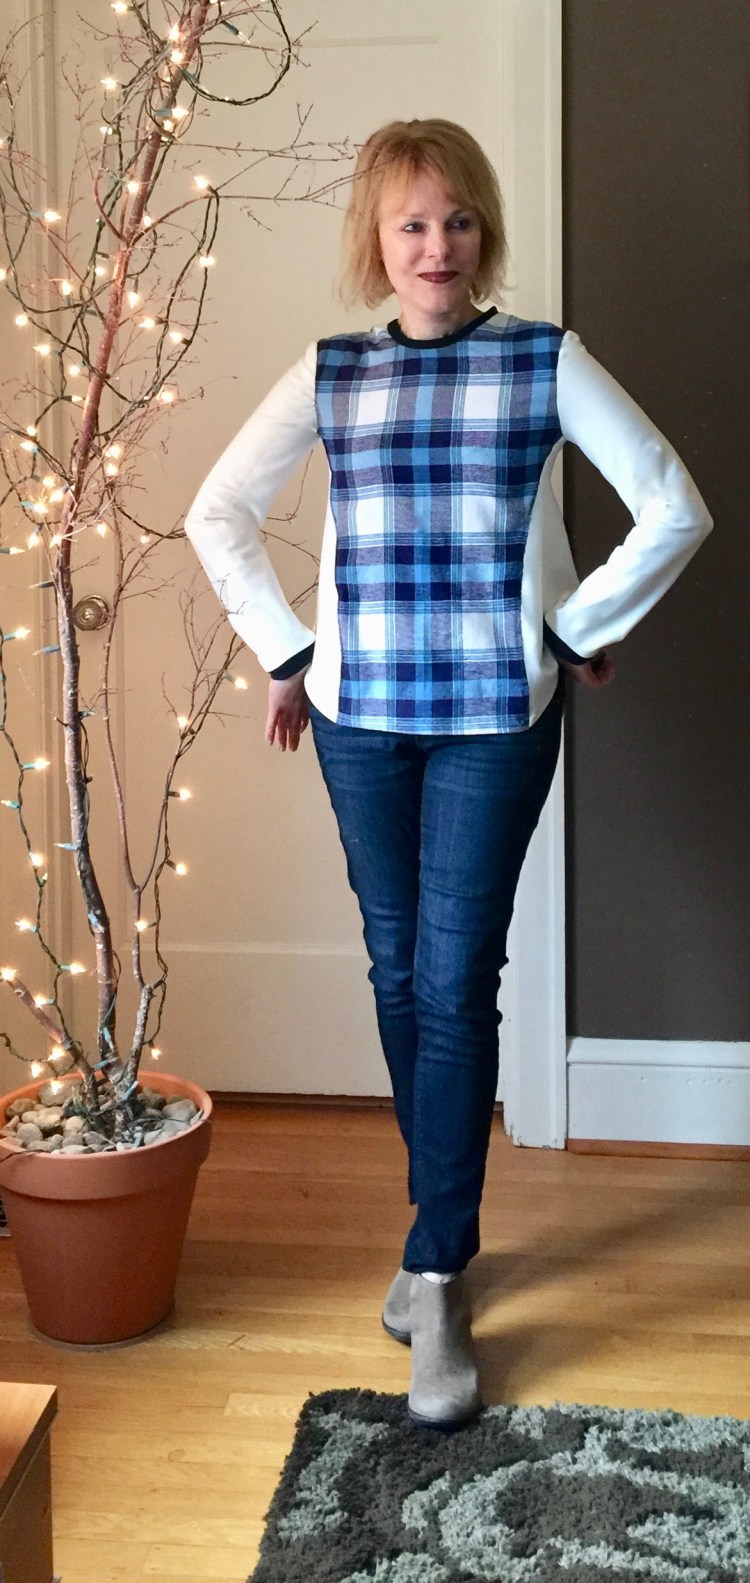
Hi all! The inspiration for this stash-busting top was a Philip Lim creation I saw at the San Francisco Saks a couple of weeks ago. It’s so fun to wander around in that amazing store, a real treat for me since we don’t have a Saks here anymore (wah!). But when I saw this top it was instant ‘love’. The bold plaid, the color blocked side panels, the contrast trim and stitching, I wanted it all. But alas, the price tag….

0400092850625_247x329

So, I set about making my own version. The good news? I used left over remnants from my recent Day Dress, and another plaid from a top I made years ago. So no new money was spent in the making of this top.

img_2040The pattern I used for this make is a tried and true: Vogue 9054.

It’s out-of-print but still available on their website and on Etsy. The design detail that makes this pattern the perfect choice for my Philip Lim top is that it has a front panel. So, that’s where I placed my cotton plaid. I used a contrasting off white knit for the side panels. Even though this pattern is designed for knits, my inspiration top combined knits and wovens, so I went out on a limb and did the same thing. I think the loose design of this top made that combination less risky than it otherwise would have been. The fit really didn’t change. I also added a contrast band to the collar and cuffs.

img_2020A detail I love on the inspiration top was the stitching on the front and back panel seams. To get that look, I top stitched those seams with a decorative stitch. I wanted to use the flat lock stitch on my serger, but alas, it just wouldn’t behave. My substitute stitch isn’t quite as stunning, but I still like it.

img_2070

I especially like the way Vogue designed the hemline of this top. There’s a bit of a high-low thing going on there that’s fun.

img_2002Well, I think my top will work as a reasonable substitute for the Philip Lim top, and wearing my DIY  version will save me from spending hundreds of dollars I don’t have. I rarely think that sewing saves money, but when it comes to designer fashions, it has a very strong edge. Thanks to Philip for the inspiration! The colors of this top make it a seasonal transition item, I think, and I feel almost Springy as we persevere through another ice storm with freezing rain. Ugh!

I’m glad I used some fabric from my stash here, because my goal this year is to reduce the size of  my stash (yes, I used bold font so I won’t forget, LOL). Lately, I’ve been feeling like I have to ‘sew to my stash’, if you know what I mean. I often buy fabric with a project in mind, but by the time I get to it, my enthusiasm for it has waned or the inspiration is gone. That means my stash is huge, and it means my sewing is often motivated by the guilt that comes with excess. It overwhelms and confuses my creative urges (yes, I’m a junkie). So, my goal is to sew some of it ASAP and give some to friends or charity so that it doesn’t weigh me down. What do you think, fellow fabric junkies? Will this strategy work? 

Happy sewing and thanks for stopping by!


The Reveal: Day and Night Dress Challenge

img_1040-2

img_1209
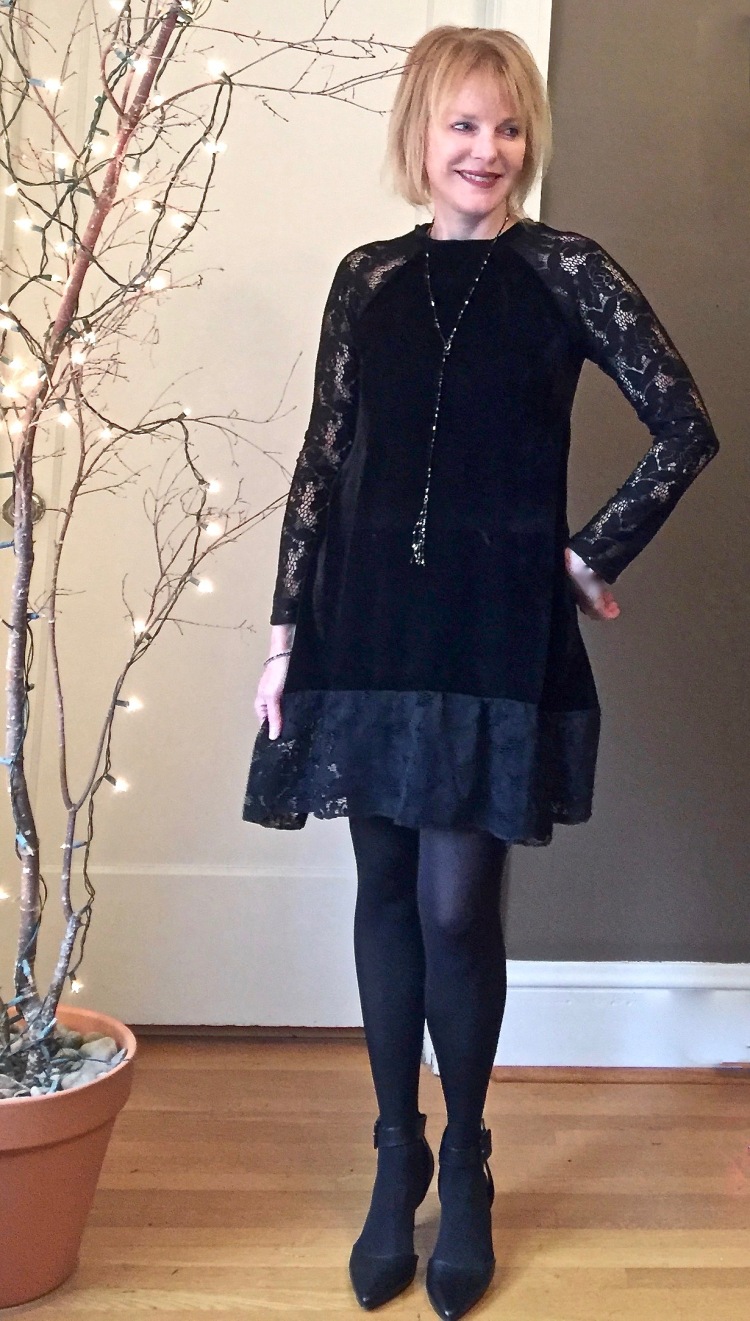
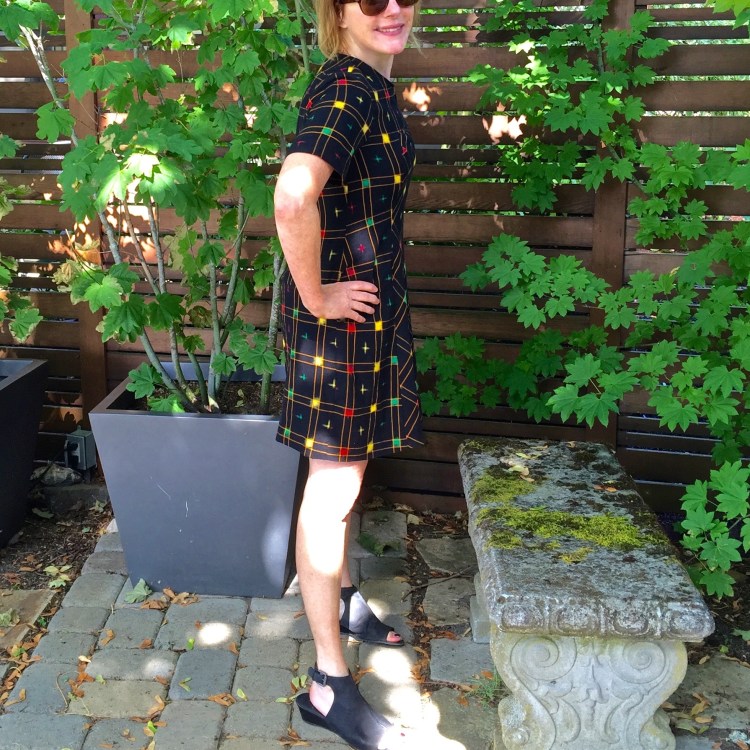
Hi all – – I’m pleased to be showing you my dresses as part of the Day and Night Dress Challenge Blog tour. Thanks to Elizabeth of Elizabeth Made This for this challenge. What better way to jump-start our sewing after the holidays! There’s a blog tour and a community challenge so check it out for some inspiration. You’ll find a list of the bloggers that are participating and links to their sites at the end of this post.

daynightgraphicdone680

My Day Dress: 

img_1004I’d wear dresses every day if I had enough of them! Dresses are perfect for everything a day can dish out: running errands, a business meeting, or (!!) happy hour. But to me, a day dress just has to have pockets. I feel weird if I don’t have somewhere to stick my hands! That’s why I picked McCalls’ 7464 for this make. It has curved pockets, a design element that mimics the line of the curved inset.The pockets were lined, but very easy to sew. The challenge was cutting and placing them on my plaid woven cotton. There’s nothing like a plaid matching challenge to test your determination!

img_1027I love how the curved insets add shape at the waist. I used a solid ponte knit for the insets and the sleeves so that it would provide a calming contrast to the busy plaid. The ponte knit, although stable, has a teeny bit of give, and since it’s placed at the waist, this means this dress is really comfy.

McCall’s 7464 is a pretty easy pattern to put together, yet it has a lot of fun detail.

 I modified the design only slightly. I added a short knit collar to give my dress a more casual look, and finished the sleeves with a narrow knit cuff too. I know I’ll wear this dress a lot.

My Night Look

img_1196I’m crazy about lace (as if y’all didn’t know that!), and when I saw this black lace at the Mill End Store, it was love at first sight. For the challenge, our night dress needed to be black, so I knew I’d use the lace as part of that look.  I decided to make a simple, unfussy dress so the lace could shine.

img_1184I paired the lace with black velvet, because, well…it’s velvet! To make the dress, I lengthened one of my favorite top patterns, Vogue 8952.

I like the Raglan sleeves on the top, and thought they’d look interesting in lace.img_1177 I love Swing-y dresses when I go out, because they have a dressy-vibe, without being fussy. To get the swing look of this dress, I extended the a-line of the top pattern by 8″. Then, I added an 8″ border of lace to the hem. I didn’t line the lace border, because I like the see through quality of the lace. With black hose/tights, I hope it’s not too revealing, just dramatic?  I know this LBD will get a lot of use.

img_0962

The Day and Night Dress Challenge blog tour is a great way to visit some new blogs and find some inspiration for your own makes. Thanks to Elizabeth for putting this together for us all to enjoy! There’s a community challenge too, with cool prizes and great sponsers. You can find the details on Elizabeth’s blog, Elizabeth Made This.

THE DAY AND NIGHT DRESS CHALLENGE BLOG TOUR SCHEDULE:

Sunday, Jan 8th: Elizabeth of Elizabeth Made This, Brittany of Brittany J Jones

Monday, Jan 9th:  Maria of How Good is That?,  Tonya of Sew So Petite

Tuesday, Jan 10th: Je’Tua of Robertswife, Meg of Cookin’ and Craftin’, Melanie of Its Melanie Darling

Wednesday, Jan 11th:  Linda of Elle Gee Makes, Tee of Maggie Elaine

Thursday, Jan 12th: Bianca of Thanks I Made Them, Daniela of On the Cutting Floor

Friday, Jan 13th:  Melissa of Mahlicadesigns, Rachel of Sew Redy, Renata of Runnningnstyle, Sonja of Sewing ala Carte

Saturday, Jan 14th: Doja of Elewa blog, Judith of Judith Dee’s World, Tanya of Mrs. Hughes

Check them out! If you decide to make a dress, I’d love to know so that I can feature your dress (s)  in a post here.

Happy sewing and thanks for stopping by!

A plaid and leather ‘duster’ for fall

img_8829

Hi all! Wearing a coat in the fall is a no-brainer, but finding the perfect one can be a bit tricky. There are days when it’s cool but not cold and wool is too much, but a summer jacket isn’t enough. That’s when a duster comes in handy!

‘Duster’ is an odd word for a topper, and a friend questioned me about why I used it, so, I looked it up. The original dusters were full-length, light-colored canvas coats worn by horsemen to protect their clothing from trail dust. Well, since I haven’t been on a horse in years, who knows why duster came to be such a catch-all term for me. I use it pretty liberally for any knee length topper that is more than a blazer, but not quite heavy enough to be called a coat.

img_8619

My duster is  made from a plaid cotton blend, that is lined in silk and trimmed with pleather at the collar and cuffs. I’ve had the fabric in my stash for awhile. It languished there, forgotten and unloved because I didn’t quite know what to do with it. I love plaid, but sometimes, it’s a bit too stiff looking for my taste. But a recent sewing room ‘re-org’ brought it to my attention again, and woudn’t you know it? I’d stored it in box with a remnant of textured ‘pleather’ (fake leather). Inspiration!

The pattern I used for my duster is Butterick 6382, a semifitted lined jacket with neckline, pocket, sleeve and length variations. I chose version D, a knee length coat with pockets and a collar.


I cut the pattern as designed with a few modifications:

  1. The coat’s front bodices meet at the middle but don’t close. I extended the front bodice pieces by an inch and a half so that they would overlap then added buttonholes and buttons.
  2. Because my fabric is a bit tame I livened it up with some textured ‘pleather’ for contrast. The pocket is trimmed with a 1′ band.img_8608
  3. I added 3″ pleather cuffs to the sleeeves.
  4. I cut the collar from ‘pleather’ and skipped the interfacing.

The pattern was pretty easy to sew, and the instructions were great. Of course, the plaid matching took a bit of effort, but that’s all on me for choosing plaid in the first place! The duster is a-line, and the shaping is accomplished by long bodice darts in the front and back. The most difficult part of the project was the additon of the trim. Since I chose pleather, this was a bit challenging.

What I learned: Pleather does not like to bend. Well, I thought that was okay because I could shape it by pressing it. Ha!  My first attempt at low heat resulted in a MELT DOWN, a mess of damaged plastic that almost ruined my iron. Yes, I did use a pressing cloth, but you have to be really, really careful. I eventually discovered that it could be coaxed into shape by using my fingers and a corner press for the collar. (This required a bit of patience). Also, my pleather remembered every pin prick, so I used fusible seam tape to secure pockets before stitching them in place.

img_8757

In case you were wondering, this is not a leaf-raking coat, even though someone I live with probably wishes it was. Ha! Frankly, I’m not sure about this make. Yes, I’m glad I did it because it pushed me to learn more about sewing with ‘pleather’ which was fun. I guess I’m not wild about this look or these colors on me. I do like how the duster feels when you wear it though, probably because of the silk lining. Maybe I should add two more pockets at chest level to give the duster a bit more style?  Or maybe it’s the shape? Belted, or unbelted?

Opinions welcome!

I’d love to know if any of you have experienced a pleather melt down as I did? And any ideas on how you can get the stuff to bend and mold? Yes, it’s a challenging fabric, but I’m dying to use it again, maybe for a skirt or jacket. Tips and advice is welcome!

Happy sewing and thanks for stopping by!


Linen and velvet all wrapped up!

Yes, it’s a busy time of year, far too busy to take on a sewing project, right?  Of course, but if you’re like me, inspiration often strikes when you have the least time to do anything about it!

Here’s my story: I was cleaning out my messy fabric bins, making room for the purchases I’m destined to make in 2016, when I found a treasure…a bit of  crinkled velvet in winter white that I’d completely forgotten existed. Suddenly, I absolutely had to have a winter white top, NOW.

IMG_6787

To keep the project’s fun quotient up and the frustration element low, I chose a tried and true pattern, Vogue 8815. For fun, I mixed things up a bit by combining a few of my favorite things; velvet for the bodice, linen for the skirt, and dotted mesh lace for the sleeves. There isn’t much to say about the construction of this top. (I reviewed it before here). I’m pleased with how it turned out, but it is a bit light- weight to wear in the winter.

Still, I was determined, so….enter a new idea… a quick wrap to keep me warm.

IMG_6826

Perhaps you’ve seen a wrap like this before at one of your favorite RTW retailers. It’s called a five-way wrap, and I tried one on at Nordstrom’s awhile back. It’s really a clever concept. You take a big circle of fabric and, by placing the armholes strategically, the wrap becomes amazingly versatile.

IMG_6824

It looked cozy and easy, so I decided to make my own. The fabric is plaid (love!) wool from Fabric Depot. I used a pattern from Indygo Junction, and the layout they show you is quite clever. You fold the fabric into quarters then lay your pattern piece on top of the four layers of fabric before cutting. When you unfold the cut fabric, your circle is symmetrical and perfect. Then, you cut the armholes, and voila! You have a wrap that you can wear several different ways.

Here it is, pinned at the neck….

IMG_6832IMG_6805

By putting it on with the armholes low, you have a short, cape-like version. Cozy!

You can belt it.

IMG_6828

Or wear it open, a long on-trend vest!

IMG_6790

I like the long vest look the best, but the coziest way to wear it may be the short  cape-like version. So warm and fun!

Truthfully though, I like the concept better than my finish version. While I was trying to take photos, I became frustrated with the way the folds in the front have to be constantly rearranged. I think this is a function of my fabric choice, not the pattern. Because I chose to use a  wool blend, the wrap is a bit stiff. Also, I bound the wrap’s edges to keep it from unraveling,  but I think this made the front from cascading in nice easy folds. If you choose a softer fabric, or serge the edges rather than bind them, it will hang nicely. Even though it isn’t perfect, still, I’m sure this wrap will come in handy, especially with my linen top.  (Now that I see how easy this wrap is, I wish I’d made a five way wrap for each of my girlfriends, but alas, it’s too late now…isn’t it?)

Are you finding time to sew during the holiday rush? Do you pick easy projects or do challenges appeal when you’re busy? Happy sewing and thanks for stopping by!


I’m falling for plaid…

IMG_6058Name Name five things that are cozier than flannel….. Can’t do it? Me neither. That’s why I’m glad this blue and green cotton flannel found its way into my shopping cart.

‘Cozy’ is the theme of my fall sewing efforts, and this shirt definitely delivers. Cotton flannel is such a dream to wear! My shirt’s first outing was a hilly walk this afternoon. Not only did the fabric score a big ten in the ‘cozy’ department, it breathes too!  So, if like me, you’ve never owned a flannel shirt, let me tell you. It’s high time you did.

IMG_6044

I loved this plaid on sight. For one thing, it’s such a great basic that just screams ‘fall’. It reminds me of everything good that these crisp cold days offer: leaf stalking (you’ll notice I didn’t say leaf raking), wine tasting, and using the fireplace for the first time. The added bonus? Plaid is a big fashion ‘yes’ this fall, so it’s available in every color combination imaginable. If you look great in chartreuse, there’s a plaid out there just for you.

Medium_0416260Medium_0344808Medium_0416256

For my shirt, I used Simplicity 2447, a button-down with princess seams, a front band, a back yoke and various front detail combinations.

I chose this pattern because it had so many variations and opportunities for contrast. I knew I wanted to cut a few pieces on the bias to make the structure of the shirt more obvious and, with this pattern, the options were endless.

IMG_6072

The hardest part of this project, (yes, you guessed it) was matching the plaid. I bought LOTS of extra fabric (on sale at Fabric Depot, so nice!) so that my match-ups could be strategic, without worrying if I’d have enough fabric. Cotton flannel is not a slippery fabric, so it was difficult to get the double layer of fabric perfectly smooth AND have the plaids on both sides match as well. I pinned the selvedges together, which helped a bit. But finally, instead of cutting out all the pattern pieces on the double layers of fabric, I opted to cut a few pieces twice on single layers. That way, I could position the collar, pockets, cuffs etc. without worrying. I just didn’t trust the wonky way the fabric seemed to move and stretch even though I could swear, I wasn’t touching it (Haunted!).   Cutting out a pattern is usual a brainless activity that I can do while watching ‘Project Runway’, yet never missing a beat. Let me tell you…not this time! TV OFF!

It was fun to figure out how to cut out the pockets.

IMG_6082 (2)

I finally decided to cut them on the diagonal for contrast and the plaid is centered on the princess seams.  I put a button on the pocket to draw your eye there. The back yolk is cut on the diagonal as well for contrast with the plaid pattern centered over the back pleat.

IMG_6064

This is my first version of Simplicity 2447 and I think I’ll make this pattern again. It fit my shape without modifications (princess seams shape the bodice), which is a rarity for me. The instructions were easy to follow.  The pattern includes lots of options (including three (3!!) sleeve options), so it’s easy to make the style your own.. This time, I tried the rolled up sleeves with the button tabs but I’ll try the long-sleeved version with cuffs soon. The hem has a nice curve, which I left long to make the shirt even cozier.

I love sewing with cotton flannel and it’s so great to wear – – I can’t figure out why I’m not living in flannel. Hmmm, is this the beginning of a new fabric obsession? I would love to hear about your adventures with my new favorite fabric!

Happy sewing and thanks for stopping by…May your week be colorful and cozy!

Butterick 5927: A warm front of plaid wool

IMG_2162
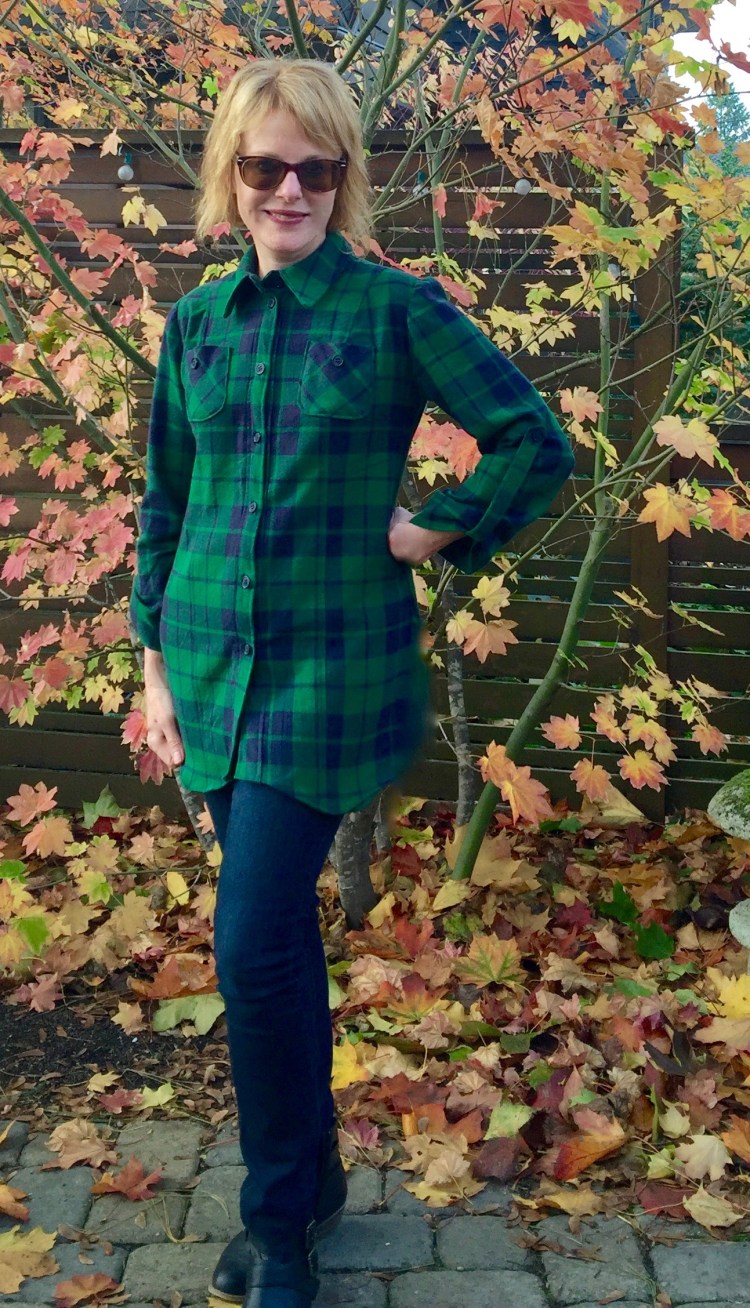
This plaid coat is my most recent attempt to brighten up my outerwear wardrobe with color.  The base color of the loose weave is avocado green, a trendy color this fall that pays homage to some 70’s legends, namely Kitchenmaid, Sunbeam and Kenmore (harvest gold or burnt orange, anyone?).
Plaid used to be the last thing I’d include in my wardrobe as it reminded me of private school uniforms. But plaid is all grown up now. It’s such a fashion mainstay, it made an appearance on more than one fashion runway this fall. Love the combination of colors and textures in these Prada plaids!
_MON0137
_MON0317
If only the fabric fairy would bring me some of this!
 
This fall, I wanted to add a loosely structured, easy-to-wear coat to my wardrobe, something to just ‘throw on’ over jeans and cords and skirts. I also wanted a stand up collar to keep out cold wind.
This proved to be a tall order, since many coat patterns had fussy lapels, details I didn’t want. I finally settled on  Butterick 5927, a lined jacket with front variations and a stand up collar.
B5927
I modified the pattern, adding 6 inches to the front and back bodice to make it less of a jacket and more of a coat (albeit a short one). I also added a couple of inches to the stand up collar with two buttons to make it a bit cozier and to protect against winter winds. To make the sleeves more weather proof, I added self drafted cuffs with buttons. 
 IMG_2170
The pattern is a nice basic shape and the coat went together easily. The biggest challenge I faced was the fabric. It frayed like crazy!! So I had to take extra care with the seam finishings. Even as I finished them, they frayed – frustrating! But other than that, it was a pretty fast sew, really. I did the seams, collars, the cuffs, all of the hard stuff. But, when it came to the lining, I stalled. Don’t ask me why! I couldn’t get myself to just finish it. The beautiful black cotton/silk blend just sat on my sewing table for weeks. What the…?
IMG_2196
True confession, here. This is a recurring problem for me. I frequently stall when it comes to the lining. I dither around. Of course, lining a garment isn’t hard at all. So why not just do it? Good question! Anyway, to make a long story short, I finally broke down and cut the lovely silk and sewed it in. No big deal. And the coat looks so finished now. Hope I can remember that next time I make a lined garment!
IMG_2308
The mornings are cold here, and some of the days are gray, but the good news is, my outwear isn’t… It’s Kitchenmaid green! 
My fall sewing frenzy is in full swing now. I’m dreaming of projects with cold weather in mind, coats and jackets and layers. How about you?
Happy sewing – and thanks for stopping by!

McCalls 7187: A plaid transition dress for Fall

IMG_2599

Yes, this dress is plaid and plaid does scream back-to-school and winter skirts. But don’t let my dress fool you. I have not given up on Summer!! After all, it’s only August. Sure, in a few weeks, the kids will be back in school, the warm air will have a crisp edge and we’ll have to start heating our houses again. But summer hasn’t thrown in the towel yet.

Still, my sewing projects are starting to shift. I’m reaching into my stash for heavier fabrics (reluctantly) with darker colors. I’m easing into this, though. After all, why let go of summer before we have to?

IMG_2660

That’s why I decided to sew a transition dress. I won’t give up the hope that there are still warm days ahead, so the fabric is a light-weight cotton. But to make the dress fall-worthy, the colors of the plaid are dark; black, red, green and gold. And nothing shouts ‘fall’ quite as loudly as plaid. This one’s especially bold – a stand-up-and-get-noticed plaid.

The pattern I used is McCalls 7187, a new one that was included in the McCalls’ fall release.

M7187M7187 (1)

It’s a fit and flare style with some interesting options. You can cut the dress with a relatively simple, straight skirt, or you can add pleats or gathers to the side panels. The pattern envelope showed the dress in a plaid, a perfect option for my bold fabric.  I chose the straighter style, only because I didn’t have quite enough fabric for the gathered, fuller option and I wasn’t sure how the plaid would look on the gathered skirt.

The pattern went together like a dream. I always cut one size larger when I’m making a McCall’s pattern, since, on me, they seem to run small (at least that’s what I tell myself). This was the case with this pattern too. The fabric was so easy to work with and fabulous to sew! It’s a woven cotton that I purchased at Mill End Fabrics. It drapes nicely, which I’m guessing is a must for this dress.

IMG_2051 (1)

I cut the front inset on the bias as indicated, a fun option that makes the plaid pop. The inset looks tricky, since it has curved seams, which I expected to be absolute torture to get right. But the inset went in perfectly the first time. How about that?!  A shout-out to the pattern designer! Thank-you!

Other than the inset, the dress is was pretty straightforward. The pattern instructions made everything quite clear. All in all,  Actual Sewing Time on this plaid frock was about three hours (three episodes of Game of Thrones, LOL).

IMG_2822

My only regret is that the dress isn’t lined, so my fabric tends to cling a bit to my legs from time to time. (Also, it was a bit windy when I shot the photos for this post which made the skirt go wonky.) I suppose you could line this dress though? But maybe the skirt would make that tricky? Not sure about that….

Are you sewing transition clothes? Or are you still focussed on summer?

Happy Sewing! And thanks for stopping by.