A Spring Jacket with Triangle Bound Buttonholes

IMG_6299
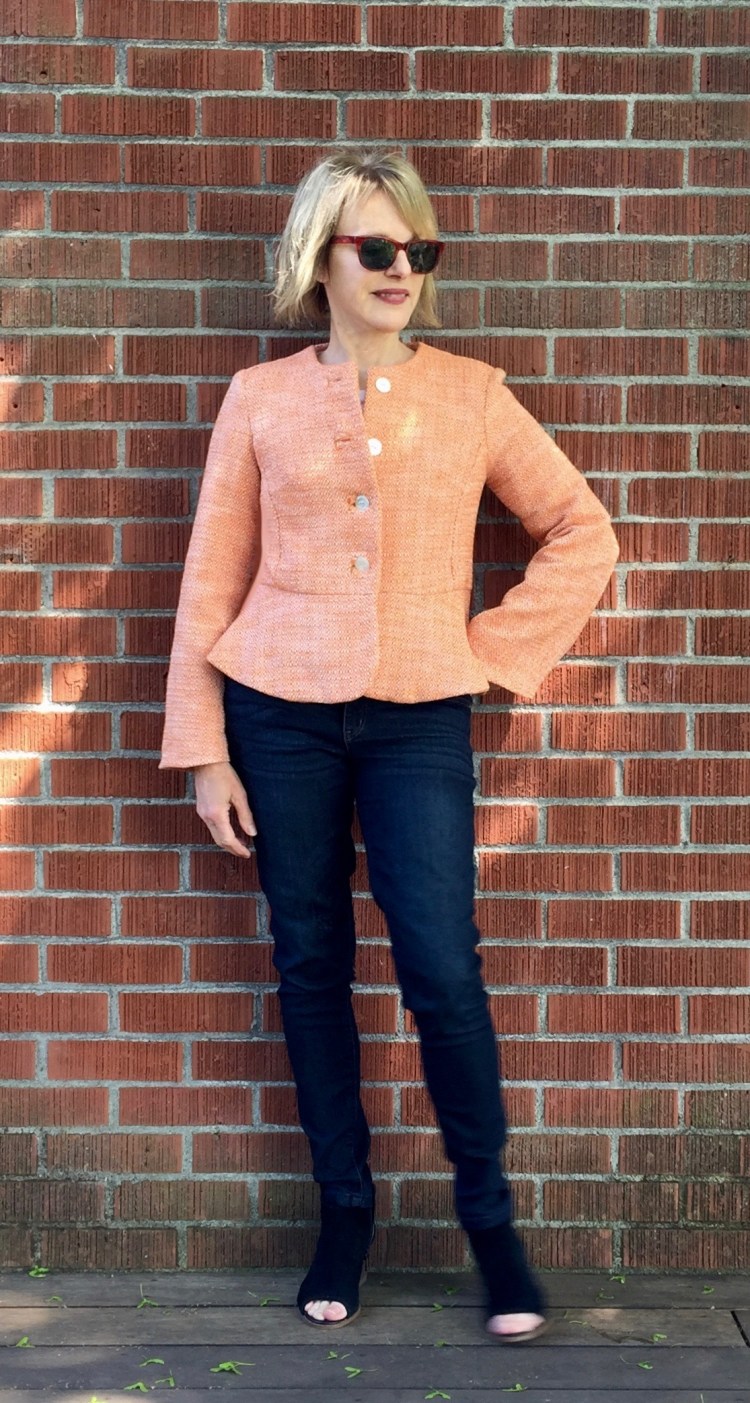
For years, my sewing bucket list has included “Jacket with Bound Buttonholes.” Well, this jacket has triangle shaped bound buttonholes and I’m saying, close enough! Yes, they were a bit fussy to sew, but I’m glad I took the leap to do them on this project. I will admit that the first two were ‘nail biters’ for sure, made possible only by the able hand-holding of my jacket class instructor, the Marvelous Marla! I was so fortunate last week to attend a three-day jacket making class lead by her. She makes everything so easy. If you ever have a chance to attend one of her classes, I highly recommend them.

I’m always attracted to peplum style jackets and shirts (here and here), so when this Simplicity pattern was released last Spring, it was an immediate add to the ‘must-have’ list. The front of the jacket is simple, so I decided it was the perfect opportunity to try a new buttonhole. IMG_6228

Triangle shaped buttonholes are very much like bound buttonholes. Marla taught me the method that’s in the Palmer Plestch Couture handbook.  Also, there’s a good explanation on-line at the Seamworks website, as well as a few U-tube videos on the subject. cfc8da3ec10d207d781d2a9d04676495e052556dThe good news…Creating a triangle bound buttonhole isn’t that hard! The bad news…There is a bit of unavoidable risk when you have to actually cut into your fabric to create the hole:) I recommend that you try out the process using scraps of fabric to start. It is a bit tricky, but very worth it, if you ask me.

IMG_6351I love this fabric, a lovely cotton boucle’ from Bolt Fabric,  but it was not ideal for this project. The weave was so loose, it unraveled at a mere glance. However, I knew it would be perfect for this pattern so I was highly motivated to push through the challenge! I used my serger to finish the edges but had to be careful not to cut off any seam allowances as I did so. I also had to be careful not to stretch the fabric as I pressed the jacket seams. The front of the jacket is completely interfaced and I lined the jacket with a simple rayon lining.

IMG_6292


The fit of this pattern is a bit tricky as there is a side seam panel, rather than straight side seams.

simplicity-peplum-jacket-pattern-8604-front-back-view

That being said, the jacket fit great without alot of adjustments.  I chose my size based on my measurements and it was really close! I shortened the waist a bit (I’m short waisted) and made a slight shoulder adjustment, but that was it. I had planned to add a mandarin collar, but when I basted it in, I didn’t like the look so left it off.

IMG_6302

The construction of the jacket wasn’t hard at all. In fact, if you’re looking for an easy, first jacket pattern to try, this would be a good candidate. The pattern instructions are edited by Threads magazine so they include finishing tips that are quite helpful.

I love my new jacket, but to be honest. I’m not really sure about this color. Melon/orange is a new color for me, but I decided it’s high time I stretched my wings a bit. I’m wearing this jacket with jeans because I couldn’t figure out what other colors would work with it. Ideas?

IMG_6338

Next on my sewing ‘to do’ list is a trench and a new Sew Over It Pattern Insider project that I’m anxious to share. Stay tuned.

Happy sewing and thanks for stopping by!


Remnant Busting Tops Inspired by Anthro

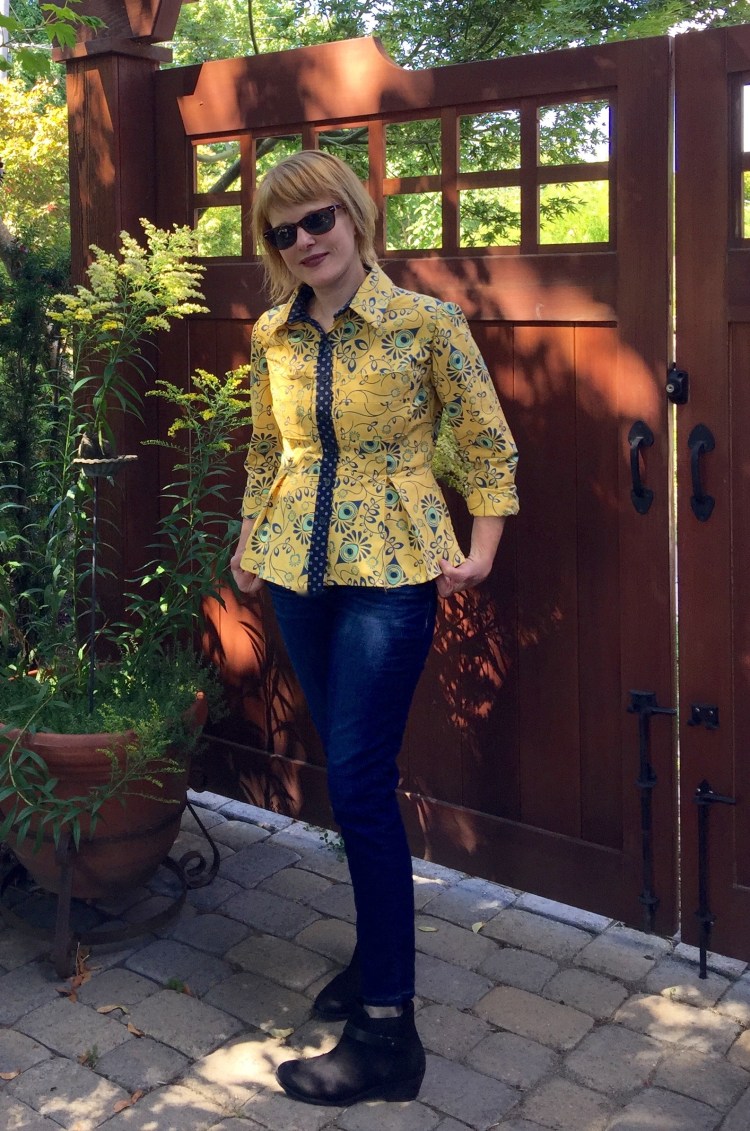
Peplum tops are still in style! I swear it’s true. Just when I thought they were ‘out’, Anthropologie added a category under ‘tops’ called ‘peplums and swing tops’. That’s where I found this inspiring photo.4112368730007_041_b2

What caught my eye was the fact that the bodice fabric did not match the peplum. In fact, it’s not even in the same color family. So easy, and cute! That photo inspired me to dig through my remnant stash.

IMG_3729

This one has a sweatshirt fleece bodice and a cotton jersey sleeve with a rayon jersey peplum. As luck would have it, the black dye used in those two mismatched jerseys was a close match. I used some random black ribbing in my stash for the neck. I managed to squeeze the bodice out of a little over a half yard.

IMG_3671

This off-white version is a ponte knit bodice with a ribbed knit skirt, cuffs and neck. I made it specifically to go under this cardigan sweater (posted here) which matches the boots I bought in Spain this summer. IMG_3682

The pattern is one I’ve made before, Vogue 9056. It’s a pretty quick make ( a couple of hours if you’re comfortable with sewing tops).  I modified it as follows – –

  • Added 4″ in length to the bodice (it’s still pretty cropped),
  • Added a 3″wide neck band at the neck.
  • Added 4 ” ribbed cuffs on the off white version.
  • Raised the neck opening by 2 inches (it was just too wide on me.) IMG_3835

It’s hard to see in all the photos, but an interesting thing happened when I stretched the ribbing to attach the skirt to the off-white ponte knit bodice. It had an interesting effect on the ribbing that makes the stripes look sort of….artsy?  It was an accident but I like how it looks, although I do think I prefer the black version.

IMG_3729

Remnants are something that most sewers have a philosophy about. I have rules about mine. If I have a piece that is 1/2 yard or more when I finish a project, and I really love it, I’ll keep it for one year. If it’s still around at that point, it goes to the donation bin.  I have alot of remnants right now though, so not sure if my rule is working (LOL!!). I’m curious how others manage their remnants – toss or keep?

Happy sewing and thanks for stopping by!

Thursday Top: Vogue 8815

IMG_7737

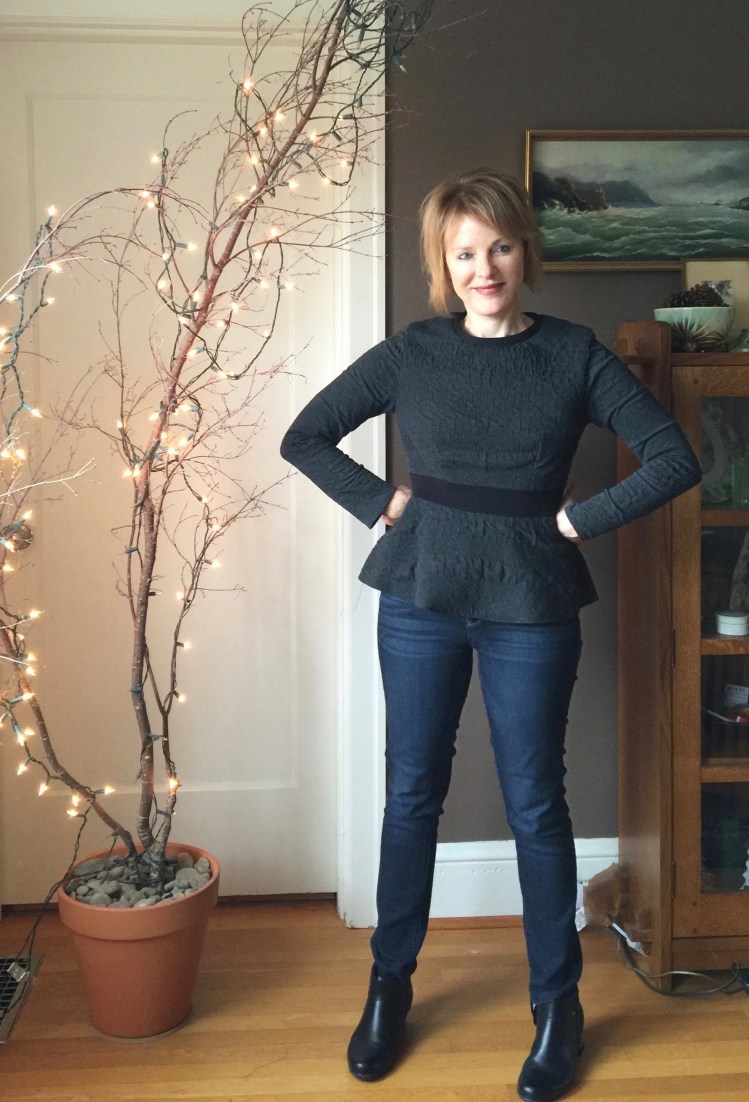
Well, here we are in February, the month that straddles the seasons.  The fabric stores are flaunting new lightweight cottons and linens. Yet, I’m still working through my stash of sweater knits.

At this point, it’s probably ridiculous to state the obvious – I am a fan of sweater knits. As I’ve confessed before, it’s not just because they’re cozy and comfortable. It’s because I can’t knit. Really. My brain gets ahead of my fingers and, well, chaos ensues. Sweater knits are the easy way out.

IMG_7750

And they are so comfortable! However, as you can see in the photo above, I’m discovering yet another cat hair on me. Knits do seem to attract fur of any sort, but doesn’t everything? Still, this particular sweater knit is wonderful, a thick cotton/lycra blend that’s textured and double faced. The result is a lush, thick fabric with a moderate amount of give that is so great to wear.

IMG_7739 I took a close up of the fabric so that you could see the texture. The pattern I used for this Thursday top is one of my TNT (tried and true) patterns, Vogue 8815.

I made it before Here. The pattern is designed for wovens, but when I found this knit, I could see it only one way – – as this top. Generally, when I decide to use a knit instead of a woven, I take the pattern down a full size. But I’ve discovered that each knit is so different, it’s hard to predict how they will behave.

This time, I tried a new method to allow for the stretch in the knit. I adjusted the seam allowances from 5/8″ to 6/8″. Because the stretch on this knit was so moderate, I didn’t want to cut out a smaller size, only to discover the knit wasn’t stretchy enough to warrant that large of an adjustment.

IMG_7748

In the end, I was glad I made the adjustment this way. The knit didn’t stretch enough across the shoulders to warrant any adjustment at all. Because I basted in the seams, it was easy to just let the back seam out where I needed to. Yahoo! So glad I didn’t screw up this great fabric 🙂

IMG_7041

Because the knit had moderate stretch, I used my Bernina’s overlock stitch rather than serging the seams. Here are my pattern modifications:

  • Because I used a knit, I didn’t insert a zipper. The neck slips over my head easily.
  • I added a solid band of knit at the neck (very stretchy so that it wouldn’t bind) in contrasting black.
  • I also added a solid black band of knit at the waist. To do this, I shortened the front and back bodice by two inches. Then I cut 2, two inch wide bands of solid knit fabric the same width as the bodice pieces.  I sewed the solid knit pieces to the shortened bodice pieces before sewing on the back and front peplum pieces.

IMG_7030

Done! One winter project down, and a few more to go. I’m getting antsy for Spring, though. I’ve been longing to work with linen again. I think my first spring project will be a shirt dress of some sort. Have you started sewing for Spring, or are you still working through winter projects?

Happy sewing and thanks for stopping by!

PR Sewing Bee Round 1 – The Good News and The…Other News

IMG_3865 (1)

Some might say I’m crazy, but this year, I entered the Pattern Review Sewing Bee, a contest that contains four challenges, each a week in length. As a rule, I don’t usually get too excited about competitions, but I decided to try this one to push myself a bit. It’s time to try something new, I told myself, and to learn a few things in the process.  Sounds good, eh? Still, I waffled, until the specifics of Round 1 were announced. The first challenge was to make a fitted blouse. And wouldn’t you know, I already had fabric in my stash for another peplum blouse. Is that destiny or what?!?

For my contest entry, I used Butterick 6097, a fitted blouse with a peplum I made here and here. This time though, I wanted to try something different. Since my fabric was a linen that had a denim look, I decided to use french seams and double topstitching to play up to the ‘jeans’  vibe of the fabric.

IMG_4724

The french seams turned out to be essential as this linen blend unraveled every time I even looked at it. I overlocked in some places too. I thought sewing all the topstitching would drive me crazy, but once I got into it, I couldn’t stop. Really. I went a little berserk. I put those double yellow lines everywhere.

To fasten the front, I used snaps instead of buttons. For those who haven’t tried inserting snaps, it’s really quite fun! You get to pound them in with a hammer. The first time is a bit…well, scary, since a screw up leaves a hole in your fabric that’s too big to deny, but then, you relax right into it. The noise made my poor cat a little insane though.

IMG_4756

Once the shirt was done, I posted photos on the PR website, wrote my review and waited. And waited. If you haven’t taken a look at all of the gorgeous shirts entered in the contest, you really should. They were all amazing. I can’t imagine how the judges decided who would go forward to the next round. But, as luck would have it, I passed muster and am moving ahead. Yahoo! That’s the good news.

IMG_4657 (1)

The Other news? Well, here’s the description of Round 2’s challenge. To quote: “In this round you will add surface embellishments to existing fabric to make a piece of fabric (or fabrics) something truly unique. You will then make a garment out of the fabric(s) that you embellished. Because the embellishment process may take additional time, participants will have TEN days for this round.”

Say what?!?  My first reaction was, WTF! My second reaction was, ‘how much wine did I have the night I decided to enter this contest’? After a good night’s sleep and a nice long bike ride this morning though, I’ve settled into the idea of this challenge. Sure, I’ve never applied a surface embellishment (whatever that is LOL) to anything other than a bit of make up on my face, but hey. There’s got to be a first time for everything. And, with any luck, something like inspiration will strike in the next 24 hours (the clock is ticking here, brain!). I will swing into action and it will be fun. (Yes, this is a pep talk :))

A few of my favorite bloggers also entered the PR Sewing bee. You might want to check out their lovely makes – –  Saturday Night Stitch, Gray all Day, Thanks I made them, to name a few.

I hope you’re enjoying our lovely fall, and are finding inspiration everywhere you look. Happy sewing and thanks for stopping by!

In defense of the polka dot; Vogue 9128

IMG_5103
When it comes to polka dots, I’m a true fan. To me, they’re a fun, easy-to-wear print; a timeless, classic look that’s fun and light. 
 
So when I spied the polka dots on this cotton knit at Mill End, I couldn’t wait to throw that bolt of fabric in my shopping cart. Imagine my surprise when the woman standing next to me scoffed at my choice. “Polka dots!” she exclaimed. “I hate those things. They send women back to the fifties every time someone wears them.” Well, as you can see, I ignored the hater and bought those dots anyway.  But she made me think even more about those innocent-looking circles of color.
IMG_5093
Of course, one of the reasons I love polka dots is their history. Some well known vintage fashion moments included polka dots.
Marilyn Monroe made history when she wore this bikini in the fifties.
.marilyn-monroe-400
Elizabeth wore them too.
elisabeth-taylor
And here’s Katherine Hepburn in polka dot pajamas. I’d love to channel her when I wear my dots!

katharine-hepburn
There’s no denying that those dots do have a decidedly fifty’s vibe, a time when women struggled, many without  the choices we enjoy today.
gettyimages-51650201
But leave it to Zooey Deschanel, a successful woman who loves polka dots and full skirts and peter pan collars, to sum it up so well.
zooey-deschanel-1062457_H130439_L
Or…Polka dots! 
IMG_4973
My polka dot tee is Vogue 9128, a pullover top (close-fitting through the bust) with neck binding, front seam detail, and a peplum with shaped hemline. I decided to make this pattern when I noticed it included details that are a bit unusual for a tee-top, like front seams and the fun peplum. I made the long sleeved version because I wanted a transition top, something lightweight enough for warm afternoons, but with long sleeves to protect on cool fall mornings.
V9128V9128 (1)
As most tees are, this was quick to put together. I love the way the peplum is constructed, (attached to the center front panel).  The seam lines at the bust are great too and the curve is so gradual, it isn’t tricky to sew at all. One note about fitting – – the pattern isn’t designed so that you can modify the waist length with a mid-bodice adjustment. For me, this wasn’t a problem as the waist was positioned correctly for my shape ( a minor miracle, since I almost always have to do a waist adjustment.) But if you’re long waisted, you might want to take extra care to figure out if the fit will be right for you.
IMG_5061
 Here’s a back view of the contrast.
What do I like most about this pattern? You know me – – it has options! You can mix and match fabrics by using contrasting solids or patterns or both. And it’s a great stash /remnant buster because it only takes 5/8 of a yard of fabric to make the contrasting panels.
It’s highly likely that I will make this top again, as the pattern just screams to be color-blocked. I probably won’t use polka dots again, although, to be honest, I do have another remnant in my stash (LOL). So, how do you feel about polka dots? Love, hate, or just so-so?
Happy sewing, and thanks for stopping by!

I’m having a That Seventies Show moment

IMG_2366
I took to heart the advice I saw in a fashion magazine recently. When it comes to fall fashion and prints,  more is more! Apparently, the old maxims about print on print should be damned.
Okay. It’s nice to know that my over-the-top shirt is on-trend, because then, perhaps I’ll have the guts to wear it! Personally, whenever I look at this shirt, all I can think of is ’That Seventies Show’.
imagesThe gang here, giving us some attitude!
I guess that isn’t a bad thing because some fashion experts insist the ‘seventies comeback’ trend in fashion is here for a second season. Okay! Bring it on because I Am Ready!
How did I end up with this print/look? Well, it’s a now familiar story. Both fabrics were in my stash, and I’ve been so In Love with the mixed print look that’s all around in RTW!
Here are some of my favorite examples. Burberry Prorsum is mixing up the prints in their Autumn 2015 RTW line.
BUR_0137
OMG. I need that. The seventies’ vibe is pretty obvious here with more of a folksy interpretation.   I’m going to have to find some fabric to recreate a mix and match look like this soon.
BUR_0165
Love the print and texture overload here, accented with bands of black.  And the fringe on that bag. Please! Can I have some!
Here’s a close up of my wild print. Sure, it’s not as cool as the Burberry print, but it cost only $12.99 a yard…Ha!
IMG_2272
I used one cotton print for the bodice, skirt and sleeves, and used the contrast for the front bands and the collar band. The cotton is so crisp, it sews like a dream (Fabric Depot). I think this cotton is meant to be used for quilting, but that’s never stopped me before, nor will it in the future. The fabric has just enough body to give the peplum a bit of a kick, and what’s not to love about that.
The top I made is Butterick 6097, a fitted shirt with a collar and peplum variations, princess seams and a front button band.
b6097_env_frontB6097
I chose this pattern because I’ve made it before (here) and I like that fact that it has a bit of structure. Also, the style works with all sorts of bottoms; shorts, skirts, and jeans. To me, the peplum style has a slight retro vibe, which I always, always love. Peplums are nice for Waistless Girls like me, because they fool folks into thinking we actually HAVE them.
I made view B, a long sleeve version that I modified. My sleeves are closer to 3/4. I added a 3 inch cuff, so that I could push the sleeves up if it got too warm (rolled up here because we’ve had more than a few 100 degree days in Oregon this summer…EEK!).
IMG_2226
Because the pattern is so fitted, I chose to go up a size in the waist (since I don’t really have one), then cut my usual size through the hips. These adjustments are the same I made in my previous version. The pattern went together easily and it fit with just a bit of last minute seam adjustment at the sides. The peplum pleats were super easy to sew. You just have to mark them well.
 IMG_2304
So, what do you think? Is this print just a bit too much? I’m not sure, but I think I’ll wear this top anyway. The fabric feels so good against my skin, and for me, that’s often the bottom line in terms of a garment’s wearabitliy.  I do love this Butterick pattern, so much so, I’ll be making another version of it this week (more is more?) and posting it here and on the Monthly Stitch Blog, since the August Challenge is ‘Two is the magic number’.
Happy sewing and thanks for stopping by!!

Eyelet: A fabric with a higher purpose

Eyelet fabric – – Not only does it look great but when summer reaches its boiling point, eyelet has a higher purpose. Its lovely holes keep you cool!
DSC03295
 A classic fabric, with a ladylike vibe, eyelet has gone through a major upgrade this season, with fresh colors and textures that give it a stylish pop! It’s the new perfect hot weather fabric, a must in Oregon, where you can never be sure your destination will be air-conditioned. So, if you don’t want to SUFFER, you wear only crisp cottons, lightweight linens, or, even, a breezy colorful eyelet.
Since it’s been hot and muggy in my neck of the woods, I’ve discovered that my wardrobe is a bit skimpy when it comes to summery tops. So, when I spotted a piece of blue (!!) eyelet in my stash, I knew immediately what I wanted to make from it: a sleeveless top.
DSC03304
The fabric: This eyelet has been in my stash for awhile, so I’m not sure where it came from. The fabric is a great shade of blue, that’s not really a navy or cobalt, but somewhere between those two colors. Love!! When I first saw this fabric, I thought I’d need to underline it, but the holes are really small, so I chose not to because I wanted the top to be super light and comfortable. I don’t mind a bit of skin showing through.
Pattern: I decided to modify one of my tried and true patterns, Vogue 8815,Unknown  images-1
a top with a raised waist and sleeve variations. My favorite version is view C because the raised waist has a unique curve to it.
images-2
It’s an easy pattern that I’ve made before (see it here). View C is supposed to be a pullover, but I added a back zipper just like view A and B. The instructions are well drafted, so this pattern would work for a beginner.
Modifications:  I made the pattern as is, but added a tie at the natural waist line to give it a different look and a bit more shape.
DSC03037 (2)
To make the tie a part of the top’s design, I marked the natural waist on the pattern, then sewed the tie into the side seams at that place. This way, when the tie is pulled to the front, it adds some shape at the waist and makes the peplum fall in easy gathers.
DSC03039
DSC03037
I think I’m going to wear this top a lot since our summer is starting off with a bang. It can be dressed up with jewelry or worn with jeans.
Last but not least, I must give a shout out to you all. Usually, I don’t sew that much in the summer, but I’ve been so inspired by the summer creations posted on my favorite blogs (visit the blogs on my list to the right to see what I’m talking about here), I’m sewing like crazy! Thanks to all of you, and Happy Summer!!

Not Your Mother’s Peplum

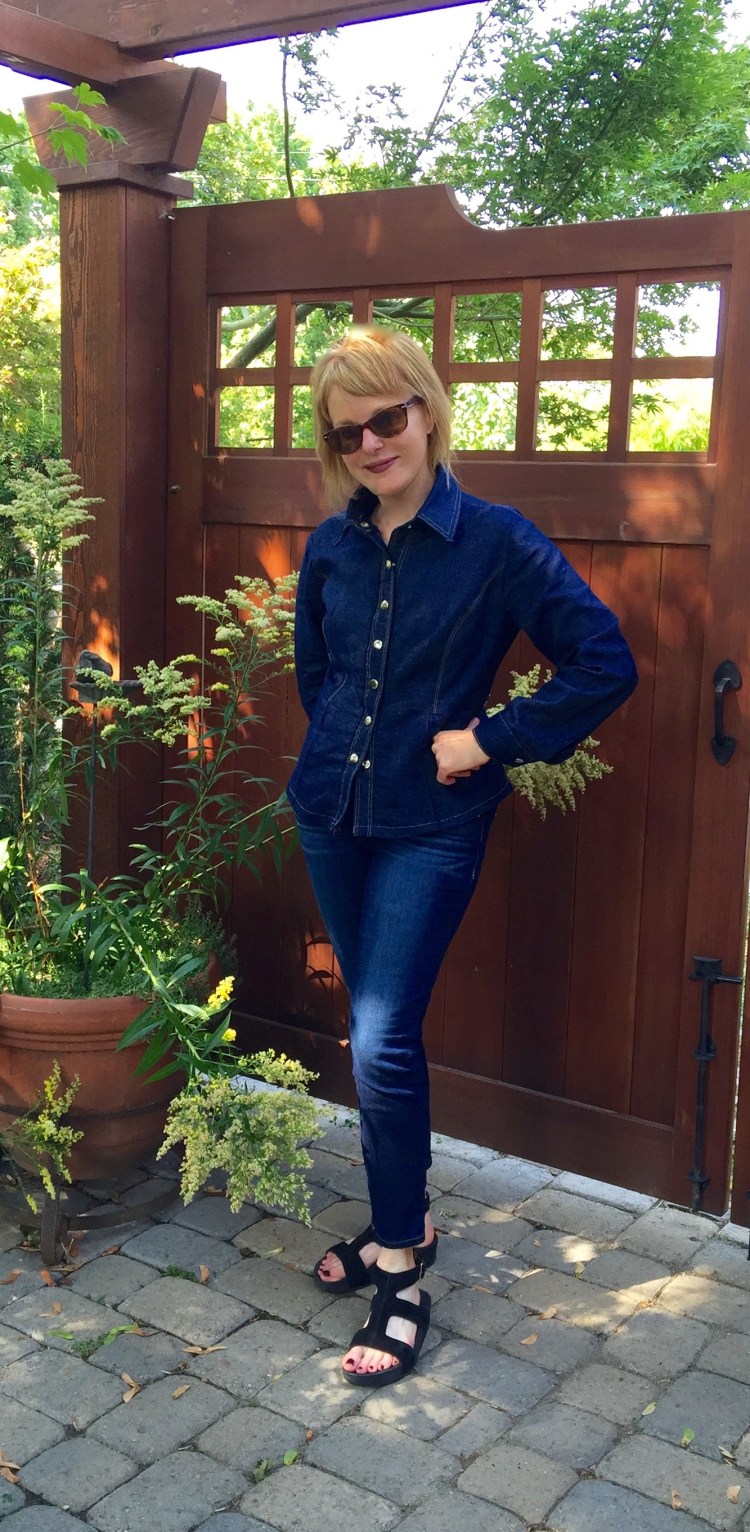
During one of my recent jaunts into the enticing, instantly gratifying world of ready-to-wear, I heard a discussion through a thin dressing room wall (which is not really eavesdropping, right?). “You absolutely cannot wear that,” one woman said to another. “It’s a peplum and they are a fashion NO!”

It was an interesting statement, one that begged for debate, or at least, extensive internet research. So, I perused the designer collections for Spring, and discovered that there could be a bit of truth to that. The old, more extreme peplum look does seem to be gone.
But now, there’s a new peplum in town. It’s less of a waist defining shape. It seems lower, a bit looser, and a little less (dare I say), prissy than the ones that came before.
Here’s one from Marni that I fell hard for.
MAR_0651
Another from Thakoon that could live in my closet if it wanted to.
503702568_1_topcropfront
Cute shorts too.
After all that research, I had to make one of my own. The pattern I used is Vogue 8815, a fitted top with a raised wast, long front darts for shaping, and a narrow hem. I chose view C because it had an interesting, less traditional look.
DSC02697
I used a lightweight cotton purchased from Fabric Depot that is a dusty denim blue (I hope to some day get over my denim obsession). Not only did I buy it because it’s Blue, but because it has a dot pattern imprinted on the fabric that I love. I used a similar solid cotton for the sleeves.
DSC02694
The pattern was easy to put together. Although view C is a pullover, I added a zipper in the back, just because it felt more finished that way.  I cut the smallest size (8) and adjusted the side seams for fit, since I’m usually a 6 through the back.
The peplum fit onto the bodice perfectly. On view C, it doesn’t extend to the back which makes the whole process easy and fast. The neck is finished with seam binding, also easy and fast. The hemline is lower in the back than the front, which gives it a bit of an edge. Cool, but it’s something to keep in mind when you choose the fabric though, as the wrong side shows.
DSC02700
 I think I like the look of a looser peplum as it feels fresh and different. This is an easy top to wear, so comfortable you could eat Thanksgiving dinner and still be able to breathe! I’ll probably have to make another, soon.
How do you feel about peplums? Has it been done to death, or do they still have a place in your heart?