Fall Sewing: Carolyn Pajamas, the 1960’s coat, and the Stacker Jacket

lindas collage copyHi All – With temperatures dropping, I’ve been inspired to sew ‘cozy’ clothes this Fall.  During November, I made a wool coat, a corduroy jacket and a pair of pajamas, and all are in heavy use. The truth is, my wardrobe needs have shifted during the pandemic. My daily uniform is a pair of jeans and a top, perfect for my usual outing, a walk in my neighborhood. Since there aren’t any social events to dress up for, I’ve enjoyed having a new coat or jacket to wear on my walks. Honestly, can you ever have too many?

The Sew Over It 1960’s Coat.

This coat pattern is a real winner from Sew Over It. The style is so classic.

IMG_4898

As a pattern insider, I received a free pattern before the general release and I was so excited to make it! From the photos, I expected the coat to be hard to sew, but it really wasn’t.

I cut my usual size based on my measurements and did a toile from a old sheet just to be sure. The bodice has some tapering, but the fit is relatively loose so I found fitting it to be easy.

IMG_4913 I splurged on fabric, a red boiled wool from the Mill End Store, here in Portland. I lined with red silk. I’m so glad I did because this coat is in heavy rotation in my wardrobe and it’s so lovely to slip your arms into silk. If you can sew a collar, set in sleeves and insert a lining, you will be good to go on this pattern. My only tip is not to use too heavy a wool as the lapels and collar might be hard to turn.

Stacker Jacket.

IMG_5601

The Stacker Jacket is from one of my favorite pattern companies, Papercut patterns. Not only is their packaging superb, their designs are so fresh. This jacket is no exception. It’s a ‘utility’  jacket, with a yoke for some interest, and great pockets. Honestly, I just can’t leave the house in anything without pockets!

IMG_5450

I used a lovely rust cordoroy for this jacket and plaid flannel for the liningm both from my stash. It’s such a cozy combination.  The buttons are vintage, found at an estate sale here in town.

IMG_5441.jpeg

Altough this jacket is lined, it was a easy sew. The fit is loose so there isn’t anything tricky there. You can easily complete this project in a weekend!

Carolyn Pajamas

IMG_5164

My Minerva Make for Minerva Crafts.com this fall is a pair of Carolyn Pajamas, from Closet Core Patterns. Honestly, these pajamas are such a mood brightener!  I spend so much time in pajamas now, as I allow myself the luxury of lounging a bit more during the pandemic. This lovely Lady McElroy cotton lawn was given to me by Minerva Crafts, and you can find my post about this pattern on their blog (here)This pattern is so fun, and I will make it again and again.

IMG_5219Even though social events are discouraged in Oregon right now, I hope to sew something festive for the holidays in December. After all, even a Zoom cocktail party is worthy of a bit of dress up, don’t you think?

Happy sewing, stay healthy and thanks for stopping by.

A Kalle Shirtdress Becomes a Coat

This week, I marked the beginning of Fall by completing my first cold-weather sewing project. My new denim walking coat was just the kind of project I needed to cope with ‘post vacation blues’. It’s a topstitching extravaganza, just the therapy I needed. Some sewists find topstitching to be stressful, but for me, the focus required is actually a relief that my brain craves when I’m down. 

My inspiration for this coat was a denim coat, designed by Madewell. I saw Cobie Smulders wear it on the already cancelled show, “Friends from College.” It’s a loose-fitting coat, made of mid-weight denim with a hidden placket and a tie belt. 

Although Colbie wore it as a dress on the show, I saw it as a long coat for Fall. Many of my knit dresses (here and here) are below my knees, so this coat will accomodate that length easily.

Pattern: To make the coat, I modified a tried and true pattern, the Kalle Shirt Dress. This pattern has so many options, I recommend it highly.

I chose this pattern because the fit is great, but loose and classic. To make it coat length, I added six inches to the bodice. To create the back vent, I eliminated the back pleat and added a seam instead, open at the bottom. Otherwise, I left the pattern pretty much as is.

 The orginal pattern has short sleeves, but I purchased the long sleeve extension from the Closet Case website. Instead of the classic french cuffs suggested by them, I eliminated the closure on the cuffs, and just folded them back.

Fabric: I used a medium weight denim from my stash for the with a darker denim for the collar, cuffs and pockets. The Kalle has one pocket, but I drafted three more. I used double topstitching on the pockets to make them pop.

I always love using a tried and true pattern in an unexpected way. As a coat, the Kalle does not disappoint! With this make, I’m officially accepting that Fall is here. It’s time to pull out the knits and wools from my stash and sew cozy

Happy sewing and thanks for stopping by!

A DIY Poncho You Can Sew in an Afternoon

IMG_8781

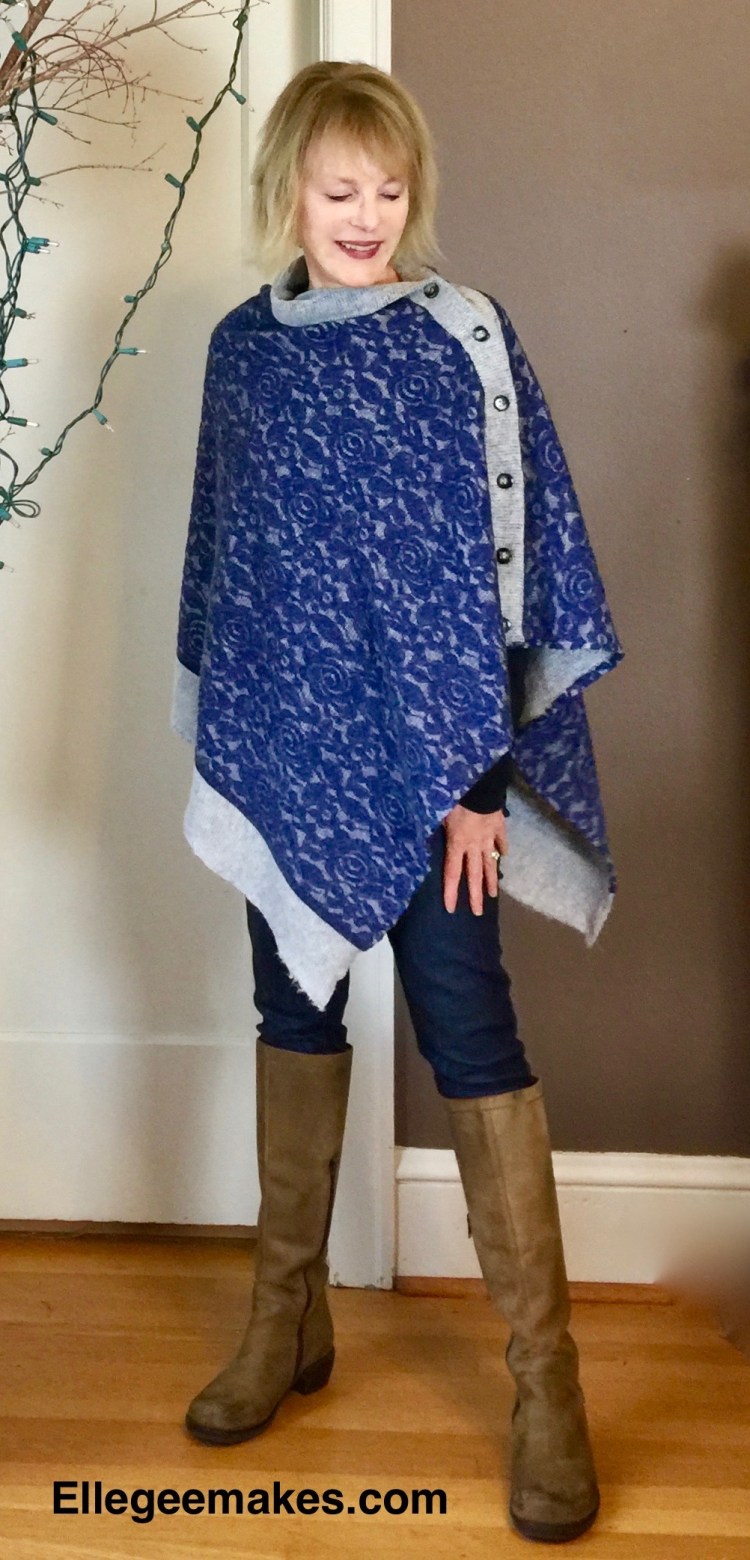
Fall weather can be so unpredictable in Oregon; warm one minute; cold the next. That’s why each Fall, I find myself drawn to add another poncho to my wardrobe. (previous makes here and here).  With very few seams and lots of fabric options, it’s the ideal quick and satisfying sewing project for a Saturday afternoon. It’s such a fun, easy project I can imagine making several of these to give as Christmas gifts.

IMG_8807

I’ve been collecting images of my favorite Fall Ponchos on Pinterest and was inspired by the many versions with button closures. When I saw this layered knit at the Mill End store, I knew it would be perfect for a cozy sweater poncho.

IMG_8864

This knit is extraordinary, a lucky find! It looks like lace but has the coziness of a knit, and, as an added bonus, the selvedge makes a cool-looking border.

IMG_8779

To make this poncho…

  • I used 1 5/8 yard of 58” wide fabric. I used the fabulous selvedges as a design detail. Probably any knit would work for this make. Come to think of it, you could probably use a woven too.
  • The button band is1 1/2 inches wide, and to make it, I just folded the long side of the fabric under. Before topstitching it in place,  I interfaced the band with a lightweight fusible interfacing. Because my knit has moderate stretch, I felt it would need the stability of the interfacing to support the buttons and button holes.
  • Before placing the buttons and buttonholes, I tried the poncho on to determine how big of a neck opening I wanted, then added the button holes accordingly, spacing them 2 1/2 inches apart. For me, the opening was about 20 inches from the edge.
  • I finished the poncho’s edges with a narrow machine stitched hem.

I love this cozy poncho. If it’s chilly, I’ll keep the neck opening small by buttoning it all the way up. If it isn’t, I leave a few unbuttoned to give the neck opening a casual look. I’ve also worn it with the buttons down the front, like a cardigan. It would make a great Christmas gift, don’t you think?

IMG_8737l managed to squeeze in a quick outdoor photo before it started to rain. As you can see the fall colors are extraordinary right now. If only these days would last a bit longer!

Up next: I have a cardigan cut out from a nice sweater knit, and am shopping for a gabardine for a trench. I’ll likely sew up a plaid skirt too in the next month. What’s on your sewing list?

Happy sewing and thanks for stopping by!

McCalls 7476-A cardigan for all seasons

img_9470-3

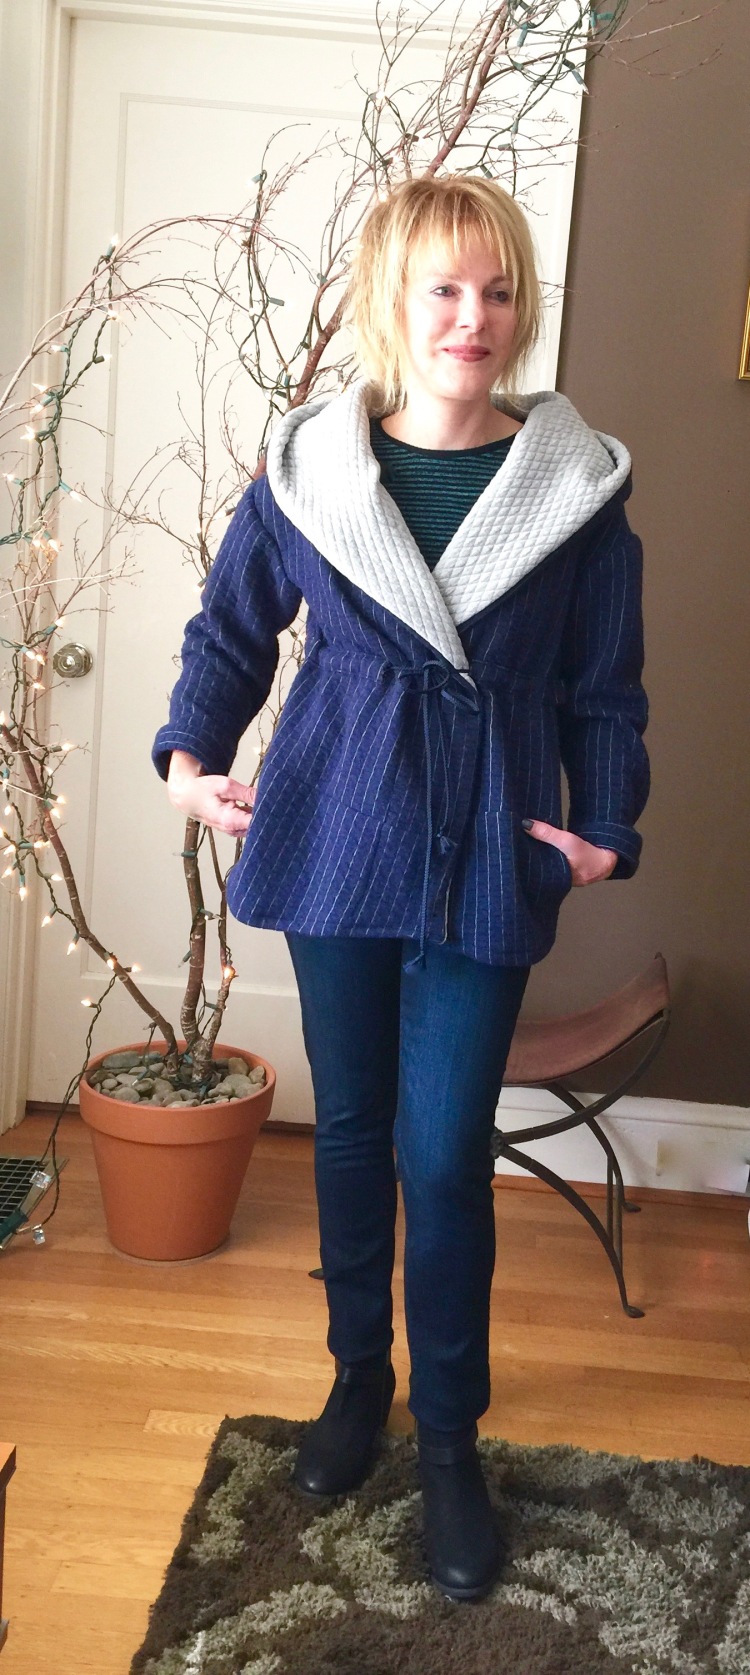
Hi All! Fall means cardigans because they are the perfect layer to throw over shirts and tee shirts when the weather begins to shift, so I’m always searching for new patterns. I was so pleased to find this new McCall’s option; a cardigan destined for ‘tried and true’ status. It’s easy and versatile with just the right amount of tapering for fit.

img_9071I like that it works with a collared shirt like this tie blouse, or over a collarless tee as well.


img_9707Because this sweater knit is pretty heavy with a bit of wool in the mix, I will likely wear it instead of a light-weight coat, so I made it really long. But I plan on making a shorter version with a shawl collar as soon as I can find another perfect knit!

The Details: My sweater knit is from Fabric Depot, a furry knit with lycra and wool in it, perfect for a cardigan jacket. The pattern is McCalls 7476, a cardigan with dropped shoulders, length options and collar variations.

m7476I love the fact that there are so many great options with this pattern. I cut my usual size small and didn’t have any fit issues. I wanted a snug fit when buttoned, but if you want a looser fit, you might want to jump up a size.

img_9692This pattern is super easy and fast to sew. I think from cut to finish it took me about three hours. I used a serger to finish my seams, but a zigzag would likely work.

It’s been a long while since I added a cardigan pattern to my pattern stash and this one has reminded me that I love them. If only I had a few more options to choose from. Do you have a favorite cardigan pattern? Let me know!

I hope your fall sewing is going splendidly. Thanks for stopping by!


McCall’s 7430- A sweater dress


img_9604
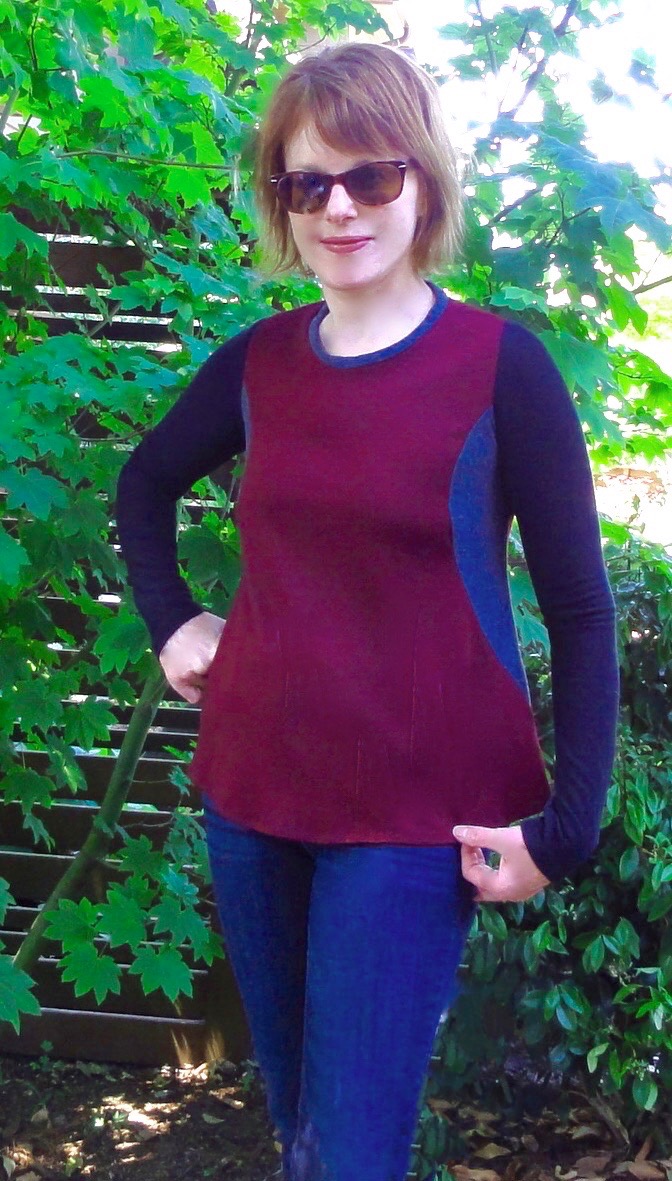
As you all know, I am a big fan of sweater knits, so much so I tend to stash/horde every one I find. Yes, I have quite a few squirreled away in my sewing nook, so (fair warning here) this is only the beginning of my annual sweater knit obsession.

Here is why I love them so, so much.  Most sweater knits are easy to sew (even without a fancy serger, just use a zigzag stitch) and wonderful to wear. I’m talking about those moderate stretch wonders with just the right amount of lycra with a dense, cozy weave. This houndstooth sweater knit is a perfect example of why I’m obsessed. It’s the perfect mix of stretch and cozy…destined to become a fall/winter wardrobe staple.

img_9588

McCall’s 7430 is the perfect sweater dress.

I love the side panels, the neckline variations, and the front and back yoke. I also love the sleeve caps. You could really have fun with contrast and color blocking here. There’s so much you can do with this pattern to make it your own.

The only modifications I made to the dress were to add front patch pockets, each 6 inches by five inches (gotta keep those pinkies warm!). I added contrast sleeve bands to finish the cuffs as well, but this is so optional. You could easily hem them with your machine as the pattern suggests.

One note about fit. The side panels eliminate the usual side seams so it’s a bit harder to use them to modify fit. Yes, I’m a big fan of taking a dress in at the sides, and I hate making muslins on a knit pattern.  It’s not impossible to adjust this pattern that way. It’s just a bit more time consuming, and if you adjust those panels too much, you run the risk of changing the look of your lovely dress. So, I’m glad the sizing is pretty true on this pattern because I didn’t need to make any adjustments at all. Phew!

img_9581I guess my obsession with sweater knits isn’t likely to end in the near future :). I’ll probably make another dress from this pattern, out of a solid knit with a contrast, since it’s so comfy and versatile. I think it’s one of those patterns you can dress up or down, maybe even make as a tunic length to wear over leggings. Love these inspiring versions from Vince Camuto…


Hmmmm, so mamy options, so little time to sew! Curious if you all are as obsessed with sweater knits as I am? Pretty sure there’s a color blocked version of this dress in my very near future!

Happy sewing and thanks for stopping by!


McCalls 7333- An Easy Jacket for Raking Leaves

img_8499

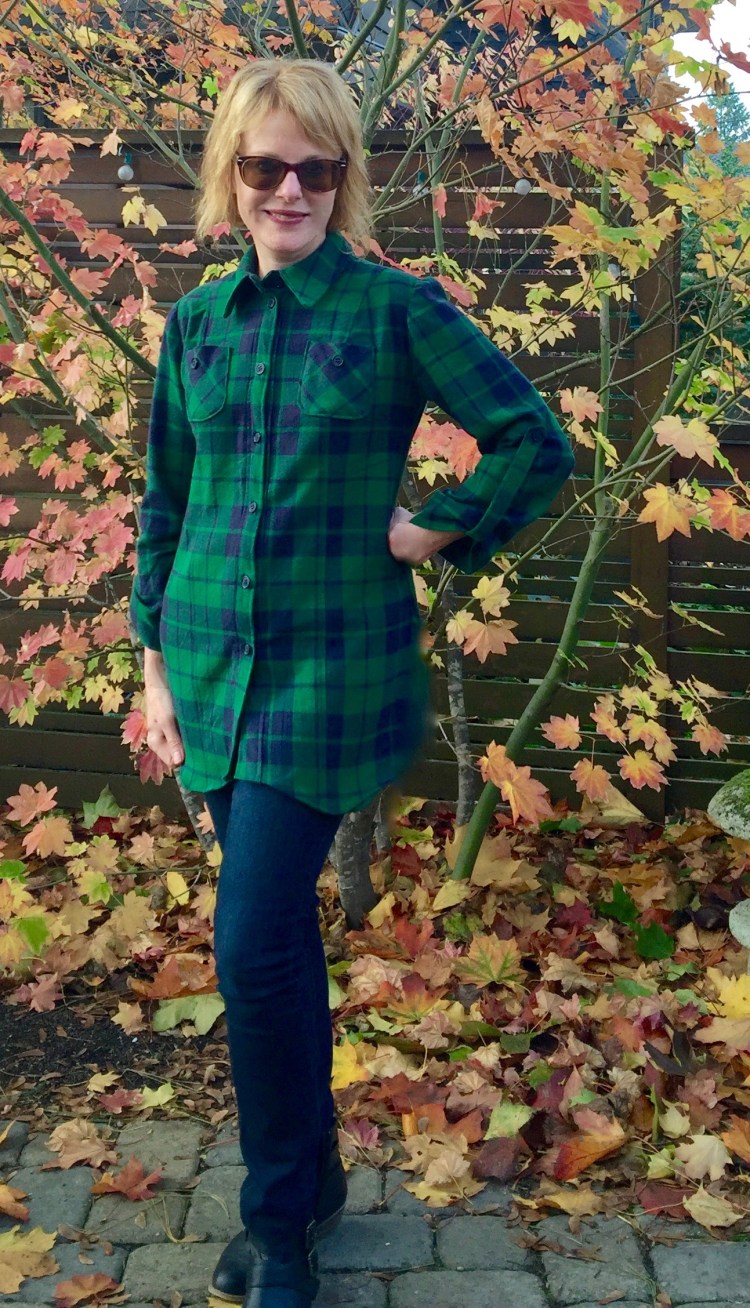
Hi All…..It’s leaf-raking time here in Oregon, a task that requires a specialized wardrobe, don’t you think? Well, here they are, piling up on the deck.

img_8409

Yet, I do not have a rake in my hand. But, if I do decide to grab one, I’ll be dressed for it! As you can see, the rainy season is upon us here in Oregon, making outside photos a challenge. I just managed to sneak one in before the rain and wind started. Good thing I chose a jacket pattern with a hood. It will come in handy in the weeks ahead.

My inspiration for this jacket was this poncho from Anthropology. I tried it on and LOVED the fit, the fleece, the tie front and the big sleeves, but didn’t love the color or the fact that it didn’t have a hood.

4133391120301_060_b

So, I grabbed a heavy knit in my stash and made McCalls 7333. That’s the beauty of sewing isn’t it, the ability to get what you want? This pattern is a fun sew, a loose-fitting, unlined jacket that has a front that extends to the hood and drop shoulders, which I really love. The waist is enhanced with a tie that you can cinch as tight as you want. This style is perfect for those of us who are ‘waist-challenged’ because we can fake what we  don’t have!  You can make it out of a variety of fabrics, including lace.

I chose a stable knit from my stash that’s pinstriped. It’s more like fleece but you could probably make this pattern out of cotton or wool too. Here’s a shot of the cinched waist from the back.

img_8458-1

For contrast, I used a gray quilted cotton knit for the hood lining and front band.Because my knit was double faced, the jacket is VERY warm, so I didn’t need to line it. The pattern is very straightforward with great instructions. The tie waist is a cord that is encased in fabric, which sounds harder than it is. To construct the casing, you merely sew a long piece of fabric to the outside. The challenge of this pattern for me, was managing the thick fabric. It was a bit tricky gettting the sleeves in smoothly because the fabric wanted to bunch, but after a few tries, I managed. I serged the seams for a nice finish.


img_8464

Oh, and the jacket has pockets too, great for long walks on crisp days. The navy pinstripe is better on me than the bright orange-y red of the Anthro. jacket. And I’m calling my jacket an on-trend make (LOL) since pinstripes are all the rage this Fall. So nice to finish this warm, little jacket before the monsoons start.

The Pattern Review Surprise Sewing Bee is on right now, lots of fun makes to see there, and Froctober is happening on the Monthly Stitch. There’s so much going on in our sewing community in the Fall. There’s no shortage of inspiration to be found! I didn’t participate in the Sewing Bee this year, but I do try to keep up with the Monthly Stitch challenges, although I have missed a few lately. Still, I love seeing everyone’s posts over there. If you haven’t, you should really take a peek. Happy sewing and thanks for stopping by!


I’m falling for plaid…

IMG_6058Name Name five things that are cozier than flannel….. Can’t do it? Me neither. That’s why I’m glad this blue and green cotton flannel found its way into my shopping cart.

‘Cozy’ is the theme of my fall sewing efforts, and this shirt definitely delivers. Cotton flannel is such a dream to wear! My shirt’s first outing was a hilly walk this afternoon. Not only did the fabric score a big ten in the ‘cozy’ department, it breathes too!  So, if like me, you’ve never owned a flannel shirt, let me tell you. It’s high time you did.

IMG_6044

I loved this plaid on sight. For one thing, it’s such a great basic that just screams ‘fall’. It reminds me of everything good that these crisp cold days offer: leaf stalking (you’ll notice I didn’t say leaf raking), wine tasting, and using the fireplace for the first time. The added bonus? Plaid is a big fashion ‘yes’ this fall, so it’s available in every color combination imaginable. If you look great in chartreuse, there’s a plaid out there just for you.

Medium_0416260Medium_0344808Medium_0416256

For my shirt, I used Simplicity 2447, a button-down with princess seams, a front band, a back yoke and various front detail combinations.

I chose this pattern because it had so many variations and opportunities for contrast. I knew I wanted to cut a few pieces on the bias to make the structure of the shirt more obvious and, with this pattern, the options were endless.

IMG_6072

The hardest part of this project, (yes, you guessed it) was matching the plaid. I bought LOTS of extra fabric (on sale at Fabric Depot, so nice!) so that my match-ups could be strategic, without worrying if I’d have enough fabric. Cotton flannel is not a slippery fabric, so it was difficult to get the double layer of fabric perfectly smooth AND have the plaids on both sides match as well. I pinned the selvedges together, which helped a bit. But finally, instead of cutting out all the pattern pieces on the double layers of fabric, I opted to cut a few pieces twice on single layers. That way, I could position the collar, pockets, cuffs etc. without worrying. I just didn’t trust the wonky way the fabric seemed to move and stretch even though I could swear, I wasn’t touching it (Haunted!).   Cutting out a pattern is usual a brainless activity that I can do while watching ‘Project Runway’, yet never missing a beat. Let me tell you…not this time! TV OFF!

It was fun to figure out how to cut out the pockets.

IMG_6082 (2)

I finally decided to cut them on the diagonal for contrast and the plaid is centered on the princess seams.  I put a button on the pocket to draw your eye there. The back yolk is cut on the diagonal as well for contrast with the plaid pattern centered over the back pleat.

IMG_6064

This is my first version of Simplicity 2447 and I think I’ll make this pattern again. It fit my shape without modifications (princess seams shape the bodice), which is a rarity for me. The instructions were easy to follow.  The pattern includes lots of options (including three (3!!) sleeve options), so it’s easy to make the style your own.. This time, I tried the rolled up sleeves with the button tabs but I’ll try the long-sleeved version with cuffs soon. The hem has a nice curve, which I left long to make the shirt even cozier.

I love sewing with cotton flannel and it’s so great to wear – – I can’t figure out why I’m not living in flannel. Hmmm, is this the beginning of a new fabric obsession? I would love to hear about your adventures with my new favorite fabric!

Happy sewing and thanks for stopping by…May your week be colorful and cozy!

A color-blocked tee in ‘Merlot’: the perfect palette cleanser

DSC03160

After completing a challenging sewing project, I often find I need an easy follow-up ‘sew’, sort of a palette cleanser, you know? A tee or a top is my ‘go-to’ project at times like these and I feel especially virtuous if my project uses up a bit of my huge, largely untamed fabric stash.

I found this great red ponte in my stash, and decided it needed to go out into the world. It’s a wine-y red, similar to the color Pantone chose for 2015, ‘Marsala’, a robust and earthy wind red that they describe as a ‘hearty but stylish tone’ (LOL).  I gotta give them credit. They definitely called that trend, because that color of red is everywhere! In Nordstrom’s fall catalog, they called it ‘merlot’ and nearly every page included a splash (Ha) of it. And who among us doesn’t love a color that reminds them of their favorite beverage?

DSC02410

The Merlot ponte in my stash was perfect for a tee, but there wasn’t enough for a long sleeved style (so typical…), so I was forced to color block (Yes, I’m a fool for it), mixing my wine-colored fabric with accents of black and gray.

The pattern I chose for my easy-to-wear tee is Vogue 8710, a semi-fitted pullover top.

V8710

V8710 (1)

The pattern was released awhile ago, but it’s still around. I love tees that fit closely around the bust and shoulders, but that have an interesting shape. This one fits that criteria perfectly because it’s almost bell shaped at the bottom, which I love, but it’s not too loose either.

DSC02372

View B is a color blocking dream-come-true because it has curved side panels that add interest to the fit, but are also the perfect host for a contrasting color.

DSC03165

For me, the fit of this pattern is pretty spot on, in spite of the fact that I have really narrow shoulders. I think this means that others might need to adjust the pattern a bit? I used red ponte’ for the bodice (moderate stretch), dark gray for the side panels, and black jersey for the sleeves and neck binding. My ponte’ knit was pretty substantial with a lot of body, but with a good drape. This seems important to support the cool shape of the bottom of the tee. I don’t think this pattern would work as well if your knit was too lightweight, even though the suggested fabric include light jerseys. Just saying….

The pattern was super easy to put together. I used the knit stitch on my regular sewing machine and it worked fine. This tee qualifies as a quick sew to be sure. You don’t have to think too much so you can watch Game of Thrones and never miss a beat. And it’s so fun to have a new top that you started in the morning, but wear in the afternoon.

DSC03167

I think I’ll make this top again, probably in some random shades of blue (I’m obsessed!). Do you have a favorite ‘palette cleanser’ pattern? Do share! Happy Sewing! And thanks for stopping by.

Seeing Red!! An embellished version of Simplicity 3833

IMG_1136s This This Fall, there’s a new kid in town, the Little Red Dress. While the Little Black Dress and the Little White Dress have always been favorites of mine, there’s something fierce and unexpected about a red dress. For one thing, you can’t be a shrinking violet if you’re wearing red at a party. You will be noticed. You might feel a bit powerful, too.

I decided to make this dress from red because when I looked at my Fall wardrobe, only one word came to mind – Somber! Everything I saw was gray or black.  Eeek! Is there anything worse? I decided it was time to find a new favorite color. Then, I met this fabric. True love! It was the most perfect shade of red; not too orange or pink, but a true, cardinal red.

My lovely cardinal fabric became the back drop for embellishment, courtesy of the second round of the Pattern Review Sewing Bee. We were asked to make the fabric our own by using surface embellishments. It took me a few days to get my head around that one (clock ticking, ticking, ticking). But once I got used to the idea, the embellishments used by Italian designers, like Dolce and Gabbana came to mind. Inspired by their swoops and swirls, I decided to try my hand at it.

IMG_1438Because I suspected the trim and appliqué would be heavy, I decided to make my dress from a medium weight rayon (woven) with some body and weight. I’m glad I did that, because the finished dress is surprisingly heavy.  Just think what the royals have to deal with, given the size of their medals and jewels!
Dress Pattern: I used Simplicity 3833 for the bodice but added self drafted sleeves because I wanted them to be bell-shaped to match the a-line shape of the dress’s lower bodice. The embellishments on the sleeves are meant to match the themes on the dress bodice. I highly recommend this pattern. It’s really fun and easy to sew. The curved seam between the upper and lower bodice gives it a unique look, I think. I chose an a -line style because the skirt is wide, a nice blank slate for embellishments.

IMG_0928The embellishments:
  • Before constructing the dress, I made a template of the swirled pattern, so that the design would be consistent on both sides of the upper and lower bodice which I knew would be tricky.
  • Then, I transferred the finished designs to the right side of the fabric with basting stitches. Nightmare. I could have used one of those lovely invisible ink marking pens, but I discovered with a test swatch, that the ink didn’t disappear on this fabric. Since I knew I’d make mistakes, I didn’t dare use one.
  •  Following those markings, I laid the trim onto the fabric pieces, adjusting the curves as I went so that the swirls wouldn’t look forced.  This took forever as it had to be done in stages – – so that the curves of the swirls would be remain perfect and symmetrical. I hand basted each trim to the fabric to keep it from shifting, before using my machine to secure it with a appliqué stitch.
  •  I created the appliqué flowers and trim from lace, then appliquéd those embellishments to the center of the swirls.
The best part of this project, was deciding where to put the embellishments so that my figure would be (ahem) enhanced by the design.  I created the swirl design templates with the a-line shape of the dress in mind. The largest swirls were put at the center of the upper and lower bodice to create a focal point for the eye. The secondary swirls were placed at the side of the a-line skirt to draw attention to that shape, while also (hopefully) adding a slimming line to the design. The design of the front embellishments are carried through to the back of the dress in a continuous line.
IMG_1041
Part of the fun of this project was creating the design templates, then applying the design to the fabric in stages. This was a long process, but it was fun to do this in layers. Each time I added a new line of embellishment, the dress took on a new look, so the design sort of ‘evolved’.
IMG_1051
One challenge I didn’t expect was locating the right trim for the embellishments. To make the design have a bit of energy, the trims needed to be of varying weights and styles. I drove all over Portland, looking for trim and bought everything I saw. So, Portland-ites – – there’s nothing left for you!   If I had to do it again (with more time), I’d probably have ordered some interesting trims from other sources for more variety.
 Ultimately, this was a fun challenge and because of it, I now have a new special occassion dress. And sewing with a color as vibrant as Cardinal was definitely inspiring. I’m determined to add some color to my fall wardrobe, maybe some jade, a bit of gold, a touch of fuchsia? Lots of warm, vibrant colors.  I’m excited to start sewing with some lovely prints too!
How is your fall closet? Happy sewing and thanks for stopping by.

McCalls 7187: A plaid transition dress for Fall

IMG_2599

Yes, this dress is plaid and plaid does scream back-to-school and winter skirts. But don’t let my dress fool you. I have not given up on Summer!! After all, it’s only August. Sure, in a few weeks, the kids will be back in school, the warm air will have a crisp edge and we’ll have to start heating our houses again. But summer hasn’t thrown in the towel yet.

Still, my sewing projects are starting to shift. I’m reaching into my stash for heavier fabrics (reluctantly) with darker colors. I’m easing into this, though. After all, why let go of summer before we have to?

IMG_2660

That’s why I decided to sew a transition dress. I won’t give up the hope that there are still warm days ahead, so the fabric is a light-weight cotton. But to make the dress fall-worthy, the colors of the plaid are dark; black, red, green and gold. And nothing shouts ‘fall’ quite as loudly as plaid. This one’s especially bold – a stand-up-and-get-noticed plaid.

The pattern I used is McCalls 7187, a new one that was included in the McCalls’ fall release.

M7187M7187 (1)

It’s a fit and flare style with some interesting options. You can cut the dress with a relatively simple, straight skirt, or you can add pleats or gathers to the side panels. The pattern envelope showed the dress in a plaid, a perfect option for my bold fabric.  I chose the straighter style, only because I didn’t have quite enough fabric for the gathered, fuller option and I wasn’t sure how the plaid would look on the gathered skirt.

The pattern went together like a dream. I always cut one size larger when I’m making a McCall’s pattern, since, on me, they seem to run small (at least that’s what I tell myself). This was the case with this pattern too. The fabric was so easy to work with and fabulous to sew! It’s a woven cotton that I purchased at Mill End Fabrics. It drapes nicely, which I’m guessing is a must for this dress.

IMG_2051 (1)

I cut the front inset on the bias as indicated, a fun option that makes the plaid pop. The inset looks tricky, since it has curved seams, which I expected to be absolute torture to get right. But the inset went in perfectly the first time. How about that?!  A shout-out to the pattern designer! Thank-you!

Other than the inset, the dress is was pretty straightforward. The pattern instructions made everything quite clear. All in all,  Actual Sewing Time on this plaid frock was about three hours (three episodes of Game of Thrones, LOL).

IMG_2822

My only regret is that the dress isn’t lined, so my fabric tends to cling a bit to my legs from time to time. (Also, it was a bit windy when I shot the photos for this post which made the skirt go wonky.) I suppose you could line this dress though? But maybe the skirt would make that tricky? Not sure about that….

Are you sewing transition clothes? Or are you still focussed on summer?

Happy Sewing! And thanks for stopping by.