DIY Cropped Pants and an Easy Top

img_7842
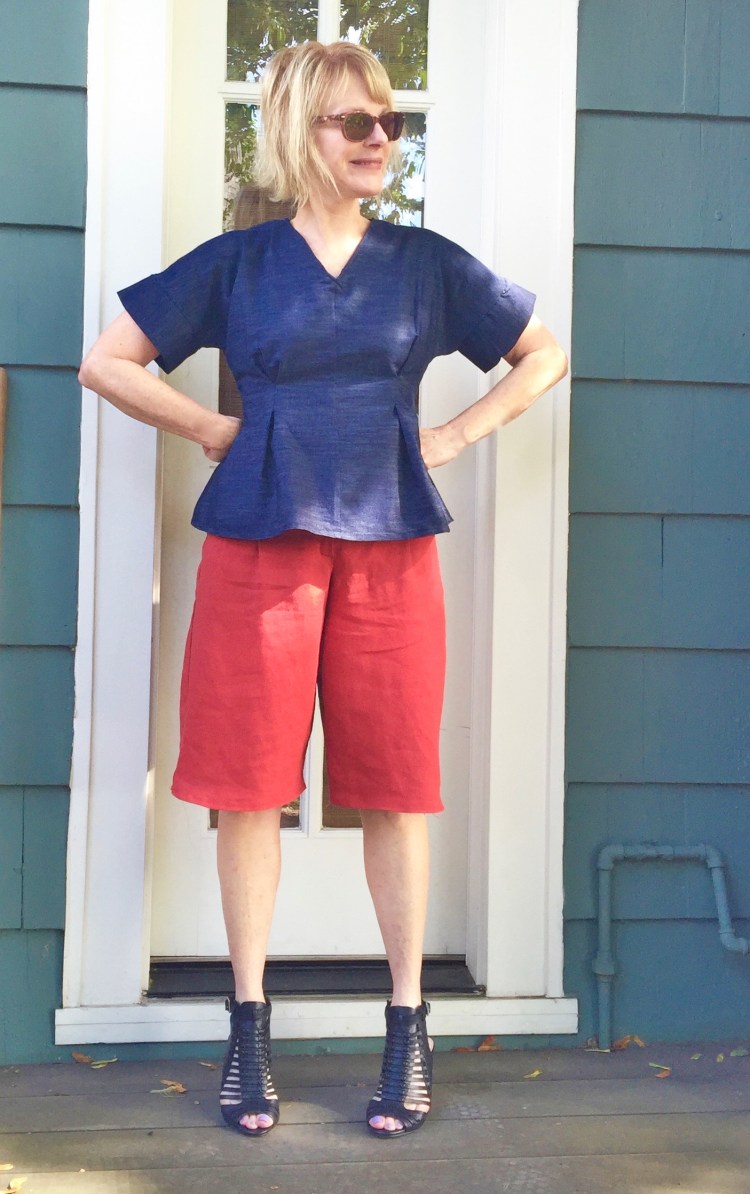
Hi All! What are these? Cropped pants? Wide shorts? Culottes? Tell me, please. Whatever they are, they’re strangely reminscent of a poppy skirt I bought in junior high. Yes, it has been that long since I had anything in my wardrobe that was poppy! Can’t tell you why I’ve waited this long because the color is so fabulous. In fact, when you think of all the colors you can wear with it (black, navy, white, denim, maybe even army green?), you could almost call it a neutral.

img_7862

I’ve wanted a pair of wide shorts/cropped pants since I saw Mimi G rocking them on her website. Yes, I could have purchased one of her excellent patterns to make these, but I felt sure a shorts pattern I had in my stash would work just fine. But after I made them, I realized didn’t have quite the right top to go with them. You know how it goes. One thing leads to another….

img_7859

The cropped pants are a long version of Vogue 9008, a shorts pattern that is so versatile. You can make a flat front or pleated front version. I chose the pleats, but then I sewed them down to give the front a smooth finish. To get the full leg look I wanted, I lengthened the shorts by six inches, keeping the line of the shorts wide at the bottom. I love the effect. The shorts are snug at the top, but they flare out like a skirt at the bottom.

The pattern is pretty straightforward. It has a mock fly zipper, which is easy to insert, and you can add pockets if you want. The instructions were clear. It wasn’t hard, but with belt loops and a back yoke (which I love) this pattern is a bit time consuming.

I made them from poppy linen, purchased at Fabric Depot. It is midweight and I planned on lining the shorts with silk, but ended up taking the lining out because it made the legs too full and bunchy.  Yes, I wanted them to be full, but I did not want them to look like clown pants.

img_7836

The top is made from a cotton-linen blend that’s the color of denim. I love this fabric and wish I could remember where I got it because I’d love to have more. The pattern is Vogue, 8906.

It has front pleats that form the shape of the bodice, eliminating the need for darts. There’s a zipper in back. To make the sleeves a little more boxy, I added a sleeve band that is 5″ wide. It makes the sleeves look more ‘finished’ to me, and adds a bit of a retro vibe, I think. I also added a v-neck, and adjusted the facings accordingly. This pattern is super easy! I plan on making several more versions including one with buttons down the front. The fit was spot on for me. I didn’t even have to adjust for my narrow shoulders. Nice!

img_7846I’m not sure if Poppy is a fall color, but I’m going to be wearing this outfit now, because linen is so perfect at this time of year. I’m not sure if I’ll really wear this top with the shorts though. Together they might be too much flare for me. Maybe I should wear them with a top that fits snuggly, or maybe something tucked in? Opinions welcome!

I hope your sewing projects are going well. Fall is my favorite time to sew, because the new fabrics are so fabulous. Enjoy!

Butterick 6378: Two tie neck tops

IMG_6452
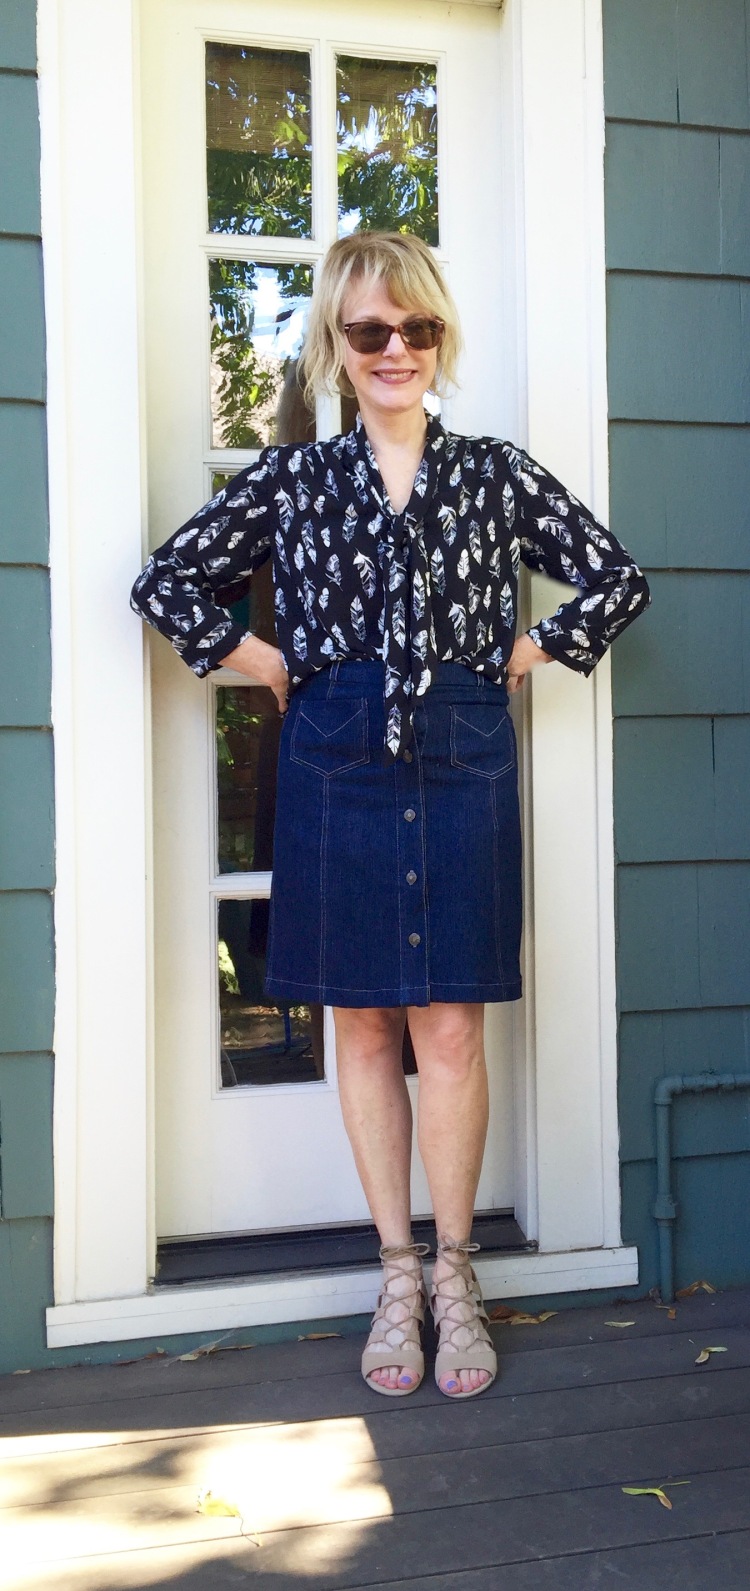
Sometimes, you make one version of a pattern, and you love it so much, you rush have to make another.

IMG_7328

It wasn’t just the versatility of the pattern that inspired me to sew two (2) versions, it was envy too. When I saw these versions in ready to wear, I had to have one (or two) for myself.

Version 1 is by Sea, and version two is Chloe. You can wear either one with the tie ‘tied’, or not, depending on your mood and it still works!


This pattern is part of Butterick’s fall collection. It offers several options, a narrow tie collar, and a broader tie that’s incorporated into the neckline.

Because the tops slip over your head, they’re easier than some to sew. But as usual, the devil is in the details. I found the two collar options to be quite different to sew.

The bow collar on this version is part of the neck line finish. It’s only two pieces which are sewed onto the collar opening….so easy!!! It becomes the facing and the collar – – so efficient. This version is made from a very stubborn rayon, that was a bit tricky to sew, but feels great to wear.IMG_6640

The fabric was very ‘shifty’. This version is ‘as designed’ with one modification. I eliminated the elastic on the sleeves and added a self-drafted 3″ cuff.

Version two is the narrow tie option. I made this out of a yummy rayon (fabric depot.com).

IMG_7261

This version (shown here with my jeans skirt) was a bit trickier to sew because there is a narrow collar that is sewn on after you insert the narrow ties. Narrow ties are hard to turn, for one thing (an understatement. My finger tips will never be the same). Then, the ties have to be placed just ‘so’ before you attach the teeny-tiny collar. Sure, it’s not impossible to get it right, but you need a bit of patience :).

I love both versions and can imagine making antoher in silk with, maybe….Hmmm….bell sleeves?!? I am not done with that look yet! Anyway, I’m giving this pattern a thumbs up. It’s a great transion look, I think, a nice bridge between the seasons, and if I could find some great fabric like the Chloe or Sea versions, I’d be all over making version number three.

Long sleeves….I think that makes this a ‘Fall’ project, even though the temperature is in the mid-90s here! Have you started your Fall sewing yet?

Happy sewing and thanks for stopping by!


Simplicity 1318 Kimono Love

IMG_5859

Hi all! I’m back from my travels, and, I’m happy to report, my travel wardrobe was put to good use. I’m now a big fan of the Danube, and my travels there were relaxing but inspirational too. So many of the communities along its shore have a rich history of handmade garments. Everywhere I looked there was something beautiful to see and enjoy.

In fact, a garment I spotted on the trip prompted the title for this week’s post: Kimono Love. This is a handmande child’s kimono from Rijksmuseum in Amsterdam (if you have a chance to visit this extraordinary museum, take it.) I could have stared at this all day.

IMG_4799

Another favorite:

IMG_4796

And here’s mine. Ha, not quite in the same league, but we do what we can!

IMG_4468

For this kimono, I used Simplicity 1318, a tried and true pattern I’ve made before (here) that’s so easy to sew!

simplicity-jackets-coats-pattern-1318-envelope-front

Because I knew it was a sure thing, I splurged and used silk. It’s a fabulous piece I found at Fabric Depot last Spring (gone now, sigh). For the front band, I used a silk in a solid contrasting gray. This is an unlined pattern, so I finished all the seams with my serger, but it would be lovely with french seams too.

IMG_5797

This kimono is a breeze to sew because the pattern has very few pieces. The style is loose and unstructured, so you don’t have to fuss with fit issues. The best fabrics for this are wovens with great drape, like this silk. Last summer, I made it from a sheer cotton which worked almost as well. I think a lightweight rayon would be great too, but really! Splurge and buy some silk! It’s so fabulous to wear and you deserve it :). I did prewash this silk, by the way, on the gentle cycle with some deteregent meant for lingerie. This made the fabric less slippery, and easier to cut and sew.

IMG_4440

I love the shape of this kimono and the high-low hem. This pattern must be a favorite of many of you, because it was one of the best loved patterns on Pattern Review for 2015.If you have a chance, take a look at the versions posted there. There are so many beauties! You’ll be glad you did.

My trip was fabulous, a much needed break, and I enjoyed the time I spent ‘unplugged’. But I missed visiting your blogs and chatting with all of you about your makes. I’ll be perusing all of your websites, catching up on things this week. I can’t wait to see what you’ve been up to!

Happy sewing and thanks for stopping by.

A cold shoulder top, dress or tunic

IMG_4728

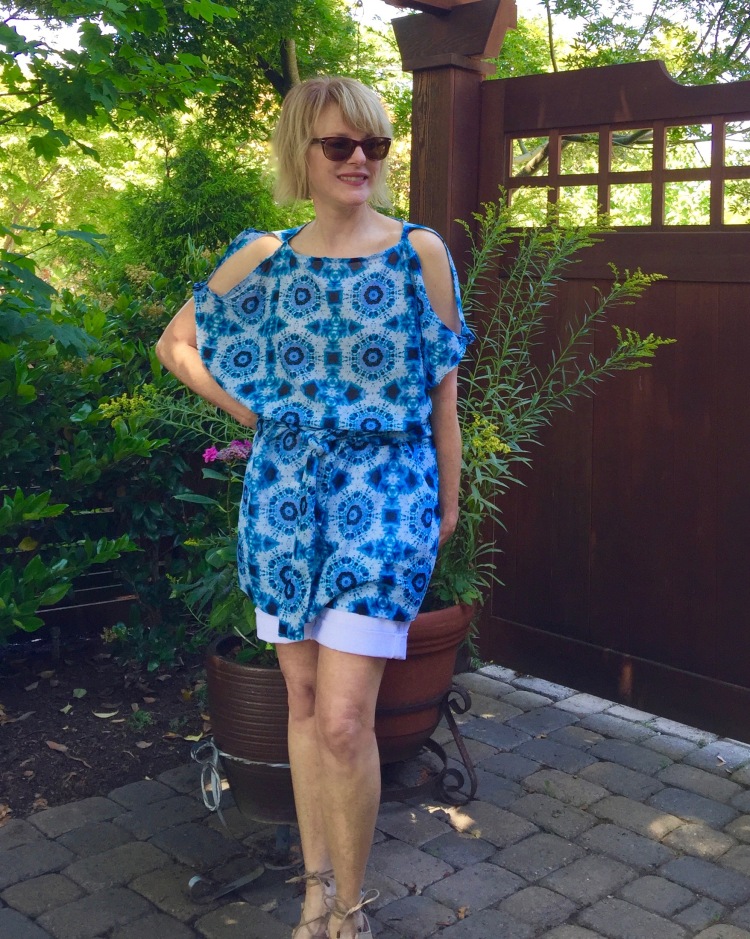
I cannot get enough of the cold shoulder look. As with most trends, when I finally get on board, I don’t let go!  This is my second cold shoulder project (first one here) and I can tell you, it will not be my last. Here’s the reason I love the cold shoulder look. Showing a bit of skin at the shoulder gives even a loose, summery top or dress a bit of a sexy vibe.

What’s even better about this top, is that it’s so versatile! By hemming it a bit on the long side, I can wear it either as a top or a dress! Here it is loose and unbelted for a hot day.

IMG_4652

Here it is over jeans, perfect for a day that’s a bit on the cool side.

IMG_4508

I think this pattern plays to the advantage of a cut-out shoulder. Even though the cut of the top is unfitted, the shoulder gives it a bit of interest, and makes it look more shapely than it is. You can belt it, or not, as the mood strikes.

IMG_4714

The pattern is Butterick 5889, an easy top, tunic and belt.

It’s a bit oversized with a slit opening at the sleeves that could not be easier to construct. The sleeve hems and the sleeve splits are just finished with a narrow hem. So fast! The cold shoulder look is created when you tack the sleeve split together at the top and bottom.

The shape of this top is rather loose and boxy, so I choose a very lightweight cotton with great drape (Mill End Store) so that it wouldn’t overwhelm my small frame. The hardest thing about this top, was getting the pattern perfectly lined up on center front, so you know this top is easy!!

IMG_4746

I can imagine wearing this top/dress both ways, belted or loose (although the unbelted version might be a bit of a man-repellant, if you’re worried about that sort of thing, LOL).

From cut-out to finish, this top took only a couple of hours to create. It might have taken less if I wasn’t watching High Society (Grace Kelly could not be more gorgeous. And the clothes!)

This top is such a fast, fun make, I might try it again out of a rayon challis. View B also has pockets and a front placket, so I might give that a go at some point. If you decided to try it, I recommend sticking with a drapey fabric, as it does have a very generous cut. The pattern came out in 2013, but it’s still easy to find and on-trend now.

What do you think?  Do you prefer it as a top, a tunic or a dress?Isn’t it nice to have some easy projects during summer? There’s so much to do outside, away from one’s sewing machine.

Happy sewing, and thanks for stopping by!

A Dress with a Few of my Favorite Things


IMG_3540

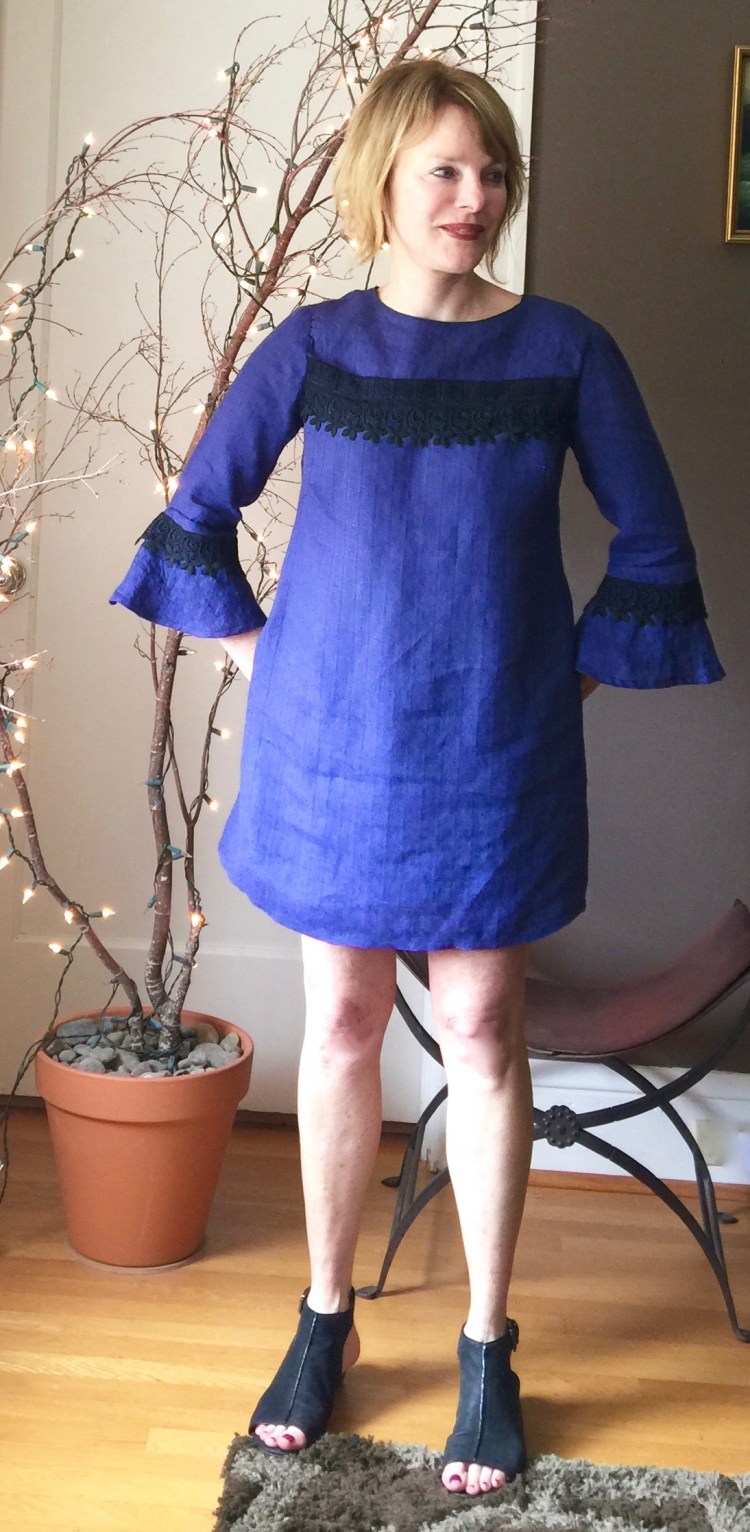
I’m smiling because this dress has three of my favorite things: linen, lace and silk. Yes, linen wrinkles, but I’m prepared to overlook that fact because it breathes like nothing else. If the weather is muggy, no worries!  When it comes to heat, this fabric is invincible.

IMG_3568To make this dress even more humidity resistant, it’s lined in silk, a splurge I never will regret. The textured linen is so special, it deserves a great lining. Not only that, but it was such a bargain! I found two yards on the remant/sample shelves at Mill End Store last summer. I bought it immediately, of course, but then I stalled. The fabric was so wonderful, I dithered about what to do with it. A dress? A top? Or, maybe a skirt? I perused pattern books, websites, flitting from one idea to another. How typical. If I love a fabric, I become paralyzed by its perfection! No idea or pattern is good enough for it. Finally, though, I settled on this idea. It’s a good thing because this linen dress is a dream to wear. The linen hangs perfectly, but feels like nothing.

IMG_3504 My dress was inspired by several RTW versions. Here are two fabulous dresses by Derek Lam and Caroline Herrara.

The pattern I used for my dress is McCalls’ 7285. I’ve made it before as a top, but decided I wanted to convert it to a dress.

To do so, I had to modify. The top pattern as drafted is a cropped style so if I extended it to dress length’as is’, it would be too tight in the hips. So, I took my hip measurement, and, as I extended the front and back bodice, I made the shape A-line, making sure the bodice was wide enough to accommodate my own width.

To add the lace embellishment on the bodice, I cut a length of lace the width of the front and back bodices just above the bust line. I stitched the lace in place on both the front and back bodice before setting the sleeves in. That way, when I did finally sew them in, the end of the lace was hidden in the sleeve seam. To add the lace to the bell of the sleeve, I sewed the lace on the bell before sewing the bell’s center back seam so that the end of the lace would be hidden in that seam as well. Also, textured linen has a tendency to fray (this is an understatement!). So, to keep my dress from unraveling into a pile of thread, I overlocked all the seams on the dress, and the silk lining as well.

IMG_3548

I love my summery dress, and I think the top pattern transitioned without too much of a struggle. However, I’m certain my method could be improved upon. I feel like I should have taken fabric drape into account as I extended the top to dress length, and that I’m lucky that it turned it as well as it did!  There must be more to it than just adding a few inches, a ‘method’ with a bit more of a rationale? Have you extended a top to a dress?  Did you just add a few inches, or did you ‘draft’ an extension?

I took my dress for a test drive today, and it was so comfortable. I’m glad I splurged on silk for the lining, because it makes it extra yummy to wear. So, if you wonder if silk is worth, my answer is ‘YES’! Go for it! You deserve it.

Happy sewing and thanks for stopping by.


McCalls 7314: Burberry knock-off

IMG_1397

As you all know, I’ve got a thing for Burberry’s classic designs, and the Spring 2016 collection was one of the best. Being peplum obsessed, I couldn’t help but fall in love with this cute shirt.

203f3d87fd36b410af8e9c14c87692ac49df2e6d

Okay, as Burberry prices go, the tag on this one wasn’t totally ridiculous…only $350. Yes, it’s a lot, but I could probably justify a splurge like that if  (1.) I didn’t have a fabric stash worth a small fortune (2.) I didn’t have an expensive shoe thing that is almost as bad as my Burberry obsession and (3.) I could commit to never buying another RTW, or piece of fabric for the rest of the year (ha, we all know that’s not going to happen!)

IMG_1399 (1)

So, a knock off it is!

The fabric: A plaid cotton gauze from Mill End Store. (They take phone orders, BTW. Although there isn’t much of this fabric left I noticed.)

The pattern: McCall’s 7314, a shirt dress pattern with a gathered skirt, elastic waist and sleeve options.

Modifications: I shortened the skirt by twelve inches. I cut my usual size, but made a small adjustment for my narrow shoulders. Other than that, no adjustments. were necessary. The sleeves are shorter on me than they are in the photo, by the way. Be forewarned…if you have long arms, and want 3/4 sleeves, cut them a bit longer.

The skirt on this dress isn’t fitted at all. You add a bit of elastic to the back to make the dress taper at the waist. You can cut the elastic as you wish, so that it’s as fitted (or not) as you want. This makes this top/dress so comfortable!!!

Challenges: Plaid matching! OMG, a nightmare!  I did okay, but I’m not happy with the sleeves. IMG_1421

I wanted them to match perfectly, but they’re a little off. I’d like to blame this on the gauze-y texture of this cotton, rather than on me, but we all know the TRUTH. The cotton is amazing to wear, well worth the effort it took to keep it straight. I have a bit of fabric left over, and might try to recut the sleeves, since I notice this mistake (LOL, you all know how this is!!) I should’ve used more pins and weights to keep it still. The skirt was impossible to line up, a fact I obsessed about until I realized, the Burberry one didn’t look much better. Still, I obsessed. Not perfect, but that’s how it goes.

This shirt is so comfortable! And I love the wide plaid. The cost: This shirt cost me less than $20 to make, since the pattern was on sale at Joann’s, and the fabric was purchased during a 25% off sale at Mill End. Yes, you have to figure in your time, but still….this is a good deal, right? Of course, the Burberry fabric is to die for….if only…

IMG_1403

I’d love to have more wide plaids in my stash because I love the look, but can’t seem to find many in the fabric stores. If you have a source, let me know. Another question..should I recut those sleeves? Opinions welcome!

Happy sewing and thanks for stopping by!


Vogue 8894 – Stripes, Blue and Linen

DSC03344
When I first saw this fabric, it seemed made for me.  It has most everything I love; two shades of BLUE, stripes and… it’s linen! Can you blame me for snatching it up? I was ecstatic, yet, once I got it home, it languished in my stash. I couldn’t decide what to do with it. Fabric love can be so paralyzing! I overthink, worrying that the style won’t do it justice, or that it will never look as good as it does on the shelf.
But our recent heat wave pushed me to act. I did not have a thing to wear (honest!!). Everything in my closet felt heavy and hot. This made my lovely fabric’s future quite clear. It would become an easy-to-wear, cool summer dress, a frock that could handle even a 100 degree day.
DSC03331
The pattern I used was one I’d had in my archives, a basic Vogue I bought during a sale, then never used. To be honest, there are many (!!)  similar patterns in my archives, ‘honest mistakes’ purchased during some crazy-good 5 for $7 sale. I’m a sucker for those sales. No matter what, I can’t buy just three patterns. I have to buy five, because, well, it’s a good deal! Needless to say, that mindset results in a pattern stash that is unwieldy and huge. Some of those lovelies will never be opened, or cut. What to do, what to do? Does one vow to use all of them so that not one pattern will be wasted? Or is it better to admit defeat and send some of them to pattern heaven?
I digress, though.
8894line8894_5
Pattern: I chose Vogue 8894 from my archives, A v-neck dress with a close fitting bodice, a raised waist, hemline variations and sleeves, and a back zipper. It was easy to put together, and the instructions were clear. I made my usual adjustments for narrow shoulders, and the fit was spot on.
Fabric: Linen from Fabric Depot.
Design Modifications: The pattern is designed with 3/4 length sleeves. This just didn’t feel right for summer. So I cut them off, and added a 4″ sleeve band. To make a long story short (Ha!), I  cut four (4) four inch wide pieces that were the width of the shortened sleeve. I sewed them together (right sides together) then turned the band right side out. The finished bands were then stitched to the sleeves.
DSC03340
Contrast: The dress seemed too plain, probably because the pattern doesn’t have a lot of complicated design elements. So I added contrasting twill tape at the neckline, the shoulder seam and the sleeve band seams.
Hem: I opted for the straight skirt. Instead of a high low hem, I chose a straight hem.
DSC03327

Lessons learned: Adding contrast was an after thought. I wore the dress once, then decided it needed a bit more pizzazz. Since the fabric was so great, I decided to go the extra mile and add contrasting twill, even though the dress was done. This was torture, since some of the seams had to be opened so that the end of the twill tape could be hidden in the seam. Since I’d  overlocked some to keep them from fraying, this was no easy task. In the future, if I get a bee in my bonnet to add trim/twill tape, I will decide that before (!!) I finish the darn thing.

That being said, I like the dress much better now, so I will probably wear it more, making the extra effort worth it. And the pattern is probably a keeper, an easy to fit, wearable dress.  I’m glad I found it in my archives.
I’d be interested to know what your strategy is regarding patterns. If you haven’t used them after awhile, do you send them on their way, or do you hold on to your patterns forever? If so, how do you organize/store them? Have a great weekend, and thanks for stopping by!!

Sew the Kimono Look – Simplicity 1318 

DSC03193
If you’ve abandoned your sewing machine to visit the alluring aisle of your favorite retail haunt, you’ve probably seen a kimono or two on display. I first noticed this fun trend, when we visited San Diego this Spring. Kimonos were everywhere, worn over cut-offs, shorts, jeans, even over short dresses. The look seemed easy-to-wear and I liked the lightweight fabrics in prints and solids. In short, sign me up!
For inspiration, here’s one by Herve Leger.
Herve-Leger-NYFW-2014-Blue-Kimono-Inspired
And another. Love the fabric combo here!
spring-2015-season-runway-kimono-belted-herve-leger-dress-7
I like how that one’s belted.
Maybe I’ll make a belt for mine.
DSC03195
Pattern: I used Simplicity 1318, a very ‘easy-to-sew’ pattern with trim and hi-low hem options. From cut to finish, it took only two hours. Other great pattern options: Butterick 6176 or Vogue 9115. 
screenshot
Fabric: Simplicity suggests using lightweight woven fabrics with drape for this pattern. I used a cotton lawn with a border print that I found at Mill End. I think it would be great out of a silky fabric as well.
DSC03194
Modifications: The pattern includes lots of sizes, ranging from  XXS – XXL. I cut a small which fit, but I did have to adjust for my narrow back. If I make another kimono, I will go a size down as the pattern is so loose-fitting. I’d like it to hang open a bit more in the front.
DSC03196
Challenges: Because I used a border print, I had to figure out how to lay the pattern on the fabric to capture the border trim most effectively. This was tricky and at one point, I headed back to the fabric store to buy more. Lesson learned! Do not be cheap. Buy more! Tip: If you’re using a border print, buy an extra half yard (at least) to give yourself some wiggle room.
DSC03202
Do I recommend this pattern?  Yes!!  It’s super easy and I love how you can fiddle around with it to create your own look with a fun fabric. Because it’s summer, I’m definitely into patterns that offer instant gratification and this one fits the bill.  There’s nothing tricky about the techniques required, and you can whip it up in an afternoon. I might try it again in a silkier fabric with contrast bands.
Stay cool! And thanks for stopping by.

Thursday tee: A gauzy top keeps its cool

DSC03117
When it comes to the summer tops in my closet, not all are equal or flattering, which means there’s always a reason to try another. And another. And another.  Perhaps that’s why I never stop wanting to sew another top!
The most beloved tops in my wardrobe are the ones that are comfortable, but not shapeless, with a bit of classic styling. And if a top has a design element that’s a bit unique, that’s even better.
DSC03085
Of course, it’s always easy to find a new pattern to try. The problem is finding one that you can love forever. Sometimes, I’ll think a top is perfect, only to find after wearing it a few times, its shine dims. Maybe the print is too busy or the color feels too dated. Or maybe it clings too much.
 I guess that’s why I own more than a few. And I don’t even want to count the number of patterns I’ve purchased in my quest for perfection!! Don’t make me! It would be down right embarrassing.
1461
So, when I thought about purchasing Simplicity 1461, I groaned as I quarreled with myself. Really? Another tunic top pattern? Will you even make this one? But I’m glad I succumbed to temptation because this pattern is a keeper.
4b5069b255c4f3d481fe936f5859fa48
It’s a tunic top that has a bit of a boho look to it. It has princess seams (always flattering!), a number of neckline and sleeve variations, and trim variations. I chose to combine views, going with a short sleeve version.
The good news about the pattern for those with a narrow back, is that there’s a center back seam which makes adjustments easy. I cut the smallest size so that the fit wouldn’t be too loose. I used some textured lightweight cotton (so cool!) in cream and white from my stash. Constructing the top was super easy and fast. The challenge was in the neckline trim.
Since I’m drawn to brown and cream, I found some brown lace at my local fabric store, then played around with it a bit ( a craft project!!). I twisted the lace around, squaring it off at the bottom to create my neck trim, and discovered that the lace, when placed side by side, made sort of a zigzag pattern, an unexpected but fun detail. I used a lot of pins to hold it in place, then stitched it to the top with matching thread.
DSC03115
Not a difficult top to sew at all. It’s easy to wear too and the open neck makes it cool and comfortable.  I’ll probably make this pattern again with long sleeves, maybe out of a gauze or a silk. And I’ll  play around with a new trim at the neck.  I do love a good craft project!
DSC03114
Do you have tops that you’ll love forever? Or are you as fickle as I am?
Happy summer and thanks for stopping by!

Not Your Mother’s Peplum

During one of my recent jaunts into the enticing, instantly gratifying world of ready-to-wear, I heard a discussion through a thin dressing room wall (which is not really eavesdropping, right?). “You absolutely cannot wear that,” one woman said to another. “It’s a peplum and they are a fashion NO!”

It was an interesting statement, one that begged for debate, or at least, extensive internet research. So, I perused the designer collections for Spring, and discovered that there could be a bit of truth to that. The old, more extreme peplum look does seem to be gone.
But now, there’s a new peplum in town. It’s less of a waist defining shape. It seems lower, a bit looser, and a little less (dare I say), prissy than the ones that came before.
Here’s one from Marni that I fell hard for.
MAR_0651
Another from Thakoon that could live in my closet if it wanted to.
503702568_1_topcropfront
Cute shorts too.
After all that research, I had to make one of my own. The pattern I used is Vogue 8815, a fitted top with a raised wast, long front darts for shaping, and a narrow hem. I chose view C because it had an interesting, less traditional look.
DSC02697
I used a lightweight cotton purchased from Fabric Depot that is a dusty denim blue (I hope to some day get over my denim obsession). Not only did I buy it because it’s Blue, but because it has a dot pattern imprinted on the fabric that I love. I used a similar solid cotton for the sleeves.
DSC02694
The pattern was easy to put together. Although view C is a pullover, I added a zipper in the back, just because it felt more finished that way.  I cut the smallest size (8) and adjusted the side seams for fit, since I’m usually a 6 through the back.
The peplum fit onto the bodice perfectly. On view C, it doesn’t extend to the back which makes the whole process easy and fast. The neck is finished with seam binding, also easy and fast. The hemline is lower in the back than the front, which gives it a bit of an edge. Cool, but it’s something to keep in mind when you choose the fabric though, as the wrong side shows.
DSC02700
 I think I like the look of a looser peplum as it feels fresh and different. This is an easy top to wear, so comfortable you could eat Thanksgiving dinner and still be able to breathe! I’ll probably have to make another, soon.
How do you feel about peplums? Has it been done to death, or do they still have a place in your heart?