More Kimono Love – Simplicity 8553

IMG_3268

Hi All! I’m sure none of you will be surprised when you see my make this week, another long flow-y kimono! Yes, admittedly, I do have a ‘thing’ for long toppers of any kind (see others here, here and here). So, I couldn’t resist this Simplicity pattern for a long kimono.

IMG_3166


In my defense, this pattern is a bit different from my other tried and true pattern (Simplicity 1318, shown here and here), in that it doesn’t have front bands (although view D includes them), the two piece sleeves are longer, and the bodice style is empire with a tie.

Truly, the pattern is a keeper as the options offered are endless; You can modify the length of course but also the bodice style as well as the sleeve options. I love the bell sleeves and the gathered sleeve option, which gives it a bit of a boho vibe. The empire wasit is a nice change as is the front tie closure, an option I really appreciate after wearing lots of free-minded, open fronted kimonos in the past.

My fabric is very special to me, because I bought it last year in a wonderful fabric store in Barcelona.

IMG_3283


It’s a rayon border print and it was love at first sight. I bought just enough to make a long version of this kimono – – which in the XS takes 2/1/4 yards. The fit is very loose – – my measurements showed a size small, but I went down a size and I’m glad I did. Rayon is a dream to sew with – even though it doesn’t fray much, I finished the seams with my serger so it would look nice inside when the wind blows it open.

IMG_3172


I love the way this fabric moves – so important when you’re trying to pull off this long kimono look.  If you used a stiff fabric, it would likely be a bit of a disaster.The pattern is quite easy to assemble; a beginner could do it. The hardest part for me was making my slippery rayon stay in place as I sewed (lots of pins and some wonder tape helped). The sleeve length is just right on me. If you had longer arms, you might want to lengthen them a bit.

IMG_3162


I love this pattern – – it was easy and fast to sew, (a must for me during the summer) and I feel so stylish in my kimono.  I can imagine another version in silk velvet for fall.

Apparently, my ‘thing’ for long flowing toppers will be around for some time to come! I know there are other kimono patterns out there… would love to know if you have a favorite.

Happy sewing and thanks for stopping by!


A New Top to Add Some Drama

IMG_2208

Me-Made May is winding down, but not without a few more revelations that are worth mentioning. I used to wear solids and very few prints – – Not so anymore! My wardrobe is dominated by prints and textures. There isn’t anything bad about this, but I miss the drama that solids bring to the table. A well-cut top or dress with drape and style looks sophisticated and polished when there isn’t the distraction of a print.

IMG_2293

Ha – – Look at the volume in these sleeves! You have to admit – this top is dramatic, much more than I realized when I chose  McCall’s 7658.

There are many views and options with this pattern (Yay!), but I chose the long sleeve version because it’s still (always) on the chilly side in Oregon.  Because of the overlay, recommended fabrics for this pattern include chiffon, Georgette and sheers. I didn’t have any of those in my stash, but I did have a lightweight sheer knit so I gave that a try.

IMG_2258

This style looked complicated to me, but the construction steps weren’t hard at all. The long sleeve version has the sleeves built right into the overlay, so makes them a breeze to sew. The trickiest part of the make was the sleeve cuff. You’re supposed to insert elastic to give the cuff a gathered look. I chose to skip that part, since you’d never see those details on my fabric anyway, so I just inserted the cuff without the elastic. The finish of the overlay is simple – – you just turn under the edge and stitch.

IMG_2298

Voila! A half hour to cut this pattern, one and half hours to sew! Not a bad way to go…:)

The bat wing sleeves really give this overlay some style and drama. It’s pretty obvious though, that the wrong fabric choice would make this style look, well, pretty hideous, LOL. So, if you’re inclined to give this one a try, stick with lightweight fabrics with lots of movement and drape.

IMG_2268


I’m happy to say, there were no adjustments necessary on this pattern for me! I know some people aren’t fond of  sleeves with volume, but I think I love this look….it’s sort of cape-like and fun. I just might have to make it again for summer with the pleated overlay in a lightweight chiffon…but wait. I hate sewing with chiffon. Hmmm, what else would work? Any thoughts?

Happy sewing and thanks for stopping by!

Blackwood Cardigan – the Star of my ‘Me Made May’


For me, Me-Made May is all about figuring out what works in my daily wardrobe and and what doesn’t. As a rule, I tend to wear me-made separates that I mix and match. The questions I ask myself are – – which me-made pieces do I reach for because they make me feel great, and which ones drive me crazy as I wear them? I take notes about my daily choices for myself, only keeping photos of outfits that are revealing in some way to me. The pieces that don’t work are thrown into the revision or donate pile. I don’t post my outfits on social media – – yes, I love seeing other people’s posts but can’t bear thirty-one days of photographs of myself, LOL!!

I’ve had a couple of revelations this month – the big one, which is the subject of this post is my absolute daily dependence on cardigans! Seriously, I wear them almost every day Unpredictable May weather is the culprit – – in Oregon it can be cold enough for a coat in the morning, but shirt-sleeve weather in the afternoon. Enter the Blackwood cardigan!

IMG_2171

Last year, my favorite cardigan pattern was  McCall’s 7476 made here and here. This year, my obvious favorite is the blackwood cardigan by Helen’s Closet patterns.

blackwood-cardigan-illustration

I’m probably the last blogger to be smitten with this pattern, but what can I say? Better late than never…

IMG_2127

Why do I love it? For one thing, the design is perfect for throwing over tops or dresses. Helen suggests that it be used as a layering piece and this blue version I made works with everything in my closet in part, because it’s blue, but also because the length and the cut are superb over everything!

I usually gravitate toward knits that have cotton as the primary ingredient, but I really love how this rayon knit feel against my skin. And it slides over sleeves so nicely!

IMG_2092

Design notes: The Blackwood rests perfectly on the shoulders which makes it great for wearing with a variety of tops and dresses. The bottom band is wide and it shapes the hemline of the sweater in a very flattering way. I love the longer length (perfect for me at 5”4”) and the wide cuff on the sleeve. The pocket size is perfection too!!

Construction notes;

  • For this pattern – the stretch and drape of the knit is everything. You want to make sure your knit has enough stretch on the cross grain for this pattern. Because it isn’t designed to close in the front, if you don’t have enough stretch, this sweater will likely gape open and probably won’t look or feel that great.
  • The front band needs to be stretched slightly to fit.
  • I stabilized the top of the pockets with a strip of fusible interfacing to keep them from sagging too much.

IMG_2159

I’m wearing it here with the Simplicity top I posted a few weeks ago (here).

I give this cardigan a big thumbs up. It’s a quick, fun sew that does the heavy lifting in my wardrobe, and as a result of my Me-Made-May discovery, I will likely make this pattern again and again! My other cardigan patterns will remain favorites, but it’s nice to expand my cardigan universe.  Thanks so much to those of you who recommended this pattern when I asked for ideas in a post last month!

Are you as hooked on cardigans as I am? Happy sewing and thanks for stopping by!


An Anthro Lace Dress Knock-Off

PicMonkey Collage-5

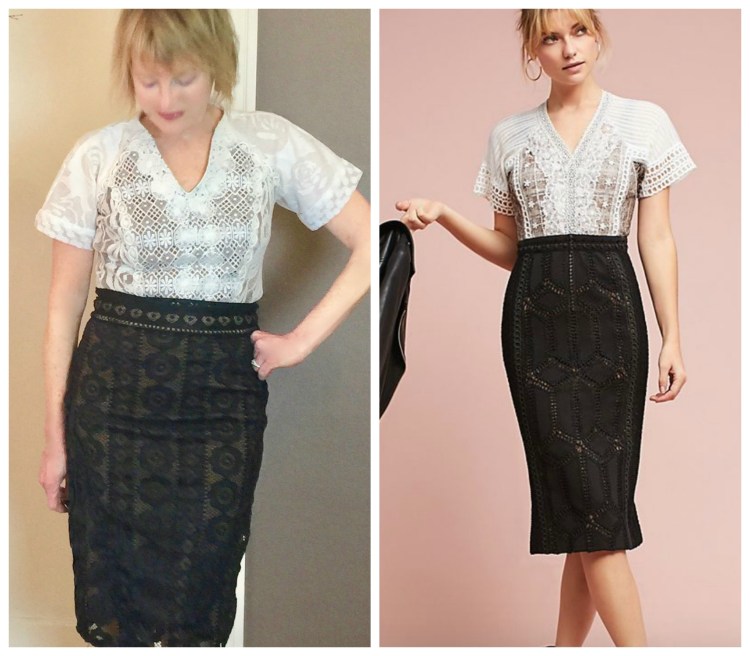
Which one is from Anthropologie? Ha, just kidding. As you all know, I have a thing for lace and when I saw the above dress from Anthropologie, I wanted it in the worst way. The lace is gorgeous, but the style is a bit edgy, a must have if you ask me! But the price tag stopped me in my tracks. $728.00. Okay, it might be worth it with all of those gorgeous layers of lace, carefully sewn in place. But, hey, we can do that; am I right? Enter the Pattern Review Bargainista contest, just the motivation I needed to get it done! IMG_8867

I used Simplicity 1699 as my basic template for this dress.

1699

It’s a simple design, a peplum top or dress with raglan sleeves and a simple rounded neck line. Since, I’d made it before I knew it would fit me, freeing me to focus on the design elements I wanted instead.

First, even though the Anthropologie dress is one piece I saw it more as a skirt and top. So I split the dress at the bodice and added a waistband to make it a skirt.

Then, I started in on the bodice/top. I cut the lining pattern pieces first then cut corresponding pieces from the lace (contrasting pieces of white lace, purchased at Joanns.) and sewed them together. I wanted a v-neck, so I cut that too.

IMG_7326 Once I had the basic bodice constructed, I took little bits of lace and layered them over the first layers of lace, focussing on placing eye popping elements on the princess seams and neckline. Then, I finished the seams, added a zipper and hemmed the bodice so that it would be a top that could be tucked in or worn out.

IMG_1973By the time all that detail work was completed, I was ready for simple tasks. I was glad the process for the skirt was much easier. I just cut it from the lace, added a waistband, and lined it – phew!

IMG_8884

The process of layering the lace on the bodice/top took some time, but it was so satisfying. Deciding where the bits of lace should go was fun, and hand stitching them into place was a calming process. I often forget just how therapeutic hand stitching is!

The good news? My new dress/ensemble is close enough to the original that my credit card is no longer in danger of being used.

IMG_8863

  • Here’s how the costs broke down using the Pattern Review contest formula – – Column dress designed by Byron Lars for Anthropologie – – $728.00
  • 2.5 Yard Fabric for lining (top and skirt) – Joanns – $12.99 per yard on sale for $9.00 x 2.5= $22.50
  • white lace fabric; (3) 1/2 yard pieces for contrast on bodice front and back (1.5 yds total)  $6.99 X 1.5 = $10.48
  • Black Lace for skirt overlay 1.5 yards x 12.99 yard on sale for 9.00 = 13.5
  • 18” zipper for top – $2.99
  • Bits of lace for top embellishment purchased at a thrift store – $5.00
  • 7” zipper for skirt (invisible) $3.99
  • Total: 58.46
  • $728.00 – $58.46 = 669.54
  • $669.54 / $728.00 = .91969 =91.9 % savings

IMG_8861

There’s nothing like a Pattern Review Contest to get the creative juices flowing. Be sure to follow the link  to check out all of the entries – there are some amazing creations and some incredible Bargainista’s out there!

Happy sewing and thanks for stopping by!

Three Versions – Simplicity Waist-Tie Top

PicMonkey Collage-5

Packing for a trip always points out the flaws in your wardrobe, don’t you think? A planned visit to the already muggy east coast made me realize – I have very few easy-to- wear, easy-to-pack tops that are humidity friendly.

Enter Simplicity 8601 – – An ‘easy-to-sew’ top with lots of variations.

simplicity-tie-front-top-pattern-8601-envelope-front

Version 1; Rayon

IMG_1234 2

This lovely batik rayon was purchased last Spring (Millendstore). I used some of it for this dress last spring. This rayon has a lovely, soft drape, so even though I was short a quarter of a yard, I worked hard to squeeze this 3/4 sleeve top from it. I was really lucky it worked because the drape of rayon is so perfect for this style!

One thing to note about this pattern – – It has a seam down the front, a necessity because of the tie at the waist. Stripes, plaids etc need to be positioned strategically. Even though this rayon has a polka dot print, it’s a batik with a noticeable pattern to it so I had to do some strategic matching around that front seam.

I loved this top right away! Encouraged by the immediate gratification this pattern offered, I pressed on and sewed a few more…..

Version two: Medium weight cotton

IMG_1279

This is View A with bell sleeves, the perfect shape for layering under sweaters.  I was a bit concerned that the stiffness of this Cotton and Steel print would be a bit much for the waist tie…but it worked! Not only is this medium weight cotton great  in humid weather, it supports the shape of these sleeves.

Version 3; Cotton Double GauzeIMG_1337

When the weather is a bit sticky, double gauze always makes me feel great, so I just had to use a cotton gauze remnant in my stash for version B. I am so glad I did! There’s a reason people use double gauze for baby blankets – it’s so soft.  Wearing this top is like wearing pajamas, which makes me wonder…..Why don’t I make everything out of double gauze?

I’m pleased with all three versions so Simplicity 8601 so it gets a big thumbs up from me. I have plans to make View D as well (flutter sleeves) and who knows what else I might whip up.  From start to finish each version of this top took only two hours to sew – – a perfect saturday or evening project. The instructions are great and the fabric options that work with this pattern are endless. I have some linen I will use for a flutter sleeve version. I will likely make a flannel version in the fall.

IMG_1332

IMG_1291


IMG_1234 2

I was pleased to see several similar RTW tops at Anthropologie last week with a waist tie, so give this look a try. What version do you like best? Have you ever made a top from double gauze?

Happy sewing and thanks for stopping by!

Putting Fushia Linen To Good Use


IMG_0927

I have a new favorite color; fuschia.  This fuschia linen jacket takes me back to my first handmade effort years ago, a Vogue Perry Ellis jacket pattern that I fussed over because it was so expensive! Everything about that project felt special to me, so I visited a specialty fabric store and splurged on three yards of beautiful fuschia linen. At that point in my life, I had an entry level job with a corresponding salary, so I was necessarily frugal and so nervous when I cut into that expensive fabric. Such a risk!! Even now, after years of sewing, that same quiver hits me when I cut into a favorite piece.

That was certainly the case with this lovely linen!

IMG_0974

When I shop for linen at the fabric stores in Portland, earthy, natural colors are easy to come by, but it’s hard to find vibrant, rich brights! So, I was so thrilled when I found this linen on-line (Fabric.com),  on sale at the end of last summer.

The pattern I chose for my casual jacket is one I’ve sewn before (here), McCalls 7333.  I loved and wore that jacket so much, I was really eager to try the pattern again.


There are many reasons to love this design; the drawstring waist, the off shoulder look, the tab sleeves, but I’m crazy about this magnificent hood!

IMG_0994 3

I’m not sure why I love hoods so much. Maybe it’s because I live in the Pacific Northwest where Rain Rules. Whatever the reason, I’m a fan of this one. I love the way the collar drapes nicely into the jacket lapel; so relaxed yet stylish.

IMG_0893 2


About the Pattern: The instructions were easy to follow. I found the sizing straightforward, but generous (XS-XXL). The style is very loose and the collar gives weight at the neck, making it quite wide, so if you cut a size too large, it could easily slip off your shoulders. Since I have narrow shoulders, I took 5/8 from the shoulders. I also cut a size smaller than my measurements, and it’s still a good fit.

One nice detail with this pattern is the two-piece sleeves with button cuffs. They add a polished element that gives this loose jacket some structure. They wereeasy and simple to insert as are the buttoned cuffs.

IMG_0946

It’s definitely linen season here (finally!) and I think this pattern was the perfect use for my cherished fabric. I’m wearing this jacket here with my Ginger jeans, which are in heavy rotation in my wardrobe! There’s another pair of those in my future too.

On my sewing table:  I’ve just cut out a Blackwood cardigan, and a new springy top for Faye’s Tops that Pop challenge (lots of inspiration on her blog)! Look for those posts soon. I’m also planning an update on my RTW fast experience and will be participating with Me-Made-May.

I love linen, and am always happy to find a new style that works with it. I have another green piece in my stash that I’ve been considering for a bright Spring trench. To do so, I’d have to underline the coat, I think, since linen is crisp but maybe not quite crisp enough. Have any of you ever underlined linen?

Happy Spring sewing and thanks for stopping by!


Remnant Buster– Vogue 9301 three ways

When it comes to fabric shopping I can be my own worst enemy. Last year, I was in a frugal mood. Unfortunately, this didn’t keep me from buying fabric – – it only kept me from purchasing enough. So, I found myself short by a half a yard on several projects. Now, in 2018, I seem to have over-corrected. Now, I have more than my fair share of one yard remnants, leftovers from large purchases of knits that were way too much for the dresses I made recently. What to do? Sew a few knit tops, of course.

Enter Vogue 9301, a semi-fitted knit top designed by Kayla Kennington.

V9301_aWho is Kayla, anyway? If you read Threads magazine, you’ve likely heard of her. She’s a designer who’s written articles for them and her creations are gorgeous – so artistic and amazing. She can take the leftovers from her various projects and turn them into something special. If you haven’t visited her website, do. It’s a treat! Vogue 9301 is such a perfect example of  her style, a semifitted top that you can mix and match fabrics and embellish as you wish.

V9301

My first version was really simple, because I needed to see how the top would fit me. I’m small, so sometimes unstructured tunics can really be overwhelming on me. To test the pattern, I used a piece of fabric that’s been in my stash for so long, it has a faded streak in the back. I’m 5′ 4″ yet, this pattern is almost as long as a dress on me…a great length with leggings.

IMG_0112

Even without contrast fabric, this pattern has a great shape and style.  I loved the asymmetry of the hem line and the hem band – I couldn’t wait to play around with contrast fabric.  To make the top a bit shorter, I shortened both the front and back bodice at the waist line by 5/8″. This made the fit much better I think for my height.

IMG_0272

For this version, I used remnants from this dress, and had some fun playing around with stripe placement. The wide band at the hemline requires alot of fabric (I had very little) and it must be in one piece, so it was a struggle to get it from the leftover fabric I had. Luckily, I made it, but it would have been fun to have cut that band so that the stripes were at a diagonal to the bodice, but that’s what happens when you’re using remnants – options are limited!  I think this version is casual and fun – – the sort of top I throw on over jeans to hang out in.

Version Three: I just had to go all the way, and add in the flaps too!

IMG_0160


I used contrast fabric remnants for the sleeves and the optional flaps. The wide hem band is a second contrast fabric and the sleeve bands are cut perpendicular to the grain.

Vogue 9301 is a fun sew and pretty fast too, each version took me about two hours. It’s a great remnant stash buster, and a nice palate cleanser after my coat. I can imagine using this pattern again.

These tops will make Me-Made-May easier to pull off this year! Are you participating? I’m joining in and will post some of my days on Instagram. I do find the exercise of wearing me-mades every day to be revealing. It’s interesting to see which makes you reach for again and again, and which you ignore! I’ll be sharing my findings here.

Remnant busting is so satisfying – would love to hear what you do with yours. Happy sewing and thanks for stopping by!

McCall’s 7430: A Knit Dress for Spring

IMG_9618I made this knit dress for a trip we just took to Santa Fe, but there was snow on the ground when we arrived so this dress never made it out of the suitcase, LOL! Still, I love wearing knit dresses, so I know this dress will have its day.

The trickiest part of this dress was positioning the stripes across the bodice and the sleeves.

Let me tell you….It took alot of pins and patience to get the stripes in the right place as I inserted the sleeves, but in the end, the effort was worth it.

I’ve made this knit dress pattern before and it’s now one of my favorites. McCalls 7430 offers a few variations that makes it easy to modify to give each version a fresh look. You can use contrast fabric for the yokes and the sleeve crowns as I did, or you can cut the entire sleeve from the same fabric as the bodice, or even make it sleeveless. There are collar variations too – a raised collar or a simple neck-band (my choice).

m7430

I love a pattern that gives you alot of options!

Challenges: There aren’t any side seams on this pattern.

IMG_9625

This makes fit a little harder to modify. Because I’d made this pattern before (here), I wasn’t concerned, as I’d already done a trial run. The good news is, the pattern is well drafted and for me,  the size dictated by my measurements was perfect.
IMG_9612

The success of this dress depends in large part on the knit, I think. The fabric must have some weight and body so that it will give the dress some shape. A thin lightweight knit wouldn’t work because it would be cling too much and would show every bump. I was lucky to find this medium weight knit at Fabric Depot. It has just the right amount of weight and crosswise stretch. It’s a rayon/cotton blend which will make it easy to wear as the temperatures rise.  Now, if the weather would just improve around here.

New Mexico stole my heart last week, and the brief sprinkling of snow only made the high desert seem more exotic. Here’s one of the sights we enjoyed as we hiked.IMG_9384

It was a great trip, but it’s good to be back at my sewing machine:).

Happy sewing and thanks for stopping by!

Tucks, Pleats, and Sewing through grief

IMG_1614

Hi all! It’s been a rough week around here. Dustin, our little buddy for sixteen years succumbed to renal failure last week. If you’ve visited here before, you may remember him from several photos. He loved to be in the middle of everything, and blog photos were no exception.


Such a character, and he always had something to say. He loved jumping on my sewing table and rolling around on the pattern pieces, hilarious! He was such a presence in our lives. Needless to say, his loss has been really hard.

Grief is such a miserable state to be in.  You want to get on with it, but you just can’t. Simple problems become hard. It wasn’t a week for big thoughts or new inspiration. It was a week for repetitve tasks, simple things. I found some comfort in the task of sewing pleats.

IMG_1612

Pleats are mindless, a bit tedious sometimes, but very calming to me. You just mark, pin, press and sew. It didn’t bother me at all that this Cynthia Rowley dress/tunic has forty pleats. But catch me at another time, and I might feel different!

I do love Simplicity 8414. Cynthia Rowley’s designs for Simplicity are always winners.simplicity-dress-cynthia-rowley-miss-pattern-8414-envelope-front

I wanted to make the dress with the ruffle, but then ran out of fabric so I settled for tunic length, which worked out quite well since the Pattern Review tunic contest is just winding down!  I might just get my entry in on time. My fabric is striped cotton shirting (Fabric Depot), that turned out to be perfect for this pleated design. The stripes became reference points that helped me to sew the pleats precisely. And there are alot of them! They give the sleeves their bell shape and the front and back bodice some fit that makes this dress flattering.


This pattern is time consuming, but not too hard. The trick is to mark the pleats clearly so that you can sew them precisely.  BE forewarned though. The fit of the dress is very loose. I cut an extra small and the fit is still roomy.  But to me, that’s what tunics are all about, comfort! My only complaint about this make is that the fabric wrinkles easily. Every time I move, another crease is born. I’m not entirely opposed to wrinkles, really. It’s just that sometimes you want to look crisp.

This is a fun pattern and it reminds me how much I enjoy sewing designs with pleat detailing. I can remember how taken I was once with the designs of Albert Nippon. Here’s a Vogue pattern he designed in the 80’s. Lots of pleats!

b070b22c7955f11c4e83553092e945fb--nipon-hurricane-katrina

Sewing as therapy….Do you find detailed sewing comforts you too?

Happy sewing and thanks for stopping by!


Chambray, Lace and Pom-Pom Trim?

IMG_6494 3
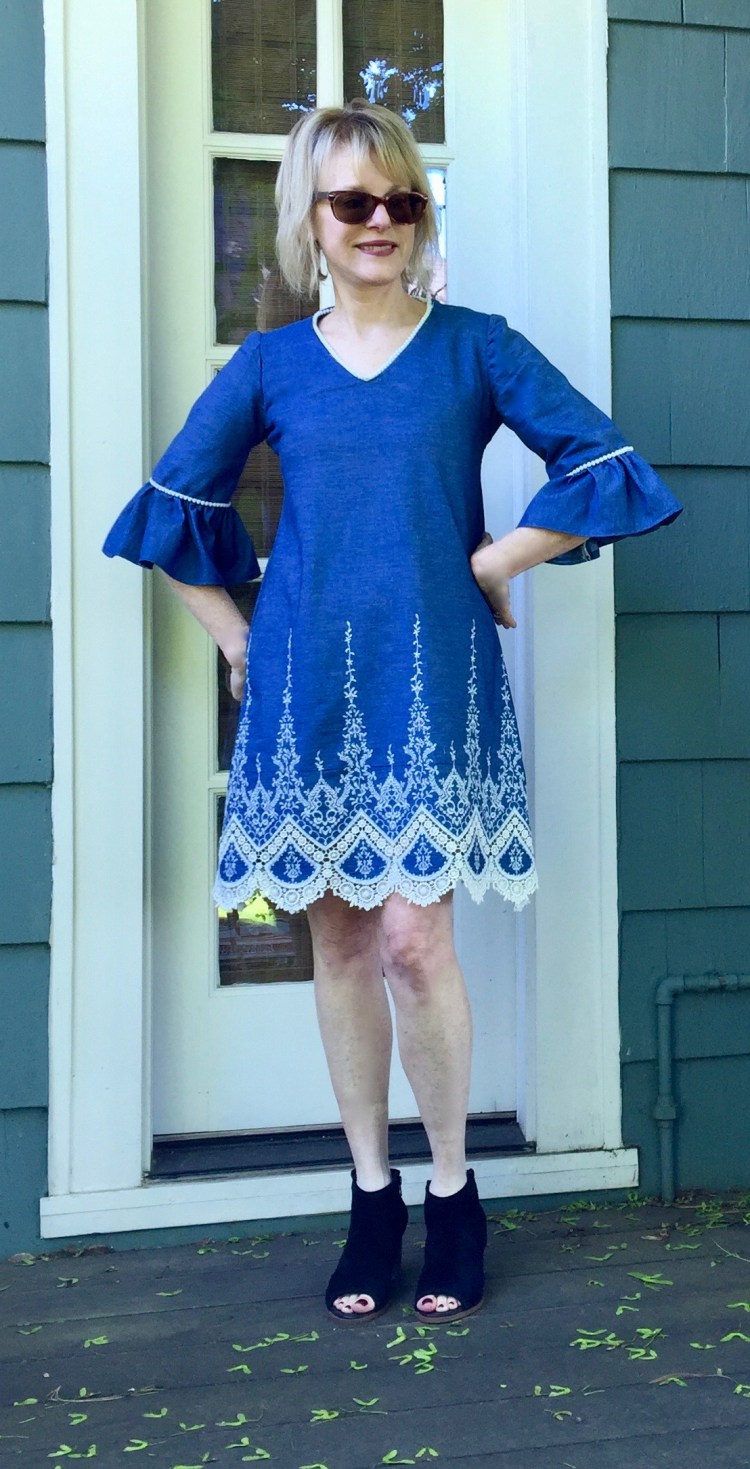
Chambray, lace and pom-pom trim… a funny combination I didn’t plan, but somehow, it happened.

If you think this new dress looks alot like the linen dress I made last spring you would be right. I loved that dress and wore it constantly until a trip to a hotel laundry shortened it to scandal level. I was so bummed! After a period of mourning, I accepted the fact that I’d have to replace it, and that’s how this dress came to be.

IMG_6385 I rarely buy fabric on-line, preferring to support the local stores, but when I saw this fabric on Fabric.com, it leaped into my shopping bag. The combination of chambray and lace would have had me, but then you add the blue….gotta have it! When the fabric arrived, I knew it was perfect for a simple shift dress, because the lace border was perfect to take center stage.

IMG_6354  Enter Mccalls 7532, a new pattern this spring that has a decidedly low key, boho vibe.

I love the swingy shape, the statement sleeves and the v-neck, a detail that begged for the pom-pom trim I had stashed away.

IMG_6481

The pattern went together easily, and the instructions were great, but I did make some changes. The skirt of this pattern is really swingy… and since my fabric was cotton chambray, it didn’t really have the right drape for the amount of ease in this pattern. So, I pulled in the side seams a bit to compensate. Trust me, I took out alot of that swing, and still had plenty of room, so you might want to size down. There’s alot of ease in the skirt that would likely work best with a crepe or a silk, or rayon challis, all recommended by McCalls.

I also modified the sleeves a bit. When I cut them as designed, it was clear to me that I would never be able to go out to dinner without knocking over a wine glass with that ruffle.  It’s true that my beverage of choice, white wine, doesn’t stain like red, but who wants to test that theory? To make the sleeves a bit more wearable, I shortened them by 3 inches and reduced the ruffle width by an inch and a half. That cost me a bit of ‘drama’ but I gained a dress I will wear.

IMG_6383

Do I love this dress more than last year’s linen/lace combo? No, but I’ve decided it’s not a comparison I have to make. This dress is cool for different reasons. It’s comfortable, the lace is gorgeous, and it will be the perfect travel companion for my trip to Spain. I love swing dresses so much, I already have another version in the works from a lighter weight fabric. It will be interesting to see how a different fabric changes the character of the dress.

I added the outside photos to this post just today, as the weather here is finally worthy of cottons, linens and silks. Yay! The only downside of beautiful weather is that I accomplish very little because I just want to play, play, play! Oh well. There’s always tomorrow when (sigh) it will probably rain.

Happy sewing and thanks for stopping by!