A Quick Cozy Jacket and Ginger Jeans

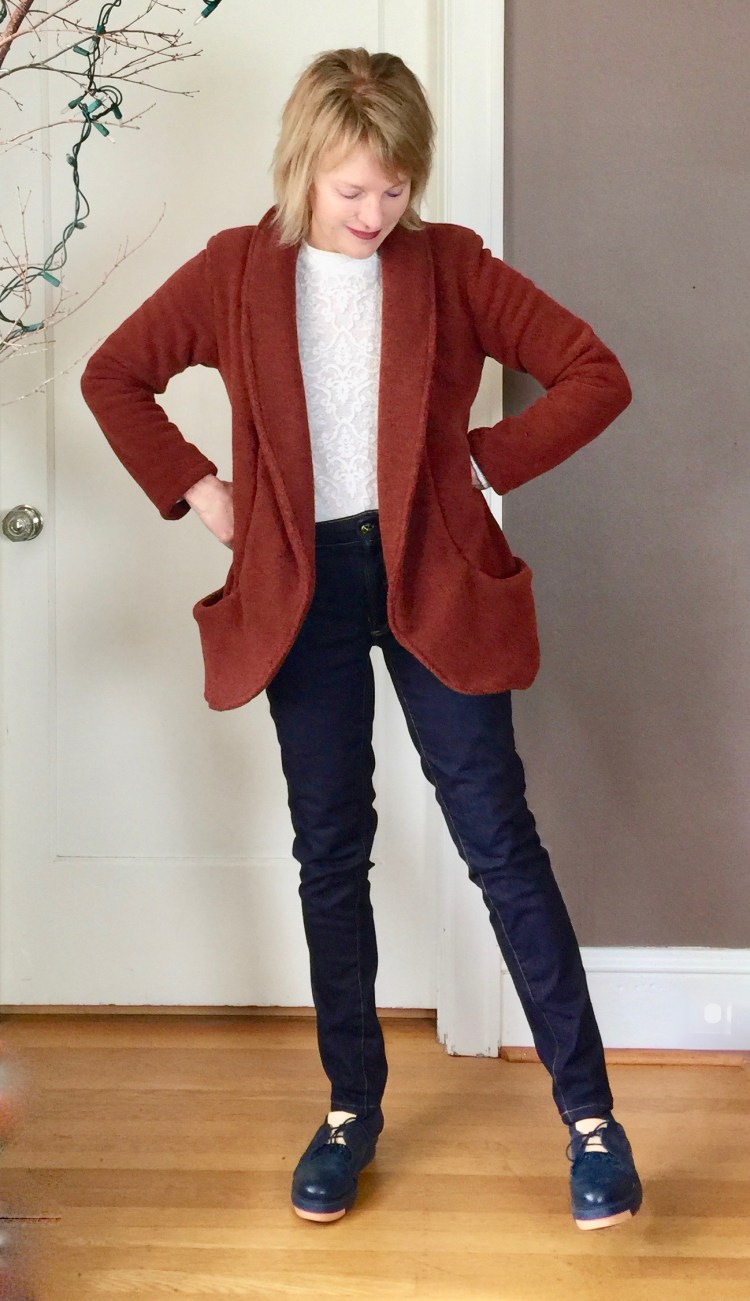
After completing my two dresses for the Day/Night Dress Challenge, I needed something to cleanse my sewing palate. Usually, when I’m in that mood, I choose a simple pattern to complete. But this time, I decided to make a fun outfit including a new pair of Ginger Jeans. So in this post I’ll talk about the jacket first followed by the jeans.IMG_9097 3The jacket – – Yes, it’s March but it’s still cold and damp here. That’s why I decided to make my jacket from fleece, a first for me!

IMG_9073I  love slouchy jackets with big pockets so I couldn’t resist Simplicity 8468, a jacket with curved seams, deep pockets and cozy lapels.

8468

I made it from double sided fleece that I found at Mill End Store. Fleece is easy to sew too, if you know a few tricks.

  1. You don’t have to finish your seams because fleece doesn’t unravel. I did choose to serge my seams though, but only because I like the finished look it gives to the inside of the jacket, but it isn’t a crime if you don’t.
  2. To keep bulk down, trim your seams and clip your curves.
  3. Topstitching can be tricky because the fabric is so thick. Walking foots are nice for this, although I managed without.

The fit of this jacket is loose so I cut the smallest size but still had room to spare. It was a quick fun sew (less than four hours with cutting time). The jacket is unlined and the fit comes from the curved seams so it’s a breeze to sew. I’m so happy with this make. It’s the sort of jacket I love to wear, casual but polished. I’m sure I’ll make this pattern again!

IMG_9143

My first Ginger Jeans: Even though I’ve made several pairs of jeans before, I still feel some trepidation when I consider sewing another pair, especially when it means trying a new pattern.  There’s the time committment involved for one thing (this pair took 6 hours), and even if you put the time in, there’s the very real possibility the darn things will not fit or feel or look the way you want. It’s the risk factor that kept me from realizing my dream of Ginger jeans for so long. But, Wow! It was worth the risk because I love this pattern. I’m so glad I took the leap!

IMG_9157

Things I learned:

  • I find that a block of dedicated time is necessary to make a pair of jeans so I dedicated an entire Saturday to this project. If I take a break, I lose momentum and it’s hard to get my head back in the game at a later time.
  • I made View B (high rise version) and used a dark very stretchy denim (Modern Domestic) that isn’t too heavy.
  • If you can, use two sewing machines, one threaded for topstitching.
  • I use wonder tape (I should invest in the stuff) to hold things in place at tricky moments (pocket facings, waistband, zipper). Pins can fall out of denim at critical moments.
  • Baste side seams so that you can rip them out if the fit isn’t just right.
  • Interfacing is optional on the waist band. I left it out and I’m glad I did for comfort.
  • Heather (Closet Case pattern’s designer) suggests that you cut the legs out one at a time, rather than cut them on doubled fabric. That way you’re assured each leg is on the straight of the grain which prevents twisting once they’re sewn.
  • Pocket facings – – okay, I really struggled with this step (it was hell, honestly). It could be just me, but the instructions made no sense. I ripped the pocket facings out twice before I resorted to referring to my favorite pair of RTW jeans and mimicking their construction.  I also referred to the on-line tutorial on the Closet Case Files website, which really helps.
  • Back pocket placement – -The marked placement seemed low to me, so I raised them as high as they could go.

IMG_9185


IMG_9183 2

Okay, maybe they aren’t perfect but they’re close enough and so comfortable! The legs bag a little which is likely because I left them a bit long as I’m always nervous they will shrink again down the road (Ha, yes, this is probably impossible, but I freak out over these sorts of things). There might be a bit of a twist on the left leg, or maybe I’m standing in an odd way :), but it’s not too bad. Otherwise, I love these jeans!  I’m really pleased with the fit. I think I may like this pattern even better than the Jalie’s I made here. I think I’ll cut out another pair soon. I need to make another pair before I forget how I did the pocket facings, LOL!!

IMG_9122


A new outfit that will be transitional for Spring, yay! What’s your go to jeans pattern? Have you ever made a jacket from fleece?

Happy sewing and thanks for stopping by!


A White Shirt and Jeans: Classics Recharged

IMG_5707
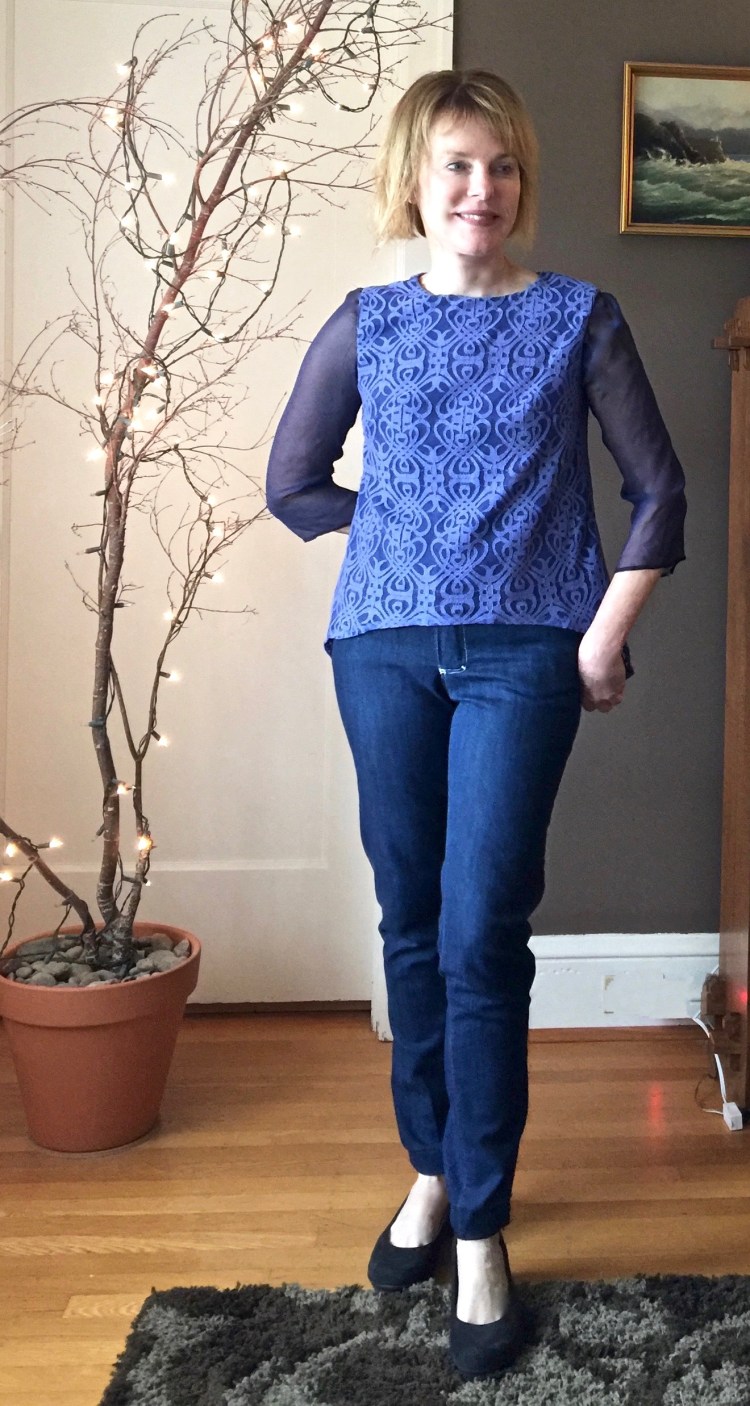
I’m such a fan of wearing classics – jeans, button-down shirts, tee shirts to name a few, so it’s always fun when you see an updated classic that brings something new to the game.

_100282034

When I saw this white Vince Camuto shirt in the Nordstrom catalog, I just had to make a DIY version. It’s a classic redefined with bell sleeves. I love this version except for one thing. The Vince sleeves are a bit too long for me. They’d end up in my soup. So my DIY sleeves are a little shorter.IMG_5635

For the shirt, I used a tried and true pattern, Butterick 5526 (made here) and modified the sleeves. This shirt is one of my favorites because it has princess seams and fits well. 5526

I used a linen/cotton blend from Fabric Depot. It has just the right amount of body to support my bell sleeves. To make the bell, I used the bell off of another pattern, Butterick 6456 (made here). It was just my luck that the top of the bell sleeve on that pattern fit the shirt sleeve of B5526 perfectly! If it hadn’t, I would have tapered it slightly to make it fit.

IMG_5691 My jeans were inspired by the Nordstrom catalog too. I used the  Jalie Jeans pattern for my DIY version, and used stretch denim from Modern Domestic, one of the awesome fabric stores here in Portland. This is my second pair of Jalie’s so they went together without too much struggle. I did forget how to do the front pockets though. So I referred to a great tutorial on this blog, Jillie Be Joyful. It was so helpful! I kept the design on back pocket pretty simple this time.

IMG_5722 2To make the jeans straight legged, I tapered the pattern’s legs by using a ready to wear pair that I love to guide me. For a little variety, I added some of the raw jeans salvage to the hem as a border. It’s a popular look in ready to wear so I couldn’t resist giving it a try.

I like the fit of these jeans, but I’m a bit frustrated with the knees. As I took these photos, wrinkles started to appear. Grrr. I might make a pair of legging jeans next (maybe Mimi G’s version?) to see if that works better in the knees.

IMG_5674

DIY jeans are fun when you’re a top stitching maniac like me. I’m determined to get a pair with perfect fit though, so I’m considering ‘rubbing’ a favorite RTW pair to copy them. Have any of you ever tried that? Does it work? How about legging jeans? Do you have a favorite pattern?

Happy Spring sewing and thanks for stopping by!

2016: Top Five Hits

1Hi All! It’s almost time to ring in the new year, so I thought I’d take the opportunity to review my top five makes of 2016.

Looking back at my sewing projects always makes me a little nervous, because I can’t bear to face the facts. Sometimes the makes that are the most fun to finish or the most time consuming, are not the ones I love to wear (sigh). They hang in my closet, lonely and ignored. Huh. But without further analysis, here they are….my top five of 2016.

img_8454

  1. This little coat:  This topper makes it into the top five because I wore it more than any other make this year! It was so versatile, more than I expected. I wore it constantly. The sewing pattern is great too….Butterick 5927, a new favorite.

IMG_3525

2. The linen and lace dress – – Well, of course I love it. It’s blue, it has statement sleeves and lace trim. This dress made me a fan of clothes with simple lines. I love to wear it.img_8499

3. This coat: OMG, it’s so warm! The stretch wool…the quilted collar…love. To make things even better, when I step into Anthropologie wearing it, the girls that work there swoon, the ultimate compliment. It was supposed to inspire me to rake leaves, but that didn’t happen.

img_9345

4. This blouse: Well, because it’s blue. Need I say more?

img_0776

5. This poncho: Okay, it had to make the list because wearing it makes me so happy. Yes, fringing it was a nightmare, but the end result made this poncho such a wardrobe stand- out. I have a ‘boho’ moment every time I put it on, something I sorely need.

Honorable mentions:

I was obsessed with denim this year too, so I just have to mention these ‘makes ‘. I didn’t wear them quite as much as I expected though (not sure why?), so I won’t give them ‘top five’ status.

IMG_3166 (2)

1. This button up denim skirt: What fun this was to make! The top stitching, the ‘jeans’ buttons up the front…my favorite things.

IMG_8749

2. This denim shirt dress: I love a good shirt dress, and I felt so great when I finished this one! I also learned about snaps. They look great, and you also get to pound them in…If you haven’t tried it, do!

There were a few misses in 2016, but who wants to talk about those? Overall, I had alot of fun at my sewing machine, which is the true test of success for me. I even made my first pair of jeans.

But the best part of 2016 was meeting all of you. I love our community and our conversations. You and your makes are a constant source of inspiration and joy for me. I want to thank you for visiting here and for being a part of my life.

Here’s to an even better 2017! And thanks to Gillian of Crafting a Rainbow for encouraging us to celebrate a fabulous year with our Top Five Makes.

Happy New Year, and thanks for stopping by!

A lace top inspired by Dolce & Gabbana

IMG_1544

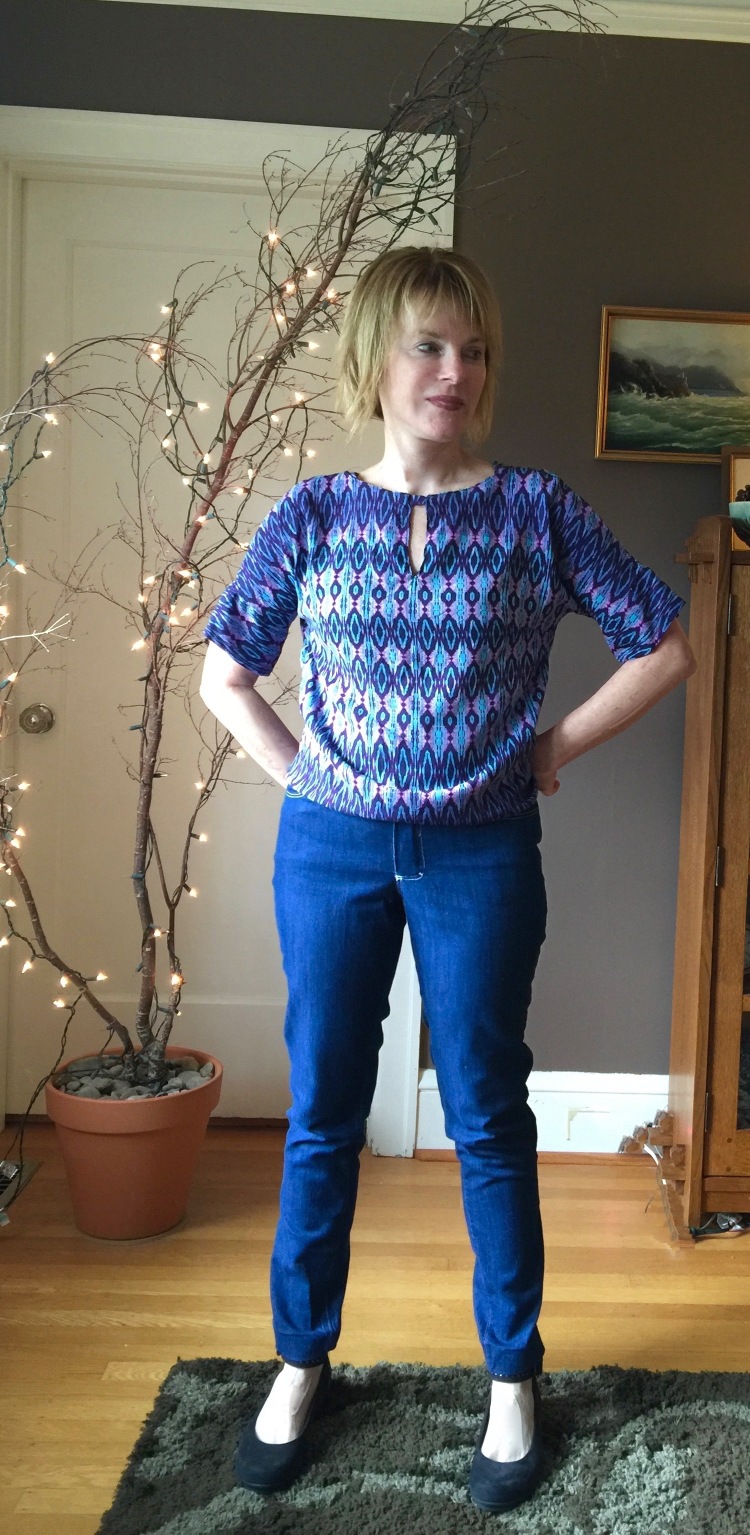
I used to think lace was reserved for prom dresses, frilly wedding dresses and other  hyper-girlie looks. But I think I’ve given that up. I can’t resist the combination of feminine lace with the edge of denim it seems. And if the lace is blue, I’m all in!

My inspiration for this top was this tunic length top/dress from Dolce and Gabbana.

37862084XH_13_F

I fully intended to go the whole way with lace on the sleeves and the longer length of the top/dress, but as luck would have it, when I ordered this lace (Fabric.com), I thought I’d ordered two yards, but ended up with one. Not sure if I pushed the wrong button or if the order was messed up at their end, but when I tried to order another yard, the lace was already gone!

I grumbled about it for awhile, then found a great sheer silk to use for the sleeves and lining. It’s so perfectly wonderful to touch and wear, I decided the mistake was a good thing after all. It forced me to use a contrast silk sleeve which is more comfortable than lace by a long shot.

IMG_1549

The pattern is one I’ve used before McCall’s 7285.

I made view D, and used the silk for the sleeves.

Other modifications:

  • I raised the neckline by an inch.
  • I made 3/4 length sleeves with a rolled hem.
  • The hem is cut ‘high-low’. Because my lace didn’t have a scalloped edge, I merely finished the bottom with a rolled hem.

It’s an easy pattern that’s well designed, a good template for your own creativity. The only challenge here was lining up the lace so that it was perfectly centered.

IMG_1505

I’m wearing this top with my recently completed Jalie Jeans and love the look! It’s comfortable but sufficiently dressy. I wore it to a party just last week.

IMG_1547I only wish I’d bought more of that lace! Honestly, I have got to get in the habit of buying more not less!  I think this top might travel with me this summer. The good thing about this lace? It doesn’t wrinkle, nor does the silk. I’m guessing this top would look dressy if I wore the right jewelry and skinny black pants?

I hope you’re enjoying all of the sewing events in the blog world right now.  I love what’s going on over at the Monthly Stitch. The McCall’s blog has been great too, with a shirt dress sew along. And Pattern Review is hosting a skirt contest. There are so many ways to find inspiration, I feel a bit spoiled. Are you participating in any of these events?

Happy sewing and thanks for stopping by!

DIY Jeans and a Burda Spring Top

IMG_1471

Hi all! Yes, I have FINALLY finished my first pair of jeans. My class at Modern Domestic here in Portland is over and I squeaked over the finish line with only five class minutes to spare! It feels sooooo good to have this project under my belt. I have wanted to sew a pair of jeans forever, but deep fear led to serious procrastination. But now I know. People, it is not that hard! Seriously, if I can, you can.  I’m already planning my next pair.

First, for those that don’t care about jeans, I’m going to give you a quick run down on this Burda top with a cool cutout in back.

IMG_1619

Pattern: Burda 114 from Issue 4/2016. Instructions were easy to follow (not always the case I have found with Burda) and you can make this top in about four hours or less. There’s also a dress length version. My fabric is a lightweight rayon that wanted to move around a lot, but after multiple tries, I did finally get the pattern pretty straight and centered on this wild print. Of course, the pattern doesn’t include seam allowances so don’t forget to add those :). One nice detail, the sleeves are short but finished with sleeve bands. I love the finished look this gives. It’s an easy pattern and the fit is very loose so I had no issues there.  I plan to make another one, maybe even a dress as I love anything with a bit of interest in the back.

The Jeans: There are so many tutorials in blog-land and on UTUBE that take you through the process of sewing jeans step by step so I will not bore you with that here. Since I’m generally impatient and easily frustrated, I took my first spin into Jeans Land under the Guidance of a Trained Professional, and I’m glad I did. My teacher was great and has made about 30 (?!?!) pairs of jeans. She has it down to a science and can whip out a pair in about four (4) hours. I think my pair took me only twelve (12) class hours. LOL

IMG_1445 (1)

Pattern: Jalie is the one we used in class because it has lots of sizes to play around with. The instructions are good, and the diagrams are clear. Yes, there are ALOT of steps, but they do a good job of holding your hand through them.I chose the low rise version and it was just right.


FIT: This is the part that scared me the most. The trick? Swedish Tracing Paper (I’m probably the last person to know about this great stuff?) It’s the same texture as interfacing so it doesn’t rip easily.  We traced our jeans pattern pieces onto it, then just basted those puppies together on the machine to check fit.

IMG_1622

Because this is durable paper, it doesn’t tear easily so you can try the paper jeans on then mark any necessary changes right onto the them before using them to cut out your jeans. HANDY! I hate making muslins (so much so that I never do which is not good) but this worked for me. BTW, the legs on this pattern are wide, so I straightened the cut of mine from the thighs down.

Interfacing: We used shape flex, which has a bit of give, a necessity on the waist of jeans. Tip…Cut it out with the grain (I forgot to do this first time through) so that you get a bit of stretch on the waistband when you need it.

IMG_1459

Topstitching: I used white thread (ARGH!!!). If I had to do it again, I would not. It made me crazy and my class got a good laugh as I took out things out over and over again. Pick a thread closer to your jeans color and save yourself some Grief. TIP; My Bernina isn’t fond of topstitching thread, so I used two spools of regular thread which could be pulled through the wider eye on a jeans needle. (don’t look too close at my white topstitching, LOL)

IMG_1451

Pockets: There are lots of templates on Pinterest for topstitching designs. Anything goes! I made up my own design and used a tracing pencil to mark it.

In summary, I like my jeans and will definitely make another pair using this pattern soon. The trickiest bits were the seams around the crouch and I didn’t love making bar tacks (not sure what that’s all about as it’s basically a tight zigzag stitch?), but I think those things will be much easier second time around. I also wish my knees weren’t so baggy. Not sure what to do about that?

What I will do differently next time. I will not topstitch with white. I will not topstitch with white. I will not topstitch with white. Ha, famous last words….

Happy sewing and thanks for stopping by!