The Last Sewing Blogger to Make the Burnside Bibs

IMG_0889.jpegI’m very late to the party here.

I bought the Burnside Bibs pattern by Sew House Seven when it first came out. I had big plans to make them ASAP.  Well, that was three years ago and, YIKES, I’m just now getting around to trying them. I hesitated to be honest. I really loved the style, but had so many issues floating around in my head. As a member of the #SewOver50 community, was I too old for the style? Would they look okay on my short waisted figure? Would I be comfortable wearing them?

IMG_0887 2.jpegWell, all of the angsty thoughts and questions completely disappeared when I began the construction process. Honestly, it was so fun! This project ticked all the boxes for me – – topstitching galore, interesting construction details like belt loops, pockets, and a self faced bib. Then there was the fabric…I used a lovely blue linen from the Mill End store, that is absolute heaven. So, I threw caution to the wind and went for it.


Burnside_Bibs_front_cover_website_1024x1024@2x.jpgConstructing these bibs was a bit time consuming.  I cut them one evening and then sewed them the next day in a marathon session. I love pushing through a project like this…you can get completely absorbed in it! The instruction booklet from Sew House Seven was really wonderful – – lots of illustrations that made it fairly easy to understand.


IMG_0746 2.jpegChallenges – – well, the biggest one was figuring out what size to cut. I perused Pattern Review, several blogs and Instagram to see what my fellow sewists had to say about this topic. On their advice, I made view 1 which is the more fitted version with the invisible zipper on the side. I used my measurements to select a size and it turned out to fit well in the crouch and waist, but was a bit baggy in the hips so I tapered down a size there. This is a common adjustment for me in patterns, and I’m happy with the result.


The construction of these bibs is a bit out of the ordinary, so I didn’t/couldn’t binge watch TV while I made these, LOL. Small price to pay though. They are so fun to wear. I love how the tie ends criss cross in the back and slip through the belt loops. As you pull them to tie them, the waist area cinchs a bit more, which makes the fit really nice. I chose to tie them at the side but you can tie them at the front or back as you prefer.

IMG_0757.jpegI cropped them a bit more than the pattern suggested as I really want to be able to enjoy these in steamy Italy when I travel there later this summer. When I wear them, I’m really comfortable!!  I don’t think twice about the age appropriate issue anymore because, well, I love them and we all deserve to dress as we wish, don’t you think?

IMG_0765 3.jpegIf you’ve hesitated to make the Burnside Bibs as I did, my advice is…go for it. It’s such a pleasurable journey.

Happy sewing and thanks for stopping by!

The Saraste Shirt, my Me-Made-May Hero

IMG_6940

When I completed the Saraste shirt, I wasn’t totally ‘in-love’ with it. In fact, I immediately pushed it to the far right side of my closet, the place where the ‘never to be worn’s’ go. It’s a sad corner and it makes me feel a bit guilty. It’s all the me-mades that were fun to sew, yet, when all was said and done, I couldn’t imagine actually wearing it.

That was the sad story of this recent reject, but everything changed when Me-Made May rolled around. This year, my pledge was a bit different. Since I already wear me-mades every day, I pledged to wear the ones that I abandoned, and try to analyze why. This is one of those makes.

IMG_6970

It might be the fabric that put me off. It’s a floral print and, when I purchased it, I thought it was a random print. When I laid it out on my cutting table, I discovered that there’s a strong repeat….pattern matching would be involved! Ugh. That discovery made me a bit cranky as I wasn’t sure I’d purchased enough fabric to make this work, but I managed to pull it off, carrying the pattern through on the sleeves and the back.

IMG_6946

I do love the fit of this shirt! The Saraste shirt is a pattern from Named Clothing’s book,  ‘Breaking the Pattern’.

COVER

I’ve made several of the patterns in this book now (here), and they’ve all been fabulous. The Saraste shirt is one of my favorites with many elements I love: princess seams down the front, a back yoke, optional sleeves and a small collar that fits my short neck. The surprise detail is small cut- outs at the shoulder, which I love.

IMG_6950

They were a bit of a challenge though. My tip is to be sure to trace the pattern carefully, noting all of the markings accurately. I hadn’t done that and had to go back and add them in. Once I had that accomplished, it wasn’t too hard to make everything work. However, I’m a bit disappointed that the cut-outs don’t show that well in my print. I’m going to have to give this lovely pattern another try in a solid colored linen, so that those slits can shine!

My Me-made analysis – – I do love the print now, but at first glance, I wasn’t too excited about it in this shirt. However, I have worn it many times this month and have discovered that it goes with everything in my closet. The fit is perfect and the shirt is easy to wear. In fact, people compliment me when I wear it:)

Lesson learned…my first take on a make shouldn’t be my last.   IMG_6959

How are you doing with Me-Made May? Any new revelations?

Happy sewing and thanks for stopping by!

Sew Bibs with Simplicity 8610

IMG_5150There’s nothing like a community sewing challenge to motivate me to complete a project that’s lingered too long on my to do list. This pinafore pattern has been on my wish list since I made the jumpsuit version last Spring (here). It took the #sewbibs challenge to push me to get it done! (more about the challenge here)

My pattern is Simplicity 8610.

I love the big pockets, topstitched front band, buttoned straps. But if this doesn’t grab you, there are many other pinafore patterns to explore. Here are a few that are on my wish list right now.

The York Pinafore from Helen’s closet

york_pinafore_10

The Dani from Seamwork

sw3093-dani-01-large-1d45fe69fcb7935303658eef9020e3c945df0ae16c0f1ec38a6c182a7fe42449

Simplicity 8641

I chose Simplicity 8610 for the big pockets, front gathers and the cool bodice band detail. Also, I love the size of the straps, a detail that can make or break this design for me. If they’re too narrow, they’re uncomfortable, but these are just right.

IMG_5250

Construction – I cut the size indicated by my measurements and there were no surprises or adjustment’s needed. (Size options are from 6-24).  The construction of the bodice is pretty easy and fast to put together. Although I made my jumpsuit version from a rayon crepe, I decided to make my pinafore from a cotton, and I’m glad I did. I think the cotton gives the pinafore a bit more structure which works well to support the gathered details and the fabulous pockets (a must on a pinafore, don’t you think?).

IMG_5176

One of the nice things about this style is that you can wear it with a long or short-sleeved top under it which makes it a great layering piece. It’s still cold and rainy here, so I chose a long sleeve, but come Spring, I’ll happily wear this with a short sleeve top, or maybe even alone.

IMG_5192I’m such a fan of the pinafore style. I think it’s perfect for casual wear about town, or as a travel wardrobe item that you use as a layering piece. I know there will be other pinafores in my future, and since the challenge is on until April 12…would love to finish another before then:)

There are so many inspiring bibs and pinafores on #sewbibs on Instagram right now. Do you have a favorite bib sewing pattern to recommend?

Happy sewing and thanks for stopping by!

An Anthropologie Inspired Burda Top


mL2l3J35Qjulp7CwY9UopA_thumb_11013
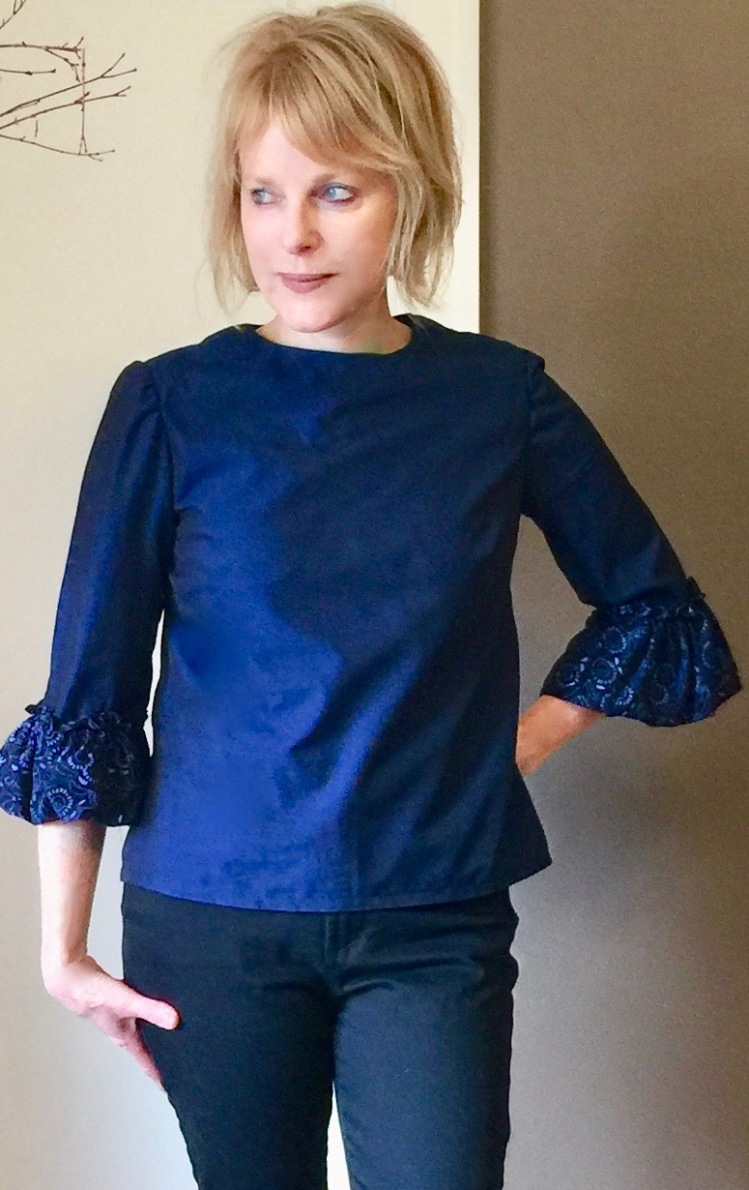
If you ask me, the November and December issues of Burda Style magazine were so great, they more than justified the hefty price of U.S. subscription. This Anthropologie inspired make is from the November issue, and it’s just one of five patterns that I marke to trace. Yes, I always dread the task of tracing the patterns from the magazine…there are so many crazy lines to sort through! But the results were worth the effort!

Here’s the Velvet top from Anthropologie that inspired me to make this.  4110348695280_070_b

This Burda Style top is really close, minus the gathers at the shoulders.

rZMxr0WtSIumRgbFb3O9OA_thumb_110f3

Navy blue is such a hard color to photograph so I’m not sure how clearly you can see the waist-pleat detailing, but it adds a nice touch and it was easy to sew. This Burda Style pattern is 11/2018 Style 110.


The magazine version is made from stretch jersey so I made my version from stretch velvet. If you try it yourself, I highly recommend a stretchy jersey with lots of drape. I cut the smallest size and the fit is great. I did forget to add the seam allowances when I first traced the pattern pieces and had to retrace them. UGH. There are so many crazy lines going every which way on those pattern inserts. I guess you could avoid that frustrating step by paying for a download of the pattern from the website, but to me, that feels like paying for the pattern twice which I could not justify, since, in the US, a subscription is already a sizeable investment. Fortunately, there aren’t alot of pieces to this pattern so the tracing wasn’t too hard.

x2MmSKnwSw2mxLcTjL4YJg_thumb_110cb

The required sewing was quite easy! I’m always impressed at how well Burda Style patterns come together.  The instructions feel so abbreviated to me, yet the projects always seem to work out! The front bodice and neckline are finished with facings and they’re very simple to attach. The sleeves are set in and they went in easily. The tie is just inserted before attaching the facing. No big deal. Machine sewn hems finish both the bodice and sleeves.


I always worry about fit when I make a wrap top. There’s so much that can go wrong in terms of gaping in the front. Because of that, I celebrate when I find one that fits well. Since this one is a clear winner, I’ll likely try it again. I might even add a few inches for a dress. It’s a great addition to the wardrobe since it can be worn alone or with a white collared shirt. Probably a lacy tee would look great under it too.

It’s always great to add a new velvet piece to my wardrobe, since I am such a fan! I’m hoping to sew a few more things before I do my yearly wrap up, but it could be wishful thinking on my part:). Happy sewing and thanks for stopping by!


An Anthro Knock-Off

IMG_2463

4110259830030_040_b2

When I saw this top in the Anthropologie, I fell in love with the denim blue checks, the side tie at the hem. But when I tried it on, the neck was so big on me, it fell to my shoulders like a cold shoulder top. Not a good look! And the long sleeves covered my fingertips. But that side tie, the color…Well, this is why I sew and keep an extensive fabric stash. As luck would have it, I just happened to have the perfect fabric right at home! Stash justified!

IMG_2414 2

My version of Anthro’s shirt is a hack of Butterick 6456, a pattern I made before, here.

B6456_aB6456

I used view D, but modified the front bodice by elminating the pleat. Then, to get the side tie look, I added a drawstring to the hem. I folded up the hem by 5/8″ to make a casing for a skinny tie that I made from fabric. The length of the tie is 1/1/2 times the circumference of the hem. Once the tie was inserted in the casing, it added a slight gathering at the hem.

IMG_2454


The fabric is a special piece of linen that’s languished in my stash for a couple of years (+), purchased at the Pendleton Outlet store a few years back (a bargain at $3.oo a yard). I’ve  been saving it for the perfect project. It’s the sort of linen I’m mad about; crisp, but not rough, able to hold a press, but not stiff. To get the long look of the sleeves, I just added four inches to the length of the sleeve before adding the bell.

IMG_2447

I like my new top and think it’s worthy of my long cherished linen. An added bonus is that this top was a bargain compared with the Anthro version, as I spent only $3/yd on the fabric! I think this top came in at under $20. It’s a rare but cherished moment when sewing is cost effective, am I right?

Some of my photos were taken in my newly painted living room. My sewing machine has been ignored of late because we’ve been doing the painting ourselves. Yes, we could have hired pros to do it, but I’d rather spend money on fabric (!!).  Let me tell you, there was a collective sigh of relief at my house this week when this project was finished.

Next up on my fall wardrobe wish list is a denim jacket. I’ve always wanted to make one, and there’s no better time than now.  I’m perusing patterns….there’s the Maisa by Named and the Stacy Jacket by Style Arc to name a few. Any suggestions? Happy fall sewing, and thanks for stopping by!


It’s going to be a Charlie Caftan Summer!

IMG_9411

If you’d asked me, ‘are Caftan’s your thing? I probably would have said, no. But I’m such a fan of this pattern by Closet Case Patterns. I was inspired to try it by Indie Pattern Month over at the Monthly Stitch. After making a muslin version, I decided it was the perfect pattern to hack for this week’s IPM challenge.

IMG_9398

This pattern has several options that provide ample opportunity for you to do your own thing. You can make a loose gathered caftan, either short or long, or a more fitted version without gathers. For my hack, I used Version A, the non-gathered version.il_fullxfull.1223032594_ih2b

I loved the shape of A so I decided to convert the Caftan look into a more fitted cocoon dress. I modified as follows:

  • I raised the inset opening by 1 1/2 because, as drafted, it was too close to the waist for the look I wanted.

IMG_9448

  • The Inset Insertion: From my muslin, I discovered I was not wild about how the front inset is assembled.  You’re supposed to insert the inset into a 1/4’ opening and make it smooth and neat. I practiced and practiced, but well, needless to say, that didn’t happen for me. So, rather than an inset, I merely slit the opening, made the pleats as instructed, then topstitched the inset over the slit. It’s easier and looks a bit smoother to me.

IMG_9415 3

  • The pleats add a cool shape to the dress so I stitched them down for a more sculpted look.
  • I added large patch pockets to the front with button down flaps. I added self-faced cuffs to the sleeves that can be rolled up and kept in place with button tabs.
  • I added a small raised collar to the back of the neck, to make the neckline look more like a shirt.
  • IMG_9379

I love my cocoon shaped shift dress. It’s so comfortable and cool, and I think the polka dots add a vintage vibe. My fabric is cotton lawn, but I could imagine this dress in linen, cotton double gauze or rayon.  It’s so versatile, I’m thinking I’ll try the gathered version, both short and long. What about you? Are you a fan of the Caftan look?

I’m loving Indie Pattern Month over at the Monthly Stitch! It’s so inspiring to see everyone’s favorite Indie patterns and how they interpret them. I’ve found some new patterns I want to try as a result, and found some new blog friends too.

Happy sewing and thanks for stopping by!

New to Me: a Colette Moneta

IMG_9110 2

It’s Indie Pattern Month over at the Monthly Stitch, a fun month of challenges designed to acquaint us with the wonderful world of Indie pattern designers. Last week’s challenge was to make a pattern from a company that was ‘New To Me’. I picked Colette patterns, a company based in my home town, Portland, and made their popular pattern, the Moneta dress.  And lucky me, my ‘make’ qualifed me as a finalist in this week’s competition! Voting is now on the Monthly Stitch and I’d love to have your vote!

IMG_9123

This is a fabulous pattern, and I can see why it’s been so popular in the sewing community. I’m not sure why I never made it before….I’ll be making it again and again. I used a cotton jersey knit and added a contrast collar, sleeve bindings and pockets. It came together easily, and my full review can be found on the Monthly Stitch website. The good news about this pattern is that Colette includes lots of collar options on their website so that you can make many fun versions.  It’s really a keeper.

If you’re new to the Monthly Stitch, it’s worth checking out. It’s a great community and every month brings a new challenge. It’s a fun way to get inspired to do something new and to make sewing friends.

Happy sewing and thanks for stopping by!

Chambray, Lace and Pom-Pom Trim?

IMG_6494 3
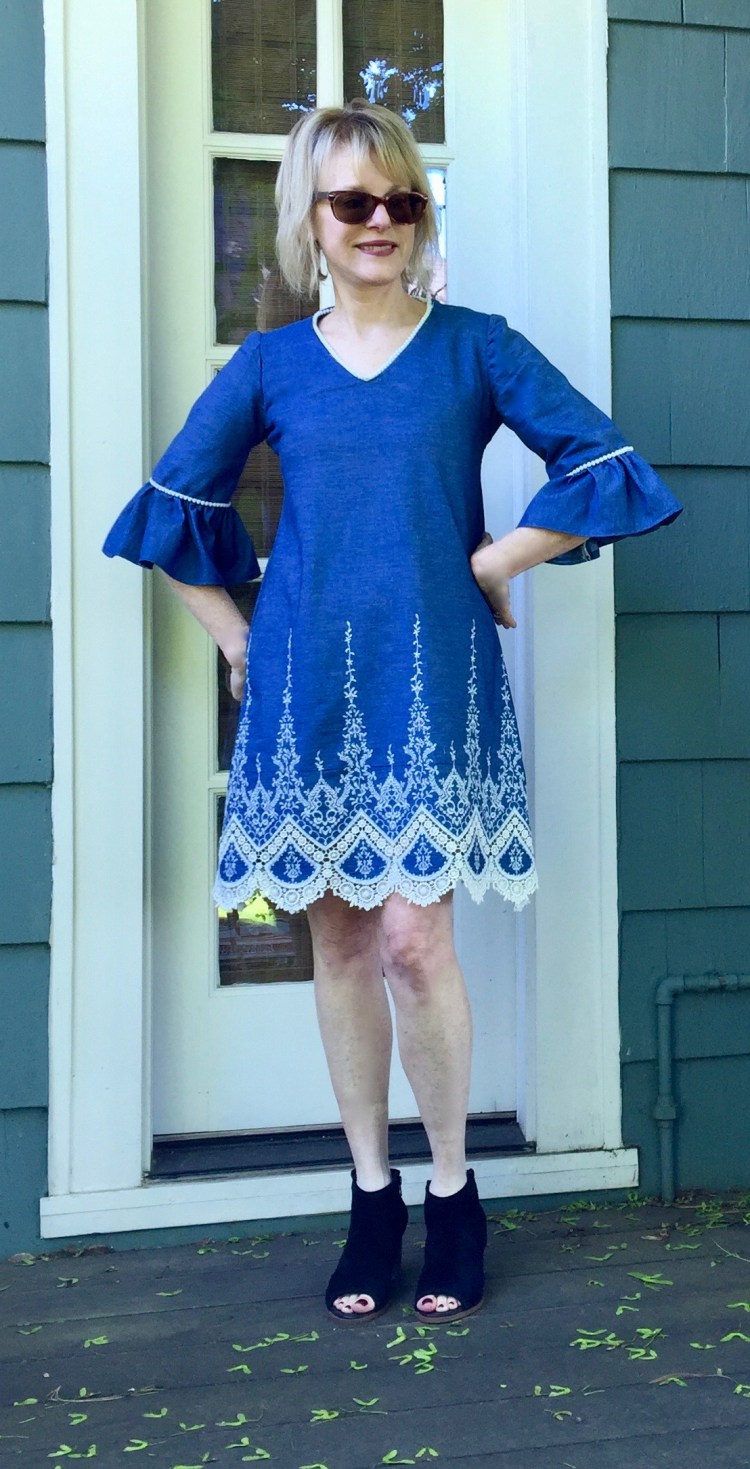
Chambray, lace and pom-pom trim… a funny combination I didn’t plan, but somehow, it happened.

If you think this new dress looks alot like the linen dress I made last spring you would be right. I loved that dress and wore it constantly until a trip to a hotel laundry shortened it to scandal level. I was so bummed! After a period of mourning, I accepted the fact that I’d have to replace it, and that’s how this dress came to be.

IMG_6385 I rarely buy fabric on-line, preferring to support the local stores, but when I saw this fabric on Fabric.com, it leaped into my shopping bag. The combination of chambray and lace would have had me, but then you add the blue….gotta have it! When the fabric arrived, I knew it was perfect for a simple shift dress, because the lace border was perfect to take center stage.

IMG_6354  Enter Mccalls 7532, a new pattern this spring that has a decidedly low key, boho vibe.

I love the swingy shape, the statement sleeves and the v-neck, a detail that begged for the pom-pom trim I had stashed away.

IMG_6481

The pattern went together easily, and the instructions were great, but I did make some changes. The skirt of this pattern is really swingy… and since my fabric was cotton chambray, it didn’t really have the right drape for the amount of ease in this pattern. So, I pulled in the side seams a bit to compensate. Trust me, I took out alot of that swing, and still had plenty of room, so you might want to size down. There’s alot of ease in the skirt that would likely work best with a crepe or a silk, or rayon challis, all recommended by McCalls.

I also modified the sleeves a bit. When I cut them as designed, it was clear to me that I would never be able to go out to dinner without knocking over a wine glass with that ruffle.  It’s true that my beverage of choice, white wine, doesn’t stain like red, but who wants to test that theory? To make the sleeves a bit more wearable, I shortened them by 3 inches and reduced the ruffle width by an inch and a half. That cost me a bit of ‘drama’ but I gained a dress I will wear.

IMG_6383

Do I love this dress more than last year’s linen/lace combo? No, but I’ve decided it’s not a comparison I have to make. This dress is cool for different reasons. It’s comfortable, the lace is gorgeous, and it will be the perfect travel companion for my trip to Spain. I love swing dresses so much, I already have another version in the works from a lighter weight fabric. It will be interesting to see how a different fabric changes the character of the dress.

I added the outside photos to this post just today, as the weather here is finally worthy of cottons, linens and silks. Yay! The only downside of beautiful weather is that I accomplish very little because I just want to play, play, play! Oh well. There’s always tomorrow when (sigh) it will probably rain.

Happy sewing and thanks for stopping by!


McCall’s 7542 times two: Bubble and Tulip Sleeves

Hi all! I meant to post this earlier this week, but a horrid stomach virus took me out of action. According to my doc, it’s extremely contagious, but the good news? You can’t catch it by reading my blog :).

Spring hasn’t exactly sprung here, but I continue to sew as if it has! These two versions of McCalls 7542 are my attempt to lighten the mood in my closet by adding some more statement sleeves. It is one of the hottest trends around, probably because they are pretty fun to wear! You just have to believe warm weather is on it’s way when you’re wearing something this fun.

Bubble sleeves are how version one is described.IMG_5297Okay, I’d never heard this term, so I googled it, and was amazed at the varied interpretations of the word, ‘bubble’. The bubble look is made by simple gathering. After you’ve gathered the sleeve, it’s turned up to the outside to make the little ruffle where it attaches to the elbow of the main sleeve. It isn’t hard at all, and it’s a great way to take an ordinary sleeve to something special.


IMG_5324For fabric, I used a cotton shirting from Fabric Depot, and a remnant of rayon that I found on the sale rack there. Of course I love them both because they’re blue :), but they are also dreamy to sew with. The cotton shirting is crisp, but not too heavy, and feels as good as silk to wear! I wish I’d bought more of this!

My second version is with tulip sleeves.IMG_5386I made this version out of cotton double gauze from Fabric Depot and I love the way it drapes. The tulip sleeves are created by two pieces that overlap before you insert the sleeves into the bodice. It isn’t tricky or hard. These sleeves need to hang softly, so a cotton that was stiff or heavy probably wouldn’t work. I could imagine these sleeves would be fabulous out of rayon or silk or crepe. In fact, I just might have to try this again out of one of those yummy fabrics!

McCalls 7542 was easy and fun to sew.

The instructions are great, and I was happy that it fit without any modifications. I just made the size that I usually do in McCalls patterns. I made the longer version both times. I’m short waisted, but the cropped version was even a bit too short for me, and I wanted to be able to tuck them into my ruffled wrap skirt.  This pattern is a pretty quick sew because it doesn’t have a back zipper. The back opening is just finished with a hook/eye. I made it in a Saturday afternoon!

Both versions are part of my capsule wardrobe.


M7542 is going to be a TNT pattern for me, and I love how many options you get with this one purchase. I’m definitely a fan of the statement sleeve trend, so I wouldn’t be surprised if I don’t end up making all of these options!

My only ‘issue’ with these ‘makes’ is that on my second version, the tulip sleeves fall open all the time.  Even though the pattern instructions don’t tell you to stitch the two overlapping pieces of the sleeve together, I’m tempted. But then, the drape-y look might be ruined…What to do? Opinions welcome…

McCalls Pattern Company is having a #M7542 Contest to see who can make the best version of this pattern! How fun is that? There are even prizes. I just might have to enter:).

Happy sewing and thanks for stopping by!


A Moto Jacket, part of a..capsule wardrobe?!?

IMG_5087

When Pattern Review announced their Wardrobe Sudoku Contest, I said, Never!  10 garments in two months that all have to coordinate with each other and shoes and accessories? Too mind-boggling for me. So I told myself I’d play along and use only fabric from my stash.

Well, the phrase, ‘never say never’ now clearly applies to me. I suppose my reluctance to join the fun had to do with the fact that I throw a hissy-fit whenever someone suggests I might sew with a plan (SWAP). I prefer to sew on a whim! But I’ve also secretly envied those who have used their sewing skills to achieve their dream capsule wardrobe too, which is basically what the Sudoku Challenge is all about.

sudoku_big

Here’s my completed Sudoku wardrobe.

PicMonkey Image

The grid shows ten combinations that work together, but the truth is, there are many, many more. The Mimi G jacket is one of the key pieces because it goes with everything, so it’s an accessory on the grid. I’ve wanted to sew this jacket for a long time. It’s a cool girl thing, you know? And this one is designed by Mimi G, no less! Definitely on my sewing bucket list, but it took this contest to get me to push through.

IMG_5109 2


I’ll wear it open, closed, over jeans, skirts and dresses. Here it is with other pieces in my Sudoku wardrobe.

The pattern; Simplicity 8174 is cute, but it’s not an easy make, to say the least. It’s a well designed pattern, but very complicated. It has a side zipper, back shoulder insets, epaulets, a waistband with carrier and belt detail, and inset zippered pockets, and it’s lined. There are lots of pattern pieces to manage, but once I got them labeled clearly, things started to work better. Here’s a shot of the back waistband, and the back shoulder panels. Cool details, eh?IMG_5094 2

I used brushed twill from my stash and cut my usual size, comparing my measurements to those on the envelope. It turned out to be perfect! Challenges….Construction took awhile, and required my full concentration. For me, the shoulder panels were the most frustrating part. They’re faced with another piece of fabric which gives them stiffness and makes them look cool when they’re top stitched. But, I found the instructions confusing. Mimi G’s video on U tube saved the day. In fact, I used it constantly through the process. It really helped, although I did find a few challenges even with that. She constantly says, do the same thing to the other side. That works for everything but the front bodice which has a right and left side.  In error, I applied the facings to both sides, but in reality, you have to wait on the left side until later in the process so that you can insert the front angled zipper correctly. So, I had a few stitches to rip out.

I did cheat on the belt carriers on the top epaulets and on the waist band. I could not get my thick fabric to turn, so I just winged it, making carriers without turning them.  My fingers were grateful.

This complex pattern had so many twists and turns, I had to turn off my new binge-watching obsession, Bloodline, so that I could concentrate. It was worth it though. I know this jacket will get worn alot, a key piece in my spring wardrobe.

Check out the contest over on Pattern Review.com for some great inspiration. I just love seeing how everyone puts together a wardrobe, and many are only using their stash like me. One of my favorite wardrobes is Elizabeth’s of Elizabeth Made This, so inspiring! Check out her fabulous makes on her blog.

My wardrobe is done and posted now,(my denim ruffled skirt is one item) and it feels good to have it behind me. Over the next few days, I’ll do some posts on my other makes, including two statement sleeve tops, a safari jacket, an alder shirt dress and a long blue cardigan. I stayed with blues and neutrals, which seems to be all I have in my stash these days!

Will I always sew with a plan? I doubt it….no new leaf being turned over here. How about you? Happy sewing and thanks for stopping by!!