New Look 6429- A Dress with an Inset


IMG_4319

Hi All! Summer is in full bloom here in Oregon, with blue skies and sunshine, the perfect start to my vacation. I thought I’d show one last addition to my travel wardrobe before heading out for a couple of weeks. Yes, I have alot of clothes (LOL) but wouldn’t you know it? At the last minute, I decided I NEEDED one more dress.  In a frenzy, I grabbed some fabric from my stash, a bit of lace, and a New Look pattern. Here’s the result.

IMG_4335

This sheath is New Look 6429, a dress I wanted to sew the minute I saw it in the catalog. With the options to add an inset or a cut out, this pattern was on my ‘must have’ list right away. I love the raglan sleeves and the great neckline.

I chose view C, because I can never  pass up an opportunity to add a lace inset.

IMG_4336 (1)

The pattern went together quickly and easily, but be forewarned. The sizing is really (!!) generous. I had to take seams in everywhere. This is one occasion when sewing a quick muslin wouldn’t have hurt, but as you all know, I don’t have the patience to take this extra step, and here’s the price I pay for it. An easy sew turned into a bit of a project because I had to fuss around with fit.

The fabric I used is a cotton with a  very, very slight stretch. The pattern is designed for wovens and stretch is not required, but I love just a little bit of stretch when I want a dress to be super comfortable, as is the case when I travel. If a dress can’t be worn all day, it doesn’t make the cut, you know?

IMG_4271I love this dress, and am so glad I found the time to squeeze in one more make as I know this will get alot of wear.

I’ll be away from my sewing machine for a few weeks, which makes me a little said. The good news? My stash has shrunk a bit over the last few months, making room for some new vacation purchases. I hope I’ll have some interesting finds to share when I return.

I hope your summer sewing is progressing nicely and that you’re enjoying some great weather. Happy sewing and thanks for stopping by!


A cold shoulder top, dress or tunic

IMG_4728

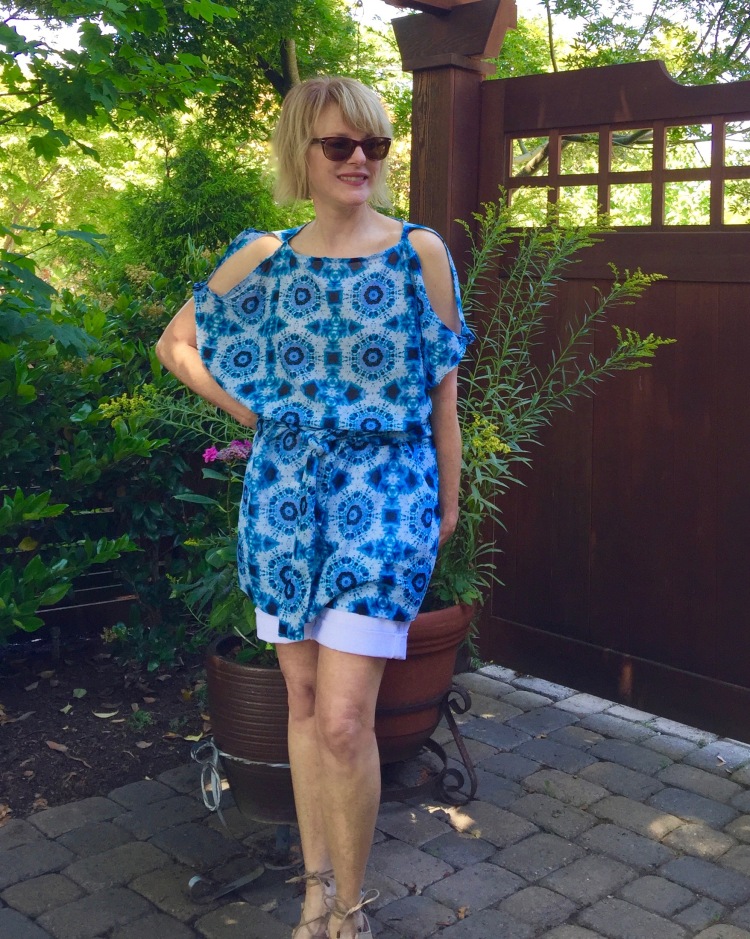
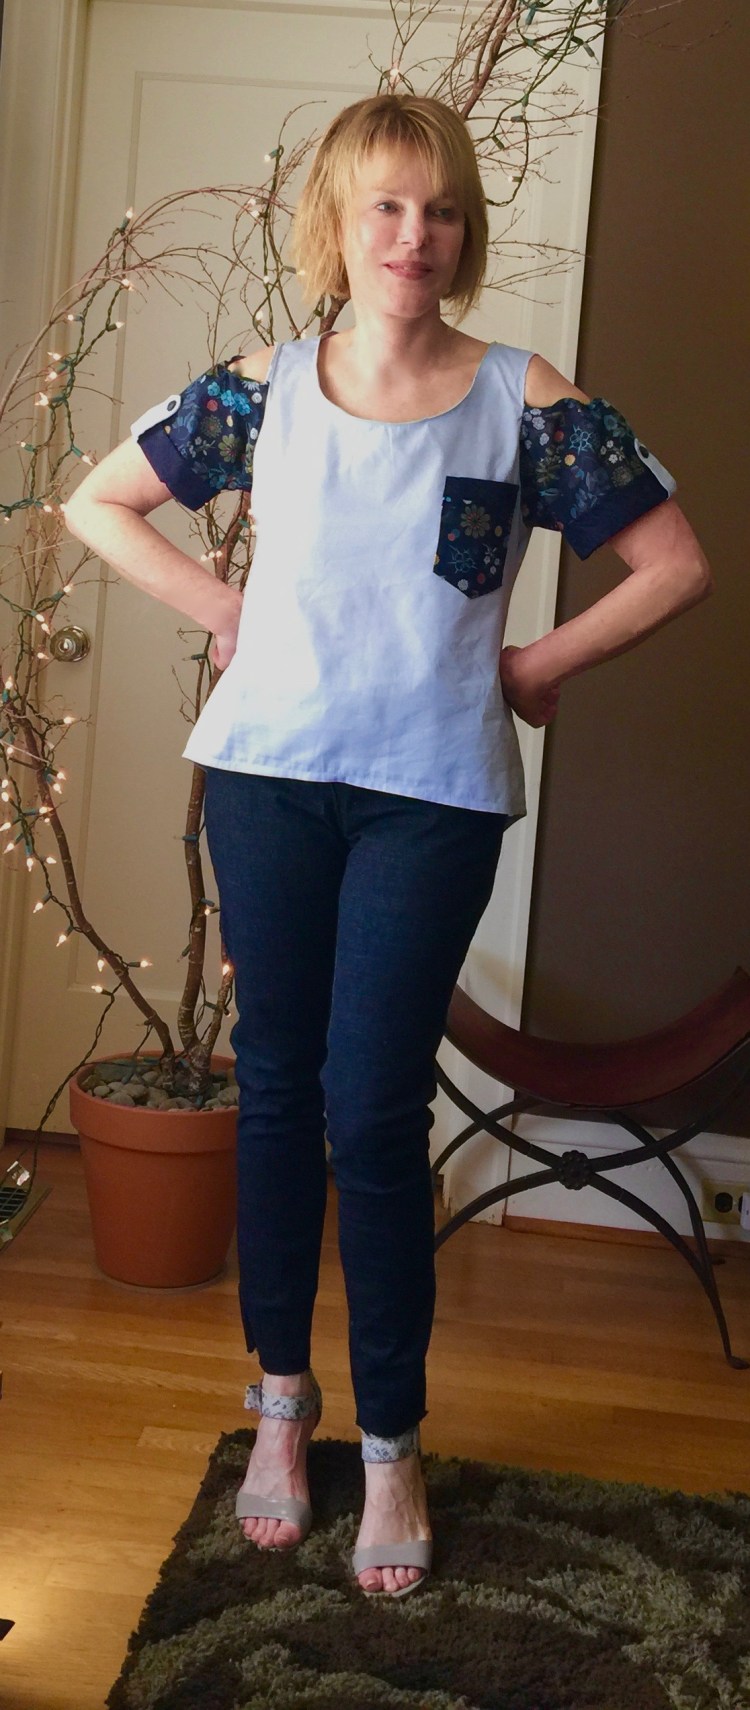
I cannot get enough of the cold shoulder look. As with most trends, when I finally get on board, I don’t let go!  This is my second cold shoulder project (first one here) and I can tell you, it will not be my last. Here’s the reason I love the cold shoulder look. Showing a bit of skin at the shoulder gives even a loose, summery top or dress a bit of a sexy vibe.

What’s even better about this top, is that it’s so versatile! By hemming it a bit on the long side, I can wear it either as a top or a dress! Here it is loose and unbelted for a hot day.

IMG_4652

Here it is over jeans, perfect for a day that’s a bit on the cool side.

IMG_4508

I think this pattern plays to the advantage of a cut-out shoulder. Even though the cut of the top is unfitted, the shoulder gives it a bit of interest, and makes it look more shapely than it is. You can belt it, or not, as the mood strikes.

IMG_4714

The pattern is Butterick 5889, an easy top, tunic and belt.

It’s a bit oversized with a slit opening at the sleeves that could not be easier to construct. The sleeve hems and the sleeve splits are just finished with a narrow hem. So fast! The cold shoulder look is created when you tack the sleeve split together at the top and bottom.

The shape of this top is rather loose and boxy, so I choose a very lightweight cotton with great drape (Mill End Store) so that it wouldn’t overwhelm my small frame. The hardest thing about this top, was getting the pattern perfectly lined up on center front, so you know this top is easy!!

IMG_4746

I can imagine wearing this top/dress both ways, belted or loose (although the unbelted version might be a bit of a man-repellant, if you’re worried about that sort of thing, LOL).

From cut-out to finish, this top took only a couple of hours to create. It might have taken less if I wasn’t watching High Society (Grace Kelly could not be more gorgeous. And the clothes!)

This top is such a fast, fun make, I might try it again out of a rayon challis. View B also has pockets and a front placket, so I might give that a go at some point. If you decided to try it, I recommend sticking with a drapey fabric, as it does have a very generous cut. The pattern came out in 2013, but it’s still easy to find and on-trend now.

What do you think?  Do you prefer it as a top, a tunic or a dress?Isn’t it nice to have some easy projects during summer? There’s so much to do outside, away from one’s sewing machine.

Happy sewing, and thanks for stopping by!

Simplicity 1160-A Cut-Out Tee

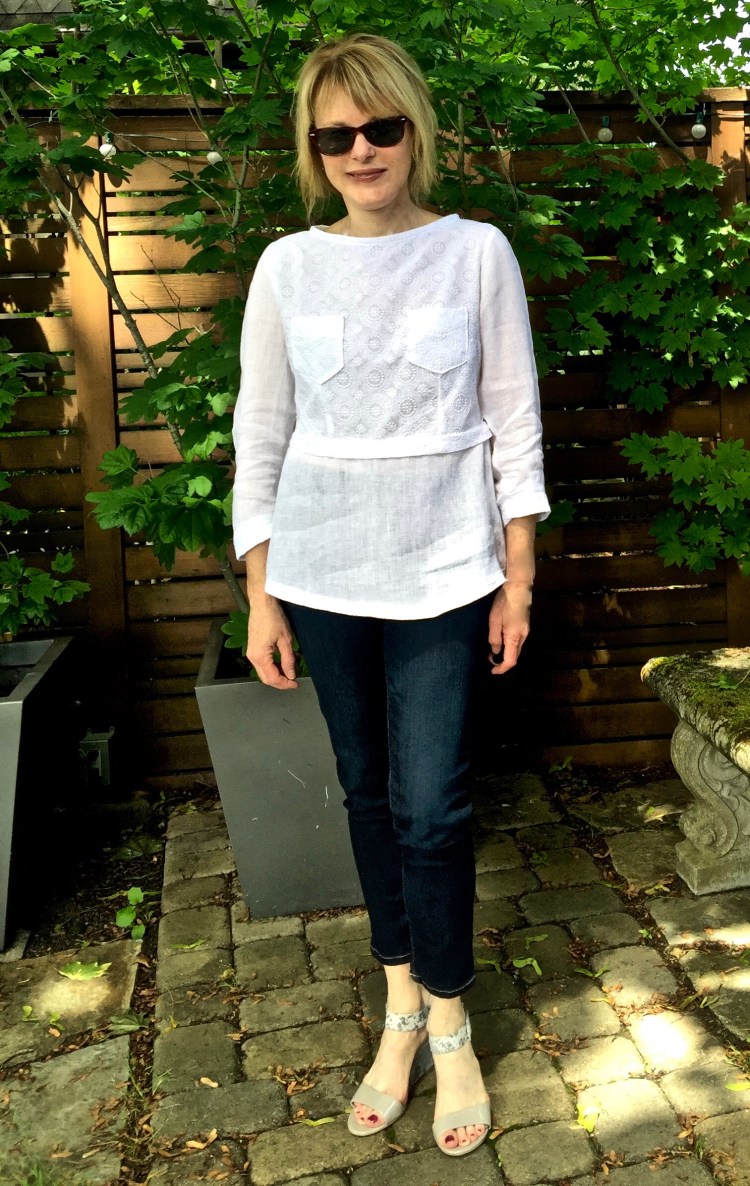
Hi all! After completing my denim skirt last week, I needed to find an easy, fun, ‘instant gratification’ project to cleanse my sewing palate.  This little tee was the answer, inspired by a recent visit to Anthropologie. I found so many wonderful tees to admire there. I’m always amazed at how they can take a simple, every day top and with a single detail, turn it into something special.  Here’s the Anthro tee:

Many of the tops I saw in RTW were ‘swing’ tees. It’s a great shape to wear for comfort and ease. I loved the back detail on this one (hated the color on me), although I thought the ties would drive me crazy.  Still, it started a bit of an obsession. I had to sew a tee with a back cut out!! After reviewing a zillion tee shirt patterns, I finally found one that was a decent match. Enter Simplicity 1160, a tee with a scoop neck, a swing shape and a cut-out back.

When I saw the line drawings, I expected that the cut-out would be tricky to sew. Here’s the good news. It’s really not.IMG_3480

The cut out detailing is faced with bias tape, the way you would finish a tee shirt neckline. It isn’t hard to do and the pattern instructions are pretty easy to follow.

The fabric I chose is a cotton jersey with moderate stretch and a soft drape. I think a ponte knit would be too stiff for this, but would love to try a flowy rayon knit next time.

IMG_3658

This pattern seemed risky for me because I have a narrow-back.  I’m happy to report, fit wasn’t an issue at all. The only change I would probably make next time around is to raise the front neckline. It’s a bit low for me, although in the peak of summer, I may love it. Otherwise, this pattern is a winner and I will make it again. After all, I’m ‘all in’ when I find a fun project you can finish in an afternoon.

IMG_3218 (2)

Hey look! It goes with my new denim skirt, although it looks a bit wrinkled here…Hmmm, too many wardrobe changes in this photo shoot, I guess! Let’s see. I’ve made a top that goes with my skirt….Does this mean I can say I have a capsule wardrobe?? One thing is clear. If I keep buying blue fabric at my current rate, eventually, everything in my wardrobe will go together.

This tee was so fun to sew, I’m on the search for others with interesting shapes. Style Arc has quite a few; the Tamara, the Kylie and the Maris, but I’ve never sewn a Style Arc pattern before and have heard they’re a bit daunting as the instructions aren’t that great. Any experience to share with Style Arc?

Happy sewing, and thanks for stopping by!


Having a 70’s Moment: Denim Button-up Skirt

IMG_3160

Hi all!  In anticipation of summer travels, I’ve been sewing up a storm! I’ve also been aware of a huge gap in my me-made separates wardrobe that must be fixed before I travel. I have very few skirts and almost no pants. My recently completed jeans helped to fill the gap, but I still need skirts, and, as luck would have it, there’s a skirt competition this month at Pattern Review, the perfect motivation!

Being a fan of denim and blue, I couldn’t resist giving a jeans skirt a go. The pattern I chose was Mc Call’s 7392, a fitted skirt with a waistband, a front band, button closure, side front and back seams, and optional pockets and carriers.

I love the design of this skirt. The front and back ‘princess’ seams make ‘fit’ a breeze and the  a-line shape and front button closure are so seventies. To satisfy my craving for ‘jean skirt’, I added some additional details like front pockets and contrast topstitching.The pattern instructions were easy to follow.

IMG_3166 (2)

My only criticism….I disliked the way the carriers are attached. They are basted to the waistband, then sewn into the waistband seam. If you want to topstitch that waistband, you can’t because the carriers are in the way. So disappointing. Next time, I will sew the carriers on the way you do with jeans. I’ll just turn the ends under and stitch them in place outside the waistband. Because this pattern has princess seams, I found it easy to modify it to fit my shape. This gets a big ‘thumbs up’ from me, since I have a wide waist that’s out of proportion to the rest of me.

IMG_3169

Fabric Used: I used dark denim, so hard to find but available at Fabric Depot.

Pattern alterations or any design changes you made: I double topstitched everything. I modified the patterns back pockets and side front pockets.

IMG_3172

Since I’m not a fan of side front pockets as I think they make my waist look shapeless, I used the back pockets as a template for two smaller front pockets, which I sewed in place, patch style. To get the smaller size for those pockets, I just traced the back pocket and reduced the size by 5/8 inch all around. I topstitched each pocket and added a chevron style ‘V’ for fun. I hesitated when it was time to put the back pockets on, as I wondered if four pockets on one skirt would be overkill, but the truth is, I love pockets! So I added them.

To make the topstitching look sharp, I double threaded my needle with regular thread. Some might prefer topstitching thread, but my machine doesn’t like it, so double threading gave visual dimension to the topstitch without clogging my machine. I also topstitched the carriers and the waistband seams, even though the pattern didn’t call for them. For a jeans skirt vibe, I used  jeans buttons in an antique finish that you pound in place with a hammer. So satisfying! The button holes were made using the contrast thread.

IMG_3168

In summary, I do like this pattern and will likely sew it again. IMG_3133 (1)

With its many seams, this pattern is easy to modify for fit, and to add your own personal touch. The cut is ‘a-line’ but not too wide at the bottom, so hard to find in a skirt pattern. It definitely satisfied my urge for a seventies style denim button-up skirt. I’ll probably try this pattern again with other dense fabrics like wool or corduroy come fall

I’m curious if others have trouble using topstitching thread? Does it clog your machine? I would love to be able to use it and know there must be a trick that I just haven’t yet discovered.

It’s still cold here, but I remain optimistic and am sewing with linens and cottons…Happy sewing and thanks for stopping by.

New to Me: Kanerva Button Back Shirt


I just might be the last blogger in the world to sew the Kanerva top! And better late than never.  This top is truly unique with buttons down the back, a pleated waist, and a split peplum. And as you all know, I’m a sucker for a peplum! True love!

IMG_2348 I’ve wanted to sew something by Named clothing for awhile. I was prompted to finally do so by the Monthly Stitch. It’s Indie Pattern Month over there, and this week we’re sewing a pattern that’s New to Me. This is my first make of the Kanerva blouse, and I am so taken with the design details! Both versions are fitted with two sets of front darts, a pleated waist and a gentle peplum.

To accentuate the fabulous design details of this blouse, I decided to use two different fabrics; A embroidered cotton and a hankerchief linen. I used the cotton for the bodice, the self-drafted pockets and sleeve bands.  I used hankerchief linen for the sleeves and peplum.

IMG_2277

Yes, linen loves to wrinkle, but it wears like pajamas, so all is forgiven. It does tend to fray though, so I finished all the seams with my serger. Of course, the back is where it’s really happening on this shirt!

IMG_2279I used vintage pearl buttons. They’re fairly flat so they won’t poke me when I lean against a hard backed chair. The placket is easy, just a few folds that you stitch down, then you add your buttons and button holes. I added self drafted pockets to the front just because I thought they would look cool and finished the neck with binding.

IMG_2289

All in all, this was a fun, straightforward make. The scariest part for me was transferring the pattern markings. I tested both tracing paper and chalk on my white fabric and both stained, so I had to use thread and pins to mark. Ugh! Not sure what a better choice would be….Recommendations are appreciated! The instructions were easy to follow though and it was about a four hour sew from cut to finish. And, I think I finished this top just in time. It’s (finally!) heating up here, with temperatures expected to be in the high nineties tomorrow. IMG_2367Although I usually choose Big Four patterns (they’re so easy to find and always on sale), I do love the fact that there’s a month dedicated to some of the alternatives available through Indie companies. There are so many choices these days, that you can always find something fun to sew. If you haven’t checked out the Monthly Stitch collective, give it a try!

The trickiest part of this project was transferring the pattern markings. Have you had problems with staining of fabrics with tracing paper? Do you know products that work better for marking?

Happy sewing and thanks for stopping by!

McCalls 7314: Burberry knock-off

IMG_1397

As you all know, I’ve got a thing for Burberry’s classic designs, and the Spring 2016 collection was one of the best. Being peplum obsessed, I couldn’t help but fall in love with this cute shirt.

203f3d87fd36b410af8e9c14c87692ac49df2e6d

Okay, as Burberry prices go, the tag on this one wasn’t totally ridiculous…only $350. Yes, it’s a lot, but I could probably justify a splurge like that if  (1.) I didn’t have a fabric stash worth a small fortune (2.) I didn’t have an expensive shoe thing that is almost as bad as my Burberry obsession and (3.) I could commit to never buying another RTW, or piece of fabric for the rest of the year (ha, we all know that’s not going to happen!)

IMG_1399 (1)

So, a knock off it is!

The fabric: A plaid cotton gauze from Mill End Store. (They take phone orders, BTW. Although there isn’t much of this fabric left I noticed.)

The pattern: McCall’s 7314, a shirt dress pattern with a gathered skirt, elastic waist and sleeve options.

Modifications: I shortened the skirt by twelve inches. I cut my usual size, but made a small adjustment for my narrow shoulders. Other than that, no adjustments. were necessary. The sleeves are shorter on me than they are in the photo, by the way. Be forewarned…if you have long arms, and want 3/4 sleeves, cut them a bit longer.

The skirt on this dress isn’t fitted at all. You add a bit of elastic to the back to make the dress taper at the waist. You can cut the elastic as you wish, so that it’s as fitted (or not) as you want. This makes this top/dress so comfortable!!!

Challenges: Plaid matching! OMG, a nightmare!  I did okay, but I’m not happy with the sleeves. IMG_1421

I wanted them to match perfectly, but they’re a little off. I’d like to blame this on the gauze-y texture of this cotton, rather than on me, but we all know the TRUTH. The cotton is amazing to wear, well worth the effort it took to keep it straight. I have a bit of fabric left over, and might try to recut the sleeves, since I notice this mistake (LOL, you all know how this is!!) I should’ve used more pins and weights to keep it still. The skirt was impossible to line up, a fact I obsessed about until I realized, the Burberry one didn’t look much better. Still, I obsessed. Not perfect, but that’s how it goes.

This shirt is so comfortable! And I love the wide plaid. The cost: This shirt cost me less than $20 to make, since the pattern was on sale at Joann’s, and the fabric was purchased during a 25% off sale at Mill End. Yes, you have to figure in your time, but still….this is a good deal, right? Of course, the Burberry fabric is to die for….if only…

IMG_1403

I’d love to have more wide plaids in my stash because I love the look, but can’t seem to find many in the fabric stores. If you have a source, let me know. Another question..should I recut those sleeves? Opinions welcome!

Happy sewing and thanks for stopping by!


Sew the look: Denim and Lace


IMG_0950My summer travel wardrobe is starting to take shape. I’m determined to pack efficiently, but this will be tricky. The trip includes a Danube River cruise and some evenings will be dress-up events. Of course, jeans are my go-to wardrobe staple, but they’re probably not ‘cruise-appropriate’ (LOL), so I’m sewing some separates that will dress-up with the right shoes and jewelry.

These two pieces; a lacy top and Denim pencil skirt will mix and match with other pieces in my wardrobe. I think both can be dressed up or down, as the mood strikes. Lace and denim are both having a fashion moment, so I love the fact that these pieces are comfy, versatile and a perhaps a bit trendy too.

IMG_0938The top is another version of McCall’s 7285, a semi-fitted pullover top that’s so easy and fast.This pattern is so well-written and designed, it’s becoming a tried and true for me.

I love the bell-sleeves and the hi-lo hem. You can make this top in an afternoon, which makes it perfect for summer sewing. This time, I used a light weight rayon from Fabric Depot for the bodice and added some black lace to the sleeves. I finished the seams with my serger. The top is so comfortable to wear, I feel like I’m in my pajamas!! I’m hoping the lace gives it a bit of a ‘dressed-up’ vibe. What do you think?

IMG_0932

The skirt has a simple pencil style. It’s Butterick 5760, (OOP) a 2012 lifestyle wardrobe piece that has a waist band, a back zipper and slit.

5760

The pattern is so simple and basic,  you could embellish it easily with pockets. I wanted to do that but didn’t have quite enough fabric (I am my own worst enemy, it seems!) and when I went back to the fabric store for more, there was none to be had. Yes, I am short, but I must learn that a skirt takes at least a YARD AND A HALF, not a yard. The fabric is a denim cotton blend with some lycra (from Fabric Depot) which makes it comfortable enough for travel.

IMG_0912

This photo is kind of dark, but I just had to show you how lush and green things are right now in Portland Oregon. Yes, we have a lot of rain, but this is the end result…almost worth it?!?

Both the skirt and top are so easy! As the weather improves, I am all about fast and easy sewing. What do you think? Is my top dressy enough for a cruise? Not sure about the skirt…..?

Me-Made-May is in full swing and I love seeing everyone’s posts on Instagram. Although I haven’t been very good about posting photos, I’ve been trying to wear me-made every day, but have found it difficult because I don’t have my jeans finished. I’m hemming them this weekend, and hope to have them to share with you soon. The class was so inspiring, I suspect I’ll become a jeans making machine this summer.

Happy Spring sewing and thanks for stopping by!

Simplicity 1280: Crossover Top Times Two

I will admit. When it comes to sewing a top, I am a bit of a speed demon. I’m happiest when I’m sewing fast, and I will not stop until I’m done. Yes, I can leave a coat, jacket or dress on the sewing table to be completed another day, but a top? No way! Tops take ONE DAY, don’t you know?

IMG_0821

Enter Simplicity 1280: a cross-over top with a keyhole neckline. The top has a bit of a ‘ANTHRO’ vibe and it can be made in a day!

1280

I made two versions of this pattern, using a not-so-special rayon, and a fabric that I’d saved for just the right project (both from Fabric Depot). Wouldn’t you know it? The not-so-special fabric turned out to be the one with the best drape for the project. (Can you guess which one it is?)

I made view C with long sleeves and skipped the elastic on the sleeves as I wanted a bit more of a boho look.

IMG_0836

The top went together pretty well, and it was done in ONE DAY!!

IMG_0817


The pattern instructions are great. Here are some construction tips that I can offer after making two versions!

  • The neck is roomy. If you have narrow shoulders like me, you might want to do a muslin, or, at a minimum, baste the neck band on to make sure it doesn’t droop. I found the extra small to be a bit roomy and had to make it even smaller so that I wouldn’t have an ‘off-the-shoulder’look without intending to. Yes, it is trendy, but….
  • The construction of the front crossover pieces is interesting. The pattern instructions tell you to topstitch the two panels together before you have the back bodice attached to the front bodice. If you use a lightweight fabric like I did, you don’t really know if the drape is nice until the top is sewn together, so when you topstitch the two fronts, you can get some gathers and puckers that have to be corrected when the top is finally put together. Personally, I hate to unpick. So,  I’d take a pass on that topstitching step until after you’ve tried the top on and checked fit and drape. On my first version of this pattern, I had to unpick the topstitching and redo it after the back was sewn to the front because the drape was so different once the bodice was completed and there were so many strange puckers to fix!  Blah!!! Second version, I just basted the two front pieces together with a short stitch. Then, after I’d confirmed I had a good fit, I topstitched like I meant it.

The good news….Once you have these crossover pieces topstitched together, they will not gap or move as you wear the top! Yay!

  • The top really needs ‘drape’, so stiff fabrics will give a much different result. I used lightweight woven rayon, and could imagine it would have turned out even better if I had used silk. Next time….

Both fabrics were chosen in hopes that I could mix things up a bit by  wearing the  prints with my striped Morris Blazer. It’s a wardrobe challenge as only solid tee shirts seem to work with it. Alas, I’m not sure either of these prints works either..opinions welcome!

I keep hoping that I’m on the road to having a true capsule wardrobe, but, well, Hmmmmm. Maybe not today?

I hope your Spring sewing is going well. Me-Made-May, are you in or out? I might pledge one Me-Made a day, as Linda at Nice dress Thanks I made it, very wisely suggested. We’ll see.

Happy sewing and thanks for stopping by!!


Florals, Cut-Out Shoulders and Pants

IMG_0455

This summer, I’m going to be vacationing in Europe during the hottest days of July. Of course, this means a bit of wardrobe planning, a task I take on willingly! A quick review of my closet revealed the truth. I have very few summery tops, and I could use a few light weight skirts and pants too. So, let the sewing marathon begin!

My top was inspired by a recent visit to Anthropologie. Cut-out shoulders are everywhere this Spring and I love the cool, summery vibe. Butterick 6057 is a great pattern that replicates that look, a loose fitting pullover top with cut-out shoulders and a high-low hem.

There are lots of cool details on this top – – sleeve bands, tabs on the sleeves, a stitched down back pleat with button detailing. The pattern is marked fast and easy, but I doubted that was the case when I saw the details, but it is! Even the the sleeve cut out is simple.

The finished look is accomplished by sewing a long skinny facing piece to the cut-out’s curve, then turning the facing to the inside. Nothing tricky about it! And I love how the sleeve tabs are enhanced with a button. These easy details combine to give the top a unique look.

IMG_0448 (1)

I made this top out of cotton shirting (a remnant in my stash), and the sleeve and sleeve bands are both from cotton lawn. Both fabrics are a dream to sew and I love the easy fit of this top.

In fact, it was such a success I decided to…. (Drum roll….) make a pair of pants to go with the top. Yes, pants do intimidate me, but I’m taking a ‘jeans’ class and have just enough knowledge now to be dangerous (LOL). I used  a linen/cotton blend with a touch of lycra for that I purchased at Fabric Depot. It’s light weight but crisp, perfect for traveling.

IMG_0461 (1)

The pattern?  Butterick 6327, new this Spring from Katherine Tilton.

IMG_0444 (2)

The pattern instructions are well written, making the construction easy. As usual, the challenge is in the fit, and, as usual, I’m not entirely pleased with the result. Gaping at the knees! A ‘smile’ line at the crotch.  Argh! That being said,  I think these issues are more about my ability to tailor a pattern to fit my body shape than with the design of the pattern itself.

IMG_0450

Maybe I can adjust the leg side seams at the knee to tighten things up a bit? Not sure how to fix the smile lines? I do like how the pants taper at the ankle. Personal preference, but I think pants that come in a bit at the ankle are more flattering. Of the two projects, I’m guessing the top will get more wear than the pants, but we’ll see. These projects reminded me of one thing…I do so love sewing with crisp, cool cotton. It’s one of the best things about Spring!

The Monthly Stitch is having a Floral challenge this month, inspiring me to use two different florals for the sleeves and sleeve bands on my top. Pop on over there to see all the wonderful makes! It’s such a great community…so much there to explore.

I hope your Spring sewing projects are pleasing you! I’d love to hear what you’re doing. Any advice on how to get rid of the baggy knees and smile lines on my pants is appreciated. Happy sewing and thanks for stopping by!


Sew Boho: Bell Sleeves and a Cardi-Vest

IMG_9942 (3).jpg

I’m calling this look ‘boho’, even though some might call it ‘romantic.’ The top has bell sleeves, my favorite look this Spring. I love them because they signal warm weather and outdoor concerts and summer food festivals, you know?

IMG_9332

Here are a couple of ready-to-wear examples for inspiration; a top by Elizabeth and James, and a dress by Alexis.  Love the lace combined with the bell sleeves.

Maybe I’ll make my next version of this top from lace. The pattern I used is McCalls 7285, a semi-fitted, pullover top with a back neck opening, button/thread loop, and narrow hem.

Although the pattern does include a lined version to be used with lace, I chose to make the unlined version (the neck is finished with a facing) and serged the seams. I was able to cut my usual size and found that the pattern fit well, with very little adjustment (just my usual narrow shoulder adjustment). The only issue I had was the length. Even though I am petite (5’3), the cropped length was so short on me, I could only take a narrow hem. If you’re taller, it might be much shorter on you. The sleeves are a dream to sew, much easier than you might imagine. The bell shape is created by gathering a long wide piece of fabric that’s added to the bottom of the straight sleeve and the instructions on how to do that are really clear. The top doesn’t have a zipper, just an opening in the back, so it would be a good pattern for a beginner. I love the easy comfortable fit of this top and plan to make another soon. It’s a fast, easy sew, perfect to make in a weekend!

IMG_9311

Since Spring days around here are usually quite cool, I decided to make a long loose vest to go over the shirt.

IMG_9842

I’m really loving the ‘long vest’ look this year. It’s the perfect layer over a tee, a shirt, even a dress. The pattern I used for my vest is Burda 10/2014 #113, a long coat pattern that I made without sleeves. The fabric is a double-sided jersey knit from my stash. To finish the edges, I used a very tight serged stitch, but you could bind the edges too. On my version, I went with the serged finish because the binding changed the way the fabric draped, and this pattern definitely needs ‘drape’. It’s so easy to sew, you can make it in a couple of hours. It’s basically a circle with some holes in it… can’t get easier than that. But watch out. When the wind catches the vest, it becomes a sail and you fly away!

I found this fun pattern after seeing Helen’s version at Gray All Day. You should check it out…love her cool, breezy look. Her lightweight version would be perfect for summer (or anytime if you’re lucky enough to live in California). Whatever fabric you choose for your vest, I’d suggest that you keep it pretty light with a nice drape so that it hangs nicely. Also, if you want to add bell sleeves to another shirt, Rhonda’s Creative Life has a great post on how to do that. Check it out!

Now, to round out my boho look, I need something else…maybe a different pair of pants? Or would you try a skirt with that top/vest? Hmmm, suggestions welcome! Oh, yeah, and I need new shoes!!!

Happy Spring sewing and thanks for stopping by!