Greeting Fall with two Isca Shirt Dresses

IMG_4339

Hi all. It’s been awhile since I’ve posted and I hope this finds you well! In September, I took a break from sewing for most of the month. We took a road trip through Yellowstone and the Tetons. During our trip, the hardest worker in my wardrobe was, hands down, my quilted Tamarack Jacket.

IMG_2734

I wore it everywhere, even hiking. The Merchant and Mills quilted cotton was just the right weight for cooler days, but also light and comfortable when it was warm. I hope there’s more of that fabric in my future! The jacket is so comfortable, I’m contemplating making another. (Here’s my previous post on the jacket if you’re interested.)

But on to the Isca Shirtdress by Marilla Walker.

IMG_4317 2

Before the trip, I decided a longer sleeved linen shirtdress would be a great travel dress. I couldn’t resist downloading the Isca Shirt dress, a pattern by Marilla Walker. It has a cool v-shaped yoke detailing on the bodice. And the pockets are perfection! Luckily, I had a big enough piece of linen in my stash.

To make the front inset stand out, I wanted the plaid to be on the diagonal, so I cut those two pieces on the bias.

IMG_4348

Construction was generally a breeze, but I did found the front bodice to be challenging. It’s meant to wrap over the shoulder apex and attach to the back bodice. That made it a very strange looking pattern piece! It threw me and I had to study the diagrams carefully to figure it out which pieces were seamed where. Once I saw the ‘light’, the construction was simple. My advice is to trust the pattern instructions, even though at first glance, it seems counter intuitive.

The fit is pretty forgiving (as in loose). I cut the smallest size but ended up taking in the side seams to adjust the volume of the skirt. If you’re between sizes you might want to size down. I shortened the length of the bodice by two inches because I’m short waisted.

I love, love the finished product. In fact, so much so, I quickly made another version out of a navy linen I bought last year in Rome (wow that seems like ages ago….).

IMG_1546

This linen is so wonderful to sew, and it has just the right drape for this project. You don’t want a stiff linen for this dress because of the gathers.

IMG_1643 2

I’m certain both dresses will get alot of wear once I have somewhere to go, LOL!

These are strange times and my routines have shifted in ways I never expected. Some days, I feel productive, and other days I seem to just be ‘marking time’. For me, having a sewing project to complete really helps. There’s something almost meditative about the process of making by hand. I feel so lucky to have a passion that makes me feel better and friends to share it with.

Happy sewing and thanks for stopping by.

#featured, #linen, #shirt-dress, #summer-wardrobe, #travel-wardrobe

ellegeemakes | October 11, 2020 at 1:25 pm | Tags: featured, linen, shirt dress, summer wardrobe, travel wardrobe | Categories: capsule wardrobe, dress pattern, linen, shirt dress, Uncategorized | URL: https://wp.me/p5M1Tl-4vk
Comment See all comments
Unsubscribe to no longer receive posts from Elle Gee Makes.
Change your email settings at Manage Subscriptions.

Trouble clicking? Copy and paste this URL into your browser:

Greeting Fall with two Isca Shirt Dresses


Summer Making Journal 2: a Patchwork top, Inari hacks and Free Range Slacks

IMG_1094
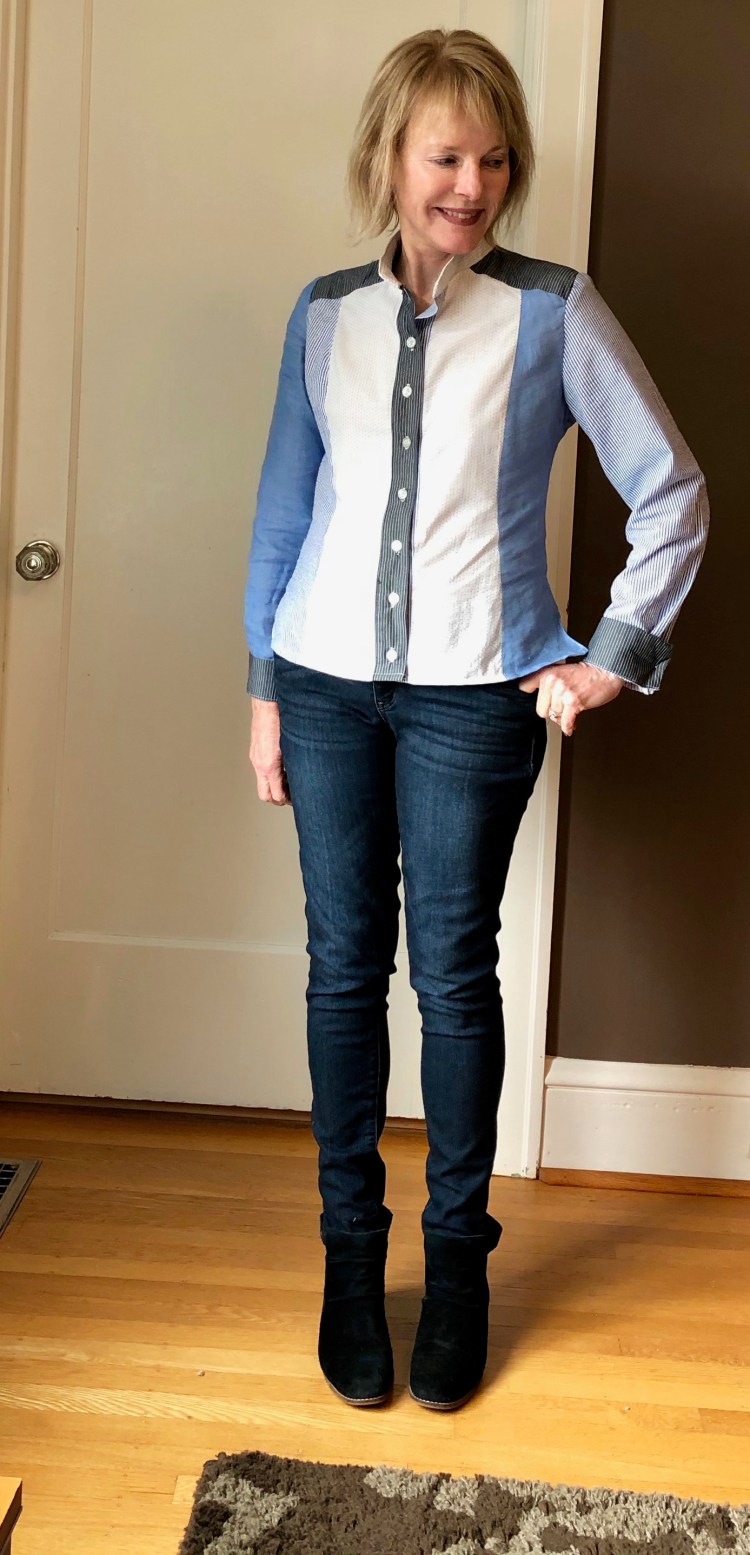
Hi all! July was a busy month in the sewing room. Recently, I cleaned my closet and donated several ragged tops (made so long ago!). I’ve been on a mission to replace them, while honoring a pledge I made to myself to use up my remnants. That pledge led me here…to my first pieced top.

IMG_1116I have never been able to throw away even the smallest scrap of linen. It’s too wonderful to toss! So, when the #JoinupJuly challenge started on Instagram, I was challenged to join up some of my linen scraps into a top.

The process of making a patchwork top isn’t difficult at all. Basically, with a quarter inch seam, you piece blocks and bits of fabric together, varying the colors. Then, when your pieced creation is large enough, you lay your pattern pieces on it and cut! My top is made using the Inari pattern from Named clothing(also made here). The lines are simple so it showcases piece work nicely.  It was so fun to figure out how to combine the linens into a pleasing pattern.

IMG_1185Here, I’m wearing my new pieced Inari with my first ever Free Range Slacks,a lovely pattern from Sew House Seven. I’ve been wanting to make these pants for ages. I used linen from my stash for this version.  I love the boxy shape of the pants, the cool seams and the deep pockets. But I found the fit to be more generous than I expected. Because the pants are high waisted and I’m short waisted, the fit of the rise was challenging. I’m pleased with the result, but my advice is to remember the loose fit when you’re choosing the size to cut. A toile would be a good idea too!

IMG_1153As you can see, the fit isn’t perfect yet. There are creases in the crouch. I’ll adjust the rise a bit more next time.

IMG_1339Here’s another Inari, this one with sleeves. I made this from rayon scraps left over from my Sew Over It Wrap skirt (see it here).I do love this rayon! It’s from art Gallery and it is so sumptious to wear. It flows so nicely too! This pattern, the Inari, is a keeper too, simple but stylish and so easy to modify to make it your own! The shorts I’m wearing are Simplicity 8841. This is a easy pattern with great fit! It has a elastic waist so you can make it quickly.IMG_1238I’m wearing my Inari here with the paper bag Burda shorts I made last summer (Here)…Love these! The linen just gets better with time. I wear them constantly!

My last Inari was also made from linen scraps, left overs from this summer dress.IMG_1274Again I used the Inari. Because I had oddly shaped pieces of fabric, I had only enough for a cropped version of the front and back bodice. So, I added a short peplum also pieced from scraps. Luckily the gathering of the peplum hides the many seams:). The sleeve bands are cut from a contrast linen.

That’s it for me for now. I’m in the process of cleaning and reorganizing my sewing room using Ikea modular shelves. And even though I recently reorganized my stash, I’m revisiting the scheme. Isn’t that the way it is with this hobby? It seems like there’s always a better way to organize your fabric, notions and patterns.

Stay safe and healthy. Happy sewing! Thanks for stopping by.


A Nano Iro Summer Coat

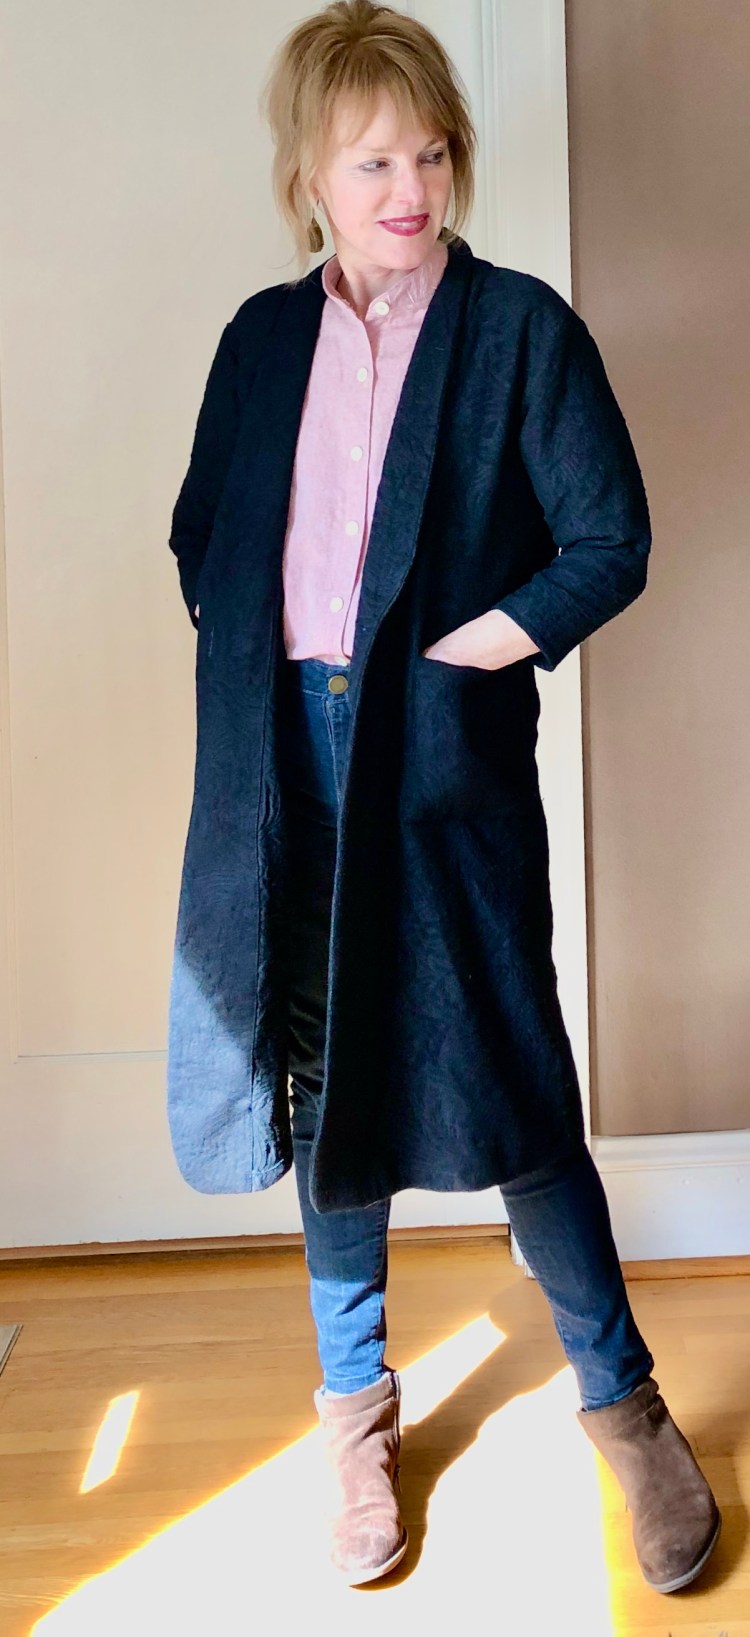
I told myself when the ‘stay at home’ time began, that I would use it as an opportunity to tackle sewing projects that were either time consuming or that had been on my to-do list for awhile. This project falls into both categories.

This coat is from the Nano Iro sewing book, by far my favorite sewing purchase of 2019! I love japanese sewing patterns, and here, they are conveniently translated. 

This pattern is called, appropriately, the summer coat. It’s unlined and best made in cotton or linen, two fabrics I can’t get enough of. I made it before, here and absolutely love wearing it. 

For this version of the summer coat, I used a really special piece of fabric I purchased in Rome last September at an amazing fabric store, Azienda Tessile Romana. 

If you visit Rome, do not miss this fabric store. The fabrics are gorgeous and when I visited, the staff was so helpful and generous with their time. You will not be disappointed. (Hopefully, we’ll all be free to visit there soon.) 

This fabric is a amazing cotton Jacquard and the texture is perfect for this coat (Black is hard to photograph, and these photos don’t do justice to this fabric!) It has just enough body to support the lapels and to give this loose-fitting coat a bit of structure. I wish I had more of this fabulous fabric!

Construction of the coat was easy. The lapels are cut into the coat, then faced. The trickest part for me was the neck facing. Even though I’d made this pattern before, I must admit, I struggled! The diagrams in the instructions helped, but for some reason, it was counterintuitive for me. I couldn’t make the facing fit to the jacket. Eventually, I realized it was because I was trying to fit the wrong side of the facing to the neck opening. Once I came to terms with that, it fit easily. 

I do love this jacket. In fact, the patterns in this book are all on my to-do list. The photos in this book are inspirational too. The fabrics they chose are enviable – – double gauzes and linens in bright colors.  I’m so glad I ticked this coat off my to-do list as it will be absolutely perfect to wear on cool Spring days.

Next up is a Tamarack Jacket. I hope to show that to you soon. 

Sewing is helping me to get through these strange days. Good health and happiness to you all. Thanks for stopping by! 

A Wiksten Haori in Kantha Cloth

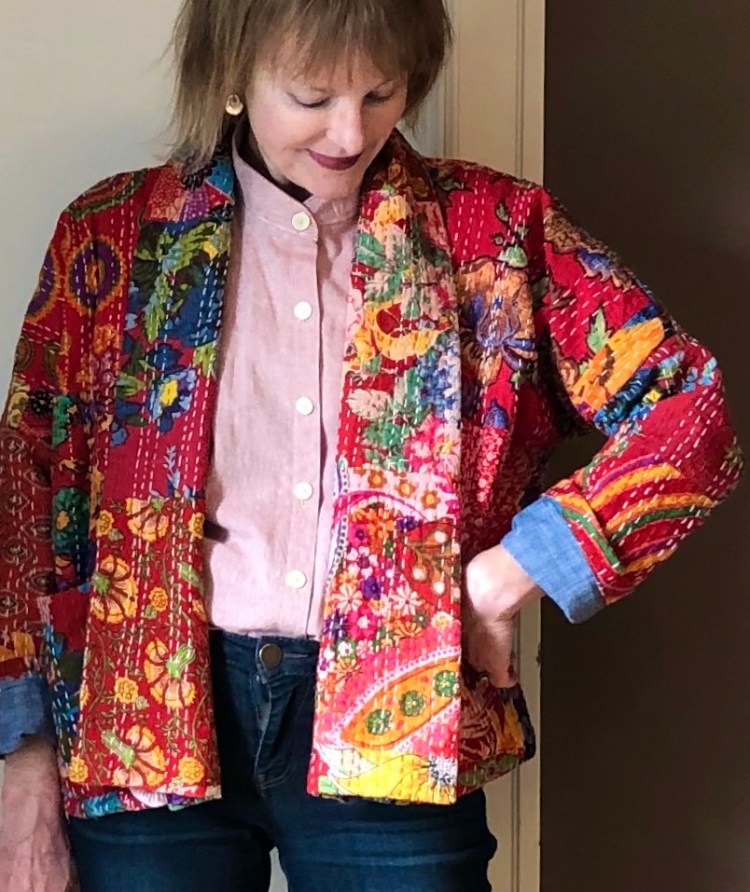
I don’t know about you, but I’m craving a bit of ‘normal’ right now. So let’s just dive into the details of this new make, a Wiksten Haori jacket. 

If you haven’t tried this pattern, you’re missing out on some fun! It’s a chance to use your favorite fabrics in a way that makes them so wearable. This is my third Haori (others posted here and here), and I’m sure there will be more. 

This is an unstructured, loose-fitting jacket with three length variations, short, medium and long. I prefer the short, cropped version on me as I really like the proportions, but I’m in love with some of the longer versions I’ve seen in wool, so I might try one of those too. 

This jacket looks more complicated than it is. If you can sew a straight seam, you can make this jacket. Yes, it is lined but that’s nothing to worry about because creating the lining is simple. You just sew another jacket from your lining material and attach the two at the bottom seam.  The only modification I made to the pattern was to leave the interfacing out of the collar band as my fabric was stiff enough.

The beauty of the Haori is that it really allows the fabric to shine. My fabric is a Kantha cloth. I found a piece at Modern Domestic then found a bit more  at Cool Cottons, here in Portland. It’s amazing fabric with beautiful colors and the layers of cloth are stitched together with a long quilting stitch. It makes me happy just looking at it!  I’m wearing it with the linen shirt I made from a japanese pattern book (posted here.) I think they work well together.

Sewing is such a stress reliever for me. In these challenging times, I’m grateful that I have a pastime that comforts me, and a community to share it with. Hang in there all, and thanks for stopping by! 

Sewing a Patchwork Shirt from Remnants

If you’ve been sewing for as long as I have, you’ve likely accumulated a large stash of fabric remnants. I find it hard/impossible to part with the lovely leftover bits when I’ve finished a project, so my remnant stash is HUGE, and overwhelming. Recently, I decided to sort and catalog the pieces. That’s when I made a lovely discovery… the colors and textures all work together.

So I decided to use the pieces to make this shirt.

Pattern: For my project, I used a tried and true shirt pattern so that fit would not be an issue. McCalls 6124 has a back yoke, two piece sleeves, a collar band and princess seams…so many opportunities to explore!

Process: Because I patchworked both the front and back, I was able to use three types of shirting and three colors of linen, about a quarter of a yard of each. Sewing was easy as I’ve made this shirt a time or two.

The best part of this project was figuring out fabric coordination and placement. In fact, I enjoyed it so much, I had a ‘moment’ when I imagined myself as a quilter. (Just what I need…a new reason to accumulate fabric, LOL!!)

I’m pleased with my shirt and am so glad my remnant stash has shrunk a bit. The good news is my shirt works well with the denim skirt I made a couple of years ago, so I know it will be worn again and again.

Of course, I’ll still be on the look out for new ways to use my lovely leftovers, so if you have ideas…please share!

Although I’ve had a bit of a challenge easing back into sewing ‘post vacation’, I’m definitely inspired by the Fall colors here in Oregon. Our cool weather has me thinking about sweaters and jackets and coats…ideas are brewing! How about you?

Happy sewing, and thanks for stopping by.

Italy: My Favorite Linen Travel Dress

Hi All! I had a wonderful trip to Italy and am now easing back into real life. I’m still battling the effects of the 9 hour time difference, but last night I slept through the night so things are looking up!

Although the weather here in Portland is a bit on the cool side, I wanted to share the dress I wore the most in Italy – – a linen dress that I finished the day we left, LOL!!! As usual, I decided at the last minute to add a dress to my travel wardrobe.

These photos were taken in the Villa Cimbrone Garden in Ravello Italy, a breath taking town perched on a cliff high above the Amalfi coast.

This linen dress was my go-to garment on the trip because the weather was warmer than expected. I thought I’d wear this dress with a tee shirt under it to protect my upper arms from the sun, but it was hot so the tee shirt stayed in the suitcase. I chose to stand in the shade often and managed to avoid a sunburn.

Dress Construction – To sew this dress, I modified my favorite loose fitting top pattern, the Grainline Hadley. The cut of this top is so flattering on everyone I think, with two neck options to choose from.

For the dress bodice, I used the sleeveless Hadley without the back pleat and lengthened the Hadley bodice by 6 inches. This became the A-line shaped bodice of the dress, complete with high – low hem.

The back button placket is a non-functional add on, just for looks. To make it, I sewed together two long strips of fabric then added buttons. After the placket was in place, I focussed on drafting the skirt. I cut two huge rectangles, that were 1 and a half times the bottom width of the Hadley. These I sewed together, then gathered and attached them to the bottom of the bodice. That’s all there was to it.

Fabric – Linen was the perfect fabric for Italy. It made me comfortable no matter what the weather. Personally, I could care less about the wrinkles. For this dress, I used a solid blue linen from my stash, purchased last season at the Mill End Store. The striped linen is from Joann’s.

This dress is so fun to wear!

Swinging wasn’t in my vacation plans, but when you’re on the Amalfi coast, why not? I enjoyed wearing linen so much on my trip, I’m determined to find ways to sew with it year round! Any thoughts on this idea?

Sewing plans – As the travel fog lifts and I put away my summer clothes, I know I’ll be inspired to sew a few fall things. I hope there will be a new trench coat, maybe a short wool coat too so watch for those posts.

Happy sewing and thanks for stopping by!

Travel Mix and Match: Burda Culottes with Two Linen Tops

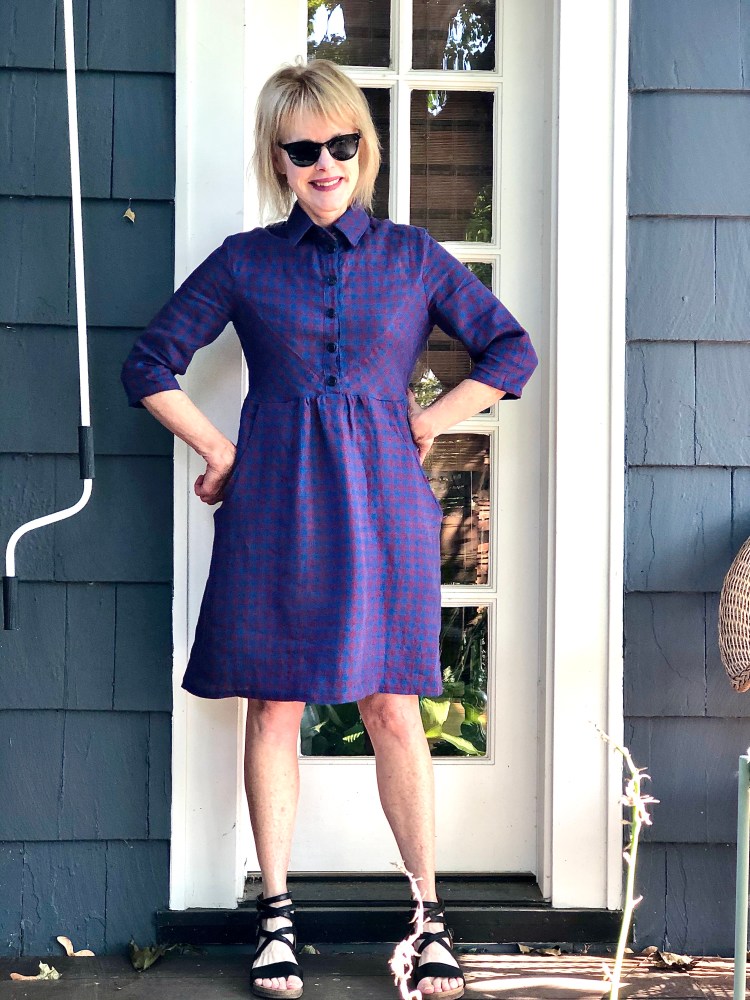
Hi All! In two weeks, I’ll be traveling to Italy, and there’s nothing like a deadline to get you motivated to sew, sew… SEW. Although I love to travel with dresses (this linen Burda will go with me) I’m going to stretch my options a bit by packing a few mix and match separates too.

IMG_2967.jpeg

Burda refers to this pattern as shorts, but I consider them to be culottes. I love the wide cut in the leg contrasted with the paper bag waist. This pattern was in the Burda magazine (07/2019 #107A) and there were only TWO pattern pieces to trace…Yahoo! Because I was going for the culotte look, I lengthened them by two inches. Cut from linen, I think they’ll be perfect for Italy’s soaring temperatures.

107_large.jpg

The paper bag waist is formed by pleats that are stitiched down at the waist. I decided to add a belt to make the waist more dramatic when I wear them with a shirt tucked in.  I also added in seam pockets – – honestly I can’t live without pockets!

IMG_2897.jpeg

I’m wearing the culottes with my new Cuff Top by the Assembly line. I love this pattern. It’s simple but unique with sleeves that are gathered at the cuff by wide elastic. Because the sleeves are cut as part of the bodice, it’s really pretty easy to put this top together. The design details are what make this top special to me…the front seam (flat felled and top-stitiched with a double needle) and the wide boat neck (also topstitiched with a double needle).  Because the front of this top is seamed, you could use contrasting fabric to great effect. I’m imagining another version in a stripe! This fabric is a lightweight gray linen, which should be perfect in the heat. 

My second travel top is also made from linen, New Look N6601. 

IMG_2816This wrap top looks much harder than it is to sew. The neck is pretty simple…faced with bias binding.  Luckily, I had enough fabric to make my own. If you’ve never made your own bias binding, I highly recommend it.  It’s really a easy way to make the inside of your garment special. If you’re curious, check out the many tutorials on U-tube. IMG_3066.jpeg

Fit can be a bit tricky for me with wrap tops, but this is drafted so well, I made a slight adjustment for narrowed shoulders and called it good.

I’m really pleased with these additions to my travel wardrobe…there’s nothing like some new pieces to really heighten your anticiaption of a trip!

I know linen wrinkles, but I’m determined to travel with it anyway. It’s perfect for hot weather, and I’ll pack a portable clothing steamer for a quick touch up when needed. I still plan to sew more items for the trip, but time is running out……fingers crossed that I persevere!!  Happy sewing and thanks for stopping by.


My ‘go-to’ outfit: wide leg pants and a safari style top

IMG_2448 2

Each season, there’s one me-made outfit that seems to rise above the rest. This one is it! A pair of cropped, wide-legged pants and a linen Fringe top – -nothing unusual or particularly earth shattering about these makes. Yet,  I find myself reaching for them over and over again.

Honestly, these pants are the best thing I’ve made in a long while!

IMG_2366

Like every other sewing blogger, I have fallen in love with wide legged pants.  They have the double appeal of being stylish and easy-to-wear.  The fact that these were an easy ‘sew’ is the icing on the cake!

8841.jpg

Simplicity 8841 is an easy-to-sew pattern with a elastic waist and huge pockets. There’s a straightlegged version and a wide legged version, cropped or full length. I went for the wide-legged cropped version, a look I’ve really grown to love.

IMG_2442.jpeg

I chose lightweight cotton chambray for this version. The fabric is so soft, these pants qualify as secret pajamas for sure! There are belt loops and a belt as well, so if I want to tuck something in, the elastic waist is well hidden.

This modified Fringe top is the perfect mate for these pants.

IMG_2441.jpeg

If you aren’t familiar with Chalk and Notch’s Fringe blouse/dress pattern, I can highly recommend it! It was the darling of Instagram for a while, and I fell in love with the many variations I saw there. Search the #fringedresspattern hastag on Instagram and you’ll see what I mean!

To make my top, I modified View A to give it a bit more of a Safari vibe. I left the upper bodice and neckline as designed (and they fit like a dream!).  Then, instead of gathering the bottom bodice panel,  I cut it to fit the measurement of the upper bodice lower seam, plus a seam allowance. I also drafted darts on the lower bodice to mimic those on the upper bodice. The pattern suggests you insert the ties in the side seams or in the back bodice darts. I chose to put them in the back darts, and I think that’s part of the reason the bodice fits so well. I love the sleeve cuffs and the button tabs.

IMG_2435

The appeal of this pattern for me is the lovely v-neck and spot on fit of the bodice. I’ve already cut a dress version, and am interested in another top, likely another modified version. Yes, I was late to the Fringe dress party, but better late than never. This pattern will be a tried and true that will take me into Fall as well.

Fall sewing is on my mind, as well as a few added wardrobe items for a trip to Italy in September. My sewing machine is fired up and ready for a marathon of projects this month, so watch for more blog posts. There will be a few….:) Happy sewing and thanks for stopping by!

Linen Tablecoth Top for #scarfrefashion and #so50vintage

IMG_2015

I have a love/hate relationship with Instagram, I must admit. I love seeing everyone’s makes but I find the limitations imposed by the IG algorithm to be so frustrating. Sometimes, my feed is so edited by Instagram, I don’t see the content I choose. Nevertheless, as you all know, I do love a good sewing challenge and Instagram is full of them! So, I will stop complaining and get on with it….:)

IMG_2046

This linen top (a bit wrinkled having just been worn) was inspired by two sewing challenges on Instagram: the #scarfrefashion challenge (includes tablecloths too) sponsored by @sewstoney and @sewdalaridada, and the #so50vintagechallenge. I happened upon a vintage linen tablecoth with beautiful cut work and mitred corners at a estate sale. I’ve made tops from tablecloths before (here and here) so I knew this one was perfect for a top. I couldn’t resist giving the challenge a whirl.

With a little over a yard of fabric to work with, my style options were a bit limited. After perusing my extensive (!!) pattern stash, I came upon Simplicity 8090, a pattern from 2016 that has all sorts of possibilities.

I chose view C because it doesn’t take alot of fabric and it’s cropped, which allowed me to use the finished edges of the tablecloth as the hem for the top.

The pattern was so easy to sew. The sleeves went in perfectly. The front placket was really easy because I used the finished edge of the tablecloth for that. I only made one modification – I added a collar stand.

I do love the french darts on this top. They look so crisp in linen.

IMG_2008

This top has a seam down the back so I positioned the bodice pieces so that the tablecloth’s cut detailing would be on either side of the seam. I cut the sleeves to use the tablecloth detailing and hem too.

IMG_2045

The inside of the shirt looks fabulous because the hem of the tablecloth finished all the seams for me, LOL!!

All in all, it was a fun project, and I’m pleased with how it turned out. The biggest challenge was the laying out the pattern properly, of course, but the extra time involved was worth it.  I do love the boxy cut of this top and know I’ll use this pattern again. Vintage linen is so lovely to work with, I’ll never be able to resist an old tablecoth again!

IMG_1977

Are you taking on any sewing challenges this summer? Let me know so I don’t miss it! I love seeing everyone’s makes….

Happy sewing and thanks for stopping by!

The Last Sewing Blogger to Make the Burnside Bibs

IMG_0889.jpegI’m very late to the party here.

I bought the Burnside Bibs pattern by Sew House Seven when it first came out. I had big plans to make them ASAP.  Well, that was three years ago and, YIKES, I’m just now getting around to trying them. I hesitated to be honest. I really loved the style, but had so many issues floating around in my head. As a member of the #SewOver50 community, was I too old for the style? Would they look okay on my short waisted figure? Would I be comfortable wearing them?

IMG_0887 2.jpegWell, all of the angsty thoughts and questions completely disappeared when I began the construction process. Honestly, it was so fun! This project ticked all the boxes for me – – topstitching galore, interesting construction details like belt loops, pockets, and a self faced bib. Then there was the fabric…I used a lovely blue linen from the Mill End store, that is absolute heaven. So, I threw caution to the wind and went for it.


Burnside_Bibs_front_cover_website_1024x1024@2x.jpgConstructing these bibs was a bit time consuming.  I cut them one evening and then sewed them the next day in a marathon session. I love pushing through a project like this…you can get completely absorbed in it! The instruction booklet from Sew House Seven was really wonderful – – lots of illustrations that made it fairly easy to understand.


IMG_0746 2.jpegChallenges – – well, the biggest one was figuring out what size to cut. I perused Pattern Review, several blogs and Instagram to see what my fellow sewists had to say about this topic. On their advice, I made view 1 which is the more fitted version with the invisible zipper on the side. I used my measurements to select a size and it turned out to fit well in the crouch and waist, but was a bit baggy in the hips so I tapered down a size there. This is a common adjustment for me in patterns, and I’m happy with the result.


The construction of these bibs is a bit out of the ordinary, so I didn’t/couldn’t binge watch TV while I made these, LOL. Small price to pay though. They are so fun to wear. I love how the tie ends criss cross in the back and slip through the belt loops. As you pull them to tie them, the waist area cinchs a bit more, which makes the fit really nice. I chose to tie them at the side but you can tie them at the front or back as you prefer.

IMG_0757.jpegI cropped them a bit more than the pattern suggested as I really want to be able to enjoy these in steamy Italy when I travel there later this summer. When I wear them, I’m really comfortable!!  I don’t think twice about the age appropriate issue anymore because, well, I love them and we all deserve to dress as we wish, don’t you think?

IMG_0765 3.jpegIf you’ve hesitated to make the Burnside Bibs as I did, my advice is…go for it. It’s such a pleasurable journey.

Happy sewing and thanks for stopping by!