New Pattern: Sew Over It Kitty Dress

IMG_6897

As a Sew Over It Pattern Insider, I had the opportunity to test Sew Over It’s latest pattern, the Kitty Dress. I love a good shirt dress (here and hereand this one is perfect with lots of design details and options that make it unique – a shawl collar, a gathered or paneled skirt, and your choice of sleeves or no sleeves at all.

IMG_6724

It’s the design of the Kitty dress that makes it tick all the boxes for me. It’s so versatile- – two bodice and skirt styles that you can mix and match!  You can choose a princess seam bodice or a two-dart bodice. Both choices can be paired with one of two skirts: either paneled or a gathered option.  Both skirts feature in-seam pockets, and all versions are cinched in at the waist with a waistband, which makes them look great on everyone.

If I had to rate the difficulty of this pattern, I’d say it’s a great option for an intermediate sewer, or for a beginner who wants to learn some new skills. The instructions are detailed and helpful, so it’s easy to dive right in!

IMG_6920

It’s no secret that I love sewing patterns that give you options so that you can play and modify as inspired. At first, since I’m a fan of a bodice with princess seams, I was drawn to option 1, but when I made my fabric choice, I changed to option two. My rayon print is colorful, and I felt the princess seam detail would be lost in the fabric’s design. So, instead, I paired the double-darted bodice option with the gathered skirt.

I love long flow-y dresses in the Spring and Summer, so I made my Kitty dress from a lovely rayon from Joanns’. This rayon has a bit of texture to it, giving it a casual crinkled look that I love. The drape of this rayon is perfect for my mid-length Kitty because it gives the skirt some swish! For added style, I chose the shawl collar, which has a bit of a vintage vibe.

IMG_6716

The double darted bodice was easy to sew – -just two pattern pieces, both shaped nicely by bust darts and waist darts. Because I have a large waist relative to my bust measurement, I made a test version to make sure the fit was accurate, and I’m glad I did.  I quickly realized the darts needed to be widened slightly to compensate for my non-standard waist.

Fitting the gathered skirt was easy. I used my hip measurements to choose the size to cut and it worked great without adjustments. Gathered skirts are so forgiving and so easy to sew!! I love the way this skirt looks and swishes in the mid-calf length. It’s all I was hoping it woud be.

IMG_6912

I love my Kitty dress, so much, version one is in my sewing queue( princess seams and sleeveless), maybe in a cotton lawn or linen for summer. The updated version of the Kitty is available at Sew Over It now.

The weather here in Portland is improving – I hope to take my Kitty outside for a test run soon!

Happy sewing and thanks for stopping by.

.

Sew Over It Meredith Wrap Dress

IMG_6124

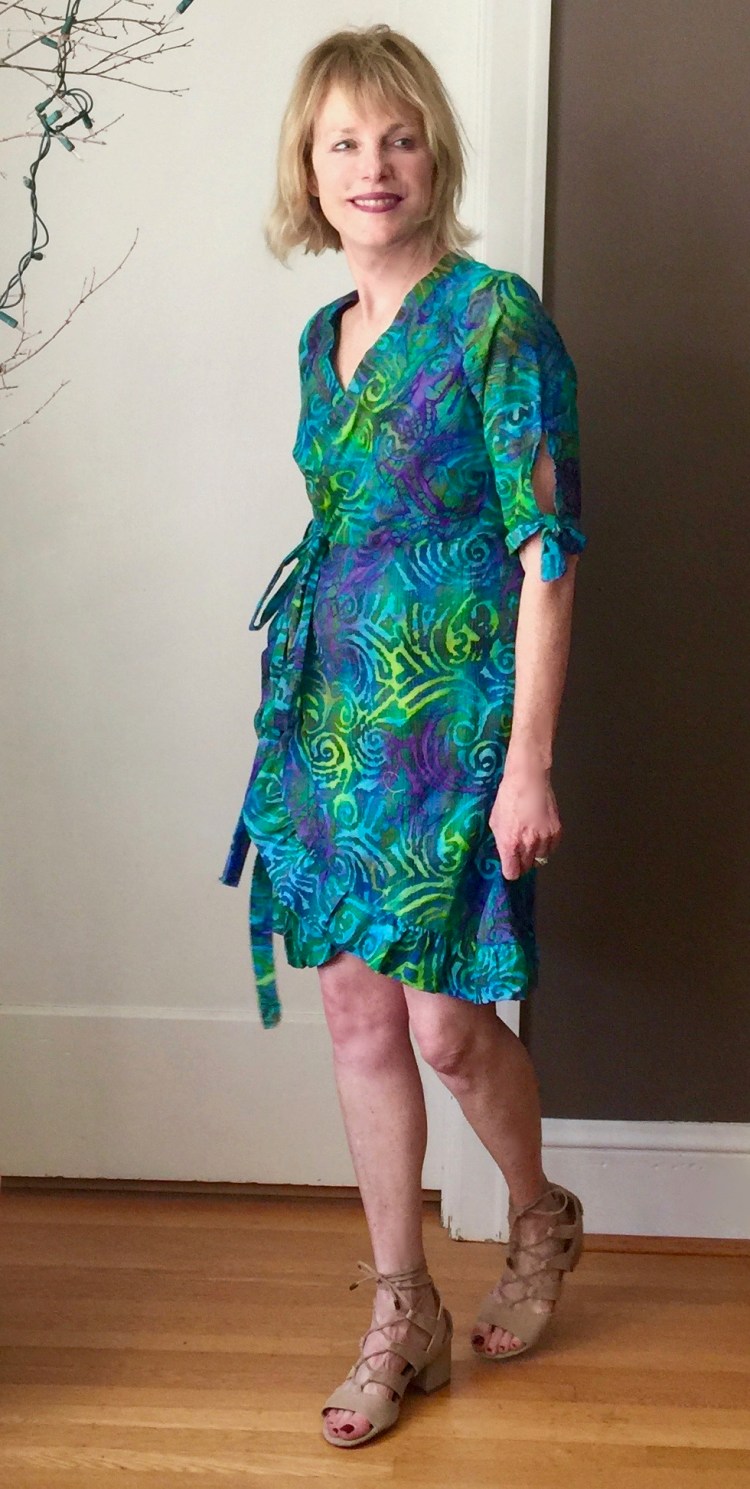
I was so pleased to be invited to be a Pattern Insider for Sew Over It patterns. I’ve been in love with their designs (especially the awesome Cocoon Coat here) so I’m excited to have the opportunity to show your their new release patterns here.

IMG_6102


The Meredith Wrap Dress was love at first sight for me. I do love a good wrap dress and this one did not disappoint. It comes in a short and love version with sleeve length variations.

I made the longer version, probably because the weather has been so cool here lately. As summer heat rolls in though, I might be inclined to shorten this hem a bit.

IMG_6130I’m so impressed with the fit of this dress! There isn’t a gap at the front and the neckline is just right, not too low like some patterns. I cut the size my measurements indicated and it fit perfectly, without any adjustments, always a win if you ask me:). Assembling the dress is pretty straightforward. Unlike some other wrap dresses I’ve tried, this pattern has one long front facing which makes it easy to stitch this dress together quickly. The two front bodices are mirror images of each other (rather than one bodice cut wide and one narrow to make the wrap), so the wrap closure is secure and comfortable to wear. The sleeves set in beautifully.  The tie is attached to the front facings before they’re stitched together.


IMG_6085I made my dress out of a soft jersey that I found at Modern Domestic here in Portland (also on-line). It’s the loveliest fabric to wear and sew with – – if only I could wear this dress all the time. It has just the right amount of two way stretch for the Meredith Dress. Really, any stretchy knit will do! I could imagine this in a silky rayon knit, or in a scuba knit too.

IMG_6098

The Meredith gets a big thumbs up from me, and there will likely be more of these in my future. I love my print jersey version, but could see this working well in a solid color. It would make a very elegant little black dress don’t you think?  Hmmm… The Meredith was just released, and it should be up on the Sew Over It website now.

Happy sewing and thanks for stopping by.

Disclaimer: As a Sew Over It Pattern Insider, I receive a free pdf copy of the pattern in return for my review, but the opinion expressed here is mine:)

Sew Bibs with Simplicity 8610

IMG_5150There’s nothing like a community sewing challenge to motivate me to complete a project that’s lingered too long on my to do list. This pinafore pattern has been on my wish list since I made the jumpsuit version last Spring (here). It took the #sewbibs challenge to push me to get it done! (more about the challenge here)

My pattern is Simplicity 8610.

I love the big pockets, topstitched front band, buttoned straps. But if this doesn’t grab you, there are many other pinafore patterns to explore. Here are a few that are on my wish list right now.

The York Pinafore from Helen’s closet

york_pinafore_10

The Dani from Seamwork

sw3093-dani-01-large-1d45fe69fcb7935303658eef9020e3c945df0ae16c0f1ec38a6c182a7fe42449

Simplicity 8641

I chose Simplicity 8610 for the big pockets, front gathers and the cool bodice band detail. Also, I love the size of the straps, a detail that can make or break this design for me. If they’re too narrow, they’re uncomfortable, but these are just right.

IMG_5250

Construction – I cut the size indicated by my measurements and there were no surprises or adjustment’s needed. (Size options are from 6-24).  The construction of the bodice is pretty easy and fast to put together. Although I made my jumpsuit version from a rayon crepe, I decided to make my pinafore from a cotton, and I’m glad I did. I think the cotton gives the pinafore a bit more structure which works well to support the gathered details and the fabulous pockets (a must on a pinafore, don’t you think?).

IMG_5176

One of the nice things about this style is that you can wear it with a long or short-sleeved top under it which makes it a great layering piece. It’s still cold and rainy here, so I chose a long sleeve, but come Spring, I’ll happily wear this with a short sleeve top, or maybe even alone.

IMG_5192I’m such a fan of the pinafore style. I think it’s perfect for casual wear about town, or as a travel wardrobe item that you use as a layering piece. I know there will be other pinafores in my future, and since the challenge is on until April 12…would love to finish another before then:)

There are so many inspiring bibs and pinafores on #sewbibs on Instagram right now. Do you have a favorite bib sewing pattern to recommend?

Happy sewing and thanks for stopping by!

Burda Style Cocoon Dress

I have to admit it…There was very little forethought behind these two new ‘makes’. I made these cocoon dresses on a whim….merely because I thought they would look pretty good with my new Cocoon coat (here)! Shallow…but true. Now that the 2018 RTW fast is over, I’m feeling quite free. I can sew anything I want without a single thought about whether I ‘need’ it to fill a hole in my wardrobe or not.  Frivilous sewing is the life for me!!

I’m such a sucker for a good knit dress in the winter, so if anyone waves a pattern in front of my face that gives me an excuse to make yet another one, I’m all in. And this one has pockets, which makes it perfect!

img_0891

I absolutely love a dress with side seams that wrap around to the front. I’m a big fan of stand up collars too….so Audrey Hepburn!

img_0872

Burda Style patterns have never been on the top of my list because they come in a magazine insert, so they all have to be traced onto pattern paper before they’re cut and sewn, and, well, I hate tracing patterns. I’d much rather buy a paper pattern, thank you very much. But the design of this dress was too good to pass up. So, I put on a binge worthy show just did it. This Burda Style pattern (1/2019/111) was worth the effort.


I loved the pattern so much I made two versions – – one from a soft, ‘poppy’ colored sweater knit I bought at the Mill End Store, and one from a textured sweat shirt jersey that I found at Joann’s (on sale!).

img_0905

img_0867

It’s always interesting to see how different a dress/pattern looks with a two different knits. The gray textured jersey is a heavier moderate stretch knit so the dress and collar look more structured in that fabric. The poppy knit is so soft with a bit more stretch so the fit is loose and easy.

The dress went together easily. The collar is cut as part of the bodice so that makes things simple. The shape of the dress is created by the forward placement of the side seams. The hardest detail is the zipper at the back. Fitting is pretty straightforward…you can modify at the side or center back seam. I used a double needle for the sleeve hem and dress hem.

I love the neckline and the cocoon shape of this pattern – obviously, I’ll likely make it again. And the best part? Both dresses work under my new coat:)

img_0949 2

It’s always fun to follow an intense project like a coat with a less involved project, a palate cleanser! To be honest, the tracing of the pattern wasn’t as bad as I expected…really went pretty quickly and I’m getting better at figuring out all of those crazy lines on the magazine insert. So, there will definitely be more Burda Style makes in my future.

I  hope your New Year has had a strong start. I’m excited about all of the sewing happenings this month – – the Pattern Review Sewing Bee started this week. I’m not participating this year, but I love watching the fun. There should be lots of inspiration there. I’m hoping to make something for Sew Japanese In January, and there’s the Day/Night Dress Challenge coming up next month, hosted by Elizabeth Made This! Lots to look forward to…

Happy sewing and thanks for stopping by!

My #Sewing Top Five Misses 2018

Each year, I enjoy a review of my #Sewing Top Five Misses almost as much as my best top five. I always learn so much from my mistakes. So without further ado, here they are!top-5-of-2018.

IMG_0169

  1. Vogue top – Okay, when I made this,  I felt pretty clever because I constructed this top from odds and ends in my fabric stash. Ha! It’s such a mashup of colors and textures, I feel oddly distracted when I wear it. What was I thinking? New Motto – – keep it simple. To the donation pile!

IMG_3804

2. Aernite pants. I really loved these when I made them, but the color of the linen turned out to be problematic. It didn’t really work with anything in my wardrobe and it made me feel blah too. Lesson learned….I will avoid peachy beiges and tans in the future.

IMG_7747

3. The Darling Ranges dress by Megan Nielsen is a new favorite (I made three (3) versions!), but this version did not work for me. Again, the issue is the color of the stripes in the linen. It’s too peachy for me. Also, I think the dress is too long(?) so I feel rather frumpy in it. So many problems here. Ugh. The embroidered linen is so gorgeous though…too lovely to part with. I’m going try to modify the dress (shorten it to a top?) or reuse the fabric in some way.

IMG_5665

4. Simplicity Vintage top: What? you say. But this one is Blue! How can it be a miss?

This top is a clear miss because it’s so annoying to wear. I kid you not. Because it’s basically a wrap top with only a front and back panel, it depends on the tie to hold in the sides. That means when the tie loosens as you wear it, you enter the danger zone. If you don’t run off to a private place to re-tie, you will soon be showing all sorts of things best left covered.  Bummer as I made three of these. Thumbs down on this one….to the pile!

IMG_3283

5. Long Kimono top; I should love this one…the fabric, the kimono style…but I’ve never worn it. I cannot seem to find an appropriate venue/occasion. There’s something so awkward about it…maybe the length? A head scratcher for sure because I do love, LOVE this fabric so much and the style gets a big thumbs up from me.  Maybe I’ll shorten it next summer or recut it as something else. Hmmmm. I’ve got some thinking to do on this one.

Lessons learned – –

  1. Fabric in tan or beige-y tones is a no-no for me. (sigh).
  2. Avoid patterns where the design includes an element that might potentially be awkward or where you might be naked if it comes ‘undone’, LOL!
  3. Even though I love the look of a long cardigan or kimono, long isn’t always that easy to wear.
  4. Fabric that isn’t in my color palate is best left behind.
  5. Simple fabric, simple designs…they always work!

Well, that pretty much sums up the good and the not so good of 2018. I have no complaints. All in all, it was a very good year. That being said, I’d like 2019 to look a bit different. I’m hoping for some new creative adventures to sweeten my sewing experience and am thinking a lot about how to make that happen.

A fresh year, a fresh start. How was your 2018?

Happy sewing and thanks for stopping by!


An Easy DIY Knit Dress

IMG_8946

My love of swinging drop waist dresses will never die! Another drop waist look here)

IMG_9039

Knit dresses are go-to items in my wardrobe. They’re so easy to wear and to dress up so that they fit all occasions. I was really pleased and somewhat surprised when I found this yummy heathered gray knit at Joann’s. There are many (!!) great fabric shops in Portland (although one of my favorites, Fabric Depot just closed their doors last week), that I’m always surprised when Joann’s has the perfect option for me. I guess it was inevitable as they seem to be stocking lots of knit options these days!


The pattern for this swingy dress is New Look 6525. il_570xN.1674841253_rgvq

As you can see from this photo, the swingy nature of this dress is created in large part by the width of the bodice and skirt.IMG_8991 2

For me the trick to successfully creating the look I wanted was to keep the loose shape, while also making sure the bodice fit well in the shoulders and bust. To do that, I graded between two sizes, small size on top, widening at the hips a bit.

It’s really a fast, fun make – – you could easily do this in an afternoon! My knit is very light weight, a must to achieve the swingy look of the skirt.

IMG_9035

It’s pretty windy here in Portland and this dress really moves in the wind:), which is awfully fun!

There weren’t too many challenges with this simple make. The trickiest bit was attaching the skirt. To create the ruffled look at the bodice/skirt seam, you finish the top edge of the ruffle then attach the wrong side of the ruffle to the right side of the bodice. Sounds easy, but getting the placement right (and even) required lots of pins and a bit of patience. I think the look was worth the effort though!

IMG_8908

Mitchell can’t resist a photo-op. He’s getting so big!!

I seem to be all about fun, easy sewing right now. I’m sure the phase will pass, but I’m not really into wearing fussy clothes right now either, so at least my mood and sew-jo are in synch! I have lots of knits in my stash and they are really calling to me so there may be another of version of this pattern in my future, maybe a longer version, or the version without the skirt. I look forward to playing around with this look.

Future plans – – I’ve been enjoying everyone’s posts lately for the ‘sewing frosting’ challenge on Instagram. Because I’ve been RTW fasting this year, I’ve sewn many functional pieces, but I’m inspired to sew something frivolous now….We’ll see where that takes me. I tend to favor sewing functional as a general rule – what about you all?

Happy sewing and thanks for stopping by!


Inari Tee/ Dress Three Ways

PicMonkey Collage-8
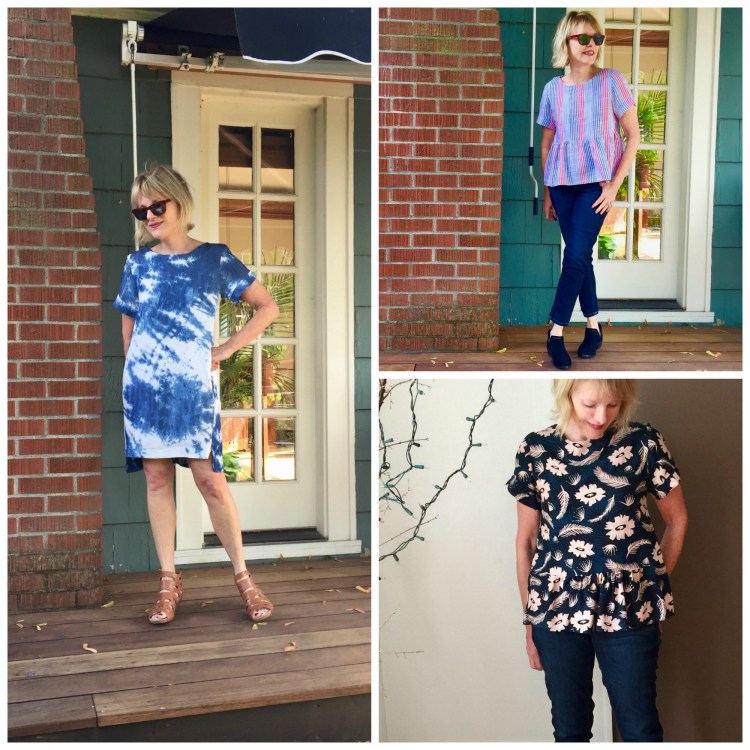
As luck would have it, I have another ‘three versions’ post for you this week. The Inari tee/dress is such a versatile pattern, it’s impossible to resist a bit of experimentation once  it’s on the cutting table!

The lovely Inari tee/dress by Named Clothing has been around for a while, but it hasn’t lost its appeal for me.

IMG_7864

I love the boat neck, the high low hem, the relaxed cocoon fit and the side slits that give the look a bit of an edge. Then, there are the lovely finishing touches, the sleeve bands, the hem stitching….it’s the little things that elevate this pattern to bring the look home!

The pattern includes two variations: A loose-fitting tee dress and a cropped A-line tee. The dress is slightly cocoon-shaped, with an uneven hemline. There are slits at the sides of the dress and you can finish the neckline with a facing or a separate neckband. This pattern works with a light to medium weight fabric, either woven or stretch which makes it doubly versatile! The instructions are really complete and easy to understand on this pattern. I think even a beginner would find it instructive and satisfying to sew.

IMG_7877

My fabric is a linen/rayon blend from Joann’s that is medium weight with a nice drape. I love the way the side seams wrap around to the front on this dress, causing the cocoon shape. There’s something so ‘cool-girl’ about a cocoon shape:).

My other versions evolved from the cropped tee version. I am not a big fan of cropped tees unless they’re on a teen, and this tee is really cropped. So, I added a ruffled bottom to the hem of the bodice.

IMG_7958

This is my buddy, Mitchell…he had to be in these photos. His twin, Maggie is too shy to participate, but Mitchell loves all the attention he can get. He’s about six months now, such a funny, outgoing guy! Don’t worry about Maggie, though. She can definitely keep up. I’m guessing she’ll be pushing her way into photos soon enough.

IMG_7917I loved working with this rayon from Fabric Depot, and it feels so cool and light on. To make this version, I cut a hem band that was 1.5 X the width of the hem, and made it seven inches deep so that when hemmed, it would add six inches to the length of the bodice. I gathered it with a long sitch then sewed it to the bodice and hemmed it.

IMG_8015

My next version is made of lightweight shirting from Joann’s. The stripe on this fabric is so striking….just had to have it. For this version, I shortened the bodice on the cropped tee by two inches and widened the ruffled bottom by two inches as well so that the top would have more of a raised waist look. I wear this one constantly! The weight of this cotton is light, but it launders so nicely and wears well in any temperature.

IMG_7995

All of my Inari makes will transition well into Fall because they’re perfect with a long cardigan or a short jacket. If you haven’t given this pattern a try, I highly recommend it. There are lots of inspiring versions in blog land and on Instagram, so give it a look!

In sewing happenings, Indie Pattern Month starts next week on the Monthly Stitch. I plan on participating in at least two of the challenges. I hope you’ll join me.

Happy sewing and thanks for stopping by!

Three Versions: Darling Ranges Dress

PicMonkey Collage-7

I’m back from my wonderful trip to France (more about that later) and am trying to ease back into the real world. So far, between jet lag and the growing awareness that daily life is not *quite* as stimulating as vacation life, it’s been a bit of a struggle. Lethargy and lack of motivation has been the mood. However, I do have a plan. This weekend I’m going to take a quick trip to a fabric store to peruse the new Fall patterns and see where that takes me.

In the meantime, I want to share with you a pattern I’m quite in love with!

f2a298a2c48e8f4d9920e6d7b46d1f6e--shirt-patterns-dress-sewing-patterns

Megan Nielsen’s Darling Ranges dress pattern has been around for a while so it’s easy to find inspiring makes on social media to cheer you on. It’s pretty versatile, with two options for the dress (with or without gathered waist) and a top. Before I left for my trip,  I made three of the dresses in quick succession. I hoped to blog it before I left, but alas…that didn’t happen! I love them all, but have a special place in my heart for the two linen versions, because, well, LINEN!

IMG_7798

My first version is made from a striped linen/rayon blend that I found at Joann’s early this Spring. I didn’t have quite enough to make the sleeves, so I had to modify, but I’m happy with the result. It’s easy to wear as is, or, with a tee under it, it will work well for Fall. The in seam pockets are great…very convenient without a lot of bulk. This dress went to France with me, and it did its job well. The tie is meant to go in the back, but I can’t stand the feeling of a tie when I lean back, so I extended the length so that it can be worn in front.

IMG_7847

This green version is made from plaid cotton shirting (ModernDomestic) so it required a bit of pattern matching. I eliminated the waist tie on this version to keep the fit loose. The sleeves are lengthened so that they’re easy to roll or push up. The pockets are self drafted and are cut on the bias.

IMG_7701

Version three is made from a lovely embroidered striped linen I found at Mill End store here in Portland. Here’s a close up of the fabric.

IMG_8029

The only changes I made to this version was to hem it about a inch longer. I also made the waist tie an inch wider so that it would look more substantial when I tied it in the front.

Fit and challenges: 

  • Shoulders – – Usually I have to do a narrow shoulder adjustment – – not here! So if you have wide shoulders, the fit on this dress may need some adjusting.
  • Fabric required – – Yes, this takes a lot of fabric! I tried to skimp a bit because I’m short, and ended up with a sleeveless version when I didn’t plan on one. Yes, the dress turned out fine, but (as usual), I should have respected the stated fabric requirements to avoid that situation.
  • Button placement – – The way they were positioned on the pattern would have left gaps where I didn’t want them, so I had to do some significant repositioning.


IMG_7812

IMG_7788

IMG_7747

All three versions are really wearable. My favorite is probably the last one, the embroidered linen, although I’m fond of the green version too. My husband has a strong dislike to that one – – his reason? “Some dresses aren’t meant to be made in green!” Hmmm…interesting and, well, thought-provoking. I hope he’s wrong, because I predict that version will be in heavy rotation this Fall. Will I make this dress again, or is three enough? Not sure…I’m tempted to make the waist less version, although I wonder if it will be too boxy. Thoughts? Please share.

Happy sewing and thanks for stopping by!!


Burda Style Raglan Sleeve Dress

IMG_6210

It’s been so hot and smoky here in Oregon. Heavy wildfire smoke has settled over Portland, a depressing reminder of last summer’s fire catastrophe in the Columbia Gorge.

But today, things are looking up! The wind is clearing the smoke away, the outside temperature is moderate and it’s safe to be outside again. It’s the perfect day to wear a simple summer dress.

IMG_6265

Did you see the August issue of Burda Style magazine? There were so many great styles I could hardly decide where to start! I was attracted to this Burda dress by the relaxed but fitted style.

770x967_BS_2018_08_101_front_large

Most of the shape is created by an elastic waist, and elastic bands on the Raglan sleeves, so there aren’t any darts or waistbands with tricky fit issues. There’s another big advantage of this pattern has…It’s only three pieces!!

101_large

Burda 08/2018 #101 is traceable or available for download.  The fit on this dress was spot on for me, and it was pretty simple to trace the pattern pieces since there were so few.

As with all Burda magazine patterns, the instructions provided were minimal. However, since there are very few seams, construction was straightforward. Of course, inside finishing is never discussed in Burda instructions, so I just finished the neckline with bias tape and serged the seams for a polished inside finish.

This rayon (Fabric Depot) has the perfect drape for summer dress. It’s just the right weight for the gathering at the waist. I’m not a big fan of exposed elastic so I did make a tie belt from matching fabric.

IMG_6270

IMG_5965

I don’t know why I don’t sew with Burda patterns more often. Maybe it’s because I have to trace the pattern?? Really though, compared to the time it takes to assemble a PDF pattern, it’s nothing. From tracing to hemming this dress only took a couple of hours…an easy Saturday afternoon make!

Hmmm, there may be more Burda style patterns in my future. What about you…fan or not?

Happy sewing and thanks for stopping by!


Vogue 9313: Ruffled wrap dress

IMG_4968
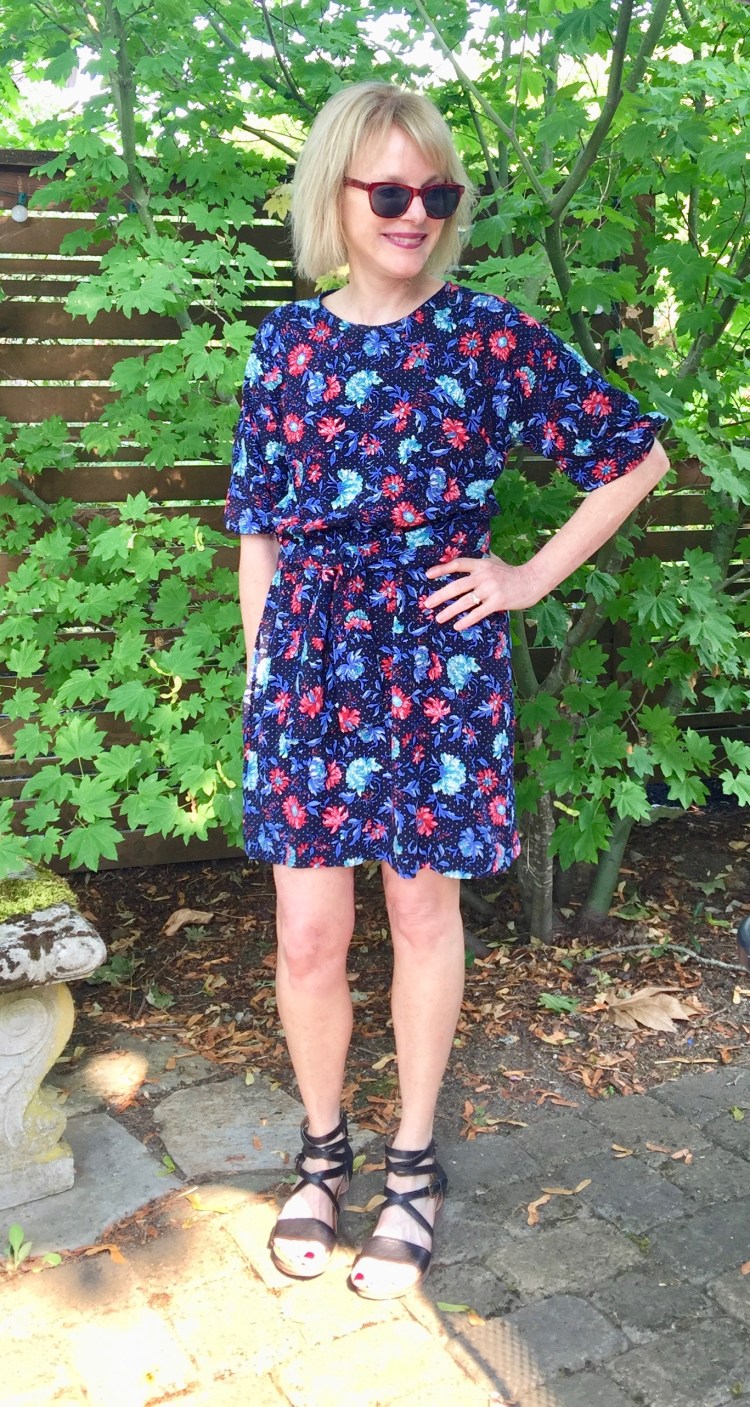
We’re experiencing a heat wave in Oregon, and the humidity is so high, my hair flips and frizzes, no matter what I do :). When it’s this hot, only a cotton dress will do, and this wrap dress is perfect for these sweaty days.  I became a fan of wrap dresses when I made this one last year. It was so cool in high summer.

IMG_5019 2

My pattern is Vogue 9313, a wrap dress with lots of “easy” options.  It has custom fit options with A-D cup sizes so it’s pretty easy to get the fit right. I modified the pattern a bit after trying on this dress at Anthropologie.

4130276110001_085_b14

  1. I re-drafted the shape of the full skirt to make it take out a bit of the fullness. (Too much fabric makes me hot in the summer). Also, I modified the two front skirts by rounding them into a tulip skirt shape so that it would work better with a ruffle.

IMG_4849 2

2. Instead of finishing the skirt fronts with bands as the pattern suggests, I added a 3 inch ruffle to each skirt front where the band would be and extended the ruffle into the hemlines as well. The ruffles are folded strips of fabric that are 1 and 1/2 times the length of the skirt fronts and hems. I gathered each ruffle with a long stitch then sewed them to the skirt fronts with a 5/8 inch seam.

4. I eliminated the front and back waist bands and lengthened the front and back bodices by two inches to make up for it.

5. The sleeves were too wide for me, so I added a tie instead of a hem. I cut a 4″ opening in each sleeve to accomodate the tie, then finished the openings with narrow hems. For the tie,  I cut a narrow strip (5″) of fabric that was two times the circumference of the sleeve. I attached it to the sleeve hem as though it was a sleeve band or cuff.

IMG_4999

I came pretty close to my goal with this make. It’s casual and comfortable but can be dressed up with a few good accessories. This cotton fabric from Fabric Depot is perfection. It has a bit of texture, but isn’t too heavy so it drapes really well and doesn’t seem to wrinkle much. Another travel dress?? Hmmm – – time will tell. I’ll know after I wear it a bit more.

Cotton and linen are my go to fabrics in the heat – and I wear dresses all the time. My Kalle shirt dress is in heavy rotation right now. What do you prefer to wear in the heat?

Happy sewing and thanks for stopping by.