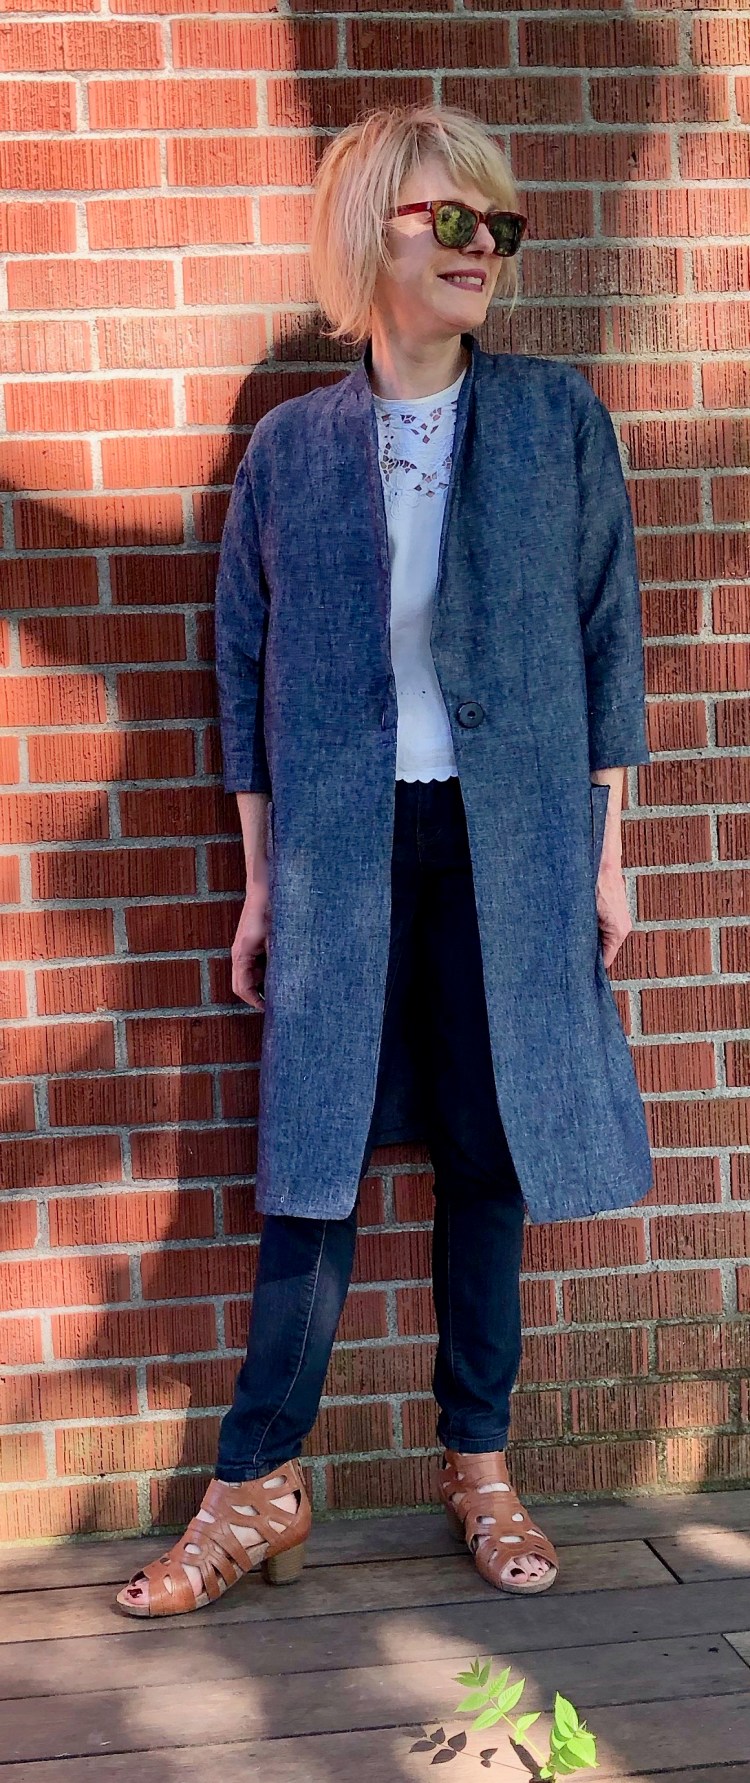
A Wiksten Haori in Kantha Cloth

I don’t know about you, but I’m craving a bit of ‘normal’ right now. So let’s just dive into the details of this new make, a Wiksten Haori jacket. 

If you haven’t tried this pattern, you’re missing out on some fun! It’s a chance to use your favorite fabrics in a way that makes them so wearable. This is my third Haori (others posted here and here), and I’m sure there will be more. 

This is an unstructured, loose-fitting jacket with three length variations, short, medium and long. I prefer the short, cropped version on me as I really like the proportions, but I’m in love with some of the longer versions I’ve seen in wool, so I might try one of those too. 

This jacket looks more complicated than it is. If you can sew a straight seam, you can make this jacket. Yes, it is lined but that’s nothing to worry about because creating the lining is simple. You just sew another jacket from your lining material and attach the two at the bottom seam.  The only modification I made to the pattern was to leave the interfacing out of the collar band as my fabric was stiff enough.

The beauty of the Haori is that it really allows the fabric to shine. My fabric is a Kantha cloth. I found a piece at Modern Domestic then found a bit more  at Cool Cottons, here in Portland. It’s amazing fabric with beautiful colors and the layers of cloth are stitched together with a long quilting stitch. It makes me happy just looking at it!  I’m wearing it with the linen shirt I made from a japanese pattern book (posted here.) I think they work well together.

Sewing is such a stress reliever for me. In these challenging times, I’m grateful that I have a pastime that comforts me, and a community to share it with. Hang in there all, and thanks for stopping by! 

Vogue 9311: Playing Dress-up

My every-day wardrobe consists of easy-to-wear layers. But once I year, I have the opportunity to really dress-up. The choir that I sing with, Oregon Repertory Singers has an annual fundraiser where formal attire is required. I always look forward to the opportunity to sew and wear something special.

In past years, I’ve sewn cocktail length dresses, but this year, I wanted something different, so I decided to go ‘long’. Honestly, in all my years of sewing, I’ve only sewn a couple of long dresses. What?? I know!! If it isn’t time now, when will it be?  

For the pattern, I chose Vogue 9311, a long dress with optional sleeves and ruffle. I love the v-neck line and think that it gives the dress a look of elegance. I made the long sleeve version, but shortened them to 3/4 length. Instead of cuffs, I used elastic to gather the base of the sleeves. I wanted to be able to push them up and away from my dinner:). 

The biggest challenge with this make was the fabric. I love the look of this burnout velvet, but it really was tough to work with. The shimmer comes from shiny gold fibres that are woven into the spaces between the sections of velvet ‘burnout’ and they tended to snag. Also, the fabric frayed like crazy so I finished all the edges with my serger before sewing the seams. I purchased microtex needles which really worked nicely! 

Even though the pattern doesn’t call for a lining, I chose to line the bodice and skirt with solid black silk. This really helped give the skirt more body and structure. The lining was easy to create and gave the entire dress a nice finished feel. It’s so lovely to wear! The ties are meant to be worn in the back, but they were so long, I was able to play around with the look, and decided I liked them better in front. 

I’m pretty pleased with my new frock and absolutely love this Vogue pattern. It’s been in my stash for awhile, and I’m so glad I finally decided to make it. I can imagine a version for Spring, maybe in linen. I really enjoyed wearing this dress last weekend. It felt so elegant. The good news is that I’ll have another chance to wear it when we sing with the Oregon Symphony in April.

This project really marks the end of winter sewing for me. I’m really ready to sew up some of my lovely woven fabrics for Spring and Summer. How about you?

Happy sewing and thanks for stopping by!

A Burda Sweater Dress you can make in a day

A simple pattern that feels stylish, and on-trend. There’s nothing better, eh?

The pattern for this sweater dress is one I’ve used before, traced patiently from a Burda style magazine pattern sheet. Once I’ve taken the time to trace a pattern, it’s always pleasing when I’m inspired to use it again!

This pattern is Burda 1/2019/111, destined to be a tried and true pattern for me. There are two things that attracted me to it ; the cocoon shape….

and the ‘audrey hepburn’ collar!

UNSPECIFIED – CIRCA 1955: Photo of Audrey Hepburn Photo by Michael Ochs Archives/Getty Images

In-seam pockets are so useful and stylish, don’t you think?

Construction Details: My fabric is a unusual textured knit I bought last year on sale at Joann’s. The knit is incredibly comfortable to wear, but I do have to admit, the stretch recovery is a bit on the relaxed side. As a result, the cocoon shape of this dress isn’t quite as pronounced as my last version (here.) Even though I’m a tad bit disappointed, the dress is fast becoming a favorite, worn over leggings, even jeans. Live and learn. I’ll be more careful when I choose knits for dresses in the future. Other than that, construction of this dress was pretty straightforward. I used my serger ( so easy) to sew and finish my seams. All in all, this dress only took about three hours!!

The Burda pattern magazine is so inspiring, but to be honest, I haven’t renewed my subscription for this year. The price tag is pretty hefty (in the States the price has increased to $100 per year), and I’d have to trace alot of patterns to make the montly investment pencil out. Instead, I’ve subscribed to the Burda on-line newsletter, (recently updated). I hope to get my monthly dose of Burda that way! We’ll see how long I can resist the urge to renew….

This weekend, I pulled a few pieces of linen and cotton from my fabric stash. I’m getting in the mood for Spring sewing. How about you?

Happy sewing and thanks for stopping by!

#sewjapaneseinjanuary times two!

You probably won’t be surprised to hear that I’ve been inspired by yet another Instagram sewing challenge! January in Oregon can be pretty dull and gray, so I’m often tempted to turn to Instagram for a bit of stimulation. Last month, the #sewjapaneseinjanuary challenge caught my eye. So, I dove into my pile of long neglected Japanese pattern books. Here’s one of my favorites.

Although some japanese pattern books are translated into English, wouldn’t you know, this favorite by Asuka Hamada is not!! No matter….we’re up the challenge, eh? Asuka Hamada’s designs are well worth the effort….chic without being too complicated.

Of course, when you sew from a Japanese pattern book, you have to trace the pattern…sigh. Well, here’s the good news. Now that I’ve done this a few times, I can honestly say, I actually enjoy the process. It’s sort of….meditative. For me, the concentration required to pattern trace is a lovely distraction! It’s like putting a jigsaw puzzle together…you have to be completely absorbed in the process or it just doesn’t happen. Here is the pattern I chose, a simple shirt with really great sleeves.

Since I don’t understand Japanese, the illustrations guided me.

Sewing from line drawings was simpler than it looks. It was freeing in a way and the process went faster too. Honestly, I may never read the pattern instructions again…LOL.

The shirt is slightly oversized which makes it great tucked into a pencil skirt or worn loose with jeans. My fabric is a lovely linen purchased at Bolt fabric. I enjoyed sewing this shirt so much, I had to make another version (minus the collar) from a linen cotton blend.

This Spring and summer, this shirt will be in heavy rotation with the striped linen skirt I made last summer.

Well, now that I know language isn’t really a barrier to trying new pattern books, who knows what will happen!? Maybe I’ll have to add another shelf in my sewing room for some new Japanese pattern books, eh? If you have any favorite pattern books…please share. I’m in the mood for a shopping spree.

Happy sewing and thanks for stopping by!

Sew Over It Farrah Jumpsuit

Hi All. The Farrah I’m wearing is a new pattern from Sew Over It, just released this week. As a Pattern Insider, I got a copy in advance. I love anything that has a utility look to it, so this boilersuit caught my interest right away. It gives functional a fresh look with big flapped pockets and a button-down front.

I made my version of the Farrah from a medium weight cotton- linen blend. I think the drape of this fabric really contributes to how I feel about this make. For the Farrah, any medium weight woven will work (cotton twill, corduroy, linen, stretch denim). In my opinion though, the softer the better. With a soft fabric, the elastic waist doesn’t bunch at all.

The pattern is designed with a good amount of ease so fitting this pattern to my own figure wasn’t hard. The only adjustment I had to make was to shorten the bodice by about an inch. I’m 5′ 4″ with a short waist so I expected this would be the case.

It’s quite comfortable to wear. The oversize style contributes to this as does the elastic waist. I did make one change to the pattern. I dropped the flaps from the lower pockets because I wanted to be able to stick my hands and cell phone in there easily. The pockets are roomy, perfect for my phone or wallet and I’m glad I made that change!

Although the Farrah style was a bit out of my comfort zone, I’m so glad I gave it a try. The one piece look is definitely on trend now and I enjoy wearing this so much. I could imagine another version of this pattern in a rust or olive colored corduroy. There are lots of cool versions popping up on Instagram, so check them out for inspiration.

Happy sewing and thanks for stopping by!

P.S.. I received a copy of the Farrah for free, but the opinions expressed here are my own.

First Make of 2020: Another Cocoon Coat

Happy New Year! This is my first make of 2020 and I am happy to say it was a success. It’s always good to start a new year with a project that you love.

I’ve made the Coccon Coat before (see it here), based on a version Sew Over It released as part of Lisa Comfort’s magazine. Now they’ve released it as a PDF pattern, available on their website (I received a free copy as a Pattern Insider). I loved the pattern so much the first time, I had to give it another go!

There are many things to love about this pattern. The cocoon shape of the coat is modern but classic. There are two piece sleeves and two pocket options. I chose the welt pockets, which can be challenging, but with their in-depth instructions made it seem easy.

Pattern Construction and Modifications: The Cocoon Coat is meant to be worn open, but that just isn’t an option that works very well in Oregon. So, I extended the front lapels by an inch and added hidden snaps to secure the opening. It changes the look of the lapel and collar a bit from the intended design, but I still like the look, and it makes it much more wearable for me. My coat is made of a good medium weight wool (Millendstore) and lined with silk from my stash.

Construction of this coat is a breeze. The lines are simple so there aren’t any tricky fit issues to resolve. I think the Cocoon coat would be a good option for someone who has never made a coat before.

2019 was a pretty successful sewing year for me with 39 blog posts:). It seems as though the number of sewing blogs has thinned out a bit in response to the growing presence of Instagram and the option to post quickly and often. I understand that, but I quite like the longer format of a blog post and the chance for a more detailed discussion. So, in 2020, I’ll continue to post here too. Thanks for reading and for keeping me company here.

Happy sewing and thanks for stopping by!

A New Gelato Top for the Holiday

Yes, it’s a busy time of year, but I managed to squeeze in a bit of sewing…a Gelato top! This lovely relaxed top might be my holiday attire of choice. I don’t know about you, but on Christmas, I prefer a day of relaxed fun…cooking and eating with friends and family, playing games, sitting on the floor by the fire, maybe even a holiday movie! Given my agenda for the day, relaxed dress isn’t optional, but required. This gelato top in bright poppy and teal will work perfectly.

This pattern is lovely for many reasons, but the detail that caught my eye was the button-up back.

I first saw this top on the blog, Girls in the Garden. Lori’s version was so cute, I had to try to make my own. The cut of the top, is relaxed and loose, but fun and flirty. The Gelato top is designed by Liesl and Company. It comes with two views – – a top like mine or a long shift -style dress.

I quite like both options, don’t you?

I made my version out of a beautiful rayon with lovely drape. Because of the oversized nature of the bodice on this top, you wouldn’t want to make it from a stiff fabric.

Construction: The button back detail looks harder than it is. The tab for the buttons is made by folding the fabric twice and stitching. The toughest part is the buttons and button holes which I made with my machine. Fit was easy because it’s a loose fitting pattern. The neck is finished with bias binding…also quite easy! The top came together in three hours including pattern layout and cutting.

I love my new top and am so glad I squeezed a bit of sewing time into the holiday schedule.

Happy holidays and thanks for stopping by!

A Sierra Jacket in Forest Green

Whoa….It’s been awhile since I’ve posted!  My mother-in-law died recently and it’s been a sad, low energy time for me. I drifted into a space where I had very little time or mental space to create. The experience of being away from sewing deepened my appreciation of it though. I’m so happy to be back with a new make, the Sierra Jacket from Closet Case Patterns. 

The design of this unlined jacket has such a cool ‘french’ vibe to me. From what I understand, Heather of Closet Case Patterns was inspired by a old canvas maker’s jacket she owned. The pattern includes two views, a long version that’s cinched at the waist and a shorter, boxier version with buttons down the front. 

Of course, an unlined jacket is the perfect opportunity to practice some nice seam finishings. I flat-felled most of the seams to keep the inside looking neat, then added some bias binding in a contrasting stripe to the front facing. It makes me so happy to look at the inside of this jacket!

The fabric I chose is a medium weight twill in deep forest green. It’s the perfect weight for days when you need a light layer. It’s pretty cold here now, so I’ve been wearing my Sierra like a blazer under my coat, but will use it as outwear in the Spring and Fall. 

Details I love…There’s a cool side tie and an extra pocket inside the front for carrying your cell phone or what ever. You can even put a pocket on the sleeve. I didn’t have enough fabric for that this time around, but will definitely add that next time. I love the two piece sleeves too, and the cinched waist. The shorter version has buttons and sleeve pockets. Trust me…I’ll make that one soon, maybe out of corduroy .

The fit of this jacket is oversized and a bit boxy so be forewarned. I like it that way, but will cut one size smaller next time. Construction steps are well explained as is the usual with this company.


I’m in love with this jacket in part because of the color… forest green. For some reason, it seems hard to find these days! The jacket is so fun to make and wear..I know I’ll make the shorter version soon!

Happy sewing and thanks for stopping by.

A New Look Knit Dress from Neglected Fabric

Do you follow #magamsewalong on Instagram? I find the monthly sew alongs created by @suestoney and @sewinginspain to be so inspirational. This month’s theme is Neglected. The idea is to create a project using somethng you’ve ignored for too long. This fabric has languished in my stash for years. I have no idea where I bought it or why!  Now, finally, the neglected has become a dress.

You can see my friend Mitchell had to participate in this photo shoot. If I want some attention from him, I just put on a pair of black tights, LOL.

Knit dresses are really my wardrobe go-to at this time of year. (see others here and here). You can throw them on them over a pair of cozy leggings and still manage to look polished. 

Speaking of neglected…I’ve been using so many Indie sewing patterns, I’ve neglected the new offerings from the Big 4 pattern companies. A few weeks ago I took the time to peruse their Fall offerings. New Look 6632 caught my eye because of the princess seams and empire waist, details you can’t always find in a knit pattern. Also, it has in-seam front pockets…perfection!

Of course, I couldn’t resist using a bit of contrasting fabric on the side panels. It always feels good to use a remnant I’ve saved from an old project!

Construction of this dress was pretty easy. There isn’t a zipper. Instead, the dress slips over your head. I modified the pattern and finished the neck with a contrasting knit band instead of the suggested bias binding. I cut a size ten based on the pattern envelope measurements, and the pattern fit welll without adjustment. 

Of course, I had to make the optional cowl neck that’s removable…so cozy! I love my new dress made from neglected fabric. Thanks to #magamsewalong for inspiring me!

Happy sewing and thanks for stopping by!

Sewing a Patchwork Shirt from Remnants

If you’ve been sewing for as long as I have, you’ve likely accumulated a large stash of fabric remnants. I find it hard/impossible to part with the lovely leftover bits when I’ve finished a project, so my remnant stash is HUGE, and overwhelming. Recently, I decided to sort and catalog the pieces. That’s when I made a lovely discovery… the colors and textures all work together.

So I decided to use the pieces to make this shirt.

Pattern: For my project, I used a tried and true shirt pattern so that fit would not be an issue. McCalls 6124 has a back yoke, two piece sleeves, a collar band and princess seams…so many opportunities to explore!

Process: Because I patchworked both the front and back, I was able to use three types of shirting and three colors of linen, about a quarter of a yard of each. Sewing was easy as I’ve made this shirt a time or two.

The best part of this project was figuring out fabric coordination and placement. In fact, I enjoyed it so much, I had a ‘moment’ when I imagined myself as a quilter. (Just what I need…a new reason to accumulate fabric, LOL!!)

I’m pleased with my shirt and am so glad my remnant stash has shrunk a bit. The good news is my shirt works well with the denim skirt I made a couple of years ago, so I know it will be worn again and again.

Of course, I’ll still be on the look out for new ways to use my lovely leftovers, so if you have ideas…please share!

Although I’ve had a bit of a challenge easing back into sewing ‘post vacation’, I’m definitely inspired by the Fall colors here in Oregon. Our cool weather has me thinking about sweaters and jackets and coats…ideas are brewing! How about you?

Happy sewing, and thanks for stopping by.