Fall Sewing: Carolyn Pajamas, the 1960’s coat, and the Stacker Jacket

lindas collage copyHi All – With temperatures dropping, I’ve been inspired to sew ‘cozy’ clothes this Fall.  During November, I made a wool coat, a corduroy jacket and a pair of pajamas, and all are in heavy use. The truth is, my wardrobe needs have shifted during the pandemic. My daily uniform is a pair of jeans and a top, perfect for my usual outing, a walk in my neighborhood. Since there aren’t any social events to dress up for, I’ve enjoyed having a new coat or jacket to wear on my walks. Honestly, can you ever have too many?

The Sew Over It 1960’s Coat.

This coat pattern is a real winner from Sew Over It. The style is so classic.

IMG_4898

As a pattern insider, I received a free pattern before the general release and I was so excited to make it! From the photos, I expected the coat to be hard to sew, but it really wasn’t.

I cut my usual size based on my measurements and did a toile from a old sheet just to be sure. The bodice has some tapering, but the fit is relatively loose so I found fitting it to be easy.

IMG_4913 I splurged on fabric, a red boiled wool from the Mill End Store, here in Portland. I lined with red silk. I’m so glad I did because this coat is in heavy rotation in my wardrobe and it’s so lovely to slip your arms into silk. If you can sew a collar, set in sleeves and insert a lining, you will be good to go on this pattern. My only tip is not to use too heavy a wool as the lapels and collar might be hard to turn.

Stacker Jacket.

IMG_5601

The Stacker Jacket is from one of my favorite pattern companies, Papercut patterns. Not only is their packaging superb, their designs are so fresh. This jacket is no exception. It’s a ‘utility’  jacket, with a yoke for some interest, and great pockets. Honestly, I just can’t leave the house in anything without pockets!

IMG_5450

I used a lovely rust cordoroy for this jacket and plaid flannel for the liningm both from my stash. It’s such a cozy combination.  The buttons are vintage, found at an estate sale here in town.

IMG_5441.jpeg

Altough this jacket is lined, it was a easy sew. The fit is loose so there isn’t anything tricky there. You can easily complete this project in a weekend!

Carolyn Pajamas

IMG_5164

My Minerva Make for Minerva Crafts.com this fall is a pair of Carolyn Pajamas, from Closet Core Patterns. Honestly, these pajamas are such a mood brightener!  I spend so much time in pajamas now, as I allow myself the luxury of lounging a bit more during the pandemic. This lovely Lady McElroy cotton lawn was given to me by Minerva Crafts, and you can find my post about this pattern on their blog (here)This pattern is so fun, and I will make it again and again.

IMG_5219Even though social events are discouraged in Oregon right now, I hope to sew something festive for the holidays in December. After all, even a Zoom cocktail party is worthy of a bit of dress up, don’t you think?

Happy sewing, stay healthy and thanks for stopping by.

Greeting Fall with two Isca Shirt Dresses

IMG_4339

Hi all. It’s been awhile since I’ve posted and I hope this finds you well! In September, I took a break from sewing for most of the month. We took a road trip through Yellowstone and the Tetons. During our trip, the hardest worker in my wardrobe was, hands down, my quilted Tamarack Jacket.

IMG_2734

I wore it everywhere, even hiking. The Merchant and Mills quilted cotton was just the right weight for cooler days, but also light and comfortable when it was warm. I hope there’s more of that fabric in my future! The jacket is so comfortable, I’m contemplating making another. (Here’s my previous post on the jacket if you’re interested.)

But on to the Isca Shirtdress by Marilla Walker.

IMG_4317 2

Before the trip, I decided a longer sleeved linen shirtdress would be a great travel dress. I couldn’t resist downloading the Isca Shirt dress, a pattern by Marilla Walker. It has a cool v-shaped yoke detailing on the bodice. And the pockets are perfection! Luckily, I had a big enough piece of linen in my stash.

To make the front inset stand out, I wanted the plaid to be on the diagonal, so I cut those two pieces on the bias.

IMG_4348

Construction was generally a breeze, but I did found the front bodice to be challenging. It’s meant to wrap over the shoulder apex and attach to the back bodice. That made it a very strange looking pattern piece! It threw me and I had to study the diagrams carefully to figure it out which pieces were seamed where. Once I saw the ‘light’, the construction was simple. My advice is to trust the pattern instructions, even though at first glance, it seems counter intuitive.

The fit is pretty forgiving (as in loose). I cut the smallest size but ended up taking in the side seams to adjust the volume of the skirt. If you’re between sizes you might want to size down. I shortened the length of the bodice by two inches because I’m short waisted.

I love, love the finished product. In fact, so much so, I quickly made another version out of a navy linen I bought last year in Rome (wow that seems like ages ago….).

IMG_1546

This linen is so wonderful to sew, and it has just the right drape for this project. You don’t want a stiff linen for this dress because of the gathers.

IMG_1643 2

I’m certain both dresses will get alot of wear once I have somewhere to go, LOL!

These are strange times and my routines have shifted in ways I never expected. Some days, I feel productive, and other days I seem to just be ‘marking time’. For me, having a sewing project to complete really helps. There’s something almost meditative about the process of making by hand. I feel so lucky to have a passion that makes me feel better and friends to share it with.

Happy sewing and thanks for stopping by.

#featured, #linen, #shirt-dress, #summer-wardrobe, #travel-wardrobe

ellegeemakes | October 11, 2020 at 1:25 pm | Tags: featured, linen, shirt dress, summer wardrobe, travel wardrobe | Categories: capsule wardrobe, dress pattern, linen, shirt dress, Uncategorized | URL: https://wp.me/p5M1Tl-4vk
Comment See all comments
Unsubscribe to no longer receive posts from Elle Gee Makes.
Change your email settings at Manage Subscriptions.

Trouble clicking? Copy and paste this URL into your browser:

Greeting Fall with two Isca Shirt Dresses


My Sew Over It London Summer Capsule Wardrobe

It’s been awhile since I’ve written. It’s been hard to imagine posting smiling photos of me in new clothes when there’s anger, hurt and death because of the systematic racism that surrounds us (during a global pandemic, no less). I’ve learned that I know very little about the daily experience of being black. So, I want to say that I’m committed to listening and learning. I support #Blacklivesmatter and am looking to the leadership and posts from @blkmakersmatter on IG. As my first action step, I am committing to making my sewing dollars count by buying from only those organizations that support anti-racism, equality and inclusion. 

Creating anything….art, clothes, music, helps us find our best selves. So in that spirit, I share what I’ve been sewing lately….

Summer-Dreaming-eBook-New

This month, Sew Over It London launched a beautiful ebook calledSummer Dreaming.Tech-Drawings-700.pngIt includes a collection of  patterns that comprise a capsule wardrobe for summer. As a Pattern Insider, I had the opportuitiy to try the patterns before release. So today, I offer an overview of the pieces I made from that collection.

IMG_9786

The key piece in my capsule is the Sorrento Jacket. It’s designed with lots of fun seams, pockets and tabs at the waist. Since I’m a big fan of topstitching, I could hardly wait to sink my teeth into this one. And it did not disappoint!  I was a little concerned about the length of the jacket since I’m short-waisted and only 5’ 4”. The sizing of this pattern was spot on for me. I did do a tissue fitting, paying attention to the shoulders and waistline. In the end, I decided to leave all as is and the fit is good!

IMG_0070.jpeg


The double seams in the front are so retro and cool. It’s well worth the time required to make it. If I had to say, I’d rate the skills required to make the jacket at intermediate level. Collar insertion and cuffs are required which can be a bit challenging, but the instructions are very complete. There’s lots of topstitching on the jacket which takes time, but I personally love sewing projects with alot of detail. I used a light gray thread to make the stitching pop. I chose medium weight denim and I’m glad I didn’t go any heavier. A heavy denim would make it difficult to get the thick seams pressed and topstitched, so I’d stick with a light to medium weight denim.

IMG_9312

Next up is the Ravello dress… a lovely versatile pattern. You can make it as a dress (long or short) or you can crop it as a top. I made it three ways, as a short dress, a cropped wrap top in linen and also another wrap top in Liberty cotton. The dress is a breeze to make, and is perfect for a beginner. It isn’t lined, so beware of picking a sheer fabric. A linen, lightweight cotton or rayon would be my choices for this pattern. It’s a quick make as the kimono style sleeves are cut into the bodice – – you can make this one in an afternoon. I love my top versions too, and want to make a long dress in the future.

Here’s the long wrap top version.

IMG_0220

And here’s the cropped linen version with the skirt of my Siena sun dress.

2F7C2A2F-736F-4E22-9FA8-09EAA76ABED9_1_105_c


The most challenging piece of all in the collection has to be the Siena dress!

IMG_0278

It can be made into a one piece sundress or made as separates ( a camisole style top and skirt). I love to mix and match so I chose the separates version. The dress has a shirred back and since I’d never tried shirring before I had to give this a whirl. It’s a fun process and not to hard to do. The top wasn’t the easiest piece to fit but end result was worth it. I made both pieces from linen. Rayon or cotton would work well too. I absolutely love the skirt. It will be in heavy rotation throughout the summer.

IMG_9801 2

My last make from the collection was the Alba skirt.

IMG_0014

This skirt is what summer dressing is all about! It’s a simple wrap skirt that you can make with or without a ruffle. I made it without the ruffle and it was such a fast easy make. A flowy fabric like rayon is best for this skirt. I like to wear it with a tee shirt, or with my Ravello top or my Sorrento jacket!

IMG_0071.jpeg

This collection really would be perfect for travel (when we can safely do that again! ). The patterns are at a variety of sewing levels so there’s something here for everyone. I’ll use the jacket, dress and skirt patterns again and again. Thanks to Sew Over It for giving me the chance to try out these lovely patterns!

Happy sewing and thanks for stopping by.

Four Linen LB Pull Overs

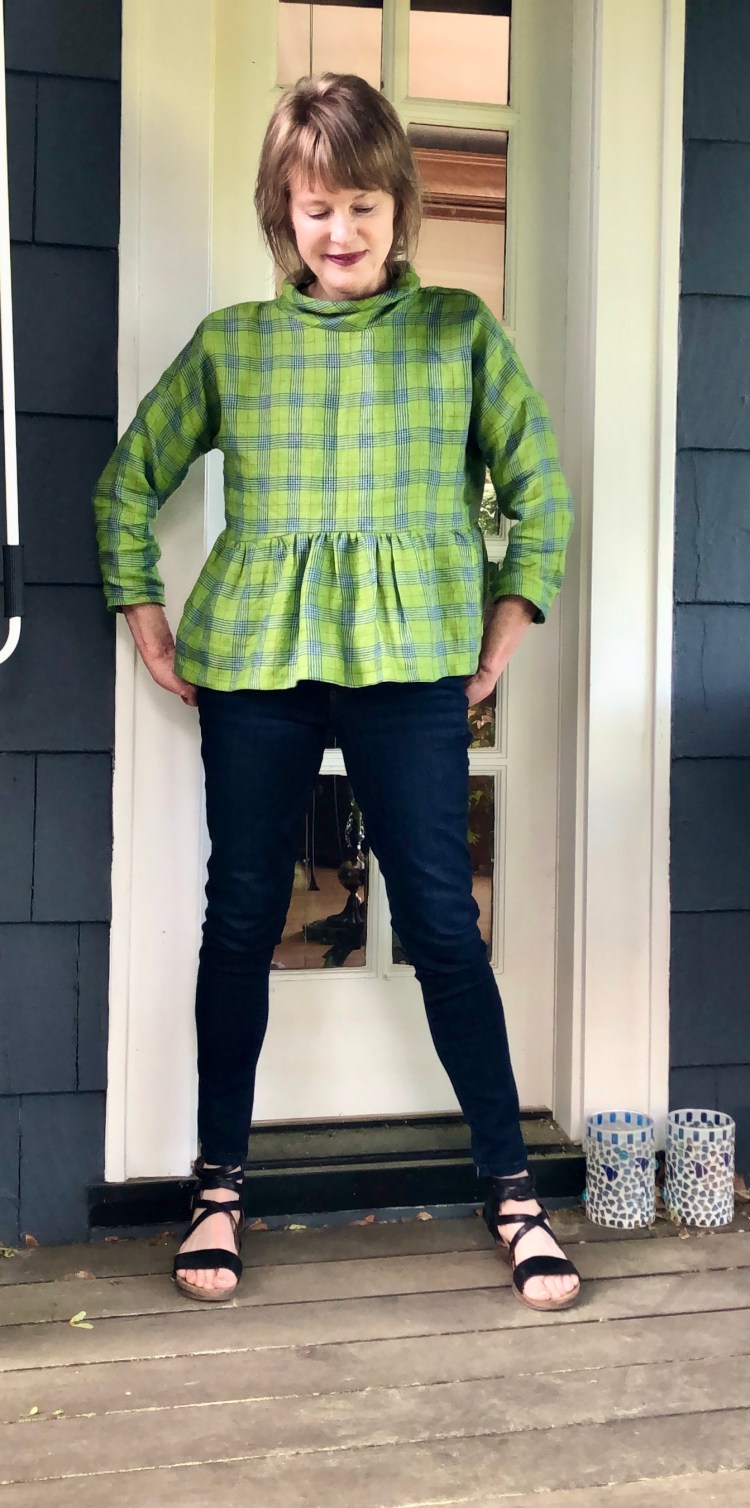
Even though I didn’t post photos during Me Made May, I’ve been taking stock of my me-made wardrobe. To my surprise, my Spring wardrobe includes 4 linen LB pullovers! What’s even more surprising, is that I’ve never written a blog post about one of my favorite patterns. It’s time to rectify that situation.

If you’re unfamiliar with the LB pullover by Paper Theory, here’s a quick run down. It’s a loose-fitting top that is suitable for wovens or knits. It has drop shoulders and long sleeves which you can modify to any length you want. There are two neck finishes, a turtleneck version or crew neck. I love this pattern because the look changes with your fabric choice. Also, it’s fun to hack!

My first linen version was simple.

This is a straightforward, out of the box version from lightweight linen (Josephines fabric.) Instant love. Immediately, I cut another in a lightweight linen (from Britex).

This time, I cropped the bodice by 6 inches and added a 8 inch peplum. To figure out how wide to make the peplum, I measured the width of the fabric at the bottom of the bodice and multiplied that by 1 1/2. Then I gathered the peplum using long stitches before stitching it to the shortened bodice. So easy! I love the loose fit of this version.

I used a remnant in my stash for this violet colored version. I absolutley love the soft feel of this linen. I cropped this version a bit, shortening the bodice by three inches. The sleeves are 3/4 length and I love to roll them up. I used the turtle neck pattern, but took a 1.5 inches off the width. This top is so easy to wear. It’s in heavy rotation.

This last version is color blocked with two linen remnants.

When the weather is hot, this hankerchief linen version is my favorite. It’s so great to work with a pattern that looks so different based on your fabric choice. I have two more LB pullovers on my cutting table, this time in knit fabrics. More on those in another post.

I hope you are well and happy during this strange, challenging time. I am grateful for the joy sewing brings and for our fabulous community of makers. Happy sewing and thanks for stopping by!


First Make of 2020: Another Cocoon Coat

Happy New Year! This is my first make of 2020 and I am happy to say it was a success. It’s always good to start a new year with a project that you love.

I’ve made the Coccon Coat before (see it here), based on a version Sew Over It released as part of Lisa Comfort’s magazine. Now they’ve released it as a PDF pattern, available on their website (I received a free copy as a Pattern Insider). I loved the pattern so much the first time, I had to give it another go!

There are many things to love about this pattern. The cocoon shape of the coat is modern but classic. There are two piece sleeves and two pocket options. I chose the welt pockets, which can be challenging, but with their in-depth instructions made it seem easy.

Pattern Construction and Modifications: The Cocoon Coat is meant to be worn open, but that just isn’t an option that works very well in Oregon. So, I extended the front lapels by an inch and added hidden snaps to secure the opening. It changes the look of the lapel and collar a bit from the intended design, but I still like the look, and it makes it much more wearable for me. My coat is made of a good medium weight wool (Millendstore) and lined with silk from my stash.

Construction of this coat is a breeze. The lines are simple so there aren’t any tricky fit issues to resolve. I think the Cocoon coat would be a good option for someone who has never made a coat before.

2019 was a pretty successful sewing year for me with 39 blog posts:). It seems as though the number of sewing blogs has thinned out a bit in response to the growing presence of Instagram and the option to post quickly and often. I understand that, but I quite like the longer format of a blog post and the chance for a more detailed discussion. So, in 2020, I’ll continue to post here too. Thanks for reading and for keeping me company here.

Happy sewing and thanks for stopping by!

A Kalle Shirtdress Becomes a Coat

This week, I marked the beginning of Fall by completing my first cold-weather sewing project. My new denim walking coat was just the kind of project I needed to cope with ‘post vacation blues’. It’s a topstitching extravaganza, just the therapy I needed. Some sewists find topstitching to be stressful, but for me, the focus required is actually a relief that my brain craves when I’m down. 

My inspiration for this coat was a denim coat, designed by Madewell. I saw Cobie Smulders wear it on the already cancelled show, “Friends from College.” It’s a loose-fitting coat, made of mid-weight denim with a hidden placket and a tie belt. 

Although Colbie wore it as a dress on the show, I saw it as a long coat for Fall. Many of my knit dresses (here and here) are below my knees, so this coat will accomodate that length easily.

Pattern: To make the coat, I modified a tried and true pattern, the Kalle Shirt Dress. This pattern has so many options, I recommend it highly.

I chose this pattern because the fit is great, but loose and classic. To make it coat length, I added six inches to the bodice. To create the back vent, I eliminated the back pleat and added a seam instead, open at the bottom. Otherwise, I left the pattern pretty much as is.

 The orginal pattern has short sleeves, but I purchased the long sleeve extension from the Closet Case website. Instead of the classic french cuffs suggested by them, I eliminated the closure on the cuffs, and just folded them back.

Fabric: I used a medium weight denim from my stash for the with a darker denim for the collar, cuffs and pockets. The Kalle has one pocket, but I drafted three more. I used double topstitching on the pockets to make them pop.

I always love using a tried and true pattern in an unexpected way. As a coat, the Kalle does not disappoint! With this make, I’m officially accepting that Fall is here. It’s time to pull out the knits and wools from my stash and sew cozy

Happy sewing and thanks for stopping by!

Travel Mix and Match: Burda Culottes with Two Linen Tops

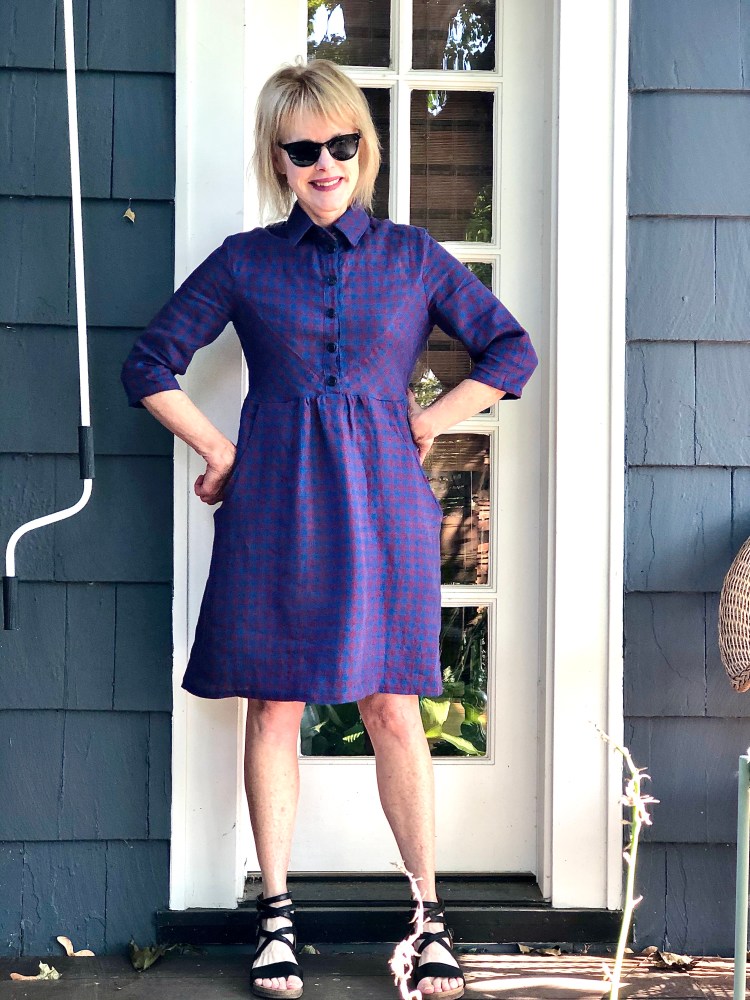
Hi All! In two weeks, I’ll be traveling to Italy, and there’s nothing like a deadline to get you motivated to sew, sew… SEW. Although I love to travel with dresses (this linen Burda will go with me) I’m going to stretch my options a bit by packing a few mix and match separates too.

IMG_2967.jpeg

Burda refers to this pattern as shorts, but I consider them to be culottes. I love the wide cut in the leg contrasted with the paper bag waist. This pattern was in the Burda magazine (07/2019 #107A) and there were only TWO pattern pieces to trace…Yahoo! Because I was going for the culotte look, I lengthened them by two inches. Cut from linen, I think they’ll be perfect for Italy’s soaring temperatures.

107_large.jpg

The paper bag waist is formed by pleats that are stitiched down at the waist. I decided to add a belt to make the waist more dramatic when I wear them with a shirt tucked in.  I also added in seam pockets – – honestly I can’t live without pockets!

IMG_2897.jpeg

I’m wearing the culottes with my new Cuff Top by the Assembly line. I love this pattern. It’s simple but unique with sleeves that are gathered at the cuff by wide elastic. Because the sleeves are cut as part of the bodice, it’s really pretty easy to put this top together. The design details are what make this top special to me…the front seam (flat felled and top-stitiched with a double needle) and the wide boat neck (also topstitiched with a double needle).  Because the front of this top is seamed, you could use contrasting fabric to great effect. I’m imagining another version in a stripe! This fabric is a lightweight gray linen, which should be perfect in the heat. 

My second travel top is also made from linen, New Look N6601. 

IMG_2816This wrap top looks much harder than it is to sew. The neck is pretty simple…faced with bias binding.  Luckily, I had enough fabric to make my own. If you’ve never made your own bias binding, I highly recommend it.  It’s really a easy way to make the inside of your garment special. If you’re curious, check out the many tutorials on U-tube. IMG_3066.jpeg

Fit can be a bit tricky for me with wrap tops, but this is drafted so well, I made a slight adjustment for narrowed shoulders and called it good.

I’m really pleased with these additions to my travel wardrobe…there’s nothing like some new pieces to really heighten your anticiaption of a trip!

I know linen wrinkles, but I’m determined to travel with it anyway. It’s perfect for hot weather, and I’ll pack a portable clothing steamer for a quick touch up when needed. I still plan to sew more items for the trip, but time is running out……fingers crossed that I persevere!!  Happy sewing and thanks for stopping by.


Kobe Top in Embroidered Linen

I know many of you have started your Fall sewing, but I’m still enjoying working through my stash of linen and cotton. It’s just hard for me to switch gears when the weather is still so warm.

Linen is my absolute favorite fabric to wear in the spring and summer, and if it’s soft and a teeny bit worn, I’m in heaven! So, I love to pick up bits of linen (tablecloths, napkins etc) at garage sales, antique stores, anywhere I can find them. I was thrilled at a recent collectible market to find a large embroidered table-cloth that showed no visible damage or stains.

IMG_6128

I knew immediately that I wanted to sew a Kobe top by Papercut patterns, a pattern I’ve been interested in making for a while.

KobeLD_large

I was attracted to the Kobe because of the interesting back.  I love the way the pleat falls across the back neck opening.

IMG_6107

When I bought the pattern, I dreamed of making it from a sheer fabric but then, I saw this linen.  I knew it would be perfect. Actually, now that I’ve made the Kobe, I can imagine a whole host of fabric options for it! Sheer silk, chiffon, rayon challis, sheer lace, anything with flow and movement should work well.

IMG_6550


The challenge of course was pattern placement. I wanted the embroidered details to take center stage. Because the Kobe is simple with only a few main pattern pieces, this wasn’t as hard as I expected.  I centered the largest part of the embroidered pattern on the front center of the bodice and did the same with the back. The trickiest part was figuring out how to do the hem, as I wanted to utilize the lovely embroidered edge. In the end, I did a muslin version to make sure I understood where the length of the front and back would fall on me. I’m really glad I did this because the Kobe is likely designed for someone who is quite a bit taller than me (5’4”). So I did a mid bodice adjustment of an inch. This really brought it up to a reasonable length.   

IMG_6568

On the sleeves, I used the same strategy – -I centered the pattern, and used the scalloped edges as a hem. This did make this a fast project – – no hemming needed!

I love my new summer top. Yes, it wrinkles, but hey, linen is worth it. And I’m happy to say, I don’t feel like I’m wearing a old table-cloth when I wear this, LOL. Have you ever made anything from an old table-cloth?

Happy sewing and thanks for stopping by!


An Anthro Inspired Peplum Top X 4

PicMonkey Collage-7
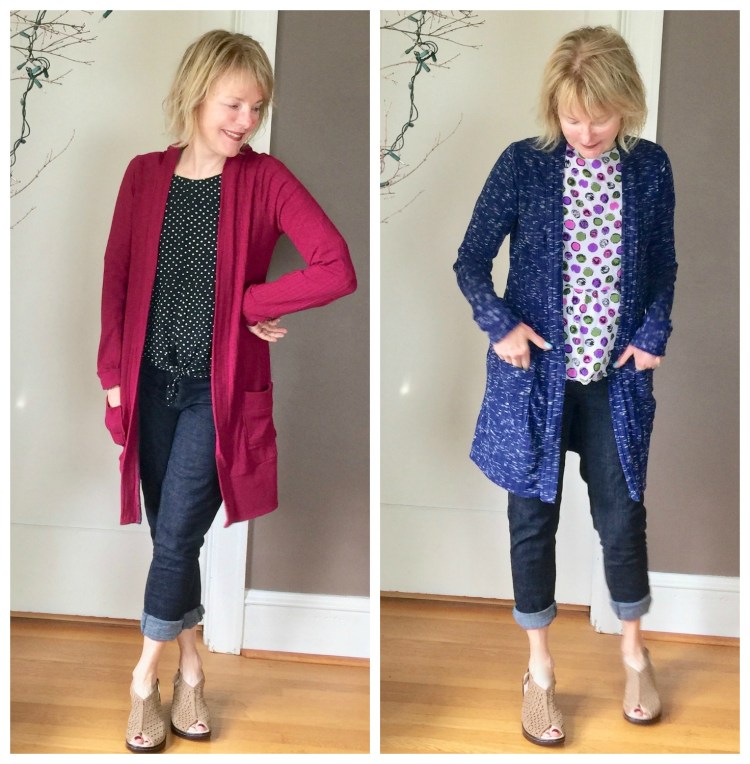
Yes, I’ve gone a little off the deep end over this pattern! What can I say? When I find a favorite pattern, I tend to go a little berzerk, imagining all of the variations…and then, before you know it, I have four versions in my closet! No, I did not sew all of these tops since my last post. They were sewn over the last couple of months, using fabric from my stash (YAY!).

And regarding the style — well, yes, this top has a peplum. I was pleased on a recent trip through Anthropologie to discover that peplum tops are still hanging on their racks.


Whew…so good to know, since I have four of them.!

I’m always amazed at how fabric choice changes the look of a pattern. So I really love doing posts where I show multiple versions. This top is Butterick 6486. I also used the angled peplum on McCall’s 7052 on a couple of versions (OOP, but you don’t really need it to pull off this style). B6486 pattern was really easy to sew – perfect for a beginner. The only modification I needed was to lengthen the bodice by a inch so that the peplum would be just above my waist.

il_570xN.1321868872_dk9p


IMG_3339

This top (version A) is really casual and easy to wear in large part because of the fabric. It’s rayon from Cotton and Steel. This fabric was released last year, a result of their collaboration with the  Rifle paper company. This is top notch fabric, my friends. It wears and sews like a dream. To make this version, I shortened the peplum by 2 inches. I’m not usually drawn to fabrics witl small prints, but I do love this one. The color palate is definitely in my wheelhouse.

This version is in cotton gauze (FabricDepot).

IMG_3541

I made this version for one reason…to wear it with the necklace I have on! It was designed by a local artist using crocheted linen and linen tassles and I needed a top that would allow it to be the center of attention. For this version I used the angled peplum from M7052. This double gauze has extraordinary drape and is comfortable even on a muggy day.

This version is a stiffer quilting cotton.

IMG_3504

It also has a assymetrical peplum, but because the cotton has more body, it looks like a different top!  The stiffer fabric gives the peplum more structure. This fabric has a coarser weave too, so the vibe of this top is casual.

Last but not least, a dressier version from a poly blend fabric with cut outs.

IMG_3448

Of course, I couldn’t resist trying a version out of something lacy! I had this fabric in my stash, purchased last summer, and only had a yard and a third, not enough for sleeves. To let the cutout design of this fabric shine, I lined the bodice with peach colored lining. This version is fun to wear with jeans/pants, but also with a skirt.

Phew – – My minor obsession with this pattern might be over now….we’ll see! Next up, I’ll be working on some pants and skirts to go with these. I’m heading to France in September so am thinking travel wardrobe as I sew right now.

In another sewing news..This week on Crafting a Rainbow, (great blog, check it out!!) Gillian drafted a great post calling for a blogging renaissance. Her thoughts really resonated with me, so I thought I’d share some of my own thoughts on the topic.  In spite of the way Instagram has grabbed the sewing world’s attention, I remain committed to this blog and to following lots of others (see the side bar for my favorites).  Instagram is a fun place to get a quick fix, but I’m constantly frustrated by the fact that there seems to be absolutely no way for me to control what shows up in my feed. I follow alot of people, yet I only see a very curated collection of posts based on some strange algorithm defined by the folks at Instagram. (Is anyone else frustrated by this?!?)  Since I like to control my personal feed,  and since I like the personal story behind the makes…(the details, the inspiration), I head to sewing blogs for that conversation. I do visit Instagram too, but only a couple of times a week. More just stresses me out. I’d love to know your thoughts….

I really appreciate you, and hope we can continue to share and chat for a long time to come.  Happy sewing and thanks for stopping by!


Blackwood Cardigan – the Star of my ‘Me Made May’


For me, Me-Made May is all about figuring out what works in my daily wardrobe and and what doesn’t. As a rule, I tend to wear me-made separates that I mix and match. The questions I ask myself are – – which me-made pieces do I reach for because they make me feel great, and which ones drive me crazy as I wear them? I take notes about my daily choices for myself, only keeping photos of outfits that are revealing in some way to me. The pieces that don’t work are thrown into the revision or donate pile. I don’t post my outfits on social media – – yes, I love seeing other people’s posts but can’t bear thirty-one days of photographs of myself, LOL!!

I’ve had a couple of revelations this month – the big one, which is the subject of this post is my absolute daily dependence on cardigans! Seriously, I wear them almost every day Unpredictable May weather is the culprit – – in Oregon it can be cold enough for a coat in the morning, but shirt-sleeve weather in the afternoon. Enter the Blackwood cardigan!

IMG_2171

Last year, my favorite cardigan pattern was  McCall’s 7476 made here and here. This year, my obvious favorite is the blackwood cardigan by Helen’s Closet patterns.

blackwood-cardigan-illustration

I’m probably the last blogger to be smitten with this pattern, but what can I say? Better late than never…

IMG_2127

Why do I love it? For one thing, the design is perfect for throwing over tops or dresses. Helen suggests that it be used as a layering piece and this blue version I made works with everything in my closet in part, because it’s blue, but also because the length and the cut are superb over everything!

I usually gravitate toward knits that have cotton as the primary ingredient, but I really love how this rayon knit feel against my skin. And it slides over sleeves so nicely!

IMG_2092

Design notes: The Blackwood rests perfectly on the shoulders which makes it great for wearing with a variety of tops and dresses. The bottom band is wide and it shapes the hemline of the sweater in a very flattering way. I love the longer length (perfect for me at 5”4”) and the wide cuff on the sleeve. The pocket size is perfection too!!

Construction notes;

  • For this pattern – the stretch and drape of the knit is everything. You want to make sure your knit has enough stretch on the cross grain for this pattern. Because it isn’t designed to close in the front, if you don’t have enough stretch, this sweater will likely gape open and probably won’t look or feel that great.
  • The front band needs to be stretched slightly to fit.
  • I stabilized the top of the pockets with a strip of fusible interfacing to keep them from sagging too much.

IMG_2159

I’m wearing it here with the Simplicity top I posted a few weeks ago (here).

I give this cardigan a big thumbs up. It’s a quick, fun sew that does the heavy lifting in my wardrobe, and as a result of my Me-Made-May discovery, I will likely make this pattern again and again! My other cardigan patterns will remain favorites, but it’s nice to expand my cardigan universe.  Thanks so much to those of you who recommended this pattern when I asked for ideas in a post last month!

Are you as hooked on cardigans as I am? Happy sewing and thanks for stopping by!