Two Tops with a Difference from Burda Style

I have always looked forward to each issue of Burda Style, but the inspiration I’ve found in the last couple of issues has been amazing. The March issue had so many options I wanted to explore, I abandoned my other sewing projects in favor of a bit of quick gratification. Here are some of the items in the March issue that I found especially appealing.

BeFunky-collageI love (!!) the two mint green jackets. I’m sure you’ll see a few from this collection here over the next few months!

To start though, I focussed on two tops that looked simple but satisfying. The first (3/2019, 112) has assymmetrical gathering in the front, a challenge that looked stylish and comfortable.

You can see from the drawing, that there are some interesting seams and gathers involved. There was no way I could resist this pattern! From the photo above, it looks like the pattern is made from a knit, but it’s actually for wovens. I noticed that this pattern is also available in the Burda pattern book so if you want to avoid the ordeal of tracing this one, hurry down to Joann’s and it will be yours.

IMG_3934

Construction challenges: The difficulty rating Burda gives this pattern is three dots (intermediate). At first glance, I couldn’t imagine why, but it was a bit of challenge. To make life easy for yourself, choose a lightweight fabric with a good amount of drape (I chose rayon). Then, cut out and mark the pattern carefully, paying close attention to the placement of the gathers. If you add gathers where there aren’t supposed to be any (even just a bit!), the front will not hang correctly. Trust me, I found out the hard way, LOL. My rayon is really lovely with a drape that reminds me of silk. But it does not like to be unpicked. So, when I extended the gathers a bit too far, it wasn’t fun correcting my mistake. But I love the assyemtrical gathering here – so worth it!

IMG_3933 2

My second make (3/2019/104) is pretty straightforward. It also requires a fabric with good drape (in my opinion), although Burda recommends cotton shirting for one version of this pattern.

IMG_4119

Well, when I saw the drop shoulders and the big gathered sleeves, it was all over for me:). There weren’t too many challenges here. I cut my usual size but was amazed at how large the neck opening was. Since I have narrow shoulders, I knew that would be a disaster, so I took out 5/8 inch at the center back to correct this. I’m so glad I did, because as you can see, it is still a generous neck-line. I used a rayon that’s almost a gauze, and finished all seams with my serger. I absolutely love these sleeves and they weren’t difficult at all. You just gather the fullness into some cuffs and call it good.

IMG_4118


I’d love to try this in another more colorful fabric for spring, maybe a rayon batik or a double gauze. I was very tempted to head to the fabric store after I completed this version, but fought the urge as I’m trying to sew from my stash. My rule this year is for every three pieces I use in my stash, I can buy one. So, eventually, I will be shopping again!

I’m happy with both of my tops – – they were well worth the time it took to trace the patterns from the magazine insert. Perhaps these two successes are a sign from the universe that my wish-list from the issue should be fully pursued!

#So50visible Instagram Challenge: However, my love for Burda these days does not change the fact that I am less than pleased at their blatent disregard for the sewist who is over 50. Of course, they are not the only company who chooses to ignore us. The Big Four are no better. Have you seen the #So50Visible challenge on Instagram? When you look at pattern catalogs/magazines, it is rare to see a model that is over 50. This is so disheartening to those of us who have supported the Big Four companies for so many years. We’re a huge part of the sewing community and the market – we cannot be ignored. So, find a pattern that features a over 50 model, make it and post it to celebrate how wonderful we all are no matter what our age. I’ll be participating in the  challenge and hope you will join me, no matter what your age.

Happy sewing and thanks for stopping by!


Vogue 8828: If Karl can, why can’t I?

IMG_7172 (1)

I rarely leave the house in anything other than pants and sweaters at this time of year, as the weather makes layering and covering up a matter of survival. But it gets old fast, don’t you think? Pants, jeans, blah! I long to wear a dress, but how? I don’t want to freeze to death.

My dilemma was unresolved until, in a holiday-induced frenzy, I perused the Chanel Couture Collection (I can dream, can’t I?). That’s when I noticed that several of Karl’s creations were actually quilted.


Of course, the Chanel fabrics are so gorgeous, they could do anything to them, and they would be fabulous. But I was caught up in Karl’s message. Dresses can be classic and beautiful, but warm too! Needless to say, creating a quilted dress became my new obsession.

IMG_7187

The pattern I used for my quilted dress is Vogue 8828, a classic style with princess seams, a fitted bodice, a raised waist, and a semi fitted or loose fitting skirt.

I decided to make the less fitted version as I’m in LOVE with A-line shapes at the moment.

I used two different quilted fabrics from Fabric Depot, a black knit and a gray knit. Both fabrics are stable knits, quilted in a diamond pattern, but of varying sizes, a fact I thought would add some contrast to the dress.

I used the black with the small diamonds for the bodice, the gray with the larger diamonds for the skirt. I thought the gray would provide some contrast for the black. But the REAL reason I picked the gray fabric for the skirt was because of the selvages. They were white and tufted, perfect to use as trim on the princess seams and neckline.

IMG_7191

Or course, as I was considering this strategy, I fancied I was mimicking Karl, since he uses trim everywhere. But OMG, what trim! Have you ever seen anything more beautiful than this?

_A2X0357

I made my own trim by cutting those selvages off the gray fabric in 1″ strips. Then, (carefully, let me tell you) I cut them down, reducing them to a width of  5/8″, zigzagging the edges so they wouldn’t unravel. Before sewing the seams, I basted my new trim at the seam line. Then, when I sewed the seams together, the lovely white part showed.

IMG_7154

Honestly, without that selvage trim, the dress would have been (dare I say it) boring? Black and gray are favorite colors of mine, but they can be a bit dull, to say the least. The lines of the princess seams are the best part of this dress and I’m glad the trim highlights them.

Vogue 8828 is a winner. I love this pattern. The style is classic, but fun and it went together easily. There are a few pattern pieces to manage, but in this instance, Vogue does a nice job of describing the construction steps so that it doesn’t make you lose your mind. Also, the sewing required to complete this dress is pretty straightforward. If you know how to insert a zipper, uou can’t go wrong! My only wish is that I’d used a invisible zipper. Oh well, there’s always next time.This dress is cozy, so it will get a lot of use.  I plan to wear it to several wintery evening events.  I plan to make this pattern again soon, from a dressier fabric.

My conclusion? As usual, Karl wasn’t wrong. Quilting doesn’t need to be limited to heavy overcoats and down jackets. Now, if I only could get my hands on some of his fabulous fabric!

Have you ever made a quilted garment? Did you wear it, or did it end up in the ‘recycle’ pile? Happy sewing, and thanks for stopping by!


Me, Amal and Lace 

Blame it on Amal Clooney. I would not have attempted this dress if it wasn’t for her.  Not only is she a brilliant attorney with a enviable last name, look how well she wears Dolce and Gabbana.

23788b4d00000578-2847905-special_guests_anna_wintour_was_a_special_guest_at_amal_s_weddin-93_1416867431334

Here’s another great example. The lace detailing accentuates the shape of the dress and makes it pop. Yet, the dress doesn’t look too fussy or girly.

_KIM0469.1366x2048

Inspired, I decided to attempt a knock off.

I used New Look 6209, a sculpted sheath with contrasting side panels and yoke. When I saw the photo on the front of the pattern envelope, I wondered if you could  achieve the same sort of contrast with lace appliqué. I also liked the unusual sleeves, with the pleated sleeve caps.

DSC02714

Part of the charm of the Dolce and Gabbana dress for me, was that the lace was appliquéd over tweed. So, I used a stable Ponte knit of light gray for the dress, thinly striped with black. (purchased at Fabric Depot.)

I cut the dress out of the Ponte first, then sewed the front to the side panels and the yoke (also cut from lace). Once the front was assembled, I measured the length of each side panel seam to determine how much lace I’d need for the contrast.

That’s when I realized just how complex this task would be! The lace had to be placed just so along the side panel’s seams, or it would draw attention, (maybe even exaggerate!!!) the parts of my body that just didn’t need it.

To avoid that, I had to figure out exactly where to stick that lace, if you get my drift.

DSC02724

First, I tried to pin the lace on the front of the dress while I stood in front of a mirror.   Let’s just say, that was a Very Bad Idea and leave it at that.

After a bit of trial and error, I decided to pin the dress front to my dress form (seems so obvious now!) and adjust the lace placement until it was right. Then, I hand basted the lace to the fabric.

Now for the crafty bit.

I used my trusty Bernina to appliqué the lace on, tracing each of the curvy edges with stitches. At first, the patience required for this was a bit out of my wheel house. Not only that, but I realized a wrong move would mean that I’d have to rip out a lot of stitches (not my favorite way to spend an afternoon.) Panic!

But as we all know, “Do or do not. There is no try.”

I forced myself to persevere. Not only was it a Growth Moment, but I had way too much money invested in lace and fabric to give up the ship.

The appliqué stitching took a long, long time. Two old movies later though, it was done! The day brightened! I went on to finish that dress.

DSC02715

Oh, one other thing. I added a bit of lace on the bottom of the sleeves too, a six inch swath of lace sewn on to the bottom of the sleeve as a cuff.

DSC02713

The pattern was easy to assemble with very little adjusting. But when it was completed, I wasn’t sure I liked this dress, wasn’t sure lace was my thing. But after spending SO much time on it, I had to take it out for a spin. At a dressy evening event, it was kept up with the best of the LBD’s, so I’ll probably wear it again.

Have you tried to recreate a designer look? I’d love to hear about your ‘knock off’ efforts.

Not Your Mother’s Peplum

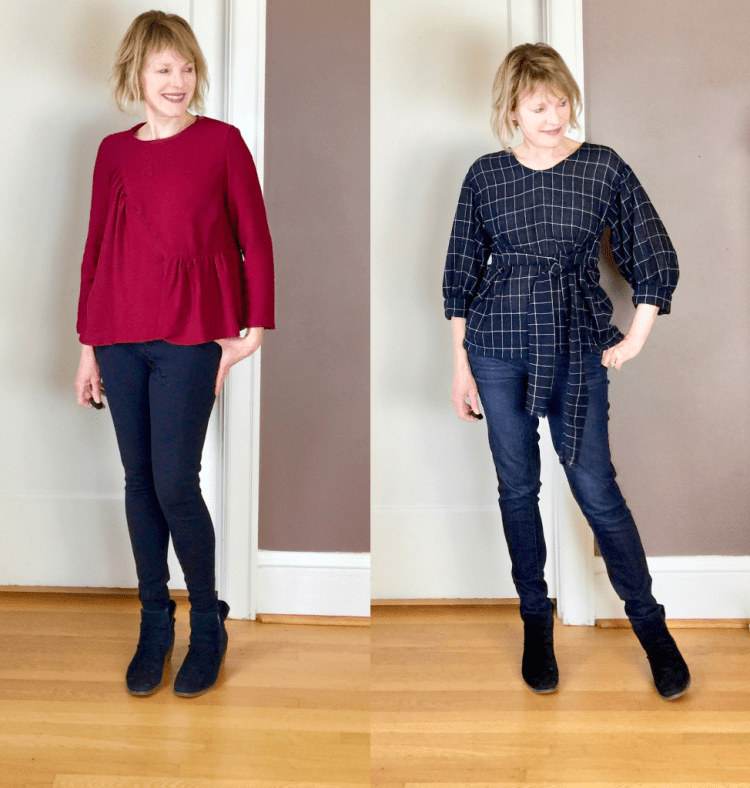
During one of my recent jaunts into the enticing, instantly gratifying world of ready-to-wear, I heard a discussion through a thin dressing room wall (which is not really eavesdropping, right?). “You absolutely cannot wear that,” one woman said to another. “It’s a peplum and they are a fashion NO!”

It was an interesting statement, one that begged for debate, or at least, extensive internet research. So, I perused the designer collections for Spring, and discovered that there could be a bit of truth to that. The old, more extreme peplum look does seem to be gone.
But now, there’s a new peplum in town. It’s less of a waist defining shape. It seems lower, a bit looser, and a little less (dare I say), prissy than the ones that came before.
Here’s one from Marni that I fell hard for.
MAR_0651
Another from Thakoon that could live in my closet if it wanted to.
503702568_1_topcropfront
Cute shorts too.
After all that research, I had to make one of my own. The pattern I used is Vogue 8815, a fitted top with a raised wast, long front darts for shaping, and a narrow hem. I chose view C because it had an interesting, less traditional look.
DSC02697
I used a lightweight cotton purchased from Fabric Depot that is a dusty denim blue (I hope to some day get over my denim obsession). Not only did I buy it because it’s Blue, but because it has a dot pattern imprinted on the fabric that I love. I used a similar solid cotton for the sleeves.
DSC02694
The pattern was easy to put together. Although view C is a pullover, I added a zipper in the back, just because it felt more finished that way.  I cut the smallest size (8) and adjusted the side seams for fit, since I’m usually a 6 through the back.
The peplum fit onto the bodice perfectly. On view C, it doesn’t extend to the back which makes the whole process easy and fast. The neck is finished with seam binding, also easy and fast. The hemline is lower in the back than the front, which gives it a bit of an edge. Cool, but it’s something to keep in mind when you choose the fabric though, as the wrong side shows.
DSC02700
 I think I like the look of a looser peplum as it feels fresh and different. This is an easy top to wear, so comfortable you could eat Thanksgiving dinner and still be able to breathe! I’ll probably have to make another, soon.
How do you feel about peplums? Has it been done to death, or do they still have a place in your heart?

Girly Print Meets Leather

When I shop for fabric during the Spring and Summer, I’m always drawn to the colorful prints. I have a hard time giving in to their allure though, because when I wear them, I feel too sweet.

But when I saw the Cotton and Steel prints this season at Fabric Depot, I had to indulge. To balance out the look, I decided to mix things up a bit, pairing the printed shirt with an edgier skirt with leather detailing and a zipper. Wearing a bit of leather and metal keeps me from feeling too…Girly. Obviously, I have issues!
DSC02589
The shirt:
The fabric I picked is a cotton lawn print, designed by Rashida Coleman Hale, her Mochifloral Teal.The colors are very ‘me’ so I nabbed a couple of yards for Simplicity 1422, a shirt with tabbed roll-up sleeves.
DSC02578
Simplicity 1422 is a great shirt pattern, with interesting variations in length and style. It was super-easy to put together, in spite of the fact that it has a collar, and tabs on the sleeves. You can sew it in an afternoon for a good dose of instant gratification. The cotton lawn is a dream to work with, easy to manipulate and press.
The skirt
To give the outfit a bit of contrast, I paired it with a brown, leather- trimmed zippered skirt made from Simplicity 1322.
DSC02579
It’s a mock wrap slim skirt. The fabric is a stable Ponte knit, that I bought so long ago, I have no idea where :). I modified the waist band of the skirt, narrowing it a bit since I have the stubborn (but perhaps inaccurate?) notion that narrow waist bands are more flattering on me.
For the side slit, I trimmed the opening with leather (Fabric Depot), then added a full length zipper, rather than the short one pictured on the pattern envelope. I did this, well, just because!
 DSC02586
This skirt pattern is super easy with many variations. I’ll use it again and again. I’ll make the shirt again too, maybe in a longer length.
All in all, a fun project and both patterns are keepers!
What do you think about Spring prints? Too sweet or you can’t live without them?

A Spring Coat like Betty’s

Betty Draper was my inspiration for this coat. Do you all remember the blue coat she wore in season one, when she was still in love with Don?
betty1bluecoat-web
A statement coat to be sure! And look at her hair, how it curls under so perfectly! No wonder Don had to have her.
I made my version of her coat from a Butterick pattern from my own extensive (!!) archives. It’s Butterick 5569, a coat pattern designed by The Cut Line that has princess seams and a big collar that gives the style a retro feel.
DSC02471
The fabric is from Mill End, an incredible fabric store here in Portland that has a wool department that beats all. My coat is made from a thick, double-faced wool in black, dotted with flecks of white.
To sharpen the details, I trimmed the coat’s front lapel and collar with piping, then finished it with vintage buttons I found in Stars Antique Mall in Portland.
DSC02483
Because the wool is double-faced, it’s very heavy, so I didn’t want to line the coat because I thought it would be too hot to wear. So, I finished the seams with binding so that they wouldn’t fray, giving the inside of the coat a finished look.
The coat’s comfortable and warm. I even braved the elements and wore it when I visited Anthropologie last week (okay, true confession. I do not make everything I wear, LOL), and I did not feel out of place in my me-made garment, which makes it a win, right?
DSC02481
Soon, it will be so warm here in Portland, I won’t want to wear this coat (says the optimist).  But right now, Summer feels years away, so coats are a must.
DSC02686
I love retro fashion, but prefer to sew from modern patterns with their fabulous fit. What about you? Have you used vintage patterns? Good experience or bad?

Shift dress: Then and Now

I must be watching too many Mad Men reruns, because this week, I found myself crafting my very own shift dress!

And I’m not the first person to want this look. Audrey did.AHepburn21_V_18Nov11_rex_b_426x639

Twiggy did.Twiggy-201x300

Jean Shrimpton did too.JShrimpton3_V_23jan12_pa_b_426x639

Pretty good company, if I had to say. It’s a timeless shape and the look is easily modified with a belt, or a bit of bling. The look became popular in the sixties when Audrey Hepburn wore a black one designed by Givenchy in Breakfast at Tiffany’s.

This week, I made my own shift dress out of a woven fabric, a chambray that looks like light-weight denim, purchased at Fabric Depot.

DSC02571

I used Vogue 8840 as the base of my design, a pattern for a drop-shoulder tunic with sleeves. I lengthened the pattern, then embellished it with pockets with buttons, and cuffs on the sleeves.

DSC02458


I self drafted the pockets by cutting seven-inch squares. I added flaps that by free cutting four triangles from the fabric, then faced them by sewing them together. I added the buttons after the fact because I thought the pockets looked boring without them.

The double top stitching came to me after shopping ready to wear. I tried on a similar dress and noticed how the stitching seemed to make the details stand out. Top stitching is mindless, but satisfying, don’t you think? And it’s a easy to do while you watch old movies, a huge plus as far as I’m concerned!

Shift dresses are so easy to wear. I also could belt this and wear it over leggings in the fall. DSC02457

After all, Audrey Hepburn belted hers! And who doesn’t want to be like her?

What about you? Do you like the shift dress look? Who do you think did it better? The girls in the sixties, or us?  Do you have a favorite shift dress pattern?


White – – It isn’t just for brides anymore!

Rumor has it that the Little White Dress has replaced the Little Black Dress for Spring. It’s a trend that’s been highlighted by both Vogue and Harper’s Bazaar magazines, and Nordstrom’s blog recently announced that we can wear white ANYWHERE.

Although I’m not usually tempted by trends, this was one I couldn’t resist. Why? Because I found the Perfect Fabric of course, a quilted knit in winter white, stitched with a diamond pattern.

You know how it goes. You see a fabric, you fall in love and, voila’! Things happen.

DSC02400

To make this casual dress, I made some modifications to a basic pattern from Vogue, 8840, a tunic top with dropped shoulders, a round neckline, and a front and back center seam. The center seams make shoulder adjustments easy for my pathetically narrow shoulders (sigh).

Because the fabric had a bit of stretch, I cut the pattern a size smaller than usual to account for the built-in ease of a knit. I also cut a border of six inches to attach to the hem to make the tunic dress length.

To achieve the bell shaped look of the sleeves, I added what is essentially a six inch border to the short sleeved version of the tunic, narrowing the border where it attaches to the sleeve, widening it at the bottom.

DSC02401

The knit had more stretch than expected so, I tailored the fit just a little by taking in the side seams by another 5/8 inch to keep the dress from resembling a large, white sack.

After trying it on, I decided the lines of the dress needed to show more, so I added a bit of contrast with strips of left over sweater knit, with a loose weave that unraveled when the edges were unfinished. So, I cut four 1 inch strips of that, and used it to trim the center seams, the pockets and the hem border. Then, I purposely frayed the edges of the sweater knit to give the dress a bit more of an edge, which it sorely needed.

DSC02403

DSC02403

I think I’ll wear this dress as it’s comfortable. Not only that but it works with a favorite pair of boots. As the weather improves, I’ll accessorize with sandals instead.

What about you? Do you believe the LWD is a look that’s here to stay? Do you like to use the raw edges of fabric when you create?