Summer Making Journal 2: a Patchwork top, Inari hacks and Free Range Slacks

IMG_1094Hi all! July was a busy month in the sewing room. Recently, I cleaned my closet and donated several ragged tops (made so long ago!). I’ve been on a mission to replace them, while honoring a pledge I made to myself to use up my remnants. That pledge led me here…to my first pieced top.

IMG_1116I have never been able to throw away even the smallest scrap of linen. It’s too wonderful to toss! So, when the #JoinupJuly challenge started on Instagram, I was challenged to join up some of my linen scraps into a top.

The process of making a patchwork top isn’t difficult at all. Basically, with a quarter inch seam, you piece blocks and bits of fabric together, varying the colors. Then, when your pieced creation is large enough, you lay your pattern pieces on it and cut! My top is made using the Inari pattern from Named clothing(also made here). The lines are simple so it showcases piece work nicely.  It was so fun to figure out how to combine the linens into a pleasing pattern.

IMG_1185Here, I’m wearing my new pieced Inari with my first ever Free Range Slacks,a lovely pattern from Sew House Seven. I’ve been wanting to make these pants for ages. I used linen from my stash for this version.  I love the boxy shape of the pants, the cool seams and the deep pockets. But I found the fit to be more generous than I expected. Because the pants are high waisted and I’m short waisted, the fit of the rise was challenging. I’m pleased with the result, but my advice is to remember the loose fit when you’re choosing the size to cut. A toile would be a good idea too!

IMG_1153As you can see, the fit isn’t perfect yet. There are creases in the crouch. I’ll adjust the rise a bit more next time.

IMG_1339Here’s another Inari, this one with sleeves. I made this from rayon scraps left over from my Sew Over It Wrap skirt (see it here).I do love this rayon! It’s from art Gallery and it is so sumptious to wear. It flows so nicely too! This pattern, the Inari, is a keeper too, simple but stylish and so easy to modify to make it your own! The shorts I’m wearing are Simplicity 8841. This is a easy pattern with great fit! It has a elastic waist so you can make it quickly.IMG_1238I’m wearing my Inari here with the paper bag Burda shorts I made last summer (Here)…Love these! The linen just gets better with time. I wear them constantly!

My last Inari was also made from linen scraps, left overs from this summer dress.IMG_1274Again I used the Inari. Because I had oddly shaped pieces of fabric, I had only enough for a cropped version of the front and back bodice. So, I added a short peplum also pieced from scraps. Luckily the gathering of the peplum hides the many seams:). The sleeve bands are cut from a contrast linen.

That’s it for me for now. I’m in the process of cleaning and reorganizing my sewing room using Ikea modular shelves. And even though I recently reorganized my stash, I’m revisiting the scheme. Isn’t that the way it is with this hobby? It seems like there’s always a better way to organize your fabric, notions and patterns.

Stay safe and healthy. Happy sewing! Thanks for stopping by.


A Cardigan for Early Spring:McCalls 6802

img_1938Yes, I know the title of this post is optimistic. Sure, there are several months of cold weather between me and Spring, but I can dream, can’t I?

This knit fabric is so soft, I knew at first sight I had to make a sweater-y wrap from it. This new cardigan is a perfect seasonal transition piece: it’s as cozy as a coat, but as soft and light as a sweater. I’ve had this knit in my stash for several years (!!). You know how it goes..sometimes you love a fabric so much, you can’t bear to cut into it.I’m glad I finally settled on this cardigan though, becuase I’ve worn it constantly since I finished it.img_1876I am a big fan of any garment that has a hood. They’re so useful when battling the elements of course, but also just to keep the chill off my neck. So the fact that McCall’s 6802 had one was a big selling point for me.

m6802_aThis loose-fitting cardigan could not be easier to make! It isn’t lined and the sleeves are cut as part of the bodice. So easy! I was able to finish it in about 3 hours. I did make one modification though. The pattern is designed to have an unlined hood with the wrong side showing. Although I like both sides of this fabric, I wanted the inside of the hood to provide contrast, so I cut a duplicate  of the hood and the front band pieces to use as a facing.

img_1968Not only does the lining provide contrast, but the facing makes the hood  warmer too. The sizing on this pattern is generous.  I cut a size 8 (the smallest size), but it was still too big, so I had to take in the seams until it fit. Also, the pattern doesn’t call for a front closure and, although I love the oversized look of it when worn open, I’ll likely wear it with a belt to keep it from becoming a parachute in the wind. If that gets tiresome, I’ll probably just add a couple of buttons down the front.

img_1900Because the cardigan is unlined, I finished the seams with my serger.A note about the sleeves: I like rolling them up a bit when I wear them, and I forgot to take photos of them unrolled. So, just so you know, they are loose and about three-quarter length, cut ‘kimono’ style. img_1947My style is pretty casual these days, so I think this cardigan will be a great addition to my wardrobe. I like the weight of this knit. It’s not too heavy, but warm, so it should be great to wear outside when the weather improves just a little. This fabric is a cat hair magnet though! Hmmm, a certain feline is going to have to stay away from me when I wear it. The colors are great though – -Not only do they blend with Dustin’s fur, but the earthy tones have just a pop of warmth that makes me feel cozy when I wear them.

Even though there’s alot of cold weather ahead, I’m feeling the urge to sew with Spring fabrics…crisp cottons and linens, maybe even some silk. But do I have anything planned? Not so much. I seem to be enjoying ‘sewing on a whim’ these days, and working through my stash. When do you transition into Spring sewing? Is now the time, or am I too early?

Happy sewing and thanks for stopping by!


Sew the look: Patchwork Cape

IMG_8118

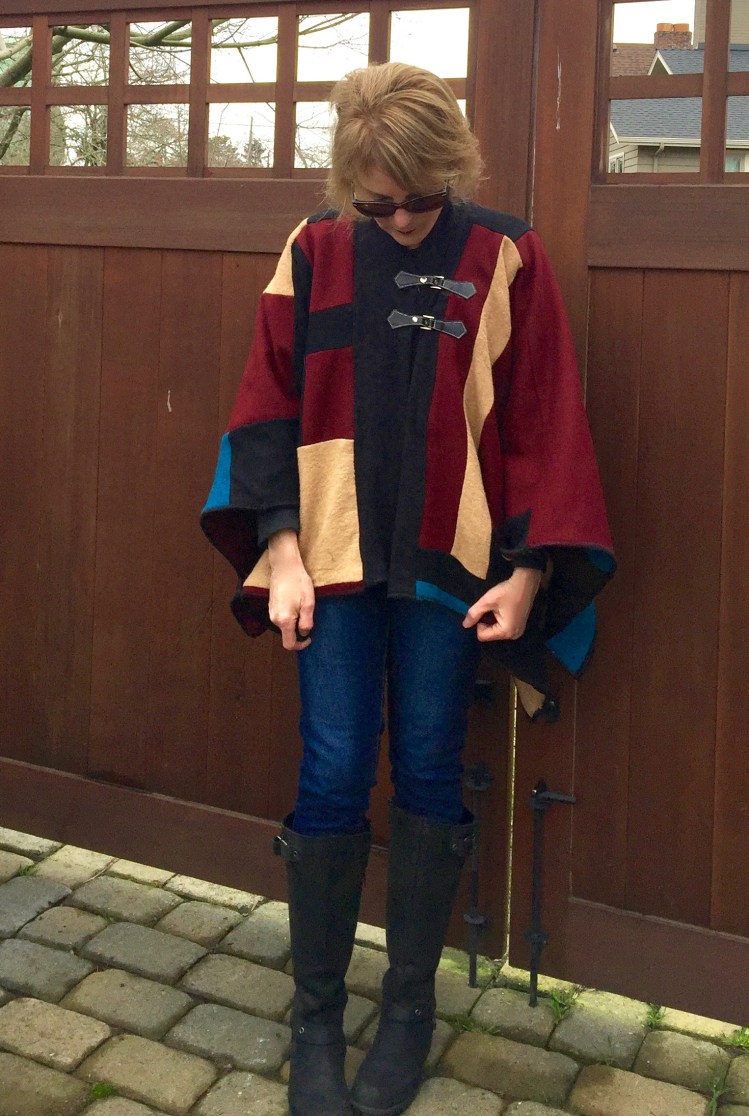
Hi all – If you follow sewing blogs, you’ve probably heard that February is UFO month, unfinished objects, as in projects that have languished on your sewing table and need to be completed. True confessions. I have PLENTY of those. This cape is a perfect example, a stash busting project I started a year ago, but couldn’t seem to finish.

I was inspired to make this cape by the Burberry capes I saw on the fall runways.

Image 2-16-16 at 3.50 PM

I loved the lovely color blocked blanket look, and decided by doing a bit of patch work I could get something similar.

The pattern I used is Vogue 9038, an easy cape you can sew in an evening.

I used the pattern pieces as a template as I began to piece together bits of wool I had in my stash. Although the pattern offers a rounded version and a squared off version, I chose the squared off version so that I could block solid pieces of wool together without having to deal with curves! I used five colors, about 1 yard of red, 1/2 yard of turquoise, 1 yard of black, 1/3 a yard of camel, 1/3 yard of brown. I made the smallest size of View A as I am only 5’4″.

I patch-worked two versions of the cape so that it would be double faced and reversible.

Here’s side one.IMG_8129

Side two.

IMG_8141

I laid the pieces of fabric on my sewing table and just cut rectangles and squares, sewing them together with 5/8″ seams until I had the shape of the cape filled in. This took about two hours per side, as I stopped frequently to decide what color to use next. I didn’t use a template..I just cut and sewed. There wasn’t any method to my madness other than I knew I wanted to have one side predominately red, and the other predominantly black.

It was an easy fun project, perfect for a day of binge watching. The sewing is all straight sewing, no curves, collars etc. So mindless and fun! After sewing my two capes together to make one, I finished the edges with a overlock stitch, using heavy thread. On one side, I sewed two leather toggles (not sure if that’s really what you call those things) so that if it was a windy day, my cape would stay securely fastened. Sometimes though, I’ll just throw it over my shoulder and go.

IMG_8153

I don’t know why I waited so long to finish this. Sometimes it’s the simplest projects that  seem to stump me. I dithered about how to finish the edges, then I procrastinated on sewing on the leather toggles (with see-through thread). But I’m glad it’s finished now, because it’s so wearable. It’s so easy to throw on for a quick trip to the store, or for an evening out with friends.

What projects are you finishing this February? Happy sewing and thanks for stopping by!