A off-the-shoulder look inspired by Theory

PicMonkey Collage-7

As you all know, I love a good designer knock-off, and Theory is one of my favorite designer lines. Last fall, a friend of mine wore the Theory shirt (on the left) to a dinner at my house, and I was smitten. She wore the shirt a bit off the shoulder and I loved the way the the gathered neckline was created by a drawstring.

IMG_2792

To create my knock off version, I used Simplicity 8550 as a template.

simplicity-off-shoulder-shirt-pattern-8550-envelope-front

The best news about this pattern is that I found it for a $1.99 at Joann’s!!  I have so many sewing patterns, I can only justify an addition if it’s a bargain. Yes, Indie patterns are great options, but you can’t beat the price when the Big Four go on sale.

simplicity-off-shoulder-shirt-pattern-8550-front-back-view

The neckline of the Simplicity top is similar to the Theory shirt in design, but it’s a bit wider. Also, it doesn’t have a drawstring closure.PicMonkey Collage-6To add a drawstring at the neckline: First, I adjusted the neck opening to make it a bit smaller. To do this, I took a half an inch out of the front and back bodice pattern at the center front and center back. Because the cut of this shirt is so loose in the shoulders and bodice, that adjustment did nothing to the comfort or fit of the top. To make the channel for the drawstring (a simple black ribbon), I replaced the neck facing with a strip of bias tape, and inserted the ribbon through that. Pretty simple modification…

Other adjustments: I tapered the bodice a bit by adding two eyelash darts in the back from the shoulders to the waist. Even though the Theory shirt is collarless, I couldn’t resist adding some drama with a big collar.

I was tempted to use Chambray for the top for my knock off, but decided I have too much blue in my wardrobe. It’s time for a new color…red! This cotton is from Fabric Depot and it has just the right amount of body for the collar – yet isn’t too stiff for the drawstring/gathered neck.


IMG_2789

This top was definitely a fly-by-the-seat-of-my-pants project, and I feel lucky that it turned out so well:) I love the fact that, with a tug on the drawstring, I can adjust the neckline of this shirt as the mood strikes. The color is nice for a change too. This top won’t be a wardrobe orphan because it works so well with my favorite Ginger jeans and with my denim skirt too.

Well, I think this officially begins my summer sewing. Fingers crossed that I get to wear it soon! Happy sewing and thanks for stopping by!

An Anthro Lace Dress Knock-Off

PicMonkey Collage-5

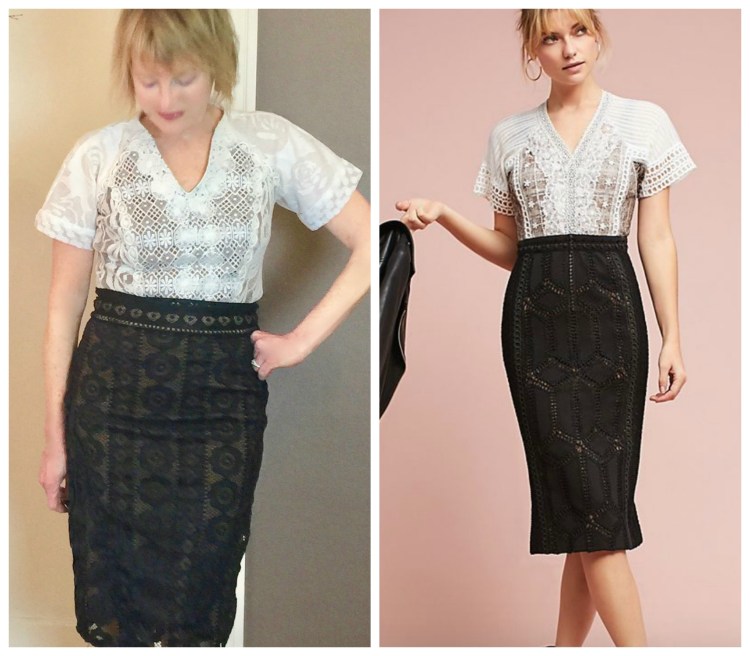
Which one is from Anthropologie? Ha, just kidding. As you all know, I have a thing for lace and when I saw the above dress from Anthropologie, I wanted it in the worst way. The lace is gorgeous, but the style is a bit edgy, a must have if you ask me! But the price tag stopped me in my tracks. $728.00. Okay, it might be worth it with all of those gorgeous layers of lace, carefully sewn in place. But, hey, we can do that; am I right? Enter the Pattern Review Bargainista contest, just the motivation I needed to get it done! IMG_8867

I used Simplicity 1699 as my basic template for this dress.

1699

It’s a simple design, a peplum top or dress with raglan sleeves and a simple rounded neck line. Since, I’d made it before I knew it would fit me, freeing me to focus on the design elements I wanted instead.

First, even though the Anthropologie dress is one piece I saw it more as a skirt and top. So I split the dress at the bodice and added a waistband to make it a skirt.

Then, I started in on the bodice/top. I cut the lining pattern pieces first then cut corresponding pieces from the lace (contrasting pieces of white lace, purchased at Joanns.) and sewed them together. I wanted a v-neck, so I cut that too.

IMG_7326 Once I had the basic bodice constructed, I took little bits of lace and layered them over the first layers of lace, focussing on placing eye popping elements on the princess seams and neckline. Then, I finished the seams, added a zipper and hemmed the bodice so that it would be a top that could be tucked in or worn out.

IMG_1973By the time all that detail work was completed, I was ready for simple tasks. I was glad the process for the skirt was much easier. I just cut it from the lace, added a waistband, and lined it – phew!

IMG_8884

The process of layering the lace on the bodice/top took some time, but it was so satisfying. Deciding where the bits of lace should go was fun, and hand stitching them into place was a calming process. I often forget just how therapeutic hand stitching is!

The good news? My new dress/ensemble is close enough to the original that my credit card is no longer in danger of being used.

IMG_8863

  • Here’s how the costs broke down using the Pattern Review contest formula – – Column dress designed by Byron Lars for Anthropologie – – $728.00
  • 2.5 Yard Fabric for lining (top and skirt) – Joanns – $12.99 per yard on sale for $9.00 x 2.5= $22.50
  • white lace fabric; (3) 1/2 yard pieces for contrast on bodice front and back (1.5 yds total)  $6.99 X 1.5 = $10.48
  • Black Lace for skirt overlay 1.5 yards x 12.99 yard on sale for 9.00 = 13.5
  • 18” zipper for top – $2.99
  • Bits of lace for top embellishment purchased at a thrift store – $5.00
  • 7” zipper for skirt (invisible) $3.99
  • Total: 58.46
  • $728.00 – $58.46 = 669.54
  • $669.54 / $728.00 = .91969 =91.9 % savings

IMG_8861

There’s nothing like a Pattern Review Contest to get the creative juices flowing. Be sure to follow the link  to check out all of the entries – there are some amazing creations and some incredible Bargainista’s out there!

Happy sewing and thanks for stopping by!

DIY: Philip Lim Inspired Top


img_2016
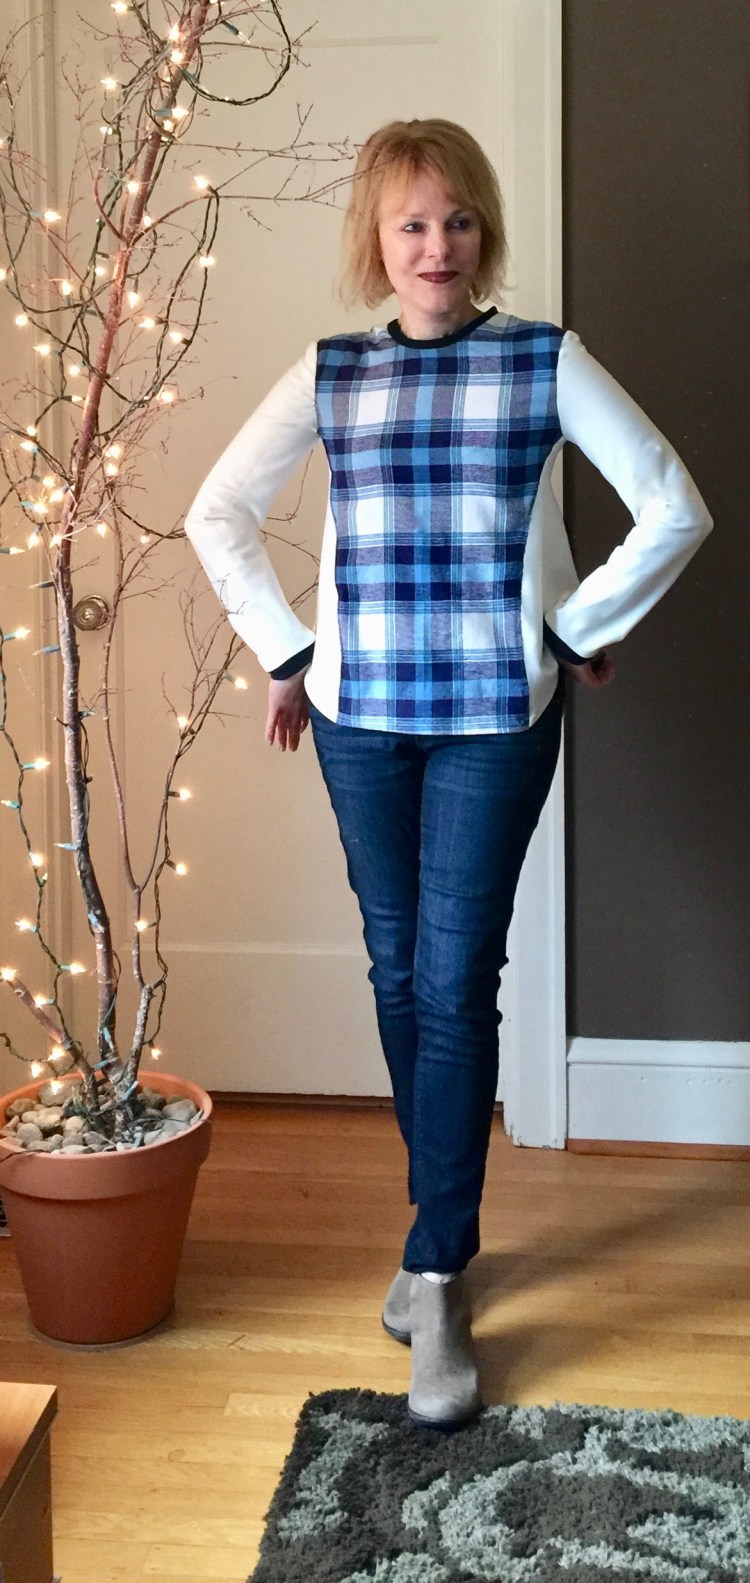
Hi all! The inspiration for this stash-busting top was a Philip Lim creation I saw at the San Francisco Saks a couple of weeks ago. It’s so fun to wander around in that amazing store, a real treat for me since we don’t have a Saks here anymore (wah!). But when I saw this top it was instant ‘love’. The bold plaid, the color blocked side panels, the contrast trim and stitching, I wanted it all. But alas, the price tag….

0400092850625_247x329

So, I set about making my own version. The good news? I used left over remnants from my recent Day Dress, and another plaid from a top I made years ago. So no new money was spent in the making of this top.

img_2040The pattern I used for this make is a tried and true: Vogue 9054.

It’s out-of-print but still available on their website and on Etsy. The design detail that makes this pattern the perfect choice for my Philip Lim top is that it has a front panel. So, that’s where I placed my cotton plaid. I used a contrasting off white knit for the side panels. Even though this pattern is designed for knits, my inspiration top combined knits and wovens, so I went out on a limb and did the same thing. I think the loose design of this top made that combination less risky than it otherwise would have been. The fit really didn’t change. I also added a contrast band to the collar and cuffs.

img_2020A detail I love on the inspiration top was the stitching on the front and back panel seams. To get that look, I top stitched those seams with a decorative stitch. I wanted to use the flat lock stitch on my serger, but alas, it just wouldn’t behave. My substitute stitch isn’t quite as stunning, but I still like it.

img_2070

I especially like the way Vogue designed the hemline of this top. There’s a bit of a high-low thing going on there that’s fun.

img_2002Well, I think my top will work as a reasonable substitute for the Philip Lim top, and wearing my DIY  version will save me from spending hundreds of dollars I don’t have. I rarely think that sewing saves money, but when it comes to designer fashions, it has a very strong edge. Thanks to Philip for the inspiration! The colors of this top make it a seasonal transition item, I think, and I feel almost Springy as we persevere through another ice storm with freezing rain. Ugh!

I’m glad I used some fabric from my stash here, because my goal this year is to reduce the size of  my stash (yes, I used bold font so I won’t forget, LOL). Lately, I’ve been feeling like I have to ‘sew to my stash’, if you know what I mean. I often buy fabric with a project in mind, but by the time I get to it, my enthusiasm for it has waned or the inspiration is gone. That means my stash is huge, and it means my sewing is often motivated by the guilt that comes with excess. It overwhelms and confuses my creative urges (yes, I’m a junkie). So, my goal is to sew some of it ASAP and give some to friends or charity so that it doesn’t weigh me down. What do you think, fellow fabric junkies? Will this strategy work? 

Happy sewing and thanks for stopping by!


A Missoni Inspired Boho Poncho

img_0769

Hi all! The weather outside is frightful but wearing a poncho is so delightful! With this cozy new make, I’m well prepared for the possiblity (fingers crossed…) of a white Christmas.

img_0784

Will it happen? I doubt it, but I’m glad I made this easy poncho. I loved laying out the pattern pieces so that the fabric’s cool weave would shine. What I didn’t like about this project? The Blanket Fringe. Yes, it looks easy, but OMG! The process went on forever. It took so many hours, I blew through my usual ‘sewing’ diet of old movies and binge worthy television series. So what did I watch? Old episodes of the Gilmore Girls. Remember that show? Such a  blast from the past, a show full of the optimism that comes from a fictional but perfect small town world. In spite of that cheery back drop, I was pretty cranky by the time this fringe was done. Still, I do love the look!

The inspiration for my poncho was a Missoni original that I’ve worshipped from afar. That makes my poncho worthy of Designin’ December, don’t you think?

missoni

Besides the cool fringe, I love the Missoni version’s hood and contrast trim. In rainy Oregon, hoods are not optional, so I was quite pleased to add one.

img_0789

I trimmed my hood with fleece binding, and used wool yarn for the blanket fringe. Blanket fringe is pretty easy to do. There are lots of U-tube tutorials, but here’s a quick summary. You poke a hole in your fabric then you pull doubled strands of yarn through the hole with a crochet hook. It’s a breeze, really, but I truly underestimated how much time and yarn it would take to fringe this poncho (Slow death by fringe).

img_0807

The pattern I used is Butterick 5715, View D. The pattern is out of print, but available on Etsy.

5715

I used a wool blend from my stash. I thought the front yoke detail might make this pattern complicated, but it went together quickly. I trimmed the front opening with contrasting fleece, but left off the buttons, opting for a looser, less structured look to mimic the Missoni version.

img_0776I love my new poncho so much, we’re destined to be inseparable! This is the way I like to dress- – in warm layers that are comfortable, easy, but that have ‘a look’.  And I have to confess. I think the fringe makes it. So maybe it was worth the crazy hours I spent on it? Hmmm….but there must be an easier way. Have you fringed anything? Did you do it the way I did? Was it torture?

I love looking to the designer runways for inpiration, which is why I love Designin’ December. For more about it, visit Linda’s fabulous blog – –Nice Dress, Thanks I made it. And join in!

I hope your holidays are joyful! Happy sewing and thanks for stopping by!


Me, Amal and Lace 

Blame it on Amal Clooney. I would not have attempted this dress if it wasn’t for her.  Not only is she a brilliant attorney with a enviable last name, look how well she wears Dolce and Gabbana.

23788b4d00000578-2847905-special_guests_anna_wintour_was_a_special_guest_at_amal_s_weddin-93_1416867431334

Here’s another great example. The lace detailing accentuates the shape of the dress and makes it pop. Yet, the dress doesn’t look too fussy or girly.

_KIM0469.1366x2048

Inspired, I decided to attempt a knock off.

I used New Look 6209, a sculpted sheath with contrasting side panels and yoke. When I saw the photo on the front of the pattern envelope, I wondered if you could  achieve the same sort of contrast with lace appliqué. I also liked the unusual sleeves, with the pleated sleeve caps.

DSC02714

Part of the charm of the Dolce and Gabbana dress for me, was that the lace was appliquéd over tweed. So, I used a stable Ponte knit of light gray for the dress, thinly striped with black. (purchased at Fabric Depot.)

I cut the dress out of the Ponte first, then sewed the front to the side panels and the yoke (also cut from lace). Once the front was assembled, I measured the length of each side panel seam to determine how much lace I’d need for the contrast.

That’s when I realized just how complex this task would be! The lace had to be placed just so along the side panel’s seams, or it would draw attention, (maybe even exaggerate!!!) the parts of my body that just didn’t need it.

To avoid that, I had to figure out exactly where to stick that lace, if you get my drift.

DSC02724

First, I tried to pin the lace on the front of the dress while I stood in front of a mirror.   Let’s just say, that was a Very Bad Idea and leave it at that.

After a bit of trial and error, I decided to pin the dress front to my dress form (seems so obvious now!) and adjust the lace placement until it was right. Then, I hand basted the lace to the fabric.

Now for the crafty bit.

I used my trusty Bernina to appliqué the lace on, tracing each of the curvy edges with stitches. At first, the patience required for this was a bit out of my wheel house. Not only that, but I realized a wrong move would mean that I’d have to rip out a lot of stitches (not my favorite way to spend an afternoon.) Panic!

But as we all know, “Do or do not. There is no try.”

I forced myself to persevere. Not only was it a Growth Moment, but I had way too much money invested in lace and fabric to give up the ship.

The appliqué stitching took a long, long time. Two old movies later though, it was done! The day brightened! I went on to finish that dress.

DSC02715

Oh, one other thing. I added a bit of lace on the bottom of the sleeves too, a six inch swath of lace sewn on to the bottom of the sleeve as a cuff.

DSC02713

The pattern was easy to assemble with very little adjusting. But when it was completed, I wasn’t sure I liked this dress, wasn’t sure lace was my thing. But after spending SO much time on it, I had to take it out for a spin. At a dressy evening event, it was kept up with the best of the LBD’s, so I’ll probably wear it again.

Have you tried to recreate a designer look? I’d love to hear about your ‘knock off’ efforts.