My First Tamarack Jacket

This jacket has been on my sewing to-do list for such a long time. I kept shuffling it to the bottom of the queue as I waited for a block of time to tackle it. Well, as you all know, I’ve got that time now!

The tamarack is quilted, making it perfect for those cooler evenings in spring and fall. For my first Tamarack (yes there will be others), I decided to use Merchant and Mills pre-quilted cotton. It’s such a lovely weight and texture, well worth the price. With this fabric, it isn’t really necessary to line the jacket, but I did anyway. I used an Nano Iro linen ( Bolt Fabric.) that’s so soft. I chose a contrasting lining so that it would would really show when the sleeves are rolled up. I finished the edges with self-made bias binding in linen (Josephine’s fabric). 

Even though I didn’t have to, I wanted the lining to be quilted, so I followed the lines already provided in my outer fabric. This was a fun, stress free way to go, and I highly recommend it!  I love how the extra quilting adds more texture to the bodice of the jacket. 

In order to get the fit I wanted, I shortened the jacket by 1 1/2 inches (I’m 5′ 4”). I love this modified length. The fit of the bodice seemed a little boxy for me so I tapered it a bit at the waist. 

The biggest construction challenge was the welt pockets. The quilted fabric is thick, making it tricky to get everything to lie flat. I decided to practice making a pocket with some thick fabric I had leftover from another project. I’m really glad I did. I felt pretty secure when I had to cut into my lovely quilted fabric. I do like the look of the welt pockets, but will likely use patch pockets next time so that the jacket will be reversible. If I had to do it over, I’d make this one reversible too, as I love the lining almost as much as the outside fabric! 

The other challenge with my thick quilt sandwich was sewing the binding around the edges. I used fabric clips I bought at Joann’s to hold the layers together as I sewed. 

Overall, this was a fun, satisfying project, and I highly recommend it. The construction of the jacket isn’t as challenging as it appears. There isn’t a collar to mess with for one thing. Also, the slow process of quilting the jacket was lovely and calming. In fact, it made me more curious about quilting in general. I may try to do a bit of improvisational quilting with my fabric scraps. What better time to play with new sewing experiences than now!

I hope you all are well and happy. Thanks for stopping by! 

A Wiksten Haori in Kantha Cloth

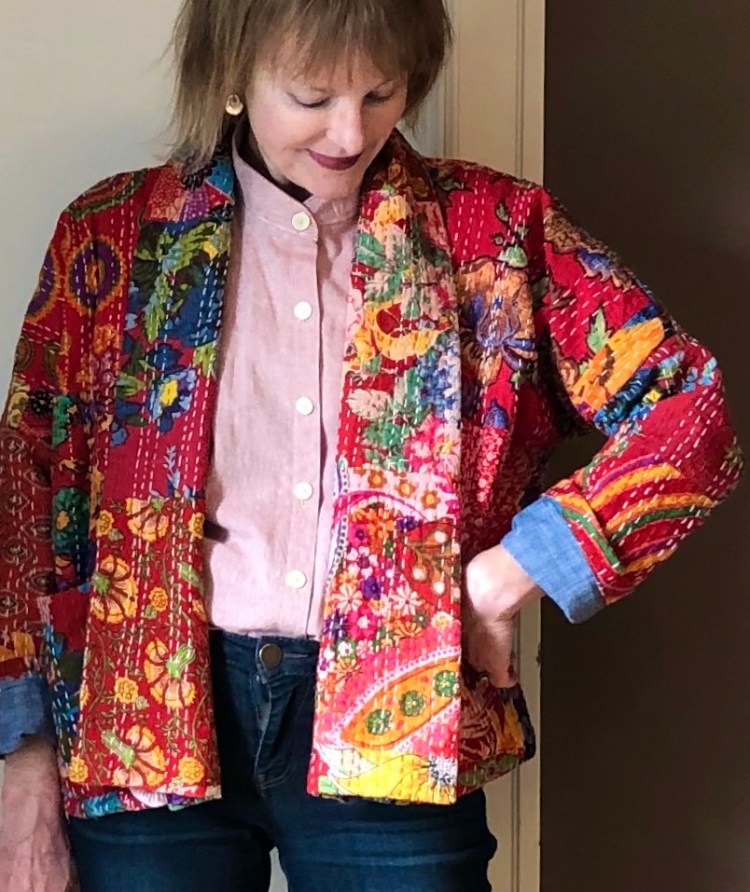
I don’t know about you, but I’m craving a bit of ‘normal’ right now. So let’s just dive into the details of this new make, a Wiksten Haori jacket. 

If you haven’t tried this pattern, you’re missing out on some fun! It’s a chance to use your favorite fabrics in a way that makes them so wearable. This is my third Haori (others posted here and here), and I’m sure there will be more. 

This is an unstructured, loose-fitting jacket with three length variations, short, medium and long. I prefer the short, cropped version on me as I really like the proportions, but I’m in love with some of the longer versions I’ve seen in wool, so I might try one of those too. 

This jacket looks more complicated than it is. If you can sew a straight seam, you can make this jacket. Yes, it is lined but that’s nothing to worry about because creating the lining is simple. You just sew another jacket from your lining material and attach the two at the bottom seam.  The only modification I made to the pattern was to leave the interfacing out of the collar band as my fabric was stiff enough.

The beauty of the Haori is that it really allows the fabric to shine. My fabric is a Kantha cloth. I found a piece at Modern Domestic then found a bit more  at Cool Cottons, here in Portland. It’s amazing fabric with beautiful colors and the layers of cloth are stitched together with a long quilting stitch. It makes me happy just looking at it!  I’m wearing it with the linen shirt I made from a japanese pattern book (posted here.) I think they work well together.

Sewing is such a stress reliever for me. In these challenging times, I’m grateful that I have a pastime that comforts me, and a community to share it with. Hang in there all, and thanks for stopping by! 

A wrap shirt from my first Japanese pattern book

IMG_5784

A wrap shirt…Looks tricky, doesn’t it? Actually, it’s all in how the shirt is buttoned up!  If you want to, you button it up the traditional way.

IMG_5814

But why would you want to, when you can do this?

A simple modification makes the wrap possible. You add a loop to one side seam, a button to the other, and viola! You have a wrap shirt.

IMG_5782

I admit it. I bought my first japanese sewing book because this cute shirt was on the front cover. I just had to give it a try.

41J7FSmIQ1L._SX365_BO1,204,203,200_

I can’t tell you why it’s taken me so long to experience the world of japanese pattern books. Perhaps, it’s because I assumed the patterns would be hard. This book, Simply Sewn, written by Michiyo Ito, shows how wrong I was. It has a variety of patterns in them, none of them especially tricky, but all of them stylish and interesting. collage


I’m so intrigued by both the hooded jacket and the cropped polka dot jacket. Now that I’ve tried one pattern and loved it, those are next on the list.

To be sure, when sewing with a pattern book, there are challenges to be faced. You have to trace the patterns (ugh, but I am getting better at it), and you have to select your size, in this instance, either S, M, L, or XL. The sizing is a bit different than what you’d find in a Big 4 pattern, but there’s a chart and a thoughtful explanation of how to choose your size. You also must add a seam allowance, a easy detail to deal with. The good news…unlike some others, this book includes full size pattern pieces and the pattern markings used are straightforward.

IMG_5778Based on my measurements, I chose a size small, and found it to be perfect. There isn’t alot of ‘fuss’ to the instructions, which I often find confuses me more than helps. They were complete and easy to understand. With each style, there’s a pattern layout chart, and construction steps with a few diagrams. Everything was pretty straightforward on this pattern so I didn’t find any challenges. The sleeve is finished with a cuff, the button tab is folded fabric, and the collar is simply drafted and sewn in place.

I really love this book and the styles there, so there will likely be another japanese pattern book in my future. Here are a few I’m considering….

51YvNlMf-BL._SX398_BO1,204,203,200_

41aTbFPnahL._SX399_BO1,204,203,200_

41e38YJ1mcL._SX396_BO1,204,203,200_

There are so many to choose from, a huge new world of possibilities.  I’m so glad I took the leap and gave this pattern a try! I know I’ll wear this shirt constantly this summer, both wrapped and buttoned up.

Have you tried Japanese pattern books? Do you have a favorite?

Happy sewing and thanks for stopping by!


An Anthro-Inspired Corduroy Shirt Dress

IMG_8444

Corduroy seems to always find a way into my Fall sewing plans and I can always count on Anthropologie to have a offerings to inspire me. When I saw this shirt dress on their website, I had to have a new corduroy shirt dress of my own.

4130320624598_070_b

I’ve made a couple of shirt dresses before using a variety of Big Four and Indie patterns (here, here and here). I decided to use a new pattern, McCall’s 7575 for this dress, because I loved how the bodice was shaped by long darts. 

I also love shirts with back yokes and two piece sleeves. View C was my choice because it’s tunic length, easily modified to a dress.


My corduroy was purchased at Fabric Depot. It has a soft hand and a touch of lycra, which makes a form-fitting dress sooooo comfortable to wear. The rust color caught my eye, a must have!

IMG_8316


I followed the pattern but modified as follows;

  1. I lengthened it by six inches.
  2. I added a very wide self tie to the side seams  (8” wide to allow for turning the edges under for a clean finish) .  Positioning this was a bit tricky. The Anthro waist tie rides a bit above the waist, and it took a few tries to get it right. Also, I think the Anthro waist tie is faced so that you don’t see the wrong side when it’s tied, but I didn’t have enough fabric. I think it looks okay one-sided with an edge stitched finish, but if I had to do it over again, I’d buy more fabric.
  3. To recreate the close-fitting look of the Anthro dress, I lengthened the bodice darts (both front and back) so that they extended the full length of the dress. Then I top stitched them down to give the look of french seams.
  4. I added French seams on the side, back yoke and on the sleeves and topstitched them all.
  5. The Anthro dress doesn’t have pockets, but I added a couple. I’m not sure that was a wise choice ( ??) as the tie overlaps over the pockets. The pockets might be a bit of a distraction from the lines of the dress. Opinions welcome…

IMG_8451

I love this pattern and will definitely add it to my arsenal of shirt patterns! I always feel ready for Fall when I’m wearing corduroy, a throwback to the days when I bought corduroy skirts to wear to school, I suppose. It’s so funny how that ritual of getting ready for the first days of school still dominates my Fall mood in spite of the fact that my family is beyond that stage of life.

When I’m taking photos for a blog post, I always try different shoes with a dress because as long as I’m at it, I might as well see what the options are, am I right?


As you can see in the photos, I tried the dress with booties with tights, booties without tights and tall boots. I think I like the tall boots best, although I’m not sure the mustard tone of my tall boots is really warm enough to go with the rust color. Opinions welcome!

Happy sewing and thanks for stopping by!

A wrap jumper or a pinafore?


img_8240-1

When I think Fall, I think, it’s ‘jumper’ weather! To me, a jumper is a sleeveless dress that’s meant to be worn over a shirt or blouse. But to my UK friends, ‘jumper’ means a sweater. Maybe, it’s less confusing to call my new make ‘a wrap dress that I am wearing over a shirt’.

This dress is one of my favorite styles because it’s wrapped. To me ‘wrap’ means comfortable, but what I really love about the style is that it’s so flattering. A wrap dress is considered to be perfect for any figure type because it defines your waist (especially nice for those of us who don’t have a waist). Wrap styles are perfect at any age, and you can wear them dressed up or dressed down.

img_8227

My sleeveless wrap dress is McCall’s 6884.

The bodice of my ‘jumper’ is view B (without the gathered front), and the sleeves are view D. I eliminated the tie and made a mock closer with three buttons, arranged assymetrically across the wrap.The fabric is black ponte knit that has moderate stretch from my stash.

Under my jumper, I’m wearing a new button-down shirt, Butterick 5526.

img_8205

This pattern in a new favorite. I made View D, but used the sleeve tabs from View A for the days when long sleeves are just too much. I chose View D because it has princess seams which makes the fit perfectly tapered. This makes the shirt easy to wear either loose, or tucked in.The fit of this pattern seems a bit snug to me through the waist, so I cut a size up from my usual.

As fitted shirts go, this pattern is pretty straightforward, and the instructions are great. But, it did take a bit of time to complete. From cut to finish, this project clocked in at four and half hours. (BTW, I finished the seams with my serger rather than constructing french seams. If you’re going to do that, add another hour (LOL).

Princess seams are my FAVORITE. Who can resist that tapered shape? The fabric I used is 100% cotton that I found in the quilting department of Joann’s. Honestly, there are bargains to be had there! I paid $5.99 a yard for this perfect pring. The colors go with everything in my closet.

A friend who is very ‘fashion forward’ wears her wrap jumper open as a long vest. Yes, I love to throw long vests over everything, so thought I’d give it a try, but I’m not sure….

img_8266
Hmmm, probably not….? 

Here’s to Fall fashion; to jumpers and skirt and coats…all my favorite things to sew! What would you call this make; a jumper, a pinafore, or a sleeveless dress?  Would you ever wear it open as a vest?

Happy sewing, and thanks for stopping by!


DIY Cropped Pants and an Easy Top

img_7842
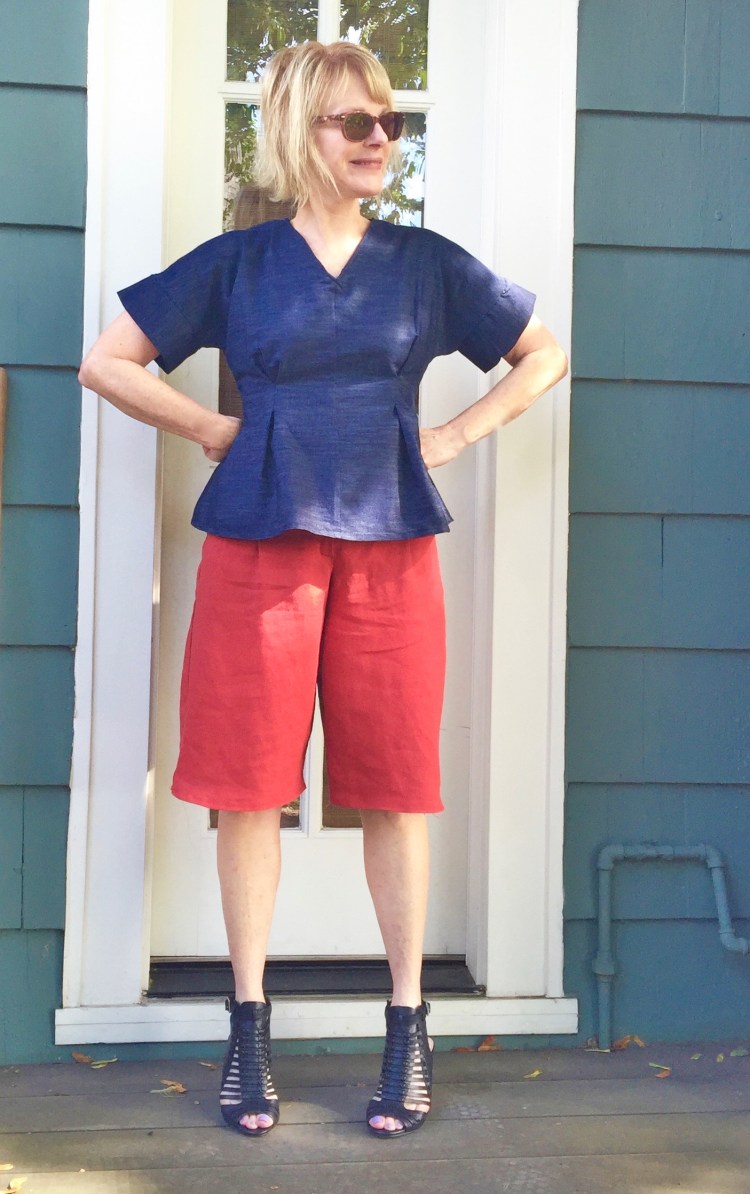
Hi All! What are these? Cropped pants? Wide shorts? Culottes? Tell me, please. Whatever they are, they’re strangely reminscent of a poppy skirt I bought in junior high. Yes, it has been that long since I had anything in my wardrobe that was poppy! Can’t tell you why I’ve waited this long because the color is so fabulous. In fact, when you think of all the colors you can wear with it (black, navy, white, denim, maybe even army green?), you could almost call it a neutral.

img_7862

I’ve wanted a pair of wide shorts/cropped pants since I saw Mimi G rocking them on her website. Yes, I could have purchased one of her excellent patterns to make these, but I felt sure a shorts pattern I had in my stash would work just fine. But after I made them, I realized didn’t have quite the right top to go with them. You know how it goes. One thing leads to another….

img_7859

The cropped pants are a long version of Vogue 9008, a shorts pattern that is so versatile. You can make a flat front or pleated front version. I chose the pleats, but then I sewed them down to give the front a smooth finish. To get the full leg look I wanted, I lengthened the shorts by six inches, keeping the line of the shorts wide at the bottom. I love the effect. The shorts are snug at the top, but they flare out like a skirt at the bottom.

The pattern is pretty straightforward. It has a mock fly zipper, which is easy to insert, and you can add pockets if you want. The instructions were clear. It wasn’t hard, but with belt loops and a back yoke (which I love) this pattern is a bit time consuming.

I made them from poppy linen, purchased at Fabric Depot. It is midweight and I planned on lining the shorts with silk, but ended up taking the lining out because it made the legs too full and bunchy.  Yes, I wanted them to be full, but I did not want them to look like clown pants.

img_7836

The top is made from a cotton-linen blend that’s the color of denim. I love this fabric and wish I could remember where I got it because I’d love to have more. The pattern is Vogue, 8906.

It has front pleats that form the shape of the bodice, eliminating the need for darts. There’s a zipper in back. To make the sleeves a little more boxy, I added a sleeve band that is 5″ wide. It makes the sleeves look more ‘finished’ to me, and adds a bit of a retro vibe, I think. I also added a v-neck, and adjusted the facings accordingly. This pattern is super easy! I plan on making several more versions including one with buttons down the front. The fit was spot on for me. I didn’t even have to adjust for my narrow shoulders. Nice!

img_7846I’m not sure if Poppy is a fall color, but I’m going to be wearing this outfit now, because linen is so perfect at this time of year. I’m not sure if I’ll really wear this top with the shorts though. Together they might be too much flare for me. Maybe I should wear them with a top that fits snuggly, or maybe something tucked in? Opinions welcome!

I hope your sewing projects are going well. Fall is my favorite time to sew, because the new fabrics are so fabulous. Enjoy!

Butterick 6057-Chambray and Floral Top

IMG_4012Hi All! It’s hot here in Oregon, so there are plenty of opportunities to enjoy my vacation wardrobe even though I’m back at home. Might as well keep those vacation vibes going as long as possible, don’t you think? This top was one of my favorites on my summer vacation, completed only a day before I left. In fact, it almost didn’t make the wardrobe ‘cut’. But I threw it into my suitcase at the last minute and I’m so glad I did. It was worth the space it took because it went with everything; skirts or shorts.   IMG_4001 (1)

The contrast print makes this shirt, if you ask me. It’s a Liberty remnant I picked up at a small shop here in Portland, Josephine’s Dry Goods. I love Liberty floral prints, but I can’t always imagine wearing something that’s all floral. But using a bit for contrast is something I can easily get into. I used the Liberty on the sleeves, the pockets and the back button band. I love these colors so much, I might just start calling them my color ‘palate’; blue, black, rust, green, colors that are perfect for fall too. That makes this top ‘transitional’, don’t you think?

This pattern, Butterick 6057, is genius. The buttons and button band down the back just give it that extra something. Oh, and I love the tabs on the sleeves too. I used a solid black for those to try to make that Liberty print stand out even more. This pattern is now, officially, a ‘tried and true’ for me.I made it before here. It’s easy to sew  and the cut is comfortable, but not ‘baggy’ and the high low hem is fun.B6057Here’s the top in ‘action’. This is Nuremburg, Germany,our last stop on the Danube. I’m posing here in chambray with my friend, Suzanne who is wearing a beautiful linen dress.  She bought a bit of fabric on this trip too :). Her shoes are cute, mine not so much. What can I say? My feet had minds of their own that day!!IMG_5747

I hope you’re enjoying the dog days of summer and are finding time to sew a few transitional wardrobe pieces for yourself! Happy sewing and thanks for stopping by!


New Look 6429- A Dress with an Inset


IMG_4319

Hi All! Summer is in full bloom here in Oregon, with blue skies and sunshine, the perfect start to my vacation. I thought I’d show one last addition to my travel wardrobe before heading out for a couple of weeks. Yes, I have alot of clothes (LOL) but wouldn’t you know it? At the last minute, I decided I NEEDED one more dress.  In a frenzy, I grabbed some fabric from my stash, a bit of lace, and a New Look pattern. Here’s the result.

IMG_4335

This sheath is New Look 6429, a dress I wanted to sew the minute I saw it in the catalog. With the options to add an inset or a cut out, this pattern was on my ‘must have’ list right away. I love the raglan sleeves and the great neckline.

I chose view C, because I can never  pass up an opportunity to add a lace inset.

IMG_4336 (1)

The pattern went together quickly and easily, but be forewarned. The sizing is really (!!) generous. I had to take seams in everywhere. This is one occasion when sewing a quick muslin wouldn’t have hurt, but as you all know, I don’t have the patience to take this extra step, and here’s the price I pay for it. An easy sew turned into a bit of a project because I had to fuss around with fit.

The fabric I used is a cotton with a  very, very slight stretch. The pattern is designed for wovens and stretch is not required, but I love just a little bit of stretch when I want a dress to be super comfortable, as is the case when I travel. If a dress can’t be worn all day, it doesn’t make the cut, you know?

IMG_4271I love this dress, and am so glad I found the time to squeeze in one more make as I know this will get alot of wear.

I’ll be away from my sewing machine for a few weeks, which makes me a little said. The good news? My stash has shrunk a bit over the last few months, making room for some new vacation purchases. I hope I’ll have some interesting finds to share when I return.

I hope your summer sewing is progressing nicely and that you’re enjoying some great weather. Happy sewing and thanks for stopping by!


Having a 70’s Moment: Denim Button-up Skirt

IMG_3160

Hi all!  In anticipation of summer travels, I’ve been sewing up a storm! I’ve also been aware of a huge gap in my me-made separates wardrobe that must be fixed before I travel. I have very few skirts and almost no pants. My recently completed jeans helped to fill the gap, but I still need skirts, and, as luck would have it, there’s a skirt competition this month at Pattern Review, the perfect motivation!

Being a fan of denim and blue, I couldn’t resist giving a jeans skirt a go. The pattern I chose was Mc Call’s 7392, a fitted skirt with a waistband, a front band, button closure, side front and back seams, and optional pockets and carriers.

I love the design of this skirt. The front and back ‘princess’ seams make ‘fit’ a breeze and the  a-line shape and front button closure are so seventies. To satisfy my craving for ‘jean skirt’, I added some additional details like front pockets and contrast topstitching.The pattern instructions were easy to follow.

IMG_3166 (2)

My only criticism….I disliked the way the carriers are attached. They are basted to the waistband, then sewn into the waistband seam. If you want to topstitch that waistband, you can’t because the carriers are in the way. So disappointing. Next time, I will sew the carriers on the way you do with jeans. I’ll just turn the ends under and stitch them in place outside the waistband. Because this pattern has princess seams, I found it easy to modify it to fit my shape. This gets a big ‘thumbs up’ from me, since I have a wide waist that’s out of proportion to the rest of me.

IMG_3169

Fabric Used: I used dark denim, so hard to find but available at Fabric Depot.

Pattern alterations or any design changes you made: I double topstitched everything. I modified the patterns back pockets and side front pockets.

IMG_3172

Since I’m not a fan of side front pockets as I think they make my waist look shapeless, I used the back pockets as a template for two smaller front pockets, which I sewed in place, patch style. To get the smaller size for those pockets, I just traced the back pocket and reduced the size by 5/8 inch all around. I topstitched each pocket and added a chevron style ‘V’ for fun. I hesitated when it was time to put the back pockets on, as I wondered if four pockets on one skirt would be overkill, but the truth is, I love pockets! So I added them.

To make the topstitching look sharp, I double threaded my needle with regular thread. Some might prefer topstitching thread, but my machine doesn’t like it, so double threading gave visual dimension to the topstitch without clogging my machine. I also topstitched the carriers and the waistband seams, even though the pattern didn’t call for them. For a jeans skirt vibe, I used  jeans buttons in an antique finish that you pound in place with a hammer. So satisfying! The button holes were made using the contrast thread.

IMG_3168

In summary, I do like this pattern and will likely sew it again. IMG_3133 (1)

With its many seams, this pattern is easy to modify for fit, and to add your own personal touch. The cut is ‘a-line’ but not too wide at the bottom, so hard to find in a skirt pattern. It definitely satisfied my urge for a seventies style denim button-up skirt. I’ll probably try this pattern again with other dense fabrics like wool or corduroy come fall

I’m curious if others have trouble using topstitching thread? Does it clog your machine? I would love to be able to use it and know there must be a trick that I just haven’t yet discovered.

It’s still cold here, but I remain optimistic and am sewing with linens and cottons…Happy sewing and thanks for stopping by.

New to Me: Kanerva Button Back Shirt


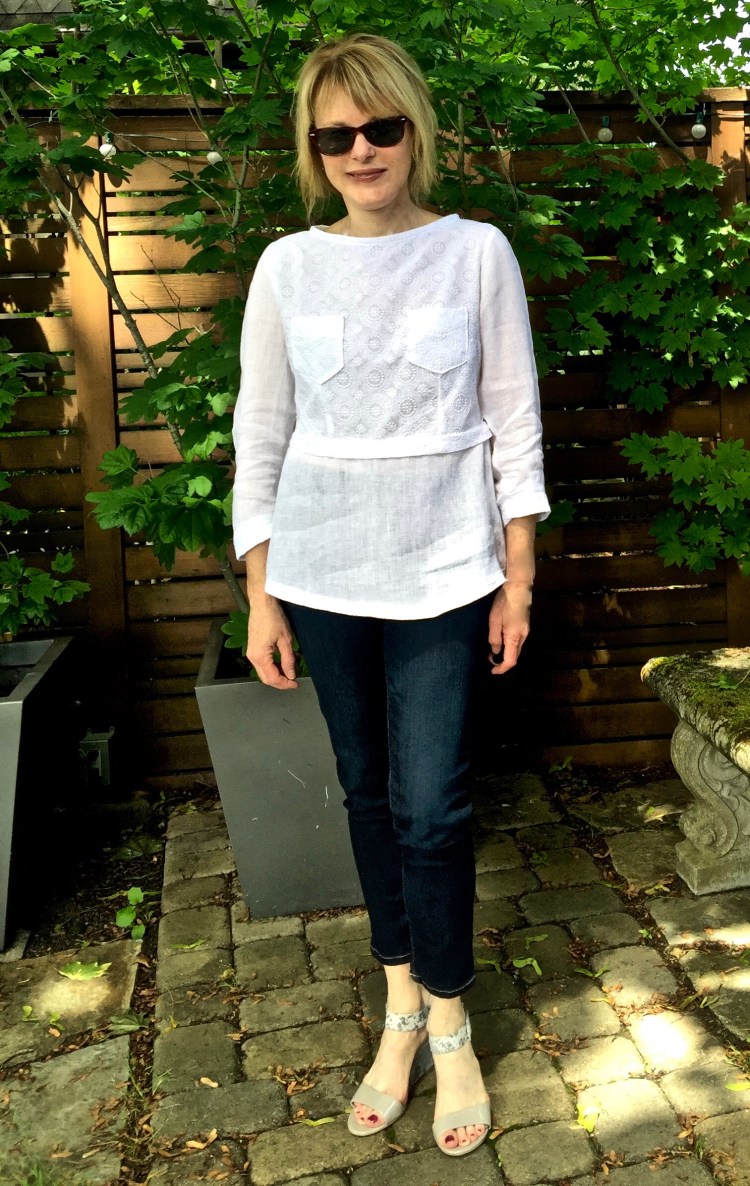
I just might be the last blogger in the world to sew the Kanerva top! And better late than never.  This top is truly unique with buttons down the back, a pleated waist, and a split peplum. And as you all know, I’m a sucker for a peplum! True love!

IMG_2348 I’ve wanted to sew something by Named clothing for awhile. I was prompted to finally do so by the Monthly Stitch. It’s Indie Pattern Month over there, and this week we’re sewing a pattern that’s New to Me. This is my first make of the Kanerva blouse, and I am so taken with the design details! Both versions are fitted with two sets of front darts, a pleated waist and a gentle peplum.

To accentuate the fabulous design details of this blouse, I decided to use two different fabrics; A embroidered cotton and a hankerchief linen. I used the cotton for the bodice, the self-drafted pockets and sleeve bands.  I used hankerchief linen for the sleeves and peplum.

IMG_2277

Yes, linen loves to wrinkle, but it wears like pajamas, so all is forgiven. It does tend to fray though, so I finished all the seams with my serger. Of course, the back is where it’s really happening on this shirt!

IMG_2279I used vintage pearl buttons. They’re fairly flat so they won’t poke me when I lean against a hard backed chair. The placket is easy, just a few folds that you stitch down, then you add your buttons and button holes. I added self drafted pockets to the front just because I thought they would look cool and finished the neck with binding.

IMG_2289

All in all, this was a fun, straightforward make. The scariest part for me was transferring the pattern markings. I tested both tracing paper and chalk on my white fabric and both stained, so I had to use thread and pins to mark. Ugh! Not sure what a better choice would be….Recommendations are appreciated! The instructions were easy to follow though and it was about a four hour sew from cut to finish. And, I think I finished this top just in time. It’s (finally!) heating up here, with temperatures expected to be in the high nineties tomorrow. IMG_2367Although I usually choose Big Four patterns (they’re so easy to find and always on sale), I do love the fact that there’s a month dedicated to some of the alternatives available through Indie companies. There are so many choices these days, that you can always find something fun to sew. If you haven’t checked out the Monthly Stitch collective, give it a try!

The trickiest part of this project was transferring the pattern markings. Have you had problems with staining of fabrics with tracing paper? Do you know products that work better for marking?

Happy sewing and thanks for stopping by!