McCall’s 6708: An animal print cardigan


IMG_7613 (1)

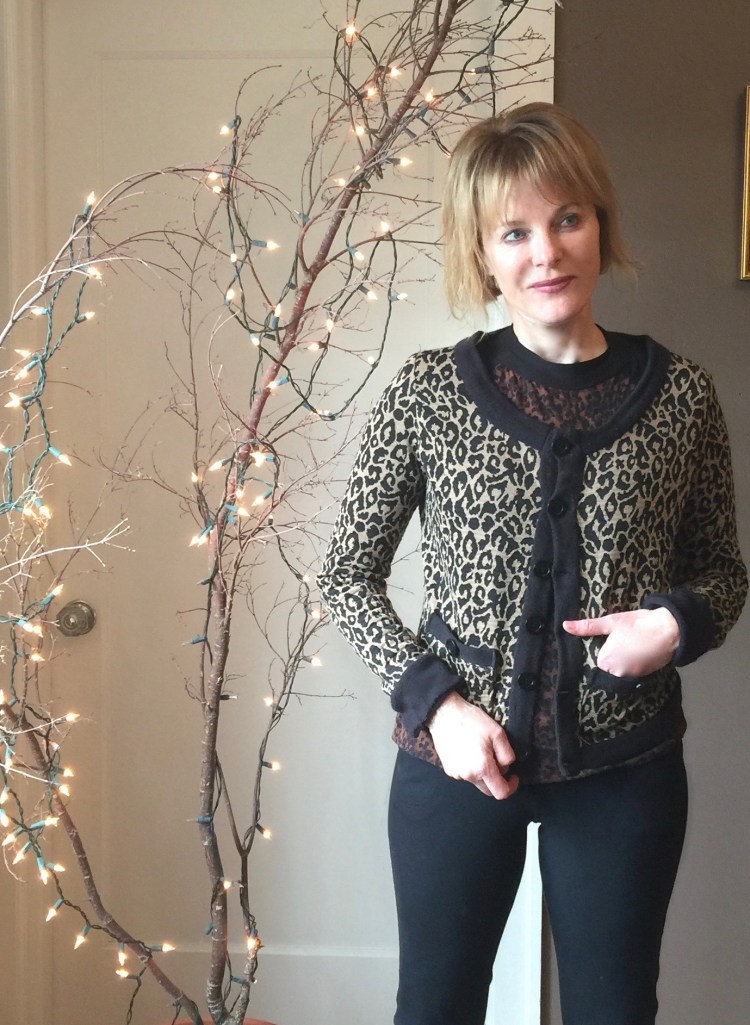
Yes, it’s a jungle out there! A bit of a cliche’ perhaps, but what better way is there to describe what’s happening in the sewing blog world these days? Everywhere, fabulous makes are being crafted from jungle worthy fabrics as part of #Jungle January, a month long walk on the wild side.

jj7

This photo is from “Pretty Grievances” and it captures the mood of the month. In my opinion, the timing for Jungle January could not be better, since it can be a bit dull around here. It’s so easy to stay stuck in a routine when it’s grimly gray outside. How nice to be inspired to do something adventuresome in the new year. What better way to shake off the glooms!

IMG_7611 (1)

The fabric for my leopard cardigan was purchased a couple of years ago at Fabric Depot. It’s a stable cotton knit that I bought without knowing what I’d make from it. (Yes, this is a scary habit of mine that has resulted in a large stash that is about to take over the world.) As the fabric languished in my stash for years, I expected it was a purchase whose time had run out because, surely, animal prints would soon go out of style. Ha! I was so, so wrong. Now, in 2016, they are making a splashy return on the runways of Marc Jacobs, Givenchy, and Dolce and Gabbana.

So inspiring! But to me, what’s even more inspiring are these classic fashion icons.

No one wore a leopard print hat quite as well as Audrey!

When I saw these classic styles, I decided my leopard print needed to be fashioned into something with a bit of a vintage look. Enter the cardigan. My pattern is McCalls 6708. It’s Out Of Print, but you could use Butterick 6062 to get the same look.   I made the shorter version, view D, so it would look like one of those boxy vintage cardigans.

The fabric I used for the bodice is a stable knit from my stash. The neck, pocket and sleeve bands are from a remnant of sweater knit. At first, I was a bit disappointed in the sweater knit trim, as it became so ‘furry’ as I worked with it. The floor under my sewing machine was covered with little fuzzy bits. But then I realized just how appropriate that was for Jungle January. My fabric was shedding! Do you think the floor of the Jungle is just covered with fur?

IMG_7619 (2)


This pattern is great because you can embellish with as many details as you would like. I added one set of pockets, trimming them with buttons and sweater knit, but you could add more. The project was easy to sew but a bit time consuming (lots of trim to put on :)). The trickiest part was the button holes on the front band. Even though I interfaced it, the fabric stretched a bit more than I’d hoped. I think a stiffer interfacing would have helped.

Under the cardigan ( just to make the Jungle theme perfectly clear), I’m wearing a leopard print tee I made awhile back.

IMG_7422

It’s one of my favorite tees, I have to admit. The fabric is so soft and yummy, and the leopard print is so dark, I imagine it’s a neutral! This means I’m allowed to wear it with everything, right?

I hope you’re enjoying January, a chance to return to routine after the hectic holidays.  To revitalize my sewing mojo and ready myself for a great 2016, I’m reorganizing my stash based on fabric content, but I’m not convinced my system is perfect. I also would like a way to keep track of my fabric inventory in a document that I could take with me when I look for patterns. Would love to know how you organize your stash!

Happy sewing and thanks for stopping by!


A DIY peplum tee with handkerchief hem

DSC03241
Summer clothes must be effortless. Right? We’re too busy soaking up the sun to spend time fussing with our frocks!  My daily uniform consists of a tee shirt and a pair of shorts, maybe a skirt or two. Nothing could be easier to throw on in the morning.
One of my favorite easy-to-wear tees of all time, was a peplum top with a handkerchief hem that I bought during an Anthropologie spending spree a couple of years ago. After many, many wearings and washings, it is finally time to send it to tee-shirt heaven. But of course, I want another to replace it. But as is often the case in the land of ‘ready-to-wear’, that ship has sailed. The only way to get a replacement tee is to make one of my own.
DSC03245
So, I decided to replicate the look by modifying my favorite basic tee pattern, Vogue 8536, a tried and true. It has several sleeve and neck variations, and my copy of the pattern has been used so many times, it’s practically in shreds! The fabric I chose is cotton with moderate stretch, purchased at Fabric Depot.
V8536
To make this tee top, I cut view A, a version with short sleeves and a crew neck. Then, in order to accommodate the addition of a skirt, I shortened the tee to the natural waist line. I wanted the skirt/peplum to attach right above the natural waist so by cutting it there, after the addition of a 5/8” seam, the skirt would attach at the perfect spot. Then, I drafted the peplum/skirt portion.
First I cut a rectangle, 28″ by 18″.IMG_0082
Then I measured the bottom of the tee. On the center of the rectangle’s long side, I marked that width.
IMG_0085
Then, for the draped handkerchief look, I marked 12″ from the bottom of my rectangle for the ‘drop’. From this 12″ mark, I drew a line to the edge of the tee shirt hem mark. On the diagram here, that’s where the ruler is placed.
.IMG_0086
Then, I cut of the triangles created by these lines. This creates the side seams for the angled peplum.
IMG_0087
The finished peplum looks like this.
IMG_0088
You cut two of these peplums, then sew them together at the angled side seams, and attach them to the tee shirt bottom (see the marked area above.) I used a one inch hem on the bottom.
DSC03243
Clear as mud? I wouldn’t be surprised! If I’ve left out anything, please let me know, and I’ll try to clarify.  There’s probably a prepared pattern somewhere that is similar to my self drafted top. But after sorting and filing my patterns this weekend, I can easily say, I Do Not need to buy another pattern. Really.  I am on a self imposed pattern purchasing hiatus. (My stash could fill a storage locker).
DSC03242
I hope your summer sewing is easy and fun. Thanks for stopping by!!

It’s summer, and the sewing is easy!

It’s a scorcher out there, my friends! And, there’s only one thing to wear at a time like this. A summer dress.  A person can’t have too many summer dresses, right? They’re so easy to throw on.
DSC03026
Personally, when it’s hot, I live by the rule, less is more. I do not want heavy fabrics. I do not want my clothes to touch me. In fact, if naked was an option, I’d (probably?) go with that.  My less-is-more attitude extends to pattern choices as well. I want a pattern that has style without structure. (Yes, that’s asking a lot.) And if it’s ‘fast and easy’, that’s even better! Who wants to be inside, bent over a sewing machine, when it’s beautiful outside?
DSC03099
This summer shift dress meets my very loose requirements. It’s a basic a-line with some soft tucks at the waist to give it a slight fit n’ flare shape. It’s made from a simple light-weight cotton, (purchased at Fabric Depot). I love this fabric because I can tell it will get softer with every wash. And it’s cotton. Sewing with cotton is always a breeze. I am such a fan…
For this dress, I used one of my ‘tried and true’ patterns, Butterick 5890, a top with tuck variations, sleeve variations and collar variations.
B5890 (1)B5890
I lengthened the tunic (view D), to make it a dress by adding 8″ to the length.
B5890 (2)
Then, to add a bit of interest, I decided to try a v-neck version. This modification was made by drawing a straight line from the edge of the inside shoulder seam to the center front seam (view D has one, which makes this pretty straightforward). Then, I added a 5/8 seam allowance so that I could add a facing to that edge. Using my straight edge, I cut a matching front facing with seams allowances as well.
DSC03098
For the sleeves, I used view A,  an option with armhole bands that are squared off. The arm bands are one of the reasons I love this pattern. They’re easy to sew, and they give the dress a bit of a vintage vibe.
DSC03090
To be honest, this dress was so easy to sew, I almost feel guilty about not challenging myself. My excuse? It’s summer! Challenges are for when it’s dark and dreary outside, right? All told, this dress took only about 3 hours from start to finish. When Butterick says, Fast and Easy, they aren’t kidding. Gotta love that! I chose a print for this dress, but I think a solid would work too (maybe some yummy linen or silk).
Do you prefer ‘fast and easy’ patterns in the summer? Or does the sunshine elevate your mood, giving you the energy for a challenge?

Thursday Tee: Color Block Love

Today’s tee is color blocked. The truth is, I love a good color blocked garment and probably will until I’m pushing up daisies. As trends go, it has a lot to offer, as well-placed blocks of color can shape your figure so that it looks like you wish it did!  Subtle combos look classic. More dramatic ones can attract attention.
But for those of us who sew, color blocking has an even deeper purpose. It gives you an opportunity to use all of those random pieces of fabric in your stash that are too boring to use alone! You know the ones -those small remnants of solids in safe colors like black and taupe and gray (sigh). I have so many, I could swear they’re reproducing.
Since I’m a bit color-block-obsessed,  I was thrilled to see the trend featured in a few designer collections this Spring. Some used big swaths of bold, bright color. I love these pieces by Roksanda Ilincic. The color combinations are unexpected, but really cool.
        54ac3aa40be08_-_elle-10-rainbow-roksanda-illincic-v-elv
image
 She is the queen of color blocking, no?
Top Shop played with the trend here; sporty and effective.
54ac3a983757d_-_elle-08-rainbow-topshop-unique-v-elv
Even J. Crew paired colors in interesting ways.  image
Okay. After looking at these exciting, edgy pieces, my color blocking moment looks a bit dull in comparison (LOL)  But, hey, it’s a start, right?
DSC02775
When I experiment with color blocking, I like to keep it simple by applying some loose rules. I pick three colors, and often keep them in the same color family. (But after seeing the color blocking examples I posted here, I doubt I’ll stick to this rule in the future. Bravery has its rewards. Am I right?) When it comes to design, I choose simple patterns so that the color combination is what the eye sees.
DSC02776
The pattern I used for this tee is McCalls’ 7093, a top/tunic that’s semi-fitted with front seam detail that makes it ideal for color blocking. I chose version B, a short sleeved tee with low pockets in the front.
Keeping with my cautious design aesthetic (in other words, I’m a chicken), I used three colors; black, brown and white for accent. The black and brown fabric is woven rayon, purchased at Fabric Depot but the white is the last piece of linen knit I bought in Capri a little over a year ago (wish I’d bought more!).
DSC02778
The pattern was fun and easy to sew, but the best part was that buzz you get when you play around with fabric combinations, using up a bit of your unwieldy stash in the process! I sewed the pattern as designed with a few slight modifications:
  •  I cut the sleeves a bit longer by adding a inch in the length.
  • I added a 1” sleeve band to the sleeve for finish.
This was a fun project and I will likely make this pattern again. Next time though, I’ll make it a little shorter. And I swear, my color blocked version will be a bit more adventuresome too. No more ‘safe’ choices for me!(?)
What about you? Do you like to experiment with color blocking? What patterns/colors have you tried?
Thanks for stopping by!

Shift dress: Then and Now

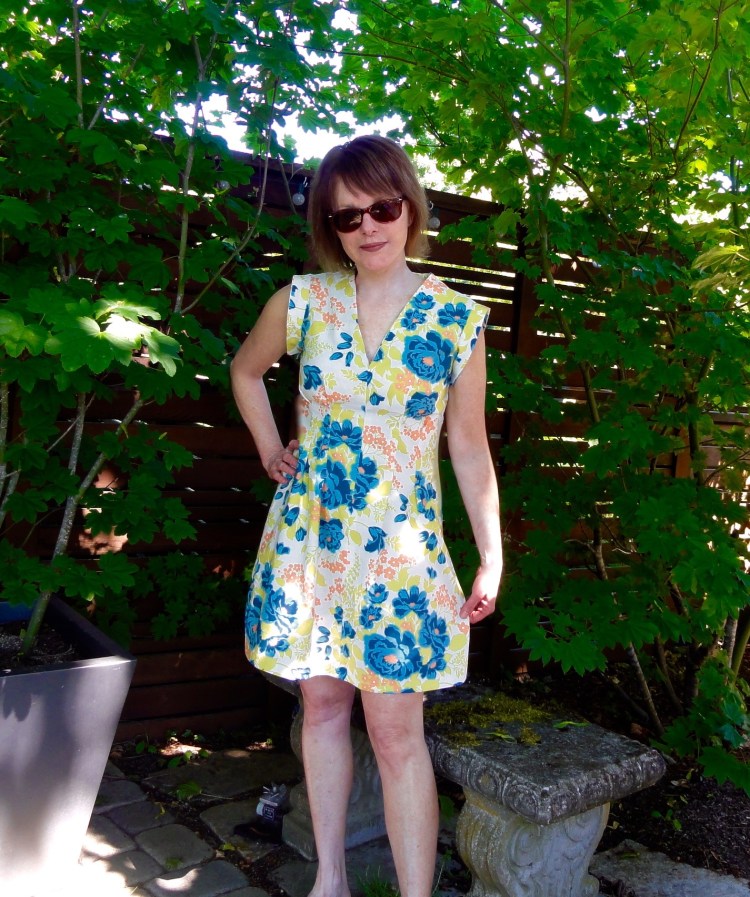
I must be watching too many Mad Men reruns, because this week, I found myself crafting my very own shift dress!

And I’m not the first person to want this look. Audrey did.AHepburn21_V_18Nov11_rex_b_426x639

Twiggy did.Twiggy-201x300

Jean Shrimpton did too.JShrimpton3_V_23jan12_pa_b_426x639

Pretty good company, if I had to say. It’s a timeless shape and the look is easily modified with a belt, or a bit of bling. The look became popular in the sixties when Audrey Hepburn wore a black one designed by Givenchy in Breakfast at Tiffany’s.

This week, I made my own shift dress out of a woven fabric, a chambray that looks like light-weight denim, purchased at Fabric Depot.

DSC02571

I used Vogue 8840 as the base of my design, a pattern for a drop-shoulder tunic with sleeves. I lengthened the pattern, then embellished it with pockets with buttons, and cuffs on the sleeves.

DSC02458


I self drafted the pockets by cutting seven-inch squares. I added flaps that by free cutting four triangles from the fabric, then faced them by sewing them together. I added the buttons after the fact because I thought the pockets looked boring without them.

The double top stitching came to me after shopping ready to wear. I tried on a similar dress and noticed how the stitching seemed to make the details stand out. Top stitching is mindless, but satisfying, don’t you think? And it’s a easy to do while you watch old movies, a huge plus as far as I’m concerned!

Shift dresses are so easy to wear. I also could belt this and wear it over leggings in the fall. DSC02457

After all, Audrey Hepburn belted hers! And who doesn’t want to be like her?

What about you? Do you like the shift dress look? Who do you think did it better? The girls in the sixties, or us?  Do you have a favorite shift dress pattern?