A plaid and leather ‘duster’ for fall

img_8829

Hi all! Wearing a coat in the fall is a no-brainer, but finding the perfect one can be a bit tricky. There are days when it’s cool but not cold and wool is too much, but a summer jacket isn’t enough. That’s when a duster comes in handy!

‘Duster’ is an odd word for a topper, and a friend questioned me about why I used it, so, I looked it up. The original dusters were full-length, light-colored canvas coats worn by horsemen to protect their clothing from trail dust. Well, since I haven’t been on a horse in years, who knows why duster came to be such a catch-all term for me. I use it pretty liberally for any knee length topper that is more than a blazer, but not quite heavy enough to be called a coat.

img_8619

My duster is  made from a plaid cotton blend, that is lined in silk and trimmed with pleather at the collar and cuffs. I’ve had the fabric in my stash for awhile. It languished there, forgotten and unloved because I didn’t quite know what to do with it. I love plaid, but sometimes, it’s a bit too stiff looking for my taste. But a recent sewing room ‘re-org’ brought it to my attention again, and woudn’t you know it? I’d stored it in box with a remnant of textured ‘pleather’ (fake leather). Inspiration!

The pattern I used for my duster is Butterick 6382, a semifitted lined jacket with neckline, pocket, sleeve and length variations. I chose version D, a knee length coat with pockets and a collar.


I cut the pattern as designed with a few modifications:

  1. The coat’s front bodices meet at the middle but don’t close. I extended the front bodice pieces by an inch and a half so that they would overlap then added buttonholes and buttons.
  2. Because my fabric is a bit tame I livened it up with some textured ‘pleather’ for contrast. The pocket is trimmed with a 1′ band.img_8608
  3. I added 3″ pleather cuffs to the sleeeves.
  4. I cut the collar from ‘pleather’ and skipped the interfacing.

The pattern was pretty easy to sew, and the instructions were great. Of course, the plaid matching took a bit of effort, but that’s all on me for choosing plaid in the first place! The duster is a-line, and the shaping is accomplished by long bodice darts in the front and back. The most difficult part of the project was the additon of the trim. Since I chose pleather, this was a bit challenging.

What I learned: Pleather does not like to bend. Well, I thought that was okay because I could shape it by pressing it. Ha!  My first attempt at low heat resulted in a MELT DOWN, a mess of damaged plastic that almost ruined my iron. Yes, I did use a pressing cloth, but you have to be really, really careful. I eventually discovered that it could be coaxed into shape by using my fingers and a corner press for the collar. (This required a bit of patience). Also, my pleather remembered every pin prick, so I used fusible seam tape to secure pockets before stitching them in place.

img_8757

In case you were wondering, this is not a leaf-raking coat, even though someone I live with probably wishes it was. Ha! Frankly, I’m not sure about this make. Yes, I’m glad I did it because it pushed me to learn more about sewing with ‘pleather’ which was fun. I guess I’m not wild about this look or these colors on me. I do like how the duster feels when you wear it though, probably because of the silk lining. Maybe I should add two more pockets at chest level to give the duster a bit more style?  Or maybe it’s the shape? Belted, or unbelted?

Opinions welcome!

I’d love to know if any of you have experienced a pleather melt down as I did? And any ideas on how you can get the stuff to bend and mold? Yes, it’s a challenging fabric, but I’m dying to use it again, maybe for a skirt or jacket. Tips and advice is welcome!

Happy sewing and thanks for stopping by!


Vogue 8346: A coat just in time for Spring

IMG_7897

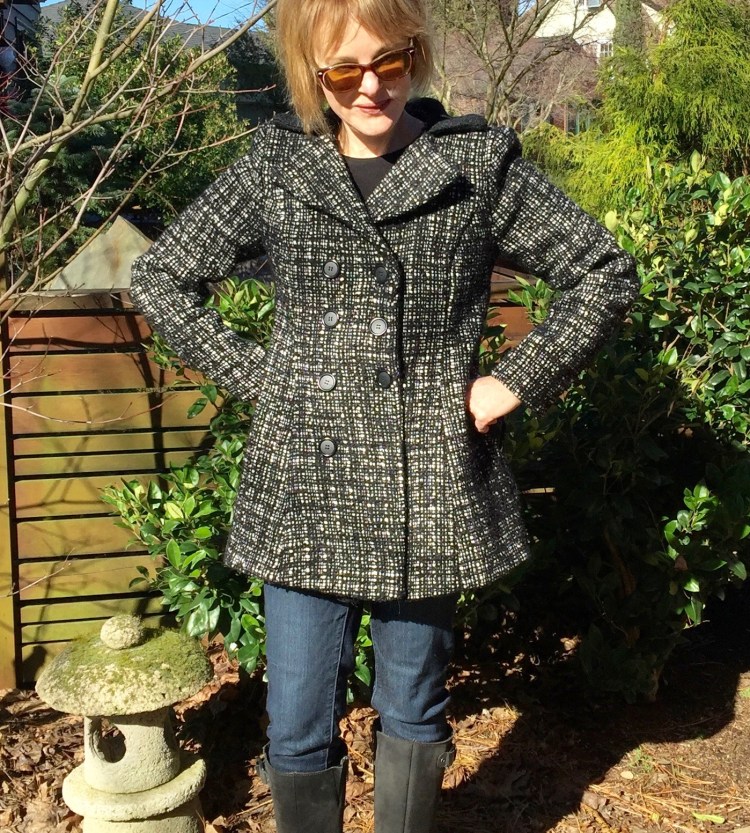
It’s sunny and warm in Portland today. Yet, I’m posting about a heavy winter coat! Yes, timing is everything, and mine isn’t impeccable, but here goes. I started this coat before Christmas, and just finished it because I worked on it in sporadically. So, here I am, wearing a wool coat when it’s sixty degrees outside. Of course, the weather here is a fickle friend, so it might be ‘bundle up’ weather tomorrow (is it evil to wish it would get cold again?). In any event, after all this work, this coat will be worn, no matter how hot it makes me!IMG_7948 (1)

This wool was purchased last year, and I loved it so much (and spent so much on it, LOL) I dithered a bit (actually a lot) before getting the nerve to cut it. I got all angsty over the choice of pattern, how to line it, whether I really needed to underline..(blah, blah, blah). Basically I was procrastinating. I do this whenever I contemplate a big project. Honestly, I drive myself crazy. Anyway, the weave of this wool was so beautiful, I couldn’t resist buying it from the Mill End Store when wool was on sale. I felt a little guilty as I splurged so I scrimped a bit on yardage, and wouldn’t you know? Now I wish I’d bought more. Once I started sewing it, I knew just how special it was. The weight, the weave, even the smell of this wool is heavenly (yes, I am weird). A long coat from it would have been so nice. Do overs, please?

The pattern I used for this coat is Vogue 8346, a classic style, with a bit of a flare.

Because my height almost qualifies me for petite status (only 5′ 4″ on a good day), I avoid styles with a lot of volume. Still, I loved the style of this coat but worried I’d look as though I was drowning in fabric.

So, I made a test coat from corduroy. This was a good move, as I realized after sewing only a few seams that the amount of flare on the design was too much for me. So I ripped it apart, recut the bodice pieces, tapering the flare a bit more, then tried again. That did the trick. Here’s my modified flare:

IMG_7898

I learned a valuable lesson from this process. The corduroy test version of my coat was great, but when I started working with the wool, I realized the drape of the two fabrics was very different. The thick wool made that little bit of flare seem quite exaggerated compared to the corduroy. So, I had to modify a bit more. All in all though, making the test coat was worth doing, as I learned a lot about the fit of the coat. The shoulders were in the right place and not too narrow, (no adjustment needed, yay), the waist was too long for me (raised it a half inch), and the sleeves were too full for me. Nothing too traumatic, but good to know.

The details: I underlined each piece to give the coat’s structure the support it needed to look crisp. This is not hard, but is time consuming, but well worth the effort. (For tips on underlining, take a look at House of Pinhero’s Peacoat Sew Along. In fact, just have fun looking around at all of her posts!) I used a polka dot silk for the lining, which feels like a dream. I highly recommend finding something luscious for the lining…you deserve it after working so hard on a coat, am I right?

IMG_7800

I added very thin shoulder pads to support the sleeve cap and an extra row of buttons because I love the ‘military’ look they add.

And, that’s about it!

IMG_7892The truth is, sewing a coat isn’t that hard, so who knows why I dithered around so much about this one? The challenge was the fit, I guess. Also, a coat with lining and underlining is a serious commitment of time and energy. But why not just jump in? Next time, I will. Sewing a coat is time well spent. I know I’ll wear this one again and again.

Do you dither around before starting a coat like I do? And what have you experienced when making a toile, (test garment) out of a fabric with a different drape? Thumbs up or down?

Happy sewing and thanks for stopping by!